Today you can no longer meet a person who does not have a flash drive with him. We appreciate this compact device so much that we don’t leave home without it. Someone stores important personal data on it and wants to always have it at hand. Some people need a flash device for work. And there are people who will definitely take this mini-drive on a visit with the hope that the owners will share the latest cinematic novelty. Then, when you get home, all you have to do is connect the flash drive to the TV and enjoy watching it.
Methods
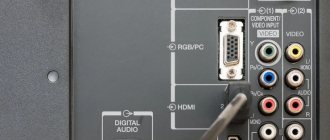
If your TV has a built-in USB connector, to connect an external drive you just need to place it in the corresponding port. Unfortunately, only modern models have this interface. To connect a flash drive or other device to outdated television receivers, you can use alternative methods.
Via USB output
Current TV models all have a built-in USB port. In most cases it is located on the rear panel. It can also be located on the side. Connecting the gadget through this connector is as follows.
Insert the drive into the appropriate port.
Then you need to select a new signal source using the remote control.
Launch the file manager and in the desired folder, find the movie or any other video that you want to watch. To switch between folders, the rewind buttons are used by default.
Via set-top box
You can connect an external digital storage device to your TV via a set-top box. TV boxes are in great demand due to their wide range of functions, simple controls and affordable prices. All set-top boxes are equipped with a USB port.
Modern TV models are connected to the set-top box using an HDMI cable. The gadget is connected to the old TV using “tulips”. To turn on a flash drive or other USB device, you must follow these steps.
The set-top box must be paired with the TV and turned on.
Connect the external drive to the gadget using the appropriate port.
Turn on the TV and go to the set-top box menu.
In the file manager, select the video file.
Launch it by pressing the Play button on your remote control.
Via DVD player
Almost all new DVD players are equipped with a USB connector. In this regard, this technique is actively used to connect flash drives to a TV. Synchronization occurs according to the following scheme.
Insert the digital drive into the appropriate interface.
Turn on the player and TV.
Select to receive signal from the player.
Now, having selected the required file, you can view it through the TV screen.
The main advantage of using this technique is that most TVs will automatically recognize it. If this does not happen, you need to select a new signal reception source. This can be done using the remote control by pressing the TV/AV button.
If the file you need is not visible or does not play, most likely its format is not supported by the player you are using. This method is great for reading data from flash drives, the only disadvantage of which is the connection of additional equipment.
Using a media player
The next option, which is also often used, is synchronizing the TV with a flash drive via a media player. Their main difference from DVD players is that they read all current formats. This practical and multifunctional technique allows you to view not only videos, but also photos, without the need for conversion. The process of operating the media player is simple and understandable to all users, regardless of experience. The synchronization process is almost the same as the option described above.
First you need to connect the player to the TV receiver by inserting the cord into the desired connector. Then a digital storage device is connected to the USB port. The basic package includes all cables necessary for connection. If you have problems pairing, try again using the following procedure.
Connect the flash drive to the desired connector.
Using the remote control, open the “Video” section.
To select the desired file, use the rewind buttons.
To start, click the “Ok” button.
Now the gadgets are ready for use - you can enjoy music, movies, TV series and other media materials. Before using the equipment for the first time, it is recommended that you carefully read the technical documentation and make sure that you have read all the required formats. Most player models read flash drives with the FAT32 file system. Please take this into account when formatting digital media.
Users who have personally tested this option note its ease of use and practicality. The need to use additional gadgets is completely eliminated. You can buy such an adapter at any electronics store at an affordable price.
Format for a “movie flash drive”: FAT, exFAT or NTFS?
Recently, the widespread use of televisions with the ability to play media files from USB drives has led to the fact that the process of downloading the next movie “to a flash drive for a TV” has become as commonplace as switching terrestrial TV channels on it.
The speed of domestic Internet access has become such that any user can afford to download a large file with a movie in the highest quality overnight or even in a couple of hours, as far as the MKV format allows it to be saved. There is no need to talk about the cost of even fairly capacious flash drives; they have become more than affordable.
However, one important problem arises: files larger than 4 gigabytes cannot be written to flash drives, since they are usually formatted in FAT32 format. The solution to the issue is to repartition the drive into exFAT or NTFS format. However, it is possible to write large files to a flash drive in exFAT format, but, unfortunately, not all TV models are able to “see” it. Another problem with NTFS: in order to partition a flash drive in this format, you must first open access to it through the disk device settings.
After this, the OS will give you the opportunity to format the flash drive to NTFS. Then it will be possible to record a file of any size (permissible by the storage capacity) on it, and your TV will probably reproduce the recorded movie in excellent quality without any problems.
However, there is one big pitfall in this decision. The fact is that the controller in any NAND flash drive provides not only the process of read/write operations, but also prevents the best uniform wear of NAND cells. This is implemented through the block organization of pages. For each block there is a counter, stored either in the block itself in service data, or in a table in separate blocks with service data. The translation table specifies the order in which blocks are used to implement the LBA range in which the user creates a partition and also stores his files.
During a write operation, a large block is taken into the controller buffer, changes are made to it, after which it is completely rewritten back, sometimes even to a new address and registered in the translation table.
So, modifying a 4 MB block in a drive even by 1 byte, the entire block is still overwritten. And, if in the case of markup in FAT(32) an entry is made to the directory, file data and information are written to both copies of the FAT table (for exFAT there is also an auxiliary bitmap structure), then in the case of NTFS an entry is made to the MFT itself (Main file table), index entry, BitMap, LogFile, and so on. In general, the number of operations increases several times.
Creation and configuration
We will need a project from which we will make a video. The finished version will retain all the transitions and effects, as well as the sound and even the pointer. Not bad, right?
Open the project and go to the “File” tab in the control panel. Next, “Save and send”, “Create video”. In the interface that opens, we can adjust the quality:
- computer monitors and high-resolution monitors - high;
- Internet and DVD - average;
- portable devices - low.
And you can also specify whether the sound and pointer will be turned on. Click “Create video” and wait for processing to complete. The output file will have a WMV extension; you can convert it to another format using the appropriate programs; there are plenty of them on the Internet.
After preparing the project, you can transfer it to a flash drive, which, in turn, can be inserted into a port on a special TV panel, and then start the video.
Why doesn't the TV play video, although its format is in the passport?
There are a number of reasons why a television receiver does not reproduce a certain format, although it is indicated in the manual. Firstly, this is an incorrect resolution or frame size.
The TV menu usually has built-in modes 16:9, 4:3, enlarged, etc., they contain fixed image size values. If the picture has different parameters, the television receiver will not be able to reproduce it. The second reason is the data transfer speed.
If it is higher than acceptable, the TV processor will not be able to recognize the information and reproduce it. If the bitrate is lower than allowed, the audio and video tracks will be out of sync, and the picture will freeze. The third reason for this device behavior may be incorrect video recording. You need to check whether the file was correctly written to the flash drive for viewing, and make sure that it is not damaged.
If the content was downloaded from the Internet or played online on a TV with a Smart TV function, you should make sure that it is completely downloaded. If the user tries to watch a file captured with a digital photo or video camera, the TV may not play it back. This is because cameras have their own types of video, which may differ from those recognized by television receivers.
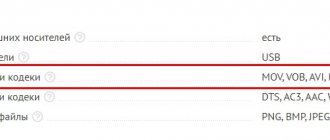
Conclusion For users interested in how to find out what video formats the TV can play, it is recommended that you refer to the operating instructions or search for information on the manufacturer's website.
The most popular formats, for example, AVI or MPEG-4, are played by almost all TVs; information on less common ones is best looked at in official sources.
Alternative options
If USB is not on the TV, then you can use third-party devices: a digital tuner, media player or DVD player.
Important! In this case, the compatibility of the flash drive’s file system needs to be checked specifically with peripheral equipment, and not with the TV.
Digital tuner
Equipment of this type is always equipped with at least one USB interface, and only with rare exceptions is it missing. So before purchasing a tuner, it would be a good idea to check the presence of a USB output. Tuners are connected using an HDMI port, and older models are connected via RCA.
Drive connection procedure:
- Connect the flash drive to the USB output.
- Turn on the TV and go to the tuner menu.
- In the local file manager, select the desired movie and play it.
Media player
This is multifunctional equipment that allows you to work with a wide variety of content. Unlike other devices, any conflicts here are kept to a minimum. A good device reads formats in almost any encoding, from the most common - MP4, AVI, to exotic ones, like OGM.
Just like other similar equipment, media players are equipped with a USB interface, most often a whole set. Ports can be numbered or marked with prefixes – In / Out. You need to use the interface marked Out, while the number is completely unimportant.
How to play video from a flash drive through a media player:
- Connect the USB drive to the device.
- Go to the media player menu and open the “Video” section.
- The equipment should scan the flash drive and display a list of found files.
- Select the desired movie and launch it.
If we are talking about a proprietary tandem, for example, when an LG media player is connected to an LG TV, then the menu for managing multimedia content on the set-top box and TV is combined. But the principle of playing files remains the same.
DVD player
Not all DVD players are equipped with USB interfaces, so when purchasing a device it would be useful to pay attention to this point. Moreover, DVD players are picky not only about the file format, but also about the codec version
That is, it may happen that one MP4 video will be played, but another in a similar format will not.
How to connect USB to DVD player:
- We connect the flash drive to the corresponding connector on the DVD device.
- Open the DVD menu on the TV and go to the file manager.
- Select the desired movie to play.
Important! When connecting DVD devices to Samsung and LG TVs, they may not see USB interfaces on peripheral equipment if it is not branded. Manufacturer-specific operating systems (Tizen / WebOS) are extremely picky about third-party gadgets
In this case, updating the TV firmware sometimes helps.
Possible problems and their solutions
Manufacturers who offer practical and functional equipment to the buyer have thought through easy use and a clear menu for the convenience of all users. However, you may encounter some problems when connecting devices. Let's look at the most common problems and how to fix them.
The TV does not see the external drive
If the TV receiver no longer sees a flash drive or other USB storage device after formatting, the problem lies in the inappropriate file system. When formatting, the operating system on the computer offers the user two options - NTFS or FAT. The equipment used may simply not support the selected format.
Information about which option you need can be found in the operating instructions. It is worth noting that the FAT32 system has strict restrictions regarding the size of recorded files. The NTFS system has no restrictions. If this is your first time using a flash drive, you may have encountered a faulty gadget. Test the storage media on another device to see what the problem is.
The next reason why the TV may not see the flash drive is excessive capacity. Each TV receiver has limitations on the memory size of the connected media, especially if you are dealing with an older model. If the 64 GB drive is not visible on your TV, select a gadget with a reduced memory capacity and try again.
As experts note, problems may arise if the television receiver has a USB service interface. It is very rare, but it is recommended to check for its presence. Manufacturers designate it using the Service only marking.
It also cannot be ruled out that the port is not working due to damage. The pad may be dirty or oxidized. It is recommended to contact a service center so that a specialist can safely resolve the problem. In some cases, it will be necessary to resolder damaged areas.
The TV signal receiver does not see files on the media
The second common problem encountered when connecting USB drives is that the equipment does not support a certain format. Also, when trying to read files in an inappropriate format, the following problems may occur.
The equipment does not reproduce sound when watching a movie or other video material, or vice versa (there is sound, but no image).
The required file is visible in the list of files, it does not open or is played upside down. You can expand the video directly while watching it, if the player you are using has this function.
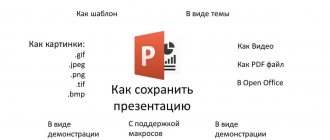
If you want to open a presentation on your TV screen, but the equipment does not see the required file, you need to resave it in the required format. Select the options you want when saving your presentation.
To change the file format, you need to use special software (converter). You can download it from the Internet completely free of charge. The most widely used programs are: Format Factory, Freemake Video Converter, Any Video Converter. Thanks to the simple and Russian-language menu, it is very easy to use the software. The work is performed as follows.
Launch the converter on your computer.
Select the file you want to convert.
Decide on the desired format and start the process.
Wait for the program to complete its work.
After completion, upload the new file to the USB flash drive and try launching again.
Cons of FAT32
- The FAT32 standard was developed many years ago when large disk capacities were theoretical, so the file system does not support files larger than 4 GB or disks larger than 8 TB.
For example, you need to upload a movie to a flash drive; it weighs 4 GB or more. If your flash drive is formatted in FAT32, then you will not be able to write anything, since this file system is not capable of detecting files of 4 GB or more. Format your flash drive in exFAT or NTFS, but better still, in NTFS.
Connection options
All modern flat-screen TVs are equipped with a standard set of connectors for reading information from third-party devices - USB, HDMI, analog and others. Early models have limited functionality, but you can also connect removable storage to them.
USB port
To watch a movie from a flash drive on a TV, you need to do the following:
- Insert the drive into the appropriate slot on the back or side of the panel.
- Activate the “TV/AV” button on the remote control.
- To search for the desired folder, use the up and down keys.
- Select a file and start viewing by clicking the "OK" button.
DVD player
Even the oldest models of players have an input for an external drive. To view files from the media, just connect the player to the TV and activate the “TV/AV” button. The system will automatically display the menu on the screen. The user will only have to select the file using the remote control.
Media player
These devices read any media files, as they support all modern video formats. Media players are equipped with different connectors and come with a set of adapters. To read information from a flash drive:
- Connect the media player to the TV with a cord. Turn them on.
- Through the control panel, open the “Video” section.
- Use the back and forth keys to navigate to the desired folder.
- To start watching a movie, activate viewing with the “OK” key.
TV tuner
The T2 digital set-top box is always equipped with a USB connector and is connected to a large screen using an adapter. The tuner is connected to all modern models via an HDMI connector. The set-top box is connected to the old television receiver through the usual “tulip”.
To play media files on your TV using a TV tuner:
- Insert the flash drive into the set-top box, turn on the TV.
- Use your remote control to find the file you need.
- Click the "Play" button.
In most cases, there are no problems with connecting and viewing through the set-top box.
Via laptop
If the drive is in the computer and you don’t want to disconnect it, you can connect the laptop directly to the TV set. To synchronize devices, use physical connectors HDMI, VGA, S-Video or wireless communication via Wi-Fi, Bluetooth. A high-quality Full HD picture is provided only by a connection via an HDMI port.
The absence of the listed devices can easily be compensated by purchasing an Android set-top box - it is equipped with all the necessary ports. In addition, the function of recording a broadcast on a flash drive at the time of connection to a television screen and installing various applications on TV will be available.
Preparing the drive
Not every USB drive will be readable on a TV device. In a good half of cases, the problem lies in the file system of the flash drive. There are several of them, and each organizes data on the media in its own way. In addition to the popular systems for the Windows platform - FAT and NTFS, there is also EXT (Linux) and HFS+ (Mac OS). The latter are much less common and, as a rule, on branded drives.
The file format of a flash drive for a TV is especially important. If it differs from the standard one for TV, then the data simply will not be read. Here it is necessary to clarify the standard file system of the TV, because a flash drive can be adjusted to it without any problems. Information of this kind is indicated in the specification for the device or in the detailed operating instructions in the “Compatibility” section.
Important! Most conflict situations occur on NTFS and FAT32 systems. Many TVs only work with FAT32, while computer drives primarily work with NTFS. Therefore, before watching a movie from a flash drive on a TV, you need to prepare it correctly.
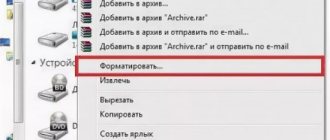
Formatting a USB drive (relevant for the Windows platform):
- Open “My Computer”.
- Right-click on the desired drive.
- In the context menu, click on the “Format” line.
- In the window that appears, in the “File system” section, select the required type (NTFS, FAT32).
- The capacity and dimensions of the cluster are set automatically.
- In the “Format Method” section, click on “Quick”.
- Click “Start” and wait for the process to complete.
Then you need to insert the flash drive into the TV and check if it sees it. If yes, then you can safely copy files to the drive and play them on TV.
Methods for connecting a USB drive to a TV
Modern technologies allow you to enjoy watching home videos and photos on the big screen. And the Flash drive plays an intermediary role. USB ports are available in almost all models of TV devices. This makes it possible to quickly and easily view the data. But if your TV receiver is not equipped with such a port, then you will have to use an alternative. If you need to connect a USB drive to a TV receiver, you can do this in several ways:
- Via USB port;
- Via USB connector of DVD player;
- Using the appropriate media player connector;
- Through an adapter.
Using the USB port on the TV
The easiest and most natural way to connect a TV to a flash drive is to insert it directly into the port on the TV panel body. The algorithm of actions is as follows:
- Write to a flash drive the data you want to view on the big screen.
- Insert it into the USB port on the case (most likely, it is located on the back wall).
- Turn on the TV device and go to “Menu”.
- Select reading data from the required media.
- Then select the information on the media that you want to view.
If you cannot find the required connector on the TV panel body, then use an adapter. This is a cable where there is an HDMI connector at one end and a USB connector at the other. As a rule, such cables are not long, but only 20–30 cm. The sequence of actions required for viewing is maintained. If the video broadcast on the TV receiver has not started, this means that the format in which the file was recorded is not supported by the TV device. In this case, you will have to download the movie in a different format, but first find out what formats the TV supports.
Using a DVD or media player
Let's figure out how to connect a flash drive to an old TV. Older models were not equipped with USB connectors. But probably every owner of an old TV has a DVD player, so connecting a flash drive can be done through it. The DVD player connects to the TV through the tulips, and then you can insert a flash drive into the port on the player.
If there is no player, then a media player will replace it, which is an excellent modern alternative. Using a cable, the player is first connected to the TV panel, and then a flash drive is inserted into it via a USB port.
Using a digital set-top box
An excellent alternative for connecting a flash drive and playing video is a digital set-top box. As a rule, modern receivers are equipped with all the ports that currently exist. The only exceptions are Apple products, which have abandoned USB ports on their set-top boxes. The connection to the TV is via an HDMI port, and the flash drive is inserted into one of the USB ports.
Also, video from a flash drive can be played through an Android set-top box, which has all the connectors as in a digital tuner. All connection steps must be performed in the same way.
Using a computer or laptop
It is not necessary to watch movies from a flash drive; you can stream them directly from your computer or laptop. You just need to connect these devices together. There are several types of wired connections:
- HDMI cable.
- Adapters with HDMI port.
- DVI and adapters with this port.
- SCART connector, which is not particularly popular.
- Via the VGA output, and using adapters with this output.
- Using RCA adapters.
Broadcasting can also be done wirelessly using your home Internet network. To do this, both devices must support the Miracast feature, which mirrors the laptop screen on the TV panel screen. Before establishing a connection, you need to make sure that your PC has the necessary drivers. It is especially easy to stream content from a tablet or smartphone, which can easily connect to Smart TV. To do this, just select the “Screen Cast” menu item.
Which file system to format the flash drive with?
Which file system to format the flash drive with. Almost everyone knows what a flash drive is. Nowadays it is simply impossible to do without this information carrier. Wherever it is used, in computer technology, and in cameras, and in video cameras, and in electronic books, and digital signatures in electronic document management, and so on and so forth. And such a thing is quite affordable for everyone. But today we will talk about computer flash media, or as it is popularly called, a flash drive.
For some, it simply serves to transfer files from computer to computer; for others, it is a whole set of programs for installing operating systems, testing computer components and programs. Some people use a flash drive to watch videos, others record video lessons using the same flash drive, others run their favorite toys and customized office programs from it. And for all this you just need to format the flash drive correctly, otherwise you will not be able to write large files to it. To work comfortably with a flash drive and for different purposes, you need to use a different file system. We will now talk to you about which file system should be used in this or that case.
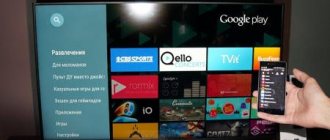
Instructions for connecting a flash drive to a TV via a Smart TV set-top box
After installing and configuring the TV set-top box, connecting a flash drive to it becomes just a matter of technique. If you want to use it to download and then watch movies, then we need two applications:
- file manager
- and media player for Smart TV
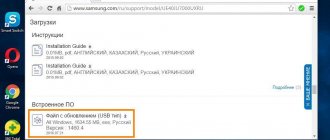
First of all, you need to connect the flash drive to the USB port of the Smart TV set-top box. After which it will be visible in the list of available removable media.
Perhaps, after this, the system itself will prompt you to open the flash card of one of the programs preinstalled on the console.
If this does not happen, you need to install one of the many free file managers from the official Google Play Store.
For example, I've been using "TV File Commander" lately.
Also a good document viewer is the X-Plore application.
We install one of these programs and launch it from the general list in the “Applications” menu of the TV set-top box.
On the main page in the main screen we will see all the internal drives, connected external flash drives or hard drives, as well as cloud storage used by your Google account. Here you can sort documents by file type - images, videos, music, etc.
The name “Built-in storage” hides the internal memory of the TV set-top box. The total and used disk space is displayed. The flash drive will be visible by its name, which was assigned to it at the time of formatting. I call it “Miscellaneous”. We navigate through the section using the remote control and go to the flash card.
Then we select the movie we need and watch the video using the video player built into this application. Yes, using TV File Commander you don’t even have to install a third-party player.
Common file systems
- NTFS (New Technology File System) is a file system that became widespread with the advent of the Windows NT family of operating systems. NTFS is the native file system for Windows. Characterized by high operational reliability.
- FAT32 (File Allocation Table) is a 32-bit version of one of the most common file systems, used by default on flash drives. FAT32 is the file system into which flash drives are formatted by default before being sold. It is believed (and not without reason) that this file system works faster than its “competitors” and is ideally suited for flash drives. But it also has its downsides.
- ext4 (Fourth Extended File System) and previous versions are a file system used in Linux.
A little theory
As a rule, TVs are not able to read a file with the .pptx extension, with the exception of instances with a built-in browser, with the help of which plug-ins can be read. This is a real problem for many users, especially for those who have never heard of different object formats. A problem for many, but not for us. Most presentations are created in Microsoft PowerPoint software, which is included in the Microsoft Office suite, so that's what we'll be looking at. Starting with PowerPoint 2010, developers added the ability to create videos from the original program project right inside the product. It’s not difficult to do, let’s get started?
Pavtube Video Converter Ultimate
Pavtube Video Converter Ultimate is a solution to the problem of converting 4K video of any format into a file adapted for 4K playback on a TV. In this case, neither the quality of the original file, nor its frame rate, nor its resolution are lost. The advantage of Pavtube Video Converter is its ease of use, installation and updating.
The video consists of several parameters that you need to know to make it readable on an LG TV (in our case). Anyone who doesn’t understand this and doesn’t want to figure it out is in for a pleasant surprise. This is the "LG TV (*mp4)" button that will do everything for you. For those familiar with video parameters, there are manual settings for the output file.
You can not only configure, for example, the 4K video codec to H.265, and the audio codec to AC3, MP3. You can compress 4K videos. You can also upscale HD video to 4K video for 4K TV. The software fully utilizes NVIDIA CUDA and AMD Technologies technologies and features high conversion speed (up to 30 times faster) than other 4K video converter. In any case, this is what the developers of Pavtube Video Converter assure.
You can make a 4K video supported by 4K TV in 3 steps: upload the video, set the format for viewing on TV, click on the button and wait for the result.