Many people are interested in whether they need to adjust the image on a newly purchased TV. The manufacturer of household appliances LG, despite the huge volumes of production, is debugging all the functions of TV panels, and from the factory they, in principle, already display normally. But in order to achieve the optimal picture, it is necessary to take into account a number of factors: the location of the TV, the size of the room, the distance from the viewer, lighting - all this plays a role. The article will talk about how to customize the image of an LG TV “to suit you.” For the most part, the recommendations are relevant for TV of any manufacturer.
Some tips
Before you adjust the brightness on your LG TV, learn the following rules that will help improve the overall picture quality:
- Do not place the TV in front of or near windows. Sunlight will create glare on the screen, resulting in a significant deterioration in display quality.
- It is optimal to place the TV in such a way that approximately 70% of the screen is located below the eye line.
- When playing content, the device begins to heat up. Therefore, the TV should not be placed close to a wall or furniture. A distance of at least 10 cm is necessary to allow air to circulate through the ventilation holes.
- Maximum image quality is achieved only when using the HDMI interface (it is advisable that the cable be from the manufacturer).
White balance settings
Below are the results of calibrating white balance and color reproduction on TV C1. They are presented as an example and should not be simply copied, since the values may vary even within devices of the same model and the same diagonal due to manufacturing tolerances. If you want to try these specific values, you will need to enter them all at once. If you end up getting reduced image quality, just reset them to their defaults.
Press the right arrow
Press the right arrow
Let's decipher the main image parameters
LG marketers are trying to encourage visitors to hardware stores to purchase their TVs. Devices should look as colorful as possible on the shelves. Therefore, the factory picture settings are set in such a way that the picture is optimal for a room with high brightness (all electronics stores have excessive lighting). However, within the confines of an apartment, where there is no such strong brightness, the screens no longer seem so colorful. Therefore, immediately after purchase, you need to adjust the image on your LG TV. Below we will talk about the main parameters that require adjustment.
Intensity
This term refers to color saturation, i.e. intensity of the selected tone. When you set the maximum saturation, the image turns out “juicy”, but at the same time, such a picture may tire your eyes. The minimum indicator for this parameter is the predominance of gray tones. The default is almost maximum intensity (the reason is described above). In order for the screen to produce optimal characteristics for all colors, it is necessary to set the average values of this parameter.
Brightness
This term refers to the balance of black color relative to the entire palette. In simple words, this characteristic determines how the darkest areas of the picture will be displayed on the screen. If this indicator is set to a high level, the image will be faded, somewhat dull. If this setting is lowered, dark pixels will be too noticeable and it will become more difficult to distinguish similar shades. Adjusting the brightness of an LG TV must be done in the room where it will be installed. It is also advisable to take into account the lighting level. Statistically, people watch television more often at darker times of the day (early morning, evening and night). Therefore, adjustments should be made in low light conditions (if you do this during the day, close the curtains). We do not recommend activating the energy saving mode. It reduces power consumption, while significantly degrading image quality. Saving a few rubles a month is clearly not worth the reduction in performance of an expensive device.
Contrast
This indicator determines the level of intensity of the light elements of the picture (essentially the opposite of brightness). The maximum value will cause the lightest elements to disappear from the screen. At the minimum value, the image becomes overly pale.
Important nuances
If it seems that the TV has lost brightness, you need to know some nuances:
- Perhaps the problem is trivial and the user just started having vision problems. To find out the reason, you need to ask your household members to watch the same image on the TV screen. If it is really dim, then the problem is with the device.
- The second possible reason is the presence of a thick layer of dust on the screen.
- If there are no problems with vision and dust, then you will have to adjust the equipment.
If you can’t restore the TV’s brightness after tuning, you should invite an experienced technician to diagnose your TV equipment. It is not advisable to solve this problem yourself, since it can cause serious damage to the purchased equipment.
Setting up basic TV settings
Basically, the basic settings are installed on the TV when you purchase it. But there are times when there are store settings there. They will have to be reset, because setting up a TV with factory settings is easier and more convenient. Disable the dynamic image change function. Some TVs have this option - it serves to adjust the color of the image to the ambient lighting. The disadvantage of this service is that changing the color format can be too rich or bright. We adjust the brightness of the display. The brightness setting affects the screen backlight, making the image brighter. There are no exact parameters here, configure it as you wish. Adjust the contrast level. The contrast setting affects the amount of white on the TV. Adjust to differentiate one color from another. For example: white from light gray, or black from light black. Adjust the sharpness level. This feature adds clarity to the image. High-definition TVs do not need to change the sharpness setting. The picture quality in such TVs is maximum. If the TV is not high resolution, then increasing the sharpness will improve the transmitted image. Do not touch the standard color settings. It is in this case that everything is configured optimally. You can create color profiles, each of which will be linked to different devices. This will help improve the image quality through other design devices. The entire operation must be repeated at least once a year. Over time, brightness decreases, image quality is lost, or the backlight dims.
Adjusting the best picture
Modern models allow detailed image adjustments without special skills. Follow these five steps to get the best performance from your TV:
- Go to the Film or Movie settings section (depending on the specific model). On more modern LG TVs, you can get to this section by pressing the corresponding button on the remote control. Activate the artificial sharpening option - it automatically adjusts this parameter depending on the current conditions (image color gamut, lighting level, etc.). Also go to the “dynamic circles” section and reduce their number a little.
- Reduce brightness. As we said earlier, by default this parameter is set to a critically high level. The latest generation models have an “automatic brightness adjustment” option. If your device has it, be sure to activate it.
- Adjust the color temperature. A low level of this characteristic will ensure a predominance of blue color, a high level - red. The optimal value is the average value, i.e. around 6500 Kelvin. If your TV model has the ability to change the color temperature, do it.
- Turn off dynamic contrast. As a result, the overall clarity of the picture will improve, the contours of the images will stand out, and the colors will be as saturated as possible. In fact, this option is absolutely useless and often makes the image quality worse.
- Go to FlatpanelsHD and go through the calibration settings. Enter your TV model and the site will provide the optimal settings. Copy them and you can use them on your device.
If standard tools for adjusting the screen on an LG TV are not enough for you, you can purchase a calibrator. This is a specially designed device that automatically adjusts image parameters, achieving the most optimal performance. Found a mistake? Select it and press ctrl+enter
What do specialists do?
Actions of telemasters in case of various breakdowns:
- The power supply is faulty.
The telemaster diagnoses the board, identifies the faulty component and then replaces it with a new one. In difficult situations, the power supply is completely replaced. They charge from 1000 rubles for work. - The LED or backlight bulbs have burned out.
The technician replaces burnt out lamps or LEDs. Sometimes the LED strip changes completely. Repairs are carried out at the service center. The cost of work is from 2000 rubles. - Matrix.
The specialist replaces the matrix with a new one. Such repairs are very expensive; it is almost always easier to buy a new TV. The cost of repair is from 70% of the price of a new TV of the brand being repaired (that is, if your TV now costs 20 thousand rubles, you will pay at least 14 thousand rubles for repairs). - Backlight inverter defective.
The telemaster identifies faulty inverter components and replaces them with new ones. Sometimes a complete board replacement is required. The cost of work for such a breakdown starts from 2000 rubles. - Motherboard (Main Board).
The specialist identifies burnt elements on the main board and replaces them with new ones. If the memory fails, it is reprogrammed using special equipment. Sometimes the entire board needs to be replaced. The cost of work starts from 2000 rubles. - T-Con board failure.
The specialist replaces the matrix controller with a new one. The cost of repairs starts from 2500 rubles.
The cost of parts necessary for repair is paid separately.
Share on social networks
How to connect a TV to a computer via Wi-Fi Broadcast from a computer to a TV via Wi-Fi
The quality of the image on the TV depends on the settings. If they are set incorrectly or the TV receiver has not saved them, the picture will be stretched and the colors will become too dark or bright. In this article we will tell you how you can solve this problem yourself and adjust the TV image without the help of a TV technician.
Contents of the articlehide1How to adjust images on a TV1.1Setting depending on the TV model2What parameters to set when setting up3Adjusting a TV image: step-by-step instructions3.1Using standard features3.2Using professional adjustment
Causes
Before performing certain actions, you need to determine the reasons why there is no color on the TV when you connect a digital set-top box. There could be several explanations for this:
- Incorrect TV color mode setting.
- Errors in connecting equipment to each other.
- Incorrect tuner setting.
- Malfunction of the set-top box or TV.
These are the main reasons why there is no color image when connecting a set-top box. To eliminate the malfunction, you must act sequentially, starting with simple steps, moving on to more complex checks.
How to adjust TV pictures
The image quality on the TV depends on the set basic parameters of the following indicators:
- format;
- brightness;
- contrast;
- color/saturation;
- sharpness.
The primary parameters of the TV are established using test pictures, on which all indicators are checked and control is carried out. At the end of the work, the quality of the image on the screen is compared with the real photograph.
The next step is to check the pixels and color. Pixels are checked using solid colors and grids. The latter looks for combinations in which the performance of pixels depends on the position of neighboring pixels.
Color quality is controlled by color bars.
Changes made are not always saved. There are several reasons for this.
- Settings are saved in HOME or Home View mode. If your TV is in DEMO or SHOP mode, you need to make changes.
- The operating rules of the receiver have been violated or the software has been installed incorrectly. Use the instructions and set the initial (factory settings).
- Incorrect operation of the TV memory. In this case, the device does not remember not only the picture settings, but also the channels.
Important! In the first two cases, the instructions will help, in the third - a professional technician who will replace the necessary parts.
Setting depending on TV model
The settings in different TV models do not differ from each other. The menu consists of the five above indicators with the same way of setting the desired parameters. The user needs to enter the menu and set their preferred values. Devices from different manufacturers will have different interfaces. Regardless of the manufacturer, black and white stripes are responsible for brightness, gray and white for contrast.
The situation is different with test pictures. They differ in appearance, but are the same in type: plain ones check the pixels on the screen, colored ones check the operation of color bars.
Attention! The TV's picture format depends on the model. The two most common types are Full HD and Ultra HD 4K.
What parameters to set when setting up
Correctly set TV settings will help avoid mistakes when setting up the picture. A high-quality picture is obtained subject to the following conditions:
- The format (size) of the image is adjusted by two triangles. Cut off triangle vertices indicate an error. Before carrying out work, you should disable the scaling function.
- Brightness. Adjustable by dark colored cells. If configured correctly, the tone of each subsequent cell will be different from the previous one. If this is not the case, work on setting the brightness should continue.
- Contrast. Adjustable with gray scale. Clear boundaries between cells of different shades of gray indicate proper operation.
- Color or saturation. For installation there is a picture depicting women with different skin colors. After working with regulators, women's skin should look natural. Red skin color indicates incorrect color and color temperature settings.
- Sharpness. The parameter is set after working out the first point. Looking at the screen, we should see all the lines exactly.
Setting up the TV picture: step-by-step instructions
The image adjustment must be done at home, in the place where the TV will be located. There are two ways to carry out the procedure.
Using standard features
To do this, find the desired button on the remote control. It can be called differently - Settings, Options, . A menu with a list of settings will appear on the TV. Next, moving the sliders, we achieve a high-quality image.
Using professional regulation
To do this, you should download the corresponding images on the Internet.
- To set the brightness, download the “Pluge pattern” image or purchase a special disk. The vertical strip that appears on the screen will be divided into several cells, numbered with Latin letters. The cell on the left side will be black. Customization involves giving the cells different colors. If everything is done correctly, the right cell will turn white.
- Contrast is adjusted in the same way as brightness, only the custom cells are gray.
- When adjusting the color, it is important to correctly adjust the green color, which has many shades. Therefore, you need to take a photo depicting nature, where there will be many shades of green, as well as photos of people of different races. Next, you should compare the picture on the monitor and the original photograph. The similarity should be maximum.
- Focus is adjusted by the Sharpness pattern application. The user should clearly see all the lines in the picture.
- Standard settings are sufficient to adjust the size.
Reference! Professional installation of picture parameters requires more time, but gives a higher quality picture on the TV screen.
Information on setting up your TV can be obtained from various forums on the Internet, where you can also download special programs.
TV
Regardless of the screen size, every owner of a liquid crystal (LCD, LED) TV wants to get maximum quality from the image produced by the screen. In order to get closer to the benchmarks for format, brightness, contrast, color and focus, we will use various expert tests from Burosch.
The tests they created are used all over the world to evaluate the quality of the image produced by a TV screen. These tests and setup instructions are only suitable for liquid crystal (LED, LCD) TVs not older than 10 years.
Setting up SMART on LG
If there is no access to traditional analogue or digital channels, the owner can use IPTV television.
In order to set up Internet TV on Smart TVs, you need to thoughtfully approach each point.
- To connect the Internet to the TV, you should use a cable. This will allow you to view videos and channels in good resolution.
- We go through the registration procedure, indicating a reliable login and password. We confirm the existence of the account via email.
- Log in to the system and download the SS application from the online store
- Then we launch the program. A code appears on the screen, which must be entered into the appropriate field on the official website. After this, an available playlist will appear for downloading.
- The playlist can be downloaded and added to the software on the TV. Instead of downloading, a link to the channel list can be added.
- After the completed manipulations, launch the IP assistant and use any channel.
You can tune in to live TV or use recorded broadcasts
This list of programs is subject to editing and replacement. However, you can only get new playlists on the official resource.
Does the screen need to be adjusted? Didn't the manufacturer take care of this?
This is partly true. Large production volumes do not allow the manufacturer to fine-tune the screen, be it Samsung, LG, Sony, Toshiba, Sharp.
The operating conditions of the TV play an important role. They will always be different: the signal sources are different, the TV is installed at different heights, the distance to the TV is different, the room lighting is different and many more aspects. Therefore, it makes no sense to adjust the image either at the manufacturer’s factory or in the store, but you need to do it at home, in the place where the TV will be installed.
Breakdowns that affect color
If you have eliminated all the interference, installed the latest firmware, restored the settings, but this still did not help, the device may have malfunctioned and one of the parts has broken. Most often they fail:
- Antenna plug. Often the damage is not noticeable. In 25% of cases, it is impossible to visually diagnose a breakdown. But if you sharply pull the cable out of the socket or step on it at least once, the signal will arrive with defects.
- Color reproduction board. Usually this part is well protected by the design, but if there is high humidity in the room or the wiring in the apartment is damaged, there is a risk of voltage surges and even short circuits. At the moment of energy surge, the color board will burn out first. It cannot be restored in Sony and Philips models; replacement will be required.
- Switch. If you use this device to receive a good TV signal from different sources (for example, satellite and cable TV), it will fail there. To check if it is working properly, connect each signal source to the TV directly. If colors are restored, simply replace the switch.
- Matrix controller. If all other faults are not confirmed, the screen microcontroller may have failed. Many workshops do not undertake repairs of such complexity and offer to replace the entire matrix assembly. Repair technicians can install an original controller instead of a broken one. It will cost much less.
Is it difficult to set up your TV correctly? Will I need professional help?
Achieving the correct display of the picture is no more difficult than setting up the channels. It will take no more than 20 minutes of your time. To make your TV pleasing to the eye, you only need to adjust the picture settings so that the test pictures are correctly displayed on the screen. You will see below exactly how it should be “correct”. Test pictures are selected by experts so that after adjustment you can enjoy any scenes in terms of brightness, color, clarity and contrast.
How to display test pictures on TV?
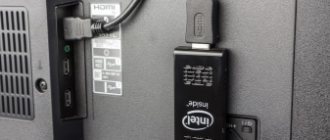
To display test images on the screen, use a USB drive (having previously written files from the archive onto it), if your TV is equipped with a USB input; if there is no USB input, output the image from your PC/laptop.
You can download the archive with files from this link. Save this file and unzip it. Write the unzipped files onto a USB flash drive, and then plug it into the appropriate TV connector.
More details about test images
Each individual picture serves to configure one parameter. The test from Burosch contains:
- Pictures for adjusting five basic parameters: format, brightness, contrast, color and focus.
- Pictures with test zones for simultaneous adjustment of several parameters
- Pictures for professional calibration
- Several real pictures for verification
Test pictures for each parameter
Used to adjust a single parameter. After adjusting this parameter, you will need to switch to another picture and adjust another parameter.
Test pictures with several test zones
They are used when you need to configure quickly or when the configuration is performed by an inexperienced user. On such images, you can adjust five basic parameters at once.
Let's start setting up the screen
First of all, you need to select the signal source on the remote control.
To do this, press the Source or Input key and select the image source: USB flash drive (or the corresponding HDMI input, if broadcasting from a PC/laptop).
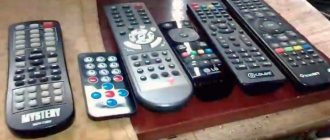
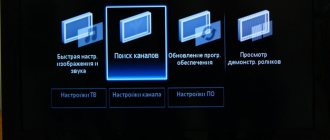
Next, you need to enter the TV menu: to do this, press the menu button on the remote control and go to the image settings. Different manufacturers call the menu button differently: it can be Settings, Options, . The picture below shows the most common remote controls.
If you have difficulty entering the menu, you can find a more precise description of this procedure in the instructions for your TV, specifically for your model. When you enter the menu you will see something like this:
Next, you have to choose which way to go: take a universal picture (faster) or adjust each parameter according to the corresponding picture (better quality).
Setting the screen format
In order for the format to be configured correctly, you need to disable the scaling functions (overscan, upscale) in the menu.
Brightness setting
The correct brightness setting is achieved when all shades of gray are clearly visible against the black background. To do this, use the remote control keys to move the brightness parameter slider in the menu until all shades of gray are visible.
Adjusting Contrast
Correctly setting the contrast is similar to setting the brightness, the only difference is that now the background is not black, but white. The correct setting will be when you see all the shades of gray on a white background. To do this, use the remote control keys to move the contrast parameter slider in the menu until all shades of gray are visible.
Color Setting
Color saturation and color temperature are adjusted based on human skin tone. In order to get the correct color settings, you will need a test picture with women depicted in it. They have different skin colors, you need to adjust the regulators so that the skin looks natural. To do this, use the remote control keys to move the color parameter slider in the menu until all faces look natural.
Setting Focus
Sharpness adjustments must be made after fine-tuning the format, which is described above. In order for the TV screen to display a clear image in the test picture, it is necessary to achieve the most accurate display of intersections and lines. To do this, move the slider of the focus (sharpness) parameter in the menu using the remote control keys until all intersections become visible.
After completing these settings, exit the menu, remove the USB flash drive, and turn on any movie or TV program. After these, your TV is set up for a pleasant viewing of videos of any content: from dynamic action films to documentaries about nature.
Sources used:
- https://tv-vybor.ru/i/159-kak-nastroit-izobrazhenie-i-jarkost-na-televizore-lg.html
- https://homeasking.com/nastrojka-izobrazheniya-televizora/
- https://technari.com.ua/ru/services/-company/articles/optimal-tv-picture/