Almost every TV, including the old CRT, can be connected to a computer or laptop. All options for connecting a TV to a computer can be divided into 2 types: 1. Connection as a monitor (single or additional). In this case, the video, music, photos and other files displayed on the TV will be played by the computer. 2. Connecting a computer to a TV to play files stored on the computer using the TV. In fact, the computer in this case will perform the functions of a regular flash drive. But this method is only possible with modern TVs equipped with built-in players.
You can connect your TV as a monitor using one of the following connectors: • HDMI; • DVI; • VGA; • RJ45 (standard network connector); • Wi-Fi; • S-Video / SCART. Inspect the connectors on your computer and TV, and based on their type, choose the connection method that suits you. Below you will find images of each of these connectors, as well as recommendations on how to connect your TV to your computer using them.
Connecting a monitor (TV) via HDMI
Not that everything was better before, but it was clearly simpler. The abbreviation HDMI stands for High Definition Multimedia Interface, that is, a high-definition multimedia interface.
Having connected the monitor via HDMI, you can find that the image is very blurry, does not occupy the entire area of the screen - there are black bars (margins) at the edges and the required clarity is missing. Moreover, we see this picture both during boot, and in the BIOS, and in Windows.
First of all, we make sure that the HMDI cable is in good condition and its length should not exceed 5 m.
Disable auto-scaling on the monitor. You may have to select the “Fit to screen” option in the monitor menu.
If your computer has a video card, built-in or external, AMD Radeon, then we try to correct the image using the AMD Vision Control Center (Catalyst Control Center) drivers. Find the “My Digital Flat-Panel” item and select the “Scaling Options” sub-item.
A slider will appear that needs to be moved to zero.
Now the image should return to normal. If you update or reinstall drivers, you will have to repeat the procedure.
If you have a video card from Nvidia, then you need to launch the Nvidia Control Center (Nvidia Control Panel) by clicking on the tray icon or right-clicking on the desktop and selecting the appropriate item.
Next, in the menu on the left, select “Adjust desktop size and position” (adjusting the size and position of the screen) and set “Overscan” to the “Do not scaling” position.
When connecting the TV to the computer, you need to turn off the TV and the computer, only after that connect the HDMI cable. Turn on the TV first, then the computer.
Switch the TV to display the signal via HDMI.
Modern flat screens are able to display images without distortion across the entire surface, including the edges. Yet many TVs use so-called Overscan technology: the image is electronically enlarged by about 5% and cropped at the edges so that LCD and plasma TVs show the same part of the image. same as kinescopes.
As a result, the number of pixels of the video card and the screen do not always match - the sharpness of the image deteriorates. In this case, even the Windows “Taskbar” may end up in an invisible part of the screen.
Most TVs allow you to turn off this magnification. On some models this function is called “Underscan”, on others “Only Scan” or “Pixel for Pixel”.
But it also happens that the Overscan function is always active when connected via HDMI and DVI. Many video cards smooth out this, reducing the overall image. At the same time, the entire Windows desktop fits on the screen, but, unfortunately, pixel-accurate image transmission is impossible.
Thus, TVs with a switchable Overscan function are more preferable.
If a monitor is not connected to the computer, you may see that the resolution on the TV does not match the screen or will remain black. Additionally, connect a monitor to the system unit via VGA or DVI.
It will show the image and this will allow you to configure the correct resolution for the TV in the video card driver.
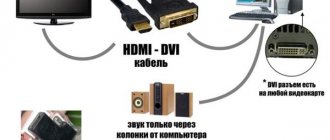
Finally, if the previous options did not help, try connecting the TV via a DVI -> HDMI to DVI adapter of the video card, but the sound will have to be connected via a separate cable to the TV or output from the computer to speakers.
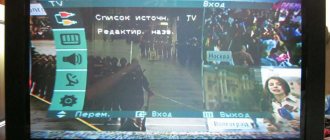
Connecting a TV via HDMI in Windows 10
1. Make sure your computer and TV are turned off.
1. Connect one end of the HDMI cable to the TV in the HDMI connector, the other to a laptop or desktop computer.
2. Turn on both devices.
3. On the TV you need to select the signal source. There should be a special button on the remote control, usually it is labeled INPUT or SOURCES or HDMI (see the instructions for the TV).
Click on it and select the HDMI connector to which you connected the cable as the source.
4. On the computer, press the [Win]+[P] keys simultaneously.5. In the “Project” window that appears, select the projection type, depending on your preference: - Computer screen only (Display the desktop only on the first screen) - Repeated (Duplicate screens) - Extend (Extend screens)
— Second screen only (Display the desktop only on the second screen).
You may need to adjust (change) the screen resolution on your computer to a resolution that the TV supports (see the instructions for your TV). If you do not synchronize the image extensions on the monitor and TV, it may end up cropped on one of the devices.
6. Confirm the changed parameters “Apply” - “Save changes” - “OK”
7. To properly connect sound, you need to right-click on the computer the sound adjustment icon on the taskbar (notification area - tray) and select “Playback devices”.
5 rules for safe online shopping The Russian quality monitoring system “Roskachestvo” has compiled a list of five rules for safe online shopping.
GeForce 419.17 WHQL Driver Available The Microsoft WHQL certified GeForce 419.17 driver is optimized for Anthem and DiRT Rally 2.0 and provides support for the new GeForce GTX 1660 Ti graphics card.
Intel is ready for mass production of MRAM memory Intel is ready to begin mass production of magnetoresistive RAM SST-MRAM (spin-transfer torque magnetoresistive random access memory).
Ad blockers stopped working in Chrome 72 After updating the Chrome browser to version 72, many users experienced that ad blockers (including Ublock Origin, Ghostery and Adblock Plus) stopped working.
Mobile Opera 50 is available. A new version of the browser has been released for Android devices - Opera 50, which has received many improvements, including an improved ad blocker and a completely new picture-in-picture mode.
YouTube has softened the rules for punishing users. Now violators will not be immediately deprived of access to YouTube video hosting functions.
faqhard.ru
Connection on Windows 7
Connecting a TV to a computer running Windows 7 is done in the same way as to a PC running Windows 8 and 10. The only difference will be in the appearance and names of the system partitions that will need to be opened to adjust the image settings or if the PC does not transmit sound to the TV. Thus, a quick change of operating modes with displays is opened the same way on all versions of the OS - with the key combination Win+P. For Windows 10 and 8, the menu is called Project and appears vertically on the right.
It contains modes such as Computer Screen, Repeating, Extend and Second Screen. On Windows 7, the menu opens horizontally and contains the same modes, but under different names: “Disable Projector”, “Duplicate”, “Expand”, “Projector Only”. To adjust image settings, on Windows 10 use the “Display Settings” section. On Windows 7 you need to select "Screen Resolution".
Conclusion Connecting a TV to a computer running Windows OS via HDMI is very easy; to do this, just connect both devices with a cable, turn it on and select on the TV to display the image from the corresponding connector. Controlling the TV from a smartphone on Windows Phone or Android with this connection is not available; all operations are performed using a mouse and keyboard, and the TV receiver is used as a large screen.
If problems occur with sound output, you can determine why the computer does not output an audio signal to the television receiver and correct the error in the settings of your laptop or PC.
How to enable HDMI on TV
“What progress has come…” I want to sing, looking at the shelves of modern supermarkets with digital equipment. The age of new technologies is constantly changing everyday life, and today you can watch your favorite movie not with a nasal pirated translation, but in high quality HD or Blu-Ray. All you need is HDMI outputs on your TV and computer.
1
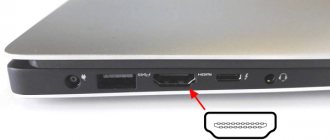
The first thing you will need is an HDMI cable. Often it comes bundled with the TV. If not, you can buy a cable at any audio-visual equipment store. Decide in advance what length of cable you need. The latest generations of TVs have several HDMI connectors on the back. Connect one end of the cable to HDMI 2 and the other to the HDMI port of your computer or laptop.
2
Don't worry if, instead of the desired image, you see a warning on the TV screen that the cable has not been connected or there is no signal. How to proceed in this case is shown using the example of Samsung TVs. Find the Source button on your TV remote and select HDMI 2 from the list provided. Perhaps at this stage the issue will be resolved and the image will appear on the TV screen.
3
If nothing has changed, go to the computer (laptop) settings - right-click on a free field of the desktop. A window will appear in which you need to select “Screen Resolution”. Pay attention to the line “Multiple screens”. If the option is set to “Display the desktop on only 1 (2) monitor”, change it to the “Duplicate these screens” option. In the “Screen” item, the inscription “Multiple monitors” should appear.
4
The desktop image will now appear on the TV screen. Attention: in order for the image on both screens to have ideal HD quality, the resolution of the TV and monitor screens must match. In this case, it will be installed by default. But let's say that your monitor does not support such a high resolution as your TV. Then set the desired resolution on your TV, since that is what you will be watching.
5
There may be a situation where you get a great picture, but no sound. This problem is also solved quite simply: as a rule, the problem is due to incorrect settings of the operating system; you do not need any additional cable. Select "Sound" in the "Control Panel" (you can use one of the screens for this). If the sound settings window does not contain the name of your TV, call up the settings menu with the right mouse button and check the boxes next to “Show disconnected devices” and “Show disconnected devices.” Next, check the box next to the name of the TV and turn off other functions (computer speakers and other devices). Confirm the task by clicking “Apply” and “Ok”. Your TV is now playing sound.
Please note that via HDMI you can enjoy watching not only movies, but also photos, Internet pages or playing computer games.
sovetclub.ru
No sound
- Find the speaker icon in the lower right corner of the screen and go to “Playback Devices”;
- The “Playback” tab should contain all possible devices. Your TV should be there with the name - right-click and then select “Set as default”. The connection may not have the name of the TV, but the HDMI port number.
If there is no sound or this connection does not exist, then most likely there is a problem with the drivers for the video card. On this occasion, I already left the previous link in the previous chapter - the problem with the image and sounds is solved there, so it’s better to go there. But you can also ask your questions in the comments.
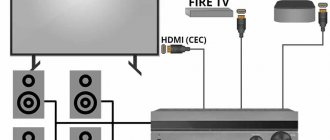
Connect the laptop to the TV via HDMI
In the case when Wi-Fi Direct is not configured, Miracast is not supported, there is no flash drive with a large capacity, but you really want to watch a movie in good quality, we remember the HDMI connector - a great way to duplicate an image on another device without losing quality. Therefore, the question arises: how to connect a TV to a computer via HDMI in Windows 10 and what is required for this? The answer is below.
To connect we need:
- laptop or desktop PC with HDMI output;
- TV with HDMI input;
- reversible HDMI cable.
Attention! To get a high-quality picture with an audio track, do not use adapters from HDMI to DVI and VGA, otherwise watching movies and photos will only leave negative emotions.
So, to transfer the image to TV we need to connect two devices using a cable:
- Turn off the TV and laptop. This must be done so as not to damage the contacts as a result of a possible spark.
- Connect the ends of the HDMI cable to the input and output connectors (TV and laptop, respectively).
- Turn on both devices.
Chances are you won't see your laptop screen projected onto your TV.
To do this, TV and PC need to be configured:
- Enter the “Menu” of the TV and find the “Input List” item. It can also be called up by pressing the “Input” key on the remote control.
- In the list that appears, click on the input source: HDMI.
- After this, the image from the computer should appear on the TV.
But if this does not happen, the external signal transmission is disabled on the laptop or PC.
To enable it you need:
- Press the Win+P keys simultaneously.
- In the window that appears, select the projection type.
The best way is the “Second Screen Only” option, in which the image from your machine will be accurately copied onto the TV screen, while the computer display itself will remain turned off. Selecting a different connection will result in two monitors running at the same time, which has a distracting effect.
If your panel has a high resolution display, the transmitted image may be blurry or grainy.
To fully utilize the resources of your TV screen, you need:
- Press RMB on the desktop.
- Select “Display Options”.
- In the window that appears, click “More display options.”
- Next, click on “Detect” and after displaying the external screen parameters, select the maximum resolution from the drop-down list.
Advice! If you don’t have cable television, and IPTV is hard on your wallet, you can watch TV through your computer: turn on the online broadcast or subcast on your PC and broadcast the image on TV.
geekon.media
Connecting a TV to a Windows 10 computer
Connecting your TV to a Windows PC via an HDMI cable rather than via Wi-Fi is the easiest way to use a large screen as a monitor for playing movies or running games. This connection has a number of advantages, including transmission of high-definition content, support for audio and video signals, and ease of connection setup.
Thanks to this, it is through HDMI that the television receiver is most often connected to other devices, be it a computer, laptop, home theater or other equipment. On Windows 8 and 10, outputting images from a computer to a TV via HDMI is very simple and is done in a similar way. There are differences for Windows 7, but they are minor and will be listed below.
Cable selection
One of the important steps in connecting a TV to a Windows PC is purchasing a cable. The HDMI standard is constantly changing, but that doesn't mean the updated versions are better than their predecessors. The backward compatibility option allows each subsequent device to receive all the features of the previous standard.
You can determine the types of this cable by their number, the most common are versions 1.4 and 2.0, the second is the best.
There are other definitions of cable versions:
- Deep Color. This standard is intended for television receivers capable of transmitting more than a trillion colors;
- V.Color. Used for modern high-resolution television screens with an improved color range that is not available to television receivers using RGB technology;
- Standard. Wire for data transmission in resolution 1920x1080 up to 15 meters;
- High Speed. The signal in Full HD resolution is transmitted at 7.5 m, but this increases the response time of the display.
In addition to different versions, the cable comes in several types - HDMI, mini and micro HDMI. To connect to laptop or PC TV receivers, the HDMI form factor is most often used. When buying a cable, you need to choose only high-quality products and not buy cheap Chinese wire. Having saved money, the user may find that the computer does not see the TV via HDMI.
Connecting to a TV
To connect a laptop or PC running Windows OS to the TV via HDMI, you need to connect both devices with a cable. It is recommended to turn off the equipment first. The required connectors are usually located on the back of the system unit, on the sides of the laptop, on the back or side panels of the TV set. If the TV is hanging tightly to the wall, you won’t be able to use a regular cable; you will need to purchase an additional corner adapter. It connects to the connector, and the cable is inserted into it. If the system unit does not have an HDMI connector, you can use an adapter from VGA or DVI to HDMI. It should be taken into account that when using adapters or adapters, the picture quality will decrease. After the cable is connected to both devices, you need to turn on the equipment and set the required signal source in the TV settings by clicking on the “Input” or “Source” button.
If your television receiver has several HDMI ports, you can determine the required one by searching through it or by looking at the designation next to this input. After the port is determined correctly and the equipment connects successfully, the loading screen for Windows 7, 8 or 10 will appear on the TV screen.
Setting up an HDMI connection
So, everything is connected and now it remains to configure this matter a little. If only one TV is connected, the picture should appear immediately. Please note that in order for the computer to boot on TV, the monitor must not only be turned off, but disconnected from the system unit!
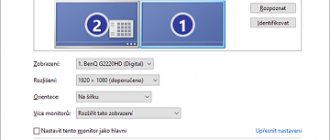
After loading Windows, all that remains is to select the appropriate screen resolution. You can do this by right-clicking on an empty space on the desktop and selecting “Screen resolution”
Here you can select your preferred resolution. The higher you go, the clearer the picture, but the smaller everything is on the screen. By default, the system selects the maximum resolution that the device supports. You can leave it like that if everything suits you. But if the work is uncomfortable, the font is too small and difficult to read, then you can reduce the resolution, but there are nuances.
LCD TVs and monitors are designed to display a certain number of dots (pixels) horizontally and vertically, for example 1920x1080 (this is the matrix resolution). And if you set a non-standard resolution, then in order to display it on its matrix, the TV will scale it, and this MAY lead to deterioration in quality and blurring of the picture, or maybe everything will be fine.
If your TV supports a resolution of 1920x1080 (Full HD), then it will also display 1280x720 well, with all the details and fonts being larger. For an HD Ready TV (not Full HD), there is no point in setting 1920×1080, because its real resolution is 1366x768 pixels.
Using the “Advanced Settings” button on the “Monitor” tab, you can set the screen refresh rate. I recommend setting it to 60Hz or more if your TV supports it:
The TV on this tab may not be called by its name, but by something like “Universal PnP Monitor”. If, when watching a video, it twitches a little or does not go smoothly, then you can experiment with this parameter. On this tab, select “True Color (32 bit)” for color rendering quality.
If there is any change in resolution, frequency or color depth, the system will display a window to confirm the changes. If the device does not work with the new parameters, then you will not be able to see this window and will not confirm your actions. There is no need to panic, just wait 15 seconds and the system, realizing that you do not see anything, will return the previous settings.