Previously, I already wrote about how to connect a TV to a computer in different ways, but the instructions were not about wireless Wi-Fi, but about HDMI, VGA and other types of wired connections to the video card output, as well as about setting up DLNA (more on this later and in this article).
This time I will describe in detail various ways to connect a TV to a computer and laptop via Wi-Fi, and will consider several areas of application of a wireless TV connection - for use as a monitor or for playing movies, music and other content from the computer’s hard drive. See also: How to transfer an image from an Android phone or tablet to a TV via Wi-Fi.
Almost all of the described methods, with the exception of the last one, require the TV itself to support a Wi-Fi connection (that is, it must be equipped with a Wi-Fi adapter). However, most modern Smart TVs can do this. The instructions are written in relation to Windows 7, 8.1 and Windows 10.
How to connect a laptop to a Philips TV
Hello friends, my friend has a Philips TV and together we very simply connected it to an Acer laptop especially for you.
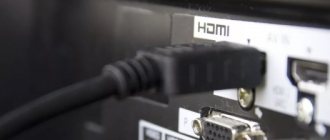
Nowadays, every laptop and every TV has HDMI connectors; this interface allows you to digitally transfer video data and audio signals from one device to another.
This is done very simply, we take the HDMI cable out of the box and connect our TV and laptop with it.
Both the laptop and the TV must have an HDMI connector.
Then we take the TV remote control. To display all available video sources, press the Source button on the remote control.
We look at the TV screen, in the menu that appears, using the remote control, select the HDMI connector to which the laptop is connected, in our case HDMI 1, and the laptop desktop appears on the TV.
If this does not happen, then in the laptop operating system we enter Screen Resolution
and select in the
Multiple displays
-
Duplicate these screens
, and in the
Display
-
Multiple monitors
. Then click Apply and OK.
Sound from the laptop should automatically appear on the TV, since the HDMI interface transmits video and sound over one cable. If the sound is not picked up by the TV automatically, then we must specify in the Windows settings to use the TV speakers for sound output.
Go to Start->Control Panel->Hardware and Sound
In the Sound window you will see the name Speakers
and the name of your TV is Philips. Right-click on Speakers and turn them off.
Then right-click on the name of your Philips TV and select Enable from the menu, that's all, audio from your laptop should now appear on your Philips TV.
How to connect
If previously, in order to connect a CRT TV and a laptop, RCA connectors were required, which provided output of a conventional type of image, now we want to see images of the highest quality, but to ensure transmission of such quality we will already need HDMI connectors.
The HDMI connector is located in the video card, it is designed to connect the display of a laptop, for example, a Toshiba, to an LG TV with cable support.
This is interesting! Exchange of an old laptop for a new one with additional payment: features of the procedure and practical tips
It can be noted that the HDMI interface is more ideal than VGA. With its support, you are given the chance to broadcast higher quality video in sync with audio. For this reason, it is more logical to use this connector directly when connecting the TV to a PC.
Order of Operations
In order to connect the TV to the laptop, you need to do the following:
- Shutdown. First, turn off both devices. You simply connect your PC to a non-working TV using the purchased cable. However, first you need to insert the single end of the cord into the PC connector, and then the other end is inserted into the TV connector.
- Loading. After the wire is in place, you need to turn on the TV. The device must be in AVI mode (switchable in the TV settings), because it allows the TV to receive signals from the PC.
- Setting up. When you connect your laptop to your TV for the first time, you should definitely adjust the image. To do this, you need to right-click on the desktop, then it all depends on your OS:
- If Windows 7 is installed on your laptop or PC, then you need to select “Screen Resolution”, then look for the “Screen” line and select the best option. If the connected TV was not immediately found by the laptop, then you need to immediately click “Find”.
In Windows XP, you need to select “Properties”, click “Options”, then “Advanced”, and then select the optimal value.
The desktop of your laptop will be reflected on the TV screen.
If you often use your TV as a second display, then it is best for you to configure options on it as on a PC. Follow the instructions for your video card. In it you can configure the “Clone” or “Mirror” modes, where both monitors are configured completely identically. In addition, it is possible to make both monitors work independently, all using the “Extended Desktop” mode.
Reboot . Now all that remains is to restart the laptop, and you can enjoy watching videos on the huge display.
This is interesting! Connecting a TV to a laptop or computer via Wi-Fi: step-by-step instructions and detailed video
Connection on Windows 7
Connecting a TV to a computer running Windows 7 is done in the same way as to a PC running Windows 8 and 10. The only difference will be in the appearance and names of the system partitions that will need to be opened to adjust the image settings or if the PC does not transmit sound to the TV. Thus, a quick change of operating modes with displays is opened the same way on all versions of the OS - with the key combination Win+P. For Windows 10 and 8, the menu is called Project and appears vertically on the right.
It contains modes such as Computer Screen, Repeating, Extend and Second Screen. On Windows 7, the menu opens horizontally and contains the same modes, but under different names: “Disable Projector”, “Duplicate”, “Expand”, “Projector Only”. To adjust image settings, on Windows 10 use the “Display Settings” section. On Windows 7 you need to select "Screen Resolution".
Conclusion Connecting a TV to a computer running Windows OS via HDMI is very easy; to do this, just connect both devices with a cable, turn it on and select on the TV to display the image from the corresponding connector. Controlling the TV from a smartphone on Windows Phone or Android with this connection is not available; all operations are performed using a mouse and keyboard, and the TV receiver is used as a large screen.
If problems occur with sound output, you can determine why the computer does not output an audio signal to the television receiver and correct the error in the settings of your laptop or PC.
Source
Why doesn't the PC detect the TV?
In some cases, the computer does not see the TV even though everything has been done properly. In order to find out why there is no signal, you need to carry out diagnostics.
The cause of the problem may be an old TV model or the fact that the laptop does not support the video format of the device.
Watch the video in which an experienced user shows how to connect a laptop to a TV via an HDMI cable:
Dear readers! Our articles talk about typical ways to resolve legal issues, but each case is unique. If you want to find out how to solve your particular problem, please use the online consultant form on the right or call:
+7 ext 583 (Moscow) ext 406 (St. Petersburg) ext 255 (Across Russia)
We connect the TV to the laptop (Windows 10) via Wi-Fi. DLNA setup
If you want to connect your TV to your computer via a wireless network, you can do this as follows:
After you connect everything, you can proceed to setting up a DLNA server on your computer. By running the server on your computer, you can watch movies on your TV. Please note that on the TV, using this method the desktop will not be displayed. You will only be able to view certain files. We have three articles on setting up a DLNA server:
Despite the fact that they are written using Windows 7 as an example, setting up a DLNA server on Windows 10 will proceed in exactly the same way. I checked that the DLNA server running on a laptop with Windows 10 installed is displayed on the TV without any problems.
I think we've sorted out the wireless connection. Let's move on to the wires.
How to connect a TV to a computer via HDMI
I decided to prepare a separate article in which I will tell in detail and show with an example how to connect a TV to a regular desktop computer using an HDMI cable. The topic is relevant, and I am often asked about it. In fact, it’s nothing complicated. But there are some nuances that we will try to understand in this article.
Almost every TV, even not the newest one, has at least one HDMI input. And in the computer, on the back panel of the system unit there is an HDMI output. This means that we can easily connect a PC to a TV using a regular HDMI cable, which can probably be bought in every digital equipment store.
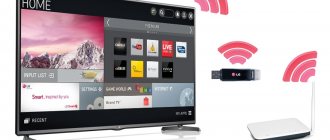
Why connect them? Everything is very simple. The TV can work as a monitor. That is, you can display images from a computer on a TV screen. The TV can be used as the main or second monitor. This means that the image from the PC will be displayed on the screen of a regular monitor and TV at the same time. Or only on TV. It depends on your tasks. It should be noted that HDMI outputs not only images, but also sound.
I myself, and other users, most often connect a PC to a TV to watch movies on the big screen, or to play games. You can also connect a gamepad to your computer and play on the big screen. Some people use TVs instead of monitors. They work with documents, surf the Internet, etc. But it seems to me that this is not very convenient. And your eyes get tired faster. For constant work at the computer, it is better to use a monitor. And connect the TV to watch movies, photos, games, etc.
The connection process will be the same for TVs from different manufacturers: LG, Samsung, Sony, Philips, Panasonic, Ergo, Hitachi, etc. Just as there will be no significant differences in the Windows settings. Yes, the settings in Windows 10, Windows 8, Windows 7 are slightly different, but not critical. I'll show you everything.
If you have a laptop, then you can do everything according to this article: how to connect a laptop to a TV via HDMI.
Scart or RCA
This type of connection is intended for old CRT TVs that only have inputs for RCA-Tulips or Scart. You are unlikely to find these connectors on laptops, so you need to use adapters. Scart-VGA RCA-VGA The cost of these adapters is not high.
- We connect the cable, if you use an adapter, then first connect the cord to it.
- We turn on the AV mode on the TV; this is a video channel on old TVs.
- Adjusting the screen resolution on the laptop.
If you use these adapters, then in most cases they already have a built-in audio cable, so the sound will come from the TV itself. However, this method has one drawback: image quality, because using the cable data it is impossible to achieve an ideal image, but this is enough for many.
Preparation: check the HDMI ports on the TV and computer, select a cable
First we need to check if our devices have the necessary ports. We also need an HDMI cable to connect. Let's look at everything in more detail. If you have everything, then you can proceed directly to connection and configuration.
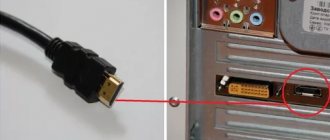
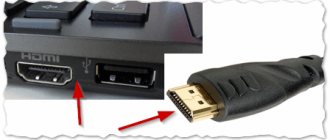
- The HDMI input on a TV is usually located on the side, or on the back panel (sometimes, both). They must be signed and numbered. They look like this (Philips on the left, LG on the right):
If your TV has at least one such port, then everything will work out. - Next, take a look at the back panel of your computer (I mean the system unit). There we need to find an HDMI output. HDMI can be on the motherboard (integrated graphics on new boards) or on the video card. But, even if you have this port on the motherboard (as I have in the photo below), and there is a separate discrete video card with an HDMI output, then the TV must be connected to the video card.
I took a photo of the system unit in a horizontal position. In my case, the TV can be connected to the HDMI output on the video card. If your computer does not have an HDMI output, but has DVI, then you can buy a DVI-HDMI adapter. And if you only have the old VGA, then you can also use a VGA-HDMI adapter, but then the sound will not be output to the TV, since VGA is not a digital output. If you want to connect a TV and monitor to your computer at the same time, you will need either two HDMIs, or HDMI and DVI. We will also need the appropriate cables. - The HDMI cable must be the length we need. If I'm not mistaken, they exist up to 20 meters. If you do not have a separate cable, you can use the one with which the monitor is connected. If you have it connected via HDMI. I have this cable:
The most common, inexpensive cable.
If you have ports on both devices and have a cable, then you can connect.
Connection and setup via HDMI
If there is no picture, check that you are connected to the TV correctly. Some models have separate input ports labeled "IN". You can also try all possible inputs on both your TV and laptop. If this does not help, then go to my article on solving this problem at this link.
We connect the TV to the computer using an HDMI cable
You just need to take a cable, connect it to the HDMI output on your computer and the HDMI input on your TV.
If you connect the TV as a monitor, that is, a single screen, then the diagram will look something like this:
Let's also consider another case when a TV and monitor are connected at the same time.
TV as a second monitor for a PC
The monitor can also be connected via HDMI (as I have in the photo below), via DVI, or even via VGA. As a result, two screens will be connected to the PC.
We sorted out the connection. Most likely, in your case there will already be a system unit with a monitor connected to it. And all you need to do is connect a TV to it.
Select HDMI input as signal source in TV settings
Most often, after connecting and turning on the devices, there is no image on the TV. A message like “No signal”, “No signal source selected” or something like that will appear. On the TV you need to select the signal source. The port where we connected the cable.
To do this, your TV remote must have a separate “SOURCES” or “INPUT” button.
After clicking on it, a menu should open in which you can select the signal source. You can see which port on the TV you connected the cable to (each port has its own number). Or simply select an active source. The process itself may vary depending on the TV. I have an old LG.
The image from the computer should appear on the TV. This will be either a copy of what is displayed on the monitor (if there is one), or a blank desktop (expand).
The main thing is that the picture from the computer appeared on the TV screen. Next, in the Windows settings we can change the image output mode. There are several of them there.
What is needed for this
You need to connect the mobile phone and the computer port. A microUSB or USB cable will help with this. On your device, select the mode you need. We are talking about drive, webcam or modem modes. As a rule, there is no need to install drivers. But there are also exceptions. For example, if a message pops up at the bottom of the smartphone screen indicating that a new device is being connected. In this case, check the Internet and download the necessary drivers. After this, the devices should complete synchronization automatically. How to connect a smartphone to a PC via wireless networks. Wireless networks do not allow data to be transferred too quickly. But with their help you can connect Android to a PC or a phone on another operating system (for example, iOS) to a laptop much faster. Make sure in advance that your computer has either a WiFi or Bluetooth module. Otherwise, you will have to go in search of a cable.
Setting up an HDMI-connected TV in Windows
The screen resolution is adjusted automatically in most cases. So in Windows settings we can only change the multi-display mode. This is only relevant when a monitor and TV are connected to the PC. If there is only one display, then these settings are not needed.
The easiest way to change mode in Windows 10, Windows 8 and Windows 7 is the keyboard shortcut Win + P.
After clicking on them, the “Project” menu will appear. In the top ten it looks like this:
In Windows 7 like this:
Let's look at each mode in more detail.
- Computer screen only (turn off the projector) – in this mode, the image will only be on the monitor.
- Repetitive (duplicate) – there will be the same image on the monitor and TV screen. There is one caveat to this mode. This is the screen resolution. For example, if, as in my case, your monitor resolution is 1920×1080, and your TV’s is 1366×768, then the monitor will be set to 1366×768 and the picture will not be very good. And if the monitor is 1920x1080 and the TV is also 1920x1080, then the picture will be clear on both screens.
- Expand – the desktop will be expanded to a second screen. In our case, this is a TV.
- Second screen only (projector only) – this is when the image from the computer will be displayed only on the TV. The monitor is turned off.
In most cases, these settings are quite sufficient.
Additional screen options
To open them, just right-click on an empty area of the desktop. In Windows 10, you need to select “Display Settings”, and in Windows 7 – “Screen Resolution”.
A settings window will open where you can see how many screens are connected to the computer.
You can also identify them (by clicking on the “Define” button), change the resolution of each screen and the operating mode (which I talked about above).
In Windows 7, the settings of a TV connected via HDMI look like this:
We figured out how to set up the image on the computer.
Peculiarities
Connection procedure
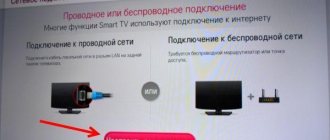
A user of any level will be able to connect the Internet to a Philips TV. There are 2 ways to do this. To achieve the greatest stability and connection speed, you can insert an Ethernet cable into a special LAN port, which should be located on the back or side of the TV.
But more often a wireless connection to the Internet via Wi-Fi is used. Before connecting your Philips TV to the Internet, check that the router is turned on and working properly. Then do the following:
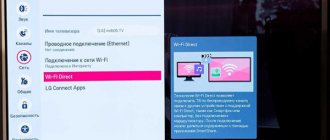
- To avoid entering your login and password, go through the Smart TV menu to the “Network connection settings” section, then click on Wi-Fi. Select the connection method via WPS. While connected to the desired network, press the WPS button on the router. This will avoid entering data on the TV device.
- If such a button is not provided, then the login and password will have to be entered manually using the remote control. Click scan. A list of networks that are available will open. Enter the SSID (or look for it in the list) and the network key (password) and connect.
- A menu will appear on the screen where you need to click “Easy Access” and confirm the action by clicking OK.
Now all you have to do is agree to the agreement that you will see after connecting to the Network.
Before turning on Wi-Fi on your Philips TV, check your router settings; incorrect settings may cause connection problems. First of all, in the router settings, make sure that the DHCP server is active.
In the case where a connection to the Internet has already been made, but the connection is interrupted, a software update or flashing of the device may be required.
In the second option, it is better to contact a service center rather than engage in “self-medication”. Otherwise, there is a possibility of causing irreparable damage to Smart TV.
What to do if the sound from the computer does not go to the TV?
This happens very often. The picture appeared on the TV, but there was no sound. It is not there at all, or it sounds from a speaker system connected to the computer. If you want the sound to come through the TV, then first check that the sound on the TV is not muted or distorted.
Next you need to go to “Playback Devices”.
Your TV should be in the list of devices. You need to right-click on it and set “Use as default”.
If the TV is not in the list, then right-click on the empty area and check the boxes next to two items: “Show disconnected devices” and “Show disconnected devices.”
If this does not help, and there is still no sound from the PC on the TV, then try reinstalling the video card driver. Just download it and start the installation. At this moment, let the HDMI cable be connected to the computer.
I showed how to check these settings in Windows 7 in the article Why there is no sound via HDMI on the TV when connecting a laptop (PC). Be sure to watch it and read the comments. There is a lot of useful information there.
I have never encountered a problem with audio output via HDMI. No matter how many times I connected, everything worked immediately after connecting. But there is such a problem.
Why Philips S561 does not see the computer
If a person connects a smartphone to a PC via a USB cable, but the computer does not react at all, it means that the user is faced with one of the following problems:
- cable fault;
- failure of the USB socket on one of the devices;
- Incorrect drivers for the smartphone are installed on the computer, or there are none at all;
- When connecting, the “Charging only” option is selected;
- failure of the operating system of one of the devices.
Thus, all identified problems can be divided into physical and software. To determine the exact reason that the Philips S561 phone does not see the PC, you need to check the hardware and settings of both devices.
Connecting a 4k TV to a computer. Ultra HD over HDMI
If you have an Ultra HD TV (aka 4k) and a video card supports this resolution, then there is a chance to get a beautiful and clear image. I checked, everything works. I have a 4k TV from Philips. And the computer has a GeForce GTX 750Ti video card, which supports resolutions up to 4096x2160.
There are a lot of nuances there. I'm not a gamer, so I'll try to explain as best I can. The fact is that it is possible to output a 4k image via HDMI, and I succeeded. But most likely we will get a frame refresh rate of 30 Hz. Which is very little. To get 60 Hz, we need a video card with HDMI 2.0 and the same cable. This is why DVI cables are used to connect to 4k monitors. But I haven’t seen anything on DVI TVs.
I connected everything, started the computer, and saw that the image on the TV was somehow strange, the colors were wrong. Perhaps this is only in my case.
Everything is resolved very simply. First, I tried in the TV settings to disable UHD (Ultra HD) for the HDMI port to which the PC is connected. The image became normal, but the resolution turned out to be normal, 1920x1080. Therefore, this method is not very suitable for us.
To get a real 4k image with natural colors, you just need to change the screen resolution to the maximum 3840x2160 in the display properties in Windows 10.
The image immediately became normal. The scale was also automatically set to 300%. Otherwise everything would be very small. It can be changed if necessary. I haven't tried playing at this resolution. But I think that this is not real. Moreover, the video card on my computer is not the newest and not the most powerful.
I look forward to your comments. Ask questions and don’t forget to share tips. Best wishes!
How to connect a Philips TV to a computer
When we purchase new household appliances, we can’t wait to try them out. This also applies to Philips TVs. The simplest thing is to connect it to an antenna to watch TV and only then think about connecting more serious equipment, for example, a computer and laptop, IPTV and DVD, a game console with headphones.
Modern TVs are equipped with various types of interfaces that allow you to connect additional external equipment. Any Philips TV has a USB port, which you can use to view information from a flash drive. The principle of connecting any household equipment to a TV is the same, but there are some nuances.
Connecting to a Philips TV
In the modern world of high technology, a person is surrounded by a large number of auxiliary transmission equipment. To enjoy its work, you need to have an idea of how to connect it to the TV and continue to use it.
Cam module
This device works on LCD and plasma television equipment, which must support HD digital format (Ready or Full). There is a special receiver for this. How to connect a cam module to a Philips TV? The whole operation does not take much time and no special knowledge is required.
- The presence of a CI slot on the TV panel is checked.
- The smart card is inserted into the adapter. Carefully monitor the correct position: the electronic module is located at the top, and the main module looks at the front side).
- The adapter device together with the card is installed in the slot. The TV must be unplugged.
- The TV turns on and information about connecting a new type of equipment is displayed on the screen.
- The remote control starts an automatic program search.
It happens that nothing is configured the first time. This means incorrect adjustment of the equipment, then the Philips TV is turned off and the adjustment is performed from the very beginning.
In this video you will learn more about how to connect a TV to a computer:
Advice! If your TV equipment recognizes the Cam module, but the channels still do not work, you should contact your provider.
In some situations, it is necessary to display the image from a personal computer monitor on a large screen. How to properly connect a laptop to a TV is indicated in the following activities:
- Check the presence of HDMI ports on the equipment prepared for connection and select a cable. The HDMI connector is installed on the side or back of the TV case. There should be a signature on it with a number - this is the cable input. Similarly, find the output on the back panel of the computer's system unit; usually it is located on the video card. As for the cable, it is chosen of such a length that it does not interfere with the room. There are connecting cables whose length reaches 20 meters.
- Make the connection. The cable is connected to sockets on the computer and TV.
Important! When connecting, both equipment must be disconnected from the electrical network. Otherwise, the ports may deteriorate (burn) from sudden voltage.
- Select the signal source in the TV settings menu.
- wired using a cable;
- wireless – via a Wi-Fi network and special transmission equipment.
Often it is impossible to immediately obtain a clear image or there may not be one at all, but only an inscription indicating the absence of a signal.
Here you need to select the port from which the signal is supplied with the cable connected. To do this, find a separate key on the remote control of the “sources” or “input” type. By clicking on it, you find the active source in the settings menu. After the image appears, it is configured using Windows settings. Most Philips TVs are equipped with a Smart TV platform, which means it can be used to watch video content from the World Wide Web. An Internet connection is required for this.
Today technologies have only two types of connection:
In the first case, data is transferred at very high speeds and this option is more suitable for viewing high-resolution video files.
What does it take for the Internet to appear?
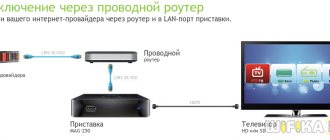
- Prepare the connecting cable.
- Connect to the LAN connector on the TV and router.
- Setting up Smart TV. To do this, find the Home button on the remote control, click on it and display “Settings”. Next, select Install and connect to the network.
- At this stage, two options will be offered: Wired and Wireless. At the user's request, the type of home network is selected.
If you connect to a wireless network, perform all actions in the following order:
- scanning;
- selecting your network from the list of proposed (found);
- entering a password;
- confirmation.
Advice! Older Philips TV models may not include built-in routers. Therefore, you need to select a separate external device that will work specifically with a specific model.
There is nothing easier than connecting headphones to the TV. You just need to find the appropriate nest. Another thing is wireless devices, which come in 2 types:
The first type is a set of headphones and a transmitting base. The station is connected to the audio output of the TV and to the electrical network. Thus, the signal is transmitted from the base to the headphones through the air at its own radio frequency. This method can be used for any Philips TV.
The second wireless option is much more complicated and depends on the selected TV model. It must be able to transmit a signal via Bluetooth. And here you need to be very careful - the Philips TV model must be compatible with wireless headphones, since some TV devices can only work on a Bluetooth connection with a mouse or remote control. This information can be easily found in the operating instructions for your television equipment. And then all that remains is to find the Settings section and learn how to connect wireless headphones to your Philips TV.
Probably, many people, far away in boxes, have hard drives with their favorite recordings of special events or unforgettable trips. Of course, they can be viewed on a computer or laptop, but this will not have the same effect as watching a video on a big screen. DVD players are used for this. Connect the equipment as follows:
- The DVD must be connected to an electrical outlet.
- The power button on the equipment itself is pressed.
- If the player turns on, then everything is fine with it.
- Turn off the equipment and connect the cables to the DVD and TV.
- Only after this the equipment is turned on again.
This procedure is performed only when connecting a new player. For further work, stop at points 1 and 2.
DVD can be easily connected to TV
But that's not all. Before connecting the DVD to the TV, you need to figure out which cable to use to connect the two devices. There are 3 types of connections for players:
- A/V connection (audio and video input on three-color sockets);
- component on five-color connectors;
- HDMI connection.
The cable connection points are located on the side or back, depending on the model, and have different colors so as not to disrupt the connection. The first two options are considered a little problematic. HDMI cable is considered as the most reliable cable, providing high quality images and sound.
Any equipment gets very hot when used for a long time, so it is not recommended to install a DVD player on a TV. By heating each other's surface, they negatively affect service life and may fail prematurely.
Advice. The best option would be to place the player on a specially designed shelf above or below the TV. If the equipment is installed far from each other, the cables will interfere and the aesthetic appearance will deteriorate.
Tricolor prefix
Connecting the tricolor to the TV is as follows:
- A SCART cable is used to connect DVD and TV equipment and turn on the power.
- Now select the channel on which you want to turn on the video mode using the remote control. A message indicating no signal will appear.
- Press keys numbered 0 and 1 in order.
- Set up the satellite signal by pressing the “i” button.
Setting up tricolor on Philips TVs is as simplified as possible, and if something doesn’t work out, you can always use the instruction manual, which is included with each TV set.
This game console is an outdated console and many people think that connecting Dandy to a TV is something impossible. In fact, it is very easy to connect using regular tri-color (A/V) wires. The image quality in this case is average.
Communication between two devices is carried out in the following ways:
- Via HDMI. Today this is the highest quality connection. There can be several connectors: one for the signal output, the rest for the input of other video signal sources.
- Coaxial or optical cable. If for some reason the TV sound panel does not support the HDMI version, then you can use a digital coaxial or optical interface. The only disadvantage of this Soundbar connection is that they are unable to support high quality audio format (HD) Dolby and DTS.
- Analog input.
If it is impossible to connect using the previous two options, the Philips TV developers have provided an analog input. The sound quality is far from perfect and only provides a stereo effect.
The soundbar connects in several ways
Home cinema
A special feature of Philips LCD TVs is that all modern models are equipped with a USB port and are able to play video files stored on a USB drive. There are TV brands that broadcast content from a PC or external device connected via a router to the Internet. The Smart platform makes it possible to watch programs and movies online. Built-in speakers in the TV body do not always provide good quality sound. Therefore, they try to display it separately on external devices (speakers, soundbar).
How to connect a home theater to a TV? The back wall of the TV is equipped with a sufficient number of connectors for audio output, including:
- Optic. A fiber optic cable is connected to it, which reliably protects against electromagnetic waves, and sound can be output in a multi-channel stream.
- Coaxial. Provides good quality sound in digital format. The shielding ability of coaxial cable is lower than that of fiber optic cable, but not so much as to significantly affect the sound effect.
- RCA. White and red sockets for broadcasting stereo sound in analog format. You can connect any low quality speakers to it.
- SCART. Designed to output analog stereo sound and is considered the lowest quality. The connector is used only in cases where other sockets do not work. But this does not apply to Philips TVs.
- Playstation Connect the console to the TV using an HDMI connecting cable. Using the TV remote control, pressing the Input button switches to the connected interface. Next, the remote control of the set-top box is used and the image on the screen is adjusted.
Modern technologies allow the use of equipment in many variations. This also applies to a mobile phone connected to the TV. It can be used as a TV remote control or as an external device on the same Wi-Fi network. To successfully connect, your smartphone or tablet must have software from Philips. This application easily plays media content that is stored in the phone's memory. Using a smartphone makes it easier to enter text data into query fields, for example, passwords when unlocking equipment.
Do you need help?
- Operating instructions PDF file, 4.7 MB, published March 3, 2011.
- Operating instructions PDF file, 4.7 MB, published March 3, 2011.
- Brochure Version:2.1.1, PDF file, 1008.8 kB, published October 23, 2021
- Operating instructions PDF file, 3.9 MB, published March 30, 2011.
- Operating instructions PDF file, 4.7 MB, published March 3, 2011.
Mobile phone utility update software
zip file, 138.0 MB, published May 25, 2011