Advantages and disadvantages
This topic is very important for the average user for obvious reasons. Rolsen equipment is relatively inexpensive, which will please those who want to buy it for a summer house, country house or garage. At the same time, the picture quality is quite high, and you can enjoy it even in many hard-to-reach places.
A number of models are equipped with a built-in player that plays not only video, but also audio information (MP3). The player and TV are controlled via a single remote control, so there is no need to buy an additional device.
The latest generation modifications are equipped with flat screens. The Rolsen company has also established the use of ultra-thin picture tubes, which will please owners of small-sized housing. It should also be noted the active use of stereo sound and a variety of settings. But Rolsen TVs sometimes cause certain complaints .
So, they still have quite significant dimensions. The weight of these models is also noticeable. They cannot be mounted on any wall or support , and moving them again is unlikely to be convenient. The disadvantage is possible with
Page 18: Azeogep
Attention! The text in this document was automatically recognized. To view the original page, you can use the “Original” mode.
Parental control.
You can restrict access to TV channels that are not suitable for children to watch.
In order to restrict/block a channel, you need to enter the default password
000000 or your own password.
Setting a password.
To set or change a password, enter your old password (if
you have already changed the password) or the default password is 000000 (if you
afraid to change your password for the first time). You will be asked to enter a new password. For under
To confirm that the new password has been entered correctly, you must enter it again.
After confirmation, press the [EXIT] key to exit the menu. Your old
The password has now been replaced with a new one.
Restoring factory settings.
With this feature you can reset all your settings to factory.
Chinese meanings of the new apparatus. Enter your own password or your password
default (000000), press [OK] to confirm the reset.
rmation (Information).
View model information, chassis version and firmware number.
Software update.
Reprogramming the set-top box to new software is carried out
Available only via DVB-T channel (not via USB).
Press the [] key and select “USB” (USB player).
The set-top box has a built-in USB multimedia interface, with which you can
play/listen to music, photos and video files, for example, such formats
like MP3, WMA, JPEG, BMP, AVI, MKV, etc. Using this menu you can
Correctly configure all USB player control parameters.
Use the navigation keys [A/T] to select a parameter and [H/^] to select it.
settings. Press [EXIT] to exit the submenu. The set-top box supports playback
Retrieving files only from external USB devices with the FAT/FAT32 file system.
Source
The lineup
And it’s appropriate to start the review with portable – car, or camping, Rolsen TVs. RTV-700 is deservedly considered a good example . Thanks to the digital receiver, it is possible to process DVB-T, DVB-T2 signals without set-top boxes. The system also has an analog tuner, so watching some regional and commercial TV channels will not be difficult. Users can record video information on SD and MMC cards.
The main characteristics of this model are as follows:
- diagonal 7 inches;
- picture resolution 800x480;
- format 16 to 9;
- complete Russification of the menu;
- electric battery capacity 1200 mAh;
- remote control included.
Plasma-based TVs are no longer produced by Rolsen.
At least all such models on the official website have been moved to the archive section. It is stated that such devices guarantee excellent sound and clear pictures. But all current models only come with an LCD screen. This is exactly what the more advanced portable device RTV-1000 is like.
The battery capacity is the same as the previous model. The ability to work autonomously for up to 3 hours in a row is declared. The brightness is 500 cd per 1 sq. m, and the contrast is 400 to 1. The viewing angle of the screen in both planes is 135 degrees.
Also provided:
- antenna input;
- composite audio-video input;
- Screen resolution 1024x600.
- How to set up a Samsung Smart TV - step by step instructions
Among home devices, the D1307 LED series stands out. Model RL-28D1307T2C is equipped with a thin front frame. OLED backlighting means that all LEDs are placed evenly behind the screen. The designers have provided for playing MKV files via USB input. The TV has a special CI+ interface that allows you to view encrypted digital channels.
The video recording option is used. Moreover, it can be recorded even in full HD quality. There is also a TimeShift function, as well as signal distribution via HDMI to any devices that support ARC. The TV will even reproduce pictures in JPG format. Playback of FLV video files is also available.
The D1309 LED series also deserves attention. related model RL-28D1309T2C The designers provided for the use of the ultra-modern DVB-T2 television signal standard. The dynamic contrast is 200,000: 1. The viewing angles in both planes reach 176 degrees.
2 speakers produce 5 watts of sound power. There is a YpbPr component connector. There is also a coaxial digital output. Please note: there are no Rolsen TVs with a built-in DVD player in this format.
The E1301 LED series may also be attractive. For example, model RL-28D1309T2C . The screen brightness of this TV is 330 cd per 1 square meter. m., its diagonal is 28 inches. Nicam and A2 sound systems are available. There is a special PC Audio output.
Other parameters:
- frame rate 60 Hz;
- headphones cannot be connected;
- Teletext function is provided;
- sleep timer;
- surround sound and equalizer with original settings;
- Freeze frame and parental control functions.
rolsen code remote control setting codes
Codes for setting up the remote control. Solving the problem step by step.
Many people asked this question, so I decided to write a post about it and help readers with this problem. This information will be useful when working with remote controls of such brands as: Samsung, LG, Sony, etc.
How to program the remote control?
To program your remote control, it is very important to check whether it contains an automatic scanning system.
We will start our explanation with this universal remote control model because it is the most used one at the moment.
This method will allow us to do the setup without having to search for the code for each TV. It's possible that the instructions that come with some remotes can be confusing, so it's important to buy a universal remote that has auto scanning like the one in the picture.
Often, the brand of your TV may not be listed in the remote control instructions, but this will not interfere with programming, since some codes correspond to TVs that are not in the booklet.
How to set up the remote control?
This small device is one of the most commonly used in the home and for this reason its operating time is very short. However, its setup is very simple.
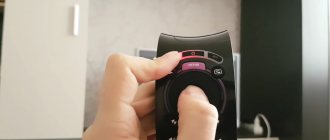
Most often we use these three buttons to configure our remote control (shown in the picture below):
Green SET button, TV1 button and red power button. The yellow arrow shows us the LDE (light emitting diode), in this case it is a small red light.
As I mentioned earlier, this remote control has an auto scanning system. There are other brands that also have it. When purchasing a remote control, pay attention to the packaging. It should roughly read: “universal remote control with automatic scanning.”
- This is very important because if the remote control does not have automatic scanning, the setup process will be impossible.
- This remote control is very versatile thanks to its ease of setup and six configurations that can be done simultaneously, meaning it can be used for 6 devices at the same time.
- They are all done using the same remote control programming procedure.
How to program a universal remote control without codes?
- To find the correct code for the remote control, you must use an automatic scanning system.
To do this we need to perform the following procedure: - Press the green SET button and the TV1 button at the same time, this will turn on the red light (indicated by the white arrow) which indicates that you are entering the program (as shown in the second image of this block).
- The instructions that come with this remote control provide some codes for well-known brands of TVs, modems, DVDs, home theaters and some other devices.
When installing windows from a flash drive it asks for a disk
It is important to try using this remote control with any other device that is not mentioned, it may work for that one too.
NOTE: If you want to know if the remote control is broken, I will leave you a way to test the remote control in the next article.
I have a Japanese ONKYO sound system that didn't come with a remote control, so I used this one. It doesn't give me all the features, but at least I don't have to get up to turn the device on or off, change the station, or turn the volume up or down.
We have already done the first programming step, which consisted of pressing the green button and TV1 (because in this case we are going to configure the TV... but in the case of another device we press the button corresponding to the installation button of the other device, and if we have already configured the TV, we can configure another device after it).
Don't forget that for other devices the whole process is done again, meaning the same encoding process is done from the beginning. It is worth noting that with this method, codes for TV and any device can be performed automatically.
As soon as our indicator lights up, we press SET. When you press the button, the light starts flashing, which means it is searching for codes.
- Then, press the red (power) button to turn off the TV... (logically, this entire process should have been done with the TV on and the remote pointed at it).
- This entire procedure must be done slowly and following all the steps.
After our TV has turned off, press the TV1 button to record the code. Then the indicator stops blinking and goes out, signaling that the remote control is configured.
If you were unable to program your remote control the first time, try again. Remember that “he who perseveres wins.”
You may also be interested in the article in which I explain how to fix your remote control.
Codes for universal remote control
These are the codes of the most famous and/or used home appliance brands in America and Asia. If you need a different brand, please let me know at x.
Steps to Program a Universal Remote Control with Codes
According to the list below, find the brand you need and enter the code of the device you want to configure. For example, if you want SONY TV codes: 000, 001, 012, 013, etc. Then follow these steps:
- Press the green button (SET) and keep it pressed. Then press the button to tune (TV1), (VCR1), etc.
- The LED will turn on instantly. Then release the two selected buttons.
- Enter the device numbers (for example, code 000 for SONY TV).
- If the code entered on the remote control is correct, the LED indicator will be charged automatically. If it is incorrect, the LED indicator will flash twice and remain on as at the beginning. If this happens, go back to step 3.
- Check whether the buttons on the remote control work or not. If the keys do not work correctly or the code is incorrect, try other codes of the same brand (for example, code 001, 012, 013... for SONY TV). Repeat steps 1 to 5 until you find the correct code and it works perfectly.
plantronics m70 factory reset
Note: During the setting process, if you want to cancel the operation, press the green (SET) button again.
If no key is pressed within 10 seconds, the remote control will automatically cancel programming.
Table of universal remote control codes for TVs
Citizen
Daewoo
Emerson
048, 054, 084, 097, 098, 100, 112, 113, 133, 134, 135, 136, 137, 138, 139, 141, 148, 157, 158, 169, 176, 177, 178, 179, 188, 195, 206, 209, 234 004, 014, 019, 034, 069, 086, 095, 099, 100, 107, 113, 157, 162, 164, 173, 176, 178, 179, 184, 188, 201, 203, 204, 207, 214, 224, 225, 238
Here we have audio equipment and DVD codes for universal remote control, also from the most famous brands.
source
TV remote control Rolsen
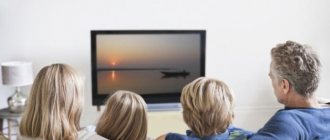
In recent decades, televisions have been produced with a remote control. The more modern the TV box model, the more versatile the included remote control. All control is done remotely.
What are Rolsen TV remote controls and more? Remote controls for Rolsen TVs are a plastic case with a remote control chip (remote control) hidden inside.
The remote control allows you to adjust the sound, switch channels, adjust brightness, select a channel display mode, run manual or auto search, and tune channels on a Rolsen TV.
All manipulations are performed by pressing buttons located on the remote control.
In addition to the standard, conventional control panel, each owner of Rolsen TVs can install universal remote controls to their TV. Like any non-native device, it needs to be configured. You will learn how to set up a universal remote control for a Rolsen TV by reading the article to the end.
How to choose a remote control for a Rolsen TV
Do you want to know which PU is suitable for your TV, Rolsen? The simplest option is when choosing in a store or online store, you can be guided by photographs of the model, and also look at the characteristics of the remote control device.
If you decide to simply replace the old regular remote control without buying a universal one, then the easiest way to choose the right one is to look at the serial number.
But if it is not visible on the body, what should you do? Look at the photos of the remote control, pay attention to the description of the buttons on the remote control and their location. They may differ, but the device series is right for you.
setting up tp link wa901nd router
In this video you will learn more about the remote control:
Settings
In addition to the usual remote control device, you can choose a universal remote control. It has a slightly different chip than a simple remote control. The microcircuit allows you to connect not one, but several devices to it.
Below, we will describe several ways to set up a universal remote control for a Rolsen TV. Here are instructions that are more suitable for models that were invented in China and also do not have manuals in Russian.
There are three ways to configure the UPDU:
- Hold down the SET (TV) key combination until the red LED lights up and click on/off (Power) once. After this action, enter the code of your TV, only after this the indicator fades out. If the LED goes off, click on the Mult button after entering the code.
- Press and hold the SET (TV) and Power buttons while entering the code.
- Press and hold SET (TV) until the red LED lights up, click on the Power button once, point it towards turning on the TV and click the Mult button.
Attention! To set up in the first two ways, you need to know the exact code of your television device. Sometimes one code works for several TVs. You need to look it up in the instructions or TV manual.
If you don’t know the TV code, then you can configure the PU without it. It will take a little longer. We turn on the TV. On the control panel, press the set (set up) button and wait for the sensor to turn red.
After this, we point the UPDU to the TV and turn it on by pressing the power button. We continue to wait for a reaction. It can be very different, sometimes there is a sound or image, switching channels, etc.
After the TV has responded, immediately press the mute button (the speaker is shown with a cross through it).
After a few seconds or minutes, the indicator will turn off. After all these processes, you can start using it.
Important! If you don’t know the four-digit number or are afraid to set up the remote control yourself, you can contact a consultant in the store who will provide assistance.
After proper setup, you can operate the remote control, turn it on and off, switch channels, and adjust the sound.
The Rolsen TV code is required to set up the remote control. What is a code? This is a unique number assigned to the TV. Using it you can install the remote control unit to the TV. Often a four-digit number from one company can match several devices from that company. To find the code for your device, look at the instructions or user manual.
source
Tips for choosing
Although a universal remote control is suitable for Rolsen TVs, as is the case with other models, it is advisable to use the recommended device. Therefore, you also need to look at how convenient the remote controls that come with the kit are. As for the screen characteristics, they vary quite a lot - both in diagonal and resolution. You should not choose a TV that is too large , because at close range the picture is unclear and your vision suffers greatly.
Of course, you need to make sure that the television receiver:
- fit into the design;
- had all the necessary connectors;
- demonstrated a high-quality picture and good sound;
- The size was suitable for the place where they were going to install it.
OLED technology, used in a number of models, can only be welcomed. It helps improve the picture and at the same time reduce visual fatigue. You should definitely be interested in the frequency and response time. These parameters are directly related to the technological level of the device. The higher the frequency and the faster the response, the better.
Rolsen TVs: features, models, setup tips
Rolsen TVs can hardly be called leaders in consumer demand. But still they find their buyer, who must know the key features of each model and brand as a whole. It is equally important to take into account the basic set-up and operation tips given by the manufacturer.
Installation and operating instructions
You can look at the instructions for a Rolsen TV using the example of RL-28D1309T2C . The manufacturer strongly recommends that this device be connected to a cable television network or connected to an outdoor (collective) antenna. Then the quality of the image and sound will be significantly higher than when connected to a conventional indoor antenna.
An adapter for CVBS connection must be purchased separately. Coaxial output is only suitable for DTV, HDMI devices.
Selecting a sound preset is done using the S. Mode key. The P. Mode option allows you to set the optimal screen parameters. You can also set the image to 16:9 or 4:3 format. Select one of the preferred channels using the FAW key.
Important: the power supply is designed for a voltage not lower than 100 and not higher than 242 V; If you deviate from these parameters, normal operation is not guaranteed.
Do not connect the TV to an outlet or section of the circuit where powerful electrical appliances are connected . The outlet must be grounded. Rolsen TVs can only be cleaned with a soft cloth. Are neutral reagents without abrasive properties applied to it? or they don’t apply anything. During viewing, the room should always be kept at a constant level of illumination, at least sufficient for reading a newspaper or magazine.
To watch digital TV programs on old Rolsen TVs, you must connect a receiver (modern models often allow you to do without it). The pin plug is connected to the tuner. The red-white cable is inserted into the audio input, and the yellow cable into the video input. Next, when setting up the TV, indicate the signal source. When setting up the tuner, indicate the direction of its transmission (the default HDMI option is not suitable).
The following video shows a presentation of the Rolsen LED TV.
We find our model and look at the third column, where it will be written whether there is a digital tuner. This is the easiest way to quickly check your TV.
The final stage of setup is working with image quality
Quite often there are situations when, after completing the search and settings of the program, they are broadcast in poor quality. In order to improve picture clarity and eliminate other defects, you can perform the following steps:
- enable the HD option in the settings;
- select the picture broadcast mode, for example, for Samsung and LG TVs, the “Cinema” mode is considered the best option;
- manually set the contrast, brightness and colors of the image.
As practice shows, you only need to spend time and effort once to understand the TV settings and compile a list of saved TV channels, in order to subsequently comfortably watch any films and programs, without being distracted by annoying little things and problems that can ruin anyone’s mood.
Source
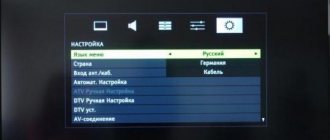
Setting up digital TV
There are two ways to configure channels.
- Automatic search.
- Manual search.
Auto channel search
- DTV mode by pressing the appropriate button or selecting Digital TV in the signal sources.
- Next, click on the Menu button.
- Use the left and right buttons to select Channel .
- Click on the Tuner and select the desired broadcast format, Broadcast to view on-air digital channels. For cable TV subscribers, you must choose Cable or DVB-C.
- In the Search DTV channel format we need - digital. ATV is analog, you can choose both options.
- We select the country Russia.
- Click on Autosearch, after which scanning will begin.
For cable TV there are a few more steps you need to take.
- Select Search Mode Full or Advanced. The last method is much faster, but you need to use it if you know the network parameters.
- Frequency.
- Modulation.
- Speed.
- You can obtain this information from your provider.
Setting up your Rolsen TV may take some time, so wait until the search is complete. Do not stop searching until the scale shows one hundred percent.
Manual setting
This is the fastest way to install channels. To use it, you need to know the frequencies of the multiplexes. You can view these frequencies on the RTRS website by selecting your locality on the interactive map of the region.
- Go to the TV menu.
- In the Channel item, select Manual search.
- Enter the frequency and click on Start, after that we save the found channels.
There are about ten TV channels in one multiplex; at the moment, only two multiplexes are broadcasting in the Russian Federation.
Setting up satellite channels
In general, setting up satellite channels is not difficult:
- We connect the TV and receiver using a special cable. We switch the TV to monitor mode.
- Using the remote control we set the satellite settings.
- In the menu we start scanning the satellite. The best option would be to use an automatic search, which will carry out all the necessary actions without user intervention.
- We edit the list of saved channels, remove from it TV channels that most likely will not be viewed by viewers;
When using satellite television, remember that deteriorating picture or sound may be caused by rain, wind or thunderstorms, which negatively affect reception conditions.
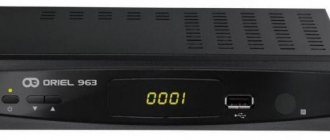
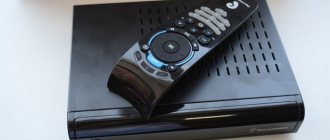
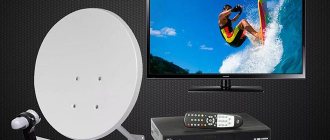
Connecting the set-top box
If your Rolsen TV does not support DVB-T2, additional equipment is required to view HD digital TV channels. The cost of a digital set-top box is about one thousand rubles. Price depends on additional features. Which you may not need.
- Disconnect the device from power.
- We connect the antenna to the set-top box.
- We take the PCA tulip cable that came with the set-top box and connect the set-top box and the TV according to the lights.
- Yellow is video, red and white is audio.
- After that, on the TV, turn on the AV video channel mode.
- We take the remote control from the console.
- We are searching for channels.
Often, user problems can be solved without calling a technician to your home. For your convenience, a consultation on setting up TVs has been organized.
Features of searching and tuning channels without a remote control
Don't panic or get upset if your TV remote control gets lost or stops working. You can cope with the situation and configure the equipment using control buttons, the functions of which are described in detail in the instructions for the equipment.
When setting up a TV without a remote control, consider the following nuances:
- The key is not available on all devices. Sometimes, in order to get into the settings, you need to simultaneously press the buttons that control the volume;
- To confirm the actions taken, you can use the “OK”, “” or “Vol+” buttons;
- On Sony brand TVs, you can start automatic search and tuning of channels by long pressing the “” button;
- Philips TVs cannot be set up without a remote control.
In recent years, Russians have almost completely abandoned conventional antennas, giving preference to more modern and high-tech receivers - special digital set-top boxes that receive signals from a satellite or via the Internet. Such devices operate similarly to smartphones or tablets: they have an operating shell (Android) installed, in which settings and work with channels were carried out using mobile applications. Users can download the necessary software from the PlayMarket store.
Remote control
The Rolsen TV remote control has the following control buttons:
1) Power button
turning on and off the TV standby mode 2)
Mute button
instantly mutes the sound, convenient when answering a phone call and other situations 3)
Button 0-9
buttons for selecting a TV channel 4)
Button Still
freeze frame in the mode of watching digital television or from an external signal source 5)
Return button
returns to the previous state
6) P.Mode button
selecting a picture mode 7)
S.Mode button
selecting an audio mode
Audio button
switching audio modes 9)
Menu button
calling the main menu of the Rolsen TV 10)
Source button
selecting an external signal source
11) Button
buttons for moving through the menu 12)
Enter button
enter, confirm 13)
Exit button
exits Menu mode 14)
Info button
information about the TV channel 15)
Ch+/Ch- button
selects the next or previous channel
16) Media button
USB mode 17)
VGA Auto button
automatically adjusts the image when connected to a computer 18)
Scale button
selects the aspect ratio of the image 19)
Vol+/Vol- button
increases or decreases volume 20)
Ch List button
channel list
21) Fav button
list of favorite channels 22)
Sleep button
controls the Rolsen TV sleep timer
Tuning in to TV channels
Initial setup of the Rolsen TV
Factory settings
If the problem persists after rebooting, perform a factory reset.
Note.
Performing a factory reset will erase all data and settings on the TV (for example: Wi-Fi and wired network settings information, Google account and other login information, Google Play and other installed applications).
Source
Butterfly "Butterfly"
You can enter the service menu as follows:
1. Set the volume to “0”.(required)
2. Press the “MUTE” button on the remote control
3. While holding the “MUTE” button, press the “” button on the front panel of the TV.
4. The letter “D” will light up on the screen in the right corner, and the adjustable parameter and its value will be displayed in the left corner.
5. Menu pages are changed with the “CAL” button. Parameters are switched using the green and red buttons on the blue field of the remote control. Parameters can be changed using the yellow and blue buttons on the blue field. Note: Do not change the values of other parameters unnecessarily, as this may lead to loss of factory settings. To avoid losing factory settings, it is advisable to first write down the values of all parameters on a piece of paper so that you can restore factory settings if they are lost.”
C1410, C1420, C2116, C2118, C2119 (dual chips with old TMP87CM38N processor)
C2112 FUNAI MK10 or you can enter the service menu only from a special service remote control.
C1420 processor boards CHO8T0934 5H32-3K49
volume to 0, press the “MUTE” button on the remote control
While holding down the “MUTE” button, press the “” button on the front panel of the TV.
The letter “D” will light up on the screen in the right corner, and the adjustable parameter and its value will be displayed in the left corner.
Switching parameters is done using the green and red buttons on the blue field of the remote control. Parameters can be changed using the yellow and blue buttons on the blue field.
output - Power off
C1455, C2156-C2159 TDA9381PS/N3/3
Entering service mode
•Login from the user console: press the [] button, the “Image” menu will appear on the screen. Press the number buttons [6] [4] [8] [3] on the remote control. To enter the M1 service menu
M4, press the corresponding number buttons on the remote control. To enter the M5 service menus
M0, you must first press the [CALL] button to exit menu M1-M4, the letter M will appear on the screen, then successively press the [LOCK] button (drawing of a suitcase with a handle) and one of the number buttons [5] [6] [7] [8] [9] [0] to enter menu M5
M0. If you are in any of the M5 menus
M0, then moving to another menu can be done without pressing the [LOCK] button, but only with the number buttons.
•In service mode, pressing the [-/-] button can enter BUS OPEN mode. Pressing this button again exits this mode.
C2910, C2519, C2988, C1410, C1420, C2116, C2118, C2119 (dual chips with new CHO8T0934 processor)
C21R21, C2121, C2190, C21R90, C1420 (single chip)
C1425
You can enter the service menu as follows:
1. Set the volume to “0”.(required)
2. Press the “MUTE” button on the remote control
3. While holding the “MUTE” button, press the “” button on the front panel of the TV.
4. The letter “D” will light up on the screen in the right corner, and the adjustable parameter and its value will be displayed in the left corner.
5. Menu pages are changed with the “CAL” button
Switching parameters is done using the green and red buttons on the blue field of the remote control. Parameters can be changed using the yellow and blue buttons on the blue field.
C2131, C2133, C2150, C2192, C2195
You can enter the service menu using one of the following methods
1.Using the service remote control
2. Briefly short-circuit pins 1 and 3 of connector X2 through a 2.2 kOhm resistor
3. Using a regular remote control, press the following key combination:
• reduce the volume to “0”
• press the "" button
• select the “suitcase” icon
• dial sequentially “5” “1” “7”
• press the green button
Exit from the service menu is carried out using the TV/AV button on the remote control. In this case, all service menu settings are recorded in EEPROM.
C1440, C2146, C2148, C2139, C2150SEZ
The “V+” button on the TV panel and the “0” button on the remote control in standby mode.
C2150Z Processor TDA9381PS/N3/1/1730 EEPROM 24C08
line transformer PET22-23C
the menu is similar to LG, enter the service menu: set the volume to “0”, turn off the TV in standby mode,
press and hold down the (V+) button on the TV panel, then press the “0” button on the remote control, hold down
buttons pressed until the brightness of the green LED increases.
The screen should display IF 38.0 saving settings using the TV/AV button on the remote control.
C2160, C21R65, C2165, C21R65
You can enter the service menu as follows:
PRESS THE VOLUME DOWN BUTTON ON THE FRONT PANEL OF THE TV, AFTER REDUCING THE VOLUME TO “O”, PRESS THE “DISPLAY ON THE REMOTE BUTTON” CONTINUING TO HOLD THE VOLUME DOWN BUTTON ON THE FRONT PANEL.
To exit the service mode, turn off the TV
C21SR80NT proc. TDA9352PS/N3/1/1683 Rolsen NTP2.1g
Put the TV into standby mode, then, while holding down the “Menu” button on the front panel of the TV, press the 0 button on the remote control. Output - TV
C21USR57NT, C21USR57S proc. TDA9352PS/N3/3 (TDA9352PXN 1.3e) (TDA9381 PXF 812.Od)
Put the TV into standby mode, then, while holding down the “Menu” button on the front panel of the TV, press the 0 button on the remote control. Output - TV
C2135
You can enter the service from a regular remote control.
You need to open the remote control; the contact pad closest to the microcircuit is not located under the button. If you jump it, the TV will enter service mode.
C1470 (S)(T), C15R80 (S)(T), C17R80 (S)(T), C2170 (S)(T), C21R70 (I)(T), C21R68, C21R80
Put the TV into standby mode, then, while holding down the button (in some versions of processor firmware, press the Volume+ button) on the front panel of the TV and press the 0 button on the remote control.
To remember the settings, you need to press the TV button and while holding it, disconnect the TV from the network.
Removing the lock: in the Functions menu, select the Lock item and dial 2 - 2 - I in sequence (white button)
Turning off HOTEL: in the Functions menu, select the menu item Indication, press and hold the Clock button until HOTEL OFF appears in the upper right corner.
C29SR45T proc. TDA9565
Put the TV into standby mode, then, while holding down the “Menu” button on the front panel of the TV, press the 0 button on the remote control. Output - TV
C29R25T proc. TDA9352PXN
Put the TV into standby mode, then, while holding down the “Menu” button on the front panel of the TV, press the 0 button on the remote control. Output - TV
C29R100, C29R140, C29R142, C29R148 (Rolsen 100 Hz models)
Service remote control for Rolsen 100 Hz is made from any RC-5 compatible (based on m/s 3010)
Entering service mode (perform sequentially):
1. Press the SVC button on the service remote control for 1/2 s (or close contacts 1 and 11 for the same time)
2. Press the “Ok” button on the remote control.
C72FDS107,109
First press the [PRESET] button, then [TEST] on the service remote control, the letter M will appear on the screen in the upper right corner. To exit the service mode, press the [TEST] button on the service remote control. You can also exit the service mode by pressing the [STANDBY] button.
Login from the user console: press the [] button, the “Image” menu will appear on the screen. Press the number buttons [6] [4] [8] [3] on the remote control. To enter the M1 service menu
M4, press the corresponding number buttons on the remote control. To enter the M5 service menus
M0, you must first press the [CALL] button to exit menu M1-M4, the letter M will appear on the screen, then successively press the [LOCK] button (drawing of a suitcase with a handle) and one of the number buttons [5] [6] [7] [8] [9] [0] to enter menu M5
M0. If you are in any of the M5 menus
M0, then moving to another menu can be done without pressing the [LOCK] button, but only with the number buttons.
In service mode, pressing the [-/-] button can enter BUS OPEN mode. Pressing this button again exits this mode.
D29R55 prot.TDA9365PS/N3/5
Put the TV into standby mode, then, while holding down the “Menu” button on the front panel of the TV, press the 0 button on the remote control. Output - TV
percent TDA9381PS/N2/2I1091 CH05T0102 EX-1A1, TDA9381PS/N2/2I1229 ROLSEN 1001001, TDA9381PS/N2/2I1373 ROLSEN 1001002
VOL = 0> mute(RC)+(FRONT)
C29SR157T plat perc. SDA555 Pro 1.4a
Input: Switch the TV to STBY and hold the button on the front panel of the TV and press the “0” button on the remote control
Exit: Turn off the power.
Source
Answers to questions on Rolsen TV
How to unlock parental controls on Rolsen C21sr68s
Is it possible to unlock the parental control code without the remote control? 11/10/2018, Yoshkar-Ola.
On the Rolsen C21sr68s plat TV, parental controls can be set and removed only from the remote control. The only possible option is to physically replace the memory chip, or flash it using a special programmer.
How to configure ROLSEN RP-32H10 without remote control?
I can't tune channels on my TV. Doesn't go to channel settings automatically. There is no original remote control, I bought it as if it were my own. Yes, it turns on, the sound, switching channels, everything works, but I can’t go into the channel settings. 09/09/2018. Bataysk.
On the body of your ROLSEN RP-32H10 TV, on the side panel, there are control buttons; settings can be made using the Menu, +/- Volume, +/- Channel and Source buttons. Unfortunately, replacing the original remote control does not always allow you to use all the standard functions, including tuning channels. You need to look for a new original remote control or try to repair the old one if it is still there.
DVB T2 is needed to receive analog and digital signals. Thanks to this, you can watch channels in high quality.
Preparing the TV
Before you start directly setting up channels, you should connect the TV to the broadcast source. With an analog signal, the cable from the antenna or cable television operator is connected directly to the antenna input of the TV (marked in the photo):
At the same time, it is worth separately considering the situation in which more than one TV is used in the apartment. In this case, a special antenna splitter is used for connection, which in most cases has two or three outputs:
How to tune channels from a regular antenna to several TVs?
People often complain that the channels on their TV in one room are worse than in another. Some of them are missing, and the rest have interference. This is due to an incorrect connection. It is important that both TVs are equidistant from the main cable. Otherwise, the one that is located closer will take over most of the signal. Also, to connect two or more TVs, you should use a high-quality cable that is better protected from interference. Therefore, a standard cheap cable, which is usually offered by many cable television operators, will not work here.
How to set up DVB T2 on your TV
The setup process is identical for most types of receivers. The buttons and menu sections, as well as the general window interface, may be different. But the algorithm is the same for all devices.
Connect to digital television and setup is easy. To do this, you just need to connect the cable to the required connector and configure the channels. If your TV model is outdated and cannot receive such signals, you will need to purchase additional equipment.
The TV has a connector for an antenna, a tulip connector, and a Scart (for audio and video). Instead of the latter, the device may have an HDMI port. This is even better.
With a dual connection via HDMI and tulip, you can switch the cable if necessary. But it is better to use HDMI for viewing as it guarantees good quality.
Reference! Also, when connecting, the distance to the tower transmitting signals is taken into account. To effectively tune the signal, you should install an antenna with a mounted amplifier on the street.
Rebooting the TV
- Restart the TV using the remote control.
Press and hold the power button on the remote control for approximately 5 seconds until the “Power off” message appears.The TV will turn off and turn on again after approximately one minute.
- Unplug the AC power cord.
If the problem persists after step 1, unplug the TV's power cord from the electrical outlet. Then press the power button on the TV, wait 2 minutes, and plug the TV's power cable back into the electrical outlet.
Clue
Your preferred settings and data will not be lost after rebooting the TV.
What difficulties may arise
There are times when it is not possible to set up DVB T2 reception. If there is such a problem, you need to make sure that there is no damage to the antenna. If it is intact, you need to check the direction. The antenna should be directed towards the tower. It is also necessary to install it outdoors; if you place it indoors, it will block the signal. If the user does not know where exactly the tower is located, torsion of the antenna will help. It must be moved very slowly and smoothly. As soon as the antenna makes contact with the tower, the device will work.
Attention! There are errors during the automatic channel search process. For example, the receiver found few channels or did not find them at all. A manual search will help.
It is also possible that the TV has found channels, but the quality of their display is very poor. This means that the antenna is turned towards the tower, but the contacts with it are bad. Try moving it a little. This problem can occur in bad weather.
Setting up DVB T2 on TV: step by step
To set up, we need a device called a receiver. It receives signals and transmits it to the TV. Signal sources: Internet, dish or antenna. The receiver is configured as follows:
- First you need to take it out of the box and remove the covering film. Failure to remove it will cause the device to overheat.
- Cut off the cable protection sheath. Its length is approximately 15 mm from the end. We clean the shell.
- We bend the protective film and screw ports F to the wires.
- We connect the cable to the receiver and TV.
- The tulip wires are inserted into the receiver and monitor ports.
- You can connect an antenna to the TV. It must be installed outdoors (house wall, balcony). Now you can start setting up.
Note! You need to be careful when stripping, as there is a risk of damaging the film covering the center conductor. It is needed for protection.
The setup is as follows:
- We are looking for a menu. There we go to settings.
- By default, the country should be specified. If not, we indicate it ourselves.
- We select the language, region, mode and search format.
- Set the signal format. Most often, DTV-T/T2 is placed at this point. This means that the TV can pick up both analog and digital signals.
- The process of searching for channels has begun. You don’t need to do anything here; the device will find all available channels on its own. The search can be interrupted at any time and continued later. If necessary, you can choose the manual channel search method. Standard means that the TV will find all channels that are not on the TV. Manually means searching only those channels that are needed. For example, a user only watches sports and does not need channels with cartoons and TV series. The manual search method allows you to ignore the latter. To implement this, you need to set a frequency that broadcasts channels in your area of residence. This can be found out from providers or on the Internet.
- Once all channels are found, or you decide to pause the search, click the save button so as not to lose the found channels.
When setting the DVB-T/T2 format, the receiver will find all signals available in the area where the user lives. But to do this you need to install an antenna and turn it towards the transmitter.
DVB T2 is needed to receive analog and digital signals. Thanks to this, you can watch channels in high quality.
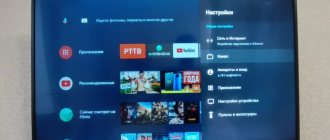
Setting up Smart TV on modern TVs
We live in the era of “smart” technology. Today, refrigerators, washing machines, dishwashers, and televisions have their own intelligence. The Smart TV feature is an innovative technology that is completely dependent on the Internet. It allows you to convert an ordinary TV into a full-fledged computer, with which you can make purchases in online stores, view news on information resources and enjoy your favorite programs in high quality.
Leading home appliance manufacturers create full-fledged operating shells for their smart TVs, while many other brands use Android, Linux and Windows for these purposes. You can configure TV channels on Smart TV using special applications.
How to set up DVB T2 on your TV
The setup process is identical for most types of receivers. The buttons and menu sections, as well as the general window interface, may be different. But the algorithm is the same for all devices.
Connect to digital television and setup is easy. To do this, you just need to connect the cable to the required connector and configure the channels. If your TV model is outdated and cannot receive such signals, you will need to purchase additional equipment.
The TV has a connector for an antenna, a tulip connector, and a Scart (for audio and video). Instead of the latter, the device may have an HDMI port. This is even better.
Setting up channels on older TV models
If desired, you can watch digital channels on an old TV; all you need to do is manually configure the TV receiver and connect a DVB-T2 set-top box to it. Perhaps the only drawback of outdated TV models is the small amount of memory for saving frequently watched channels; most often, you can add no more than six positions to this list.
To search for and configure older TV models, you can use not only remote controls, but also physical control buttons on the TV itself.
What difficulties may arise
There are times when it is not possible to set up DVB T2 reception. If there is such a problem, you need to make sure that there is no damage to the antenna. If it is intact, you need to check the direction. The antenna should be directed towards the tower. It is also necessary to install it outdoors; if you place it indoors, it will block the signal. If the user does not know where exactly the tower is located, torsion of the antenna will help. It must be moved very slowly and smoothly. As soon as the antenna makes contact with the tower, the device will work.
Attention! There are errors during the automatic channel search process. For example, the receiver found few channels or did not find them at all. A manual search will help.
It is also possible that the TV has found channels, but the quality of their display is very poor. This means that the antenna is turned towards the tower, but the contacts with it are bad. Try moving it a little. This problem can occur in bad weather.