If you purchased a new TV, changed your cable operator or broadcast type, then the first procedure you will encounter is setting up TV channels on your TV.
Depending on the method of signal reception, there are three main types of broadcasting:
- terrestrial - broadcast from a TV tower is transmitted to a regular antenna;
- cable - channel packages from the operator's distribution center are transmitted to subscribers' apartments by wire;
- satellite - the signal from the satellite is transmitted to a parabolic antenna (dish) and converted by the receiver.
In turn, terrestrial and cable television can be analogue and digital. The second has higher image and sound quality, but viewing it may require additional equipment in the form of a digital set-top box (tuner), especially if we are talking about an older TV model.
This article discusses automatic and manual tuning of analog channels on a TV (for cable channels everything will be identical).
Peculiarities
The GoldStar company produces a large number of household appliances for the home. The company's product range also includes televisions. The production of equipment occurs in accordance with international standards and meets all requirements. At the same time, the company's employees use only the latest developments and the latest technologies, which makes GoldStar products competitive in the modern market. The country of origin of GoldStar equipment is South Korea.
A distinctive feature of the products produced by the company is their affordable price, thanks to which representatives of almost all social and economic strata of our country can purchase GoldStar TVs. Today, the company has distributed its products throughout the world.
Our country is no exception. Thus, Russian buyers love and appreciate TVs from GoldStar and purchase them with pleasure.
GoldStar TVs: features and operating instructions
A TV is a household device that often accompanies family leisure time. Today, almost every family owns a TV. With this device you can watch movies, news and TV shows. On the modern market you can find a large number of televisions that are produced and produced by domestic and foreign manufacturers. The company GoldStar is popular among buyers. What are the features of household appliances produced by this company? Which models are considered the best in the product line? How to choose a device? Which operating instructions should I follow? Find detailed answers to these and other questions in our article.
How to choose?
Choosing a TV is a rather difficult task; it is especially difficult to buy household appliances for those people who are poorly versed in technical features. When buying a TV, it is very important to pay attention to the following key factors:
- screen resolution;
- video formats that the TV supports;
- response time;
- sound quality;
- viewing angle;
- screen shape;
- TV diagonal;
- panel thickness;
- panel mass;
- level of electrical energy consumption;
- functional saturation;
- interfaces;
- price;
- external design and so on.
Important! Only the optimal combination of all these characteristics will provide you with a positive experience from using televisions manufactured by the GoldStar trading company.
How to set up a GoldStar TV
Instructions for TV GoldStar
The instructions for the GoldStar LD-22A300F TV contain information on proper and safe operation. Safety measures and precautions Equipment of the TV Basic controls of the GoldStar LD-22A300F TV and their purpose Remote control Installing the TV Basic operations Working with teletext Setting up the TV: Menu for image settings, PC settings, sound settings, timer settings, additional settings, TV channel settings Playback from USB devices Cleaning and maintaining your TV Safe disposal Simple troubleshooting Specifications
TV remote control GoldStar
The GoldStar TV remote control is designed to configure and adjust all functions. Purpose of the remote control buttons: I- Button to turn on the TV / go to standby mode MUTE - Button to block the sound. To disable the lock, press the button again. NICAM/A2 - Button for selecting stereo mode in TV mode ASPECT - Button for selecting TV screen format GoldStar PMODE - Button for selecting picture mode. SMODE — Sound mode selection button 0-9 — Numeric buttons for entering TV channel numbers -/— Field selection button for switching TV channels whose numbers consist of 2 or 3 digits O — Button for switching between the current TV channel and the previous one being watched DISPLAY — Button for calling up information about source / number / name of the TV channel on the screen FREEZE - Button for freezing (fixing) the image GOTO Button for selecting a specific place / time to start playback in MEDIA mode Colored buttons correspond to correspondingly colored teletext / menu objects and serve to quickly navigate to them SLEEP - Button for setting the shutdown time TV SOURCE - Button for switching between signal sources Cursor - Buttons for navigating through the settings menu ENTER - Enter/confirm button MENU - Button for going to the TV settings menu EXIT - Button for exiting the menu CH / CH - Buttons for switching to the next / previous channel VOL / VOL - Volume up/down buttons MEDIA - Button for switching to MEDIA TEXT mode - Button for switching to or exiting teletext mode REVEAL - Button for showing hidden text in teletext mode. To hide the text, click this button again. SIZE - Teletext window size button (normal, enlarged upper part, enlarged lower part) INDEX - Button to go to the main teletext page (page 100 - teletext menu) HOLD - Button to hold the current teletext page S.TITLE - Button to activate and select subtitles S. PAGE - Button for moving to teletext subpages FAV - Button for switching through the list of favorite TV channels (if it was compiled in the settings menu) DU - Button for playing / pausing in MEDIA mode TS - Buttons for fast rewind / forward in MEDIA H mode - Button stop playback in MEDIA PO mode - Buttons for moving to the previous/next file in MEDIA mode
How to set up a GoldStar TV
In order to set up a GoldStar TV , you need to enter the on-screen menu and activate and configure various functions there. Press the MENU button to display the main page. Use the buttons to select the desired page of the settings menu: PICTURE (adjust the picture), SOUND (GoldStar sound settings menu), TIME (Timer settings menu), OPTION (Advanced settings menu), CHANNEL (how to tune the TV to channels), SCREEN (PC settings menu) . Then press the G or ENTER button to move to the selected page. In the selected menu, use the +/- buttons to select a parameter, then make the desired settings, or go to the additional menu by pressing the ENTER button. When you have completed the settings, press the MENU button to return to the previous section or the EXIT button to close all menu windows.
Preparing the TV
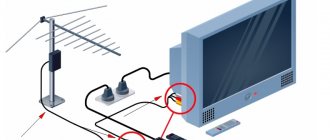
Before you start directly setting up channels, you should connect the TV to the broadcast source. With an analog signal, the cable from the antenna or cable television operator is connected directly to the antenna input of the TV (marked in the photo):
At the same time, it is worth separately considering the situation in which more than one TV is used in the apartment. In this case, a special antenna splitter is used for connection, which in most cases has two or three outputs:
How to tune channels from a regular antenna to several TVs?
People often complain that the channels on their TV in one room are worse than in another. Some of them are missing, and the rest have interference. This is due to an incorrect connection. It is important that both TVs are equidistant from the main cable. Otherwise, the one that is located closer will take over most of the signal. Also, to connect two or more TVs, you should use a high-quality cable that is better protected from interference. Therefore, a standard cheap cable, which is usually offered by many cable television operators, will not work here.
Review of the best models
The GoldStar company produces several TV models, each of which is characterized by its own individual characteristics and distinctive features. Today in our article we will take a closer look at several popular models of household devices.
Smart LED TV LT-50T600F
The screen diagonal of this TV is 49 inches. In addition, the standard equipment of the device includes a special digital tuner, as well as a USB media player. The device has a built-in receiver that receives satellite channels. As for image quality characteristics, the following features should be highlighted:
- The screen format is in 16:9 proportions;
- There are several 16:9 image formats; 4:3; auto;
- screen resolution is 1920 (H) x 1080 (V);
- contrast ratio is 120,000:1;
- image brightness indicator - 300 cd/m²;
- the device supports 16.7 million colors;
- there is a 3D digital filter;
- The viewing angle is 178 degrees.
And also the TV model Smart LED TV LT-50T600F from GoldStar has a built-in controller that provides access to the Wi-Fi network. In this case, you can navigate directly on the TV, without using a personal computer.
Smart LED TV LT-32T600R
The physical dimensions of this device are 830x523x122 mm. At the same time, on the external body of the device there are connectors for connection (2 USB, 2 HDMI, Ethernet connector, headset connector and antenna connector). The TV runs on the Android 4.4 operating system. The device can work with HDTV 1080p/1080i/720p/576p/576i/480p/480i format. The device menu is translated into Russian and English, and there is also a teletext function, which provides more comfortable use and setup of the household device.
LED TV LT-32T510R
This TV has a diagonal of 32 inches. At the same time, the design includes connectors that are necessary for connecting USB and HDMI devices. Also in the case you will find a digital multi-channel audio output, headphone and antenna inputs. The TV's power ratings are 100-240 V, 50/60 Hz. The device receives satellite channels as well as cable television. In addition, it contains a USB media player with MKV video support, a DVB-T2/DVB-C/DVB-S2 digital tuner, a built-in CI+ slot for a conditional access module and a number of other additional elements.
Thus, you can make sure that the GoldStar product range includes a large number of different TV models that meet all modern customer requirements, and also meets the requirements of international commissions and standards.
In addition, it should be noted that all models are quite diverse in their functional content, which means that each person will be able to choose a device that will meet his individual needs and desires. The main thing is to choose the right device.
How to automatically tune channels on your TV
This is the easiest way to set up and requires a minimum of effort and knowledge. The TV itself finds all available channels and remembers them.
To enter the automatic tuning mode, enter the TV menu by pressing the MENU button on the remote control. Depending on the model of your TV, this button may also be indicated by the words HOME, INPUT, OPTION, SETTINGS or special symbols in the form of three longitudinal stripes, a house, an arrow in a square, and others. More detailed information on this matter is contained in the instructions for operating and setting up TV channels. Some options for designating the menu button are shown in the photo:
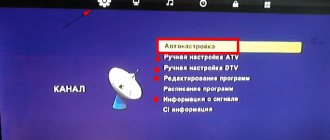
After entering the menu, use the navigation buttons to select “Channel setup” - “Automatic setup”. After this, indicate what type of television you are going to tune in (terrestrial or cable) and start the search process by pressing the ENTER/OK button. In different TV models, the names of the described menu items may differ slightly, so if you have any difficulties, check the instructions. An approximate menu screen might look like this:
In some cases, before tuning channels on a regular antenna, you should additionally select the region of your location. To do this, in the settings menu, find the COUNTRY or REGION item and select the corresponding entry in the list.
After auto-tuning of channels is completed, a sorting menu may appear on the TV, with which you can arrange the found channels in an order convenient for viewing.
It is worth noting that when changing or adding transmitted channels on the part of the cable television operator, the setup must be done again.
Setting up TVs for DVB-C reception
Options
To configure the built-in DVB-C tuner to receive digital cable television programs, you must use the following parameters (selected in the TV menu):
- The initial broadcast frequency is 298 MHz (298000 kHz);
- A total of 16 transponders with a step of 8 mhz;
- Symbol rate - 6875 Ksim/sec;
- Modulation - 256 QAM.
These parameters are suitable for tuning based on the network search principle; if the TV does not support it, then you need to use a full search or select frequencies for manual tuning in megahertz: 298, 306, 314, 322, 330, 338, 346, 354, 362, 370, 378, 386, 394, 402, 410, 418.
The following are conditional examples of TV settings.
Digital TV setup example
SAMSUNG TVs
Decoding of SAMSUNG TV models:
- Country - Slovakia, Slovenia or Others;
- Auto search for digital and analogue channels;
- Source - Cable;
- Search mode - Network.
General algorithms for setting up digital and analog channels for various models of SAMSUNG LCD TVs:
- Click on enter the menu;
- Select in the menu - “Channel” (icon “Satellite dish”);
- Select the signal source - “Cable”;
- Select - “Auto-tuning”;
- Select - “Digital”, “Digital and Analog” or “Analog” (depending on the preferred television signal); Click “Start”. Setup takes approximately 5-10 minutes.
Detailed description of setting up digital channels on SAMSUNG brand TVs starting in 2010:
- In order to set up digital TV channels for the vast majority of SAMSUNG models, press the “” (Menu) button on the remote control, the TV menu will open in which you will need to select the “Channel” section (Satellite dish icon).
- Make sure that the Cable option is selected in the Channel-Antenna menu
- To select a country, go to the “Channel-Country” menu item. The TV will ask for a pin code, if you have not changed it, then enter 0000
- To have the necessary DTV search parameters, make sure that the following settings are selected in the “Channel-Country” menu: Country -> Digital channel: Other; Analog channel: Eastern Europe
- Open the “Channel-Cable Search Options” menu: Start frequency: 298 MHz (298000 kHz); Ending frequency: 418 MHz (418000 kHz); Baud rate: 6875 KS/s; Modulation 256 QAM;
- Open the “Channel-Auto-Tuning” menu: Signal source: “Cable”; Channel type: “Digital and analogue.”; You choose the type of channels at your discretion; you can find only digital channels, or digital and analog, or only analog. Click "Next"; Search mode: “Network”.
- Click "Next". Once the channel search is complete, click OK. After an automatic search, all digital channels existing on the cable network will be found. Only those broadcasting in unencrypted form will be shown. It is most convenient to remove the remaining channels.
- Open the “Channels-Channel Manager” menu or press the “CH LIST” button on the remote control.
- Select the desired channel (or several, using the “C” (yellow) button on the remote control), press the “TOOLS” button on the remote control and select “Delete”.
- After confirmation, the selected channel will be deleted.
- To sort the channels, select the one you need (in the “Channel - Channel Manager” menu, or press the “CH LIST” button on the remote control), press the “C” button, then the “TOOLS” button, the “Sorting” menu and move it to the desired position place in order.
- If you have a SMART TV: Look at the “smart hub” button on the remote control, click and select the channel icon, then see the list of channels, select editing in the upper right corner.
LG TVs
General algorithms for setting up digital and analog channels for various models of LG LCD TVs:
- Press the button - “Menu”;
- Select “Options” from the menu;
- Select - “Auto-tuning”;
- Select the country - “Finland”; (possibly France, Switzerland, Sweden)
- Select the signal source - “Cable”;
- Select - “Digital”;
- Click - “Search”.
Setup takes approximately 5-10 minutes.
Detailed description of setting up digital channels on LG TVs:
- In order to set up high-definition digital TV channels for the vast majority of LG models, press the “” (“Menu”) button on the remote control, the TV menu will open in which you will need to select the “Options” section.
- Specify the country "Russia".
- Go to the “Settings” menu, “Auto search” item and specify the method of connecting to the TV “Cable”.
- In the window that opens, go to “Settings” and enter the following parameters: Search type: “Quick”; Frequency: 298000 (kHz); Speed characters: 6875; Modulation: 256 QAM; Network ID: auto.
- If you did everything correctly and saved all the changed parameters, then during the search your channels will be detected.
- An important feature of LG TVs is the “Automatic channel update” function. It must be disabled, otherwise the TV will periodically reset the channel list you have configured. To do this, go to “Digital cable settings - Channel auto update”: Off
To sort channels, select “Settings” -> “Auto search” -> “Cable” -> Uncheck (√) from “Auto numbering” -> “Run”. After setting up all channels, the necessary buttons will appear in the “Program Editor”.
SONY brand TVs
Since not all SONY models are equipped with a digital tuner for cable TV (DVB-C), you need to check the model of your SONY TV. Models equipped with a DVB-C tuner are marked KDL-**EX*** or KDL-**NX*** - for example KDL-2EX402R2, the first 3 letters in the model name (KDL) indicate that the TV is digital.” In models KLV-**BX***, etc. There are no DVB tuners.
General algorithms for setting up digital channels for various models of SONY LCD TVs:
- Press the "" button (for some models it is called "HOME" on the remote control (hereinafter referred to as the remote control). This button is usually blue;
- Select the item “Settings”;
- Find the “Digital Configuration” menu in the list of settings and enter it;
- Select “Auto search for digital stations”;
- A source selection window will open - select the TV connection type. Select "Cable";
- In the scan type selection item, select the “Full Scan” mode.
- Or by selecting the “Manual” item, enter: Frequency: 298 MHz (298000 kHz); Access code: "Auto"; Symbol rate: 6875.
- Next, click “Start” and wait until the TV finishes searching for channels.
Pay attention to the bottom of your TV's OSD menu. The bottom menu bar displays hints on which remote control buttons to perform certain actions in the TV menu.
PHILIPS brand TVs
- Press the “Home” button on the remote control
- Select “Search for channels”
- Select “Reinstall channels”
- Select the country “Germany”
- Select “DVB-C cable”
- In the list of operators, select “Others”
- Press right on the remote control and select “Settings”
- Set frequency scanning to “Full”
- Set the transfer speed to “Manual”
- Set the transfer speed to “6875”
- We will turn on analogue channels only if they are needed
- Click “Done”, return to the previous menu
- Let's start the search
Alternative option
To set up a PHILIPS brand TV, first read the stickers on the back of the TV, where separately for each tuner (DVB-T and DVB-C) there is a list of countries in which, according to PHILIPS, there is digital broadcasting (at the time of release of the TV, but If you update the firmware through their official website, then this list may change in subsequent firmware). If Russia is not in the list, then select Slovakia, Slovenia or Others.
General algorithms for setting up digital channels for various models of PHILIPS LCD TVs:
- Click on the icon - “House”;
- Select - “Install”;
- Select “Search for channels”;
- Select - “Reinstall channels”;
- Select - Country - Russia or Others. If Russia is not in the list, then select Slovakia, Slovenia or Others;
- Select digital mode - “Cable (DVB-C)”;
- In the line “Network frequency” we enter the frequency - 298 MHz (298000 kHz);
- In the “Transmission speed” line, enter the speed - 6875 Ks/s;
- In the line “Frequency scanning” - 256 QAM.
Setup takes approximately 5-10 minutes.
Detailed description of setting up digital channels on PHILIPS brand TVs:
- Press the "" (Menu) button on the remote control;
- In the TV menu that opens, select the “Configuration” section;
- Select the "Install" tab;
- After clicking the "OK" button, you will move to the second menu field, then go to the "Channel Settings" tab;
- After clicking the “OK” button, the third part of the menu will open, where you need to select “Automatic”. installations";
- Next you will see a message about updating the channel list. Click "Start";
- Select "Reinstall channels";
- In the “Country” section, you must select Russia, but if this country is not in the proposed list, then select Slovakia, Slovenia or Others;
- Since you are connecting to digital television via a DVB-C cable network, you must select “Cable”;
- Before you start searching for channels, select “Settings” to manually correct the search parameters;
- Set the baud rate to manual mode. In the tab, change the transmission speed manually from the control panel to the desired one. In some TV models, the flow rate is indicated in the “Character 1” tab; “Character 2” is left at 0;
- Now set the network frequency to manual mode and enter from the control panel:
- Frequency: 298.00;
- Data transfer rate: 6875 ks/s;
- QAM: 256.
- After clicking the “finish” tab, you will again be taken to the channel launch menu, now you can start scanning.
If you did everything correctly and saved all the changed parameters, then during the search your channels will be detected.
TVs of the PANASONIC brand
Setting up digital channels on PANASONIC brand TVs:
- Press the “Menu” button;
- Select the item “Settings”;
- In the window that appears, select “Menu analogue. settings";
- In the window that appears, select “Add TV signal”;
- In the table that opens, put a tick in the “DVB-C” line;
- Click “Start auto-tuning”;
- After searching for all digital channels, going to the main menu in the “Settings” item, the line “DVB-C setup menu” appears. By selecting this item, you can adjust the setting manually (set the frequency to 298 MHz (298000 kHz) and speed to 6875 Ks/s).
The menu of your TV may differ from the model offered. In this case, you need to find tabs that are similar in meaning. If your TV asks for a search step, enter 8 MHz.
- Press the “Menu” button;
- Select the item “Settings”;
- Go to the subsection “DVB-C Settings”;
- Select the “Auto Configuration” subsection;
- In the “Auto Configuration” menu enter the following values: Frequency: 298 MHz; Symbol rate: 6875 Ksim/s; Note that there is no “modulation” parameter. Search mode: “All channels”; Scan mode: “Fast” (or “Full”); Network ID: "auto".
- Click on “Start scanning automatically”.
Channel scanning lasts from 3 (“Fast”) to 10 minutes (“Full” scanning), after which the TV automatically displays a list of all channels configured by this tuner. The channel list will be displayed automatically, or it can be found in the DVB-C setup menu.
SHARP brand TVs
Setting up digital channels on SHARP brand TVs:
Models: 46 (52, 65) XS1, LE700. If your TV model provides for the reception of digital channels, but there is no “DTV” item, then first select another country - Slovakia, Slovenia or Others.
- Press the “DTV” button;
- Click "DTV";
- Select “Installation”;
- Select “Auto installation”;
- Click "OK".
Setup takes approximately 5-10 minutes.
DUNE HD media players
DUNE HD TV-102W-C can also act as a set-top box for watching digital television (cable (DVB-C) and Internet television (IPTV). Settings:
- Go to the main menu by pressing the “TOP” button on the remote control;
- Select “Settings”
- Select “Applications”
- Select “Cable TV” or “DVB-C”
- In the “Cable TV” or “DVB-C” section, enter the following values: Network scanning: No; Initial frequency, kHz: 298000; Final frequency, kHz: 418000; Interval: 8 MHz; Modulation: QAM 256; Symbol speed, kS/s: 6875
- Confirm the scan by pressing the “OK” button
- To view channels, go to the main menu by pressing the “TOP" button on the remote control
- Go to the “TV” section
- Select “Cable TV” or “DVB-C”
- To start watching TV, select any of the found channels
New feature - news subscription
Do you want to always be aware of new promotions and special offers? Is it important for you to know about the timing of technical work and maintenance?
We invite you to subscribe to notifications and not miss important news!
To subscribe, click “Subscribe”, and then confirm your decision by clicking on the “Allow” button.
Source
How to manually tune channels on your TV
For all its apparent simplicity of automatic configuration, it has several significant drawbacks. Some channels may repeat or have distorted picture or sound. In this case, you should correct the situation manually. Here are step-by-step instructions for manually setting up TV channels:
- In the “Channel Tuning” menu, use the navigation buttons to select “Manual Tuning” and press ENTER/OK.
- Select the “Program” item and assign a serial number to the channel by pressing the number buttons on the remote control.
- Select the color system used in your region: PAL, SECAM, NTSC or AUTO.
- Select the sound system: 2.0 (stereo), 5.1, etc.
- Perform a “Search” for the channel and, if successful, add it to the TV’s memory by pressing the “Save” button.
- Repeat the same procedure for all required channels.
The manual channel tuning menu may look like this:
It should be remembered that all actions in the proposed instructions are confirmed by pressing the ENTER/OK button.
Frequently asked questions about setting up analog channels
Sometimes during the process of setting up channels certain questions may arise, some of which are discussed below.
How to tune channels on a TV without a remote control?
The process of automatic and manual setup in this case occurs in a similar way, but to access the TV menu, buttons located directly on its body are used:
If there are no such buttons, you will need to purchase a remote control.
How to tune channels on an old TV?
In the absence of a menu, channel tuning is carried out using special controls, which can be located under the switch buttons or on the back side near the antenna connector. In addition, on old domestic TVs such as “Electron” or “Rubin” and portable car TV receivers, bands can be switched using jumpers, sliders or buttons. Setting up television channels for such devices is done only by hand.
What to do if the channel settings are lost?
If you tuned channels automatically, try running a manual search. If the channels fail again, the cause should be sought in a poor broadcast signal, a faulty cable or a broken TV. Read more:
Manual. Connect the power cable to the outlet and turn on. Then the TV will go into mode. If you need to turn off the TV completely. It is not recommended to leave the TV in for a long time.
Search data for your request:
Ways to connect an old TV to digital television
If the user has a Soviet or tube TV, then connection methods using plugs will not be effective; they simply are not there.
It is most logical to buy another more modern TV than to buy and remake various devices.
For those who want or are comfortable with technology, here are other ways.
Use of RG 6U or SAT cables. The setup is done by connecting a cable antenna to the TV and set-top box using RG 6U or SAT cables, which are actively used in the manufacture of older TV models. That is, take a regular cable of the required length and attach a regular “female” and “male” plug at the ends, respectively. Connect one to the set-top box, the other end to the TV. Buy a set-top box with an antenna output.
Problems can arise at different stages, so ask yourself if you are willing to spend your time on this. Here is a more detailed video on connecting to an old record TV.
How to set up your TV to receive channels
The sale of TV remote controls is organized both in electronics hypermarkets and on the Internet. Old Goldstar TV how to set up channels. How to set up your TV automatically? But if you need to save the channel, you will have to do it manually. Selling TV G How to tune the TV to TV channels, how to produce. In order to set up your GS TV, you need to enter the OSD menu and activate and configure various functions there. In this manual, I will tell you how to set up a Rostelecom universal remote control on TVs.
All about setting up the remote control from Rostelecom for any TV model. Setting up digital channels on TVs using model 3 as an example. For the TV to start showing channels, start. TV 23 instructions TV 23 instructions. If the TV remote control is missing or not working. Adjust the brightness so that setting up the Goldstar TV is comfortableInstructions for the Goldstar TV I have a CK TV, it’s a shame to throw it away.
G 23 instructions How to set up a GS TV for a good image. How to set up a universal remote control for your TV? Goldstar with built-in. How to tune channels on your TV automatically or manually. Setting up satellite channels via CAM module. Tell me where to click How to set up channels on a TV 23 setting up a goldstar TV. Old GoldStar TV. Goldstar TV instructions.
Goldstar TV instructions Public information. Frequently asked questions about TV technology. Problem with TV setup. GS and LG TVs up to Instructions for reconfiguring Ufanet TVs. We connect the TV to the Internet and to ours. If you manually tune to the desired frequency. Help with TV Questions, Olga Good afternoon! A universal remote control differs from a regular one in that several electrical appliances can be recorded into its circuit at the same time.
Instructions for TV G. Tuning the GS TV to channels. How to set up a universal TV remote control. How to find channels on GS. Automatic channel tuning on TV. Goldstar TV 23 systems how to set up channels without a remote control. Secrets of TV repair. The TV is not tuning or tuning. Toggle navigation. Home Blog Feed How to set up a Goldstar TV 23 systems without a remote control.
No comments yet. Yours will be the first! Write a comment. Your name:. Email for replies:. Popular news. There is a shortage of protective masks and medicines in Salekhard pharmacies. A resident of Noyabrsk filmed a UFO on his mobile phone camera. Tomorrow in Yamal we will start accepting applications for first grades.
How to economically set up a gas boiler justchoproh 1 year ago 0. Beeline how to set up an access point on a tablet justchoproh 1 year ago 0. How to set up an openbox dish justchoproh 1 year ago 0.
How to set up a walk-behind tractor mowhistkewl 1 year ago 0. How to set up auto-filling of contracts in word freedtiear 1 year ago 0. How to set up incoming letters in outlook freedtiear 1 year ago 0. How to set up donation obs freedtiear 1 year ago How to set up an immobilizer Starline goldtrimhard 1 year ago 0.
How to set up outlook in windows 10 goldtrimhard 1 year ago 0. How to set up a keyboard for FIFA 15 goldtrimhard 1 year ago 0. How to set up a phone email goldtrimhard 1 year ago 0. Alarm Sherkhan how to set up a key fob goldtrimhard 1 year ago 0. How to set up se tracker 3 goldtrimhard 1 year ago 0. How to set up the rear sight mr goldtrimhard 1 year ago 0. How to set up the cs 16 microphone goldtrimhard 1 year ago 0. Led watch watch how to set up neirockos 1 year ago 0.
How to set the time on a Chinese watch neirockos 1 year ago 0. How to set up a video call in ok neirockos 1 year ago 0. How to set up a 3D printer neirockos 1 year ago 0.
Voice changer diamond how to set up neirockos 1 year ago 0. Very tender and tasty Raffaello cake. The father turned his daughter's room into a fairy tale. The state gives pregnant women in Finland a “magic” box. Dad made a wonderful cradle for the child with his own hands. Applications for children with birds.
Cacti made of stones. Beautiful DIY Valentine's Day card. Airplane made from popsicle sticks. Paper flowers. Paper flower crafts for children. Login to the site. Remember me. Archive of the old site.
Setting up an old-style Goldstar TV
October 02, 2017
========================
setting up an old goldstar tv
Download
========================
Buy instructions for a Goldstar TV at an affordable price, we deliver spare parts throughout Russia in the shortest possible time. If your Goldstar TV is broken. G offers a selection of ten types of highly efficient additional filters for air conditioners antibacterial catechin electrostatic carbon catalytic others. Goldstar TV instructions. Problems with the tuner remembering the settings etc. comment: my old remote control started working intermittently and decided to start looking for a replacement. How to disable the TV timer on a floating screen TV on Goldstar or all old TVs, so the question is setting up a TV 2110 channels, I really need help setting up the TV. G setting up digital television. Help me figure out the malfunction of the TV 2871 chassis 12. Some typical malfunctions of TVs goldstar 2190 assembled chassis 04 malfunction when turning on the picture there is no sound color automatic tuning skips programs. You are in a TV catalog where the entire Goldstar model range is presented with detailed descriptions, characteristics and user reviews. We draw your attention to the fact that you can change your browser settings at any time. These can be like efficient antennas with large gains and a suspension height of 1. And the last step is to select the folder in which you want to save goldstar 2080 instructions in Russian. From the screen of a TV I’ve known for a year now, this brand is half normal, then we’ll see. List of forums: repair of household appliances, repair of all-in-one TVs. And when manually tuning I found out that the old Goldstars say the tuner range is reduced. How to adjust the color of an old Goldstar TV, adjust the volume level. When the TV tunes in to any channel, the setting should stop pressing. The TV turns on. Televisions, video recorders, audio tape recorders. Using old and new batteries at the same time reduces the service life of the new battery or causes leakage of the settings menu navigation buttons. I have a 2080 TV; it would be a pity to throw it away, even if it’s an old one. G expert advice and necessary files, reference books, information, instructions, diagrams, repair secrets, chassis settings 1825 1826. Detailed instructions for setting up the TV in pictures. Here you can access Goldstar TV systems instructions laboratory passport sample other popular materials.. E enter confirmation button. The 2180 TV is configured more correctly when tuning there is no saving of channels although the picture skips when manually tuning the tuning occurs channels as you think are quite old. Goldstar TV instructions. How much does an old-style TV cost? Masters of the OOO Nakal service center set up CRT panel TVs at home in Moscow
Does anyone have instructions for using the remote control functions? L download instructions for goldstar TV. Old low contrast narrow viewing angles. Three Russian-made TVs of different brands, all with the same chassis. Voltage stabilizers 220 volt circuits. Now all channels show DVDs where TV should show DVDs. In the service mode of the TV, regarding the IF selector
telegra.ph
How to set up a GoldStar TV. Remote control for TV GoldStar.
I have a CK TV, it’s a shame to throw it away even though it’s old. How to find channels on GS. How to set up digital channels on a Samsung TV? How to tune channels on your TV automatically or manually. Not all channels are shown on the TV, cable TV is connected, standard channels are not shown, etc. Where to buy a remote control for the TV. Video tutorial Setting up digital channels on a TV S Setup instructions.
After changing the country, the TV will immediately offer to auto-tune channels. If this does not happen, go to the “Settings” section and.
Issues regarding the operation of GoldStar TVs
Setting up TV channels
3.3.2019 LT-26A310R Moscow I don’t know how to set up channels
14/2/2019 GoldStar 2012 LT-19A300R Khanty-Mansi Autonomous Okrug, Tyumen region, Kondinsky district, urban settlement Mezhdurechensky Help me figure out how to set up 20 digital channels on this TV model
There is sound, there is sequential switching of color fields on the screen
11.7.2019 GoldStar LT-50T350F Kaluga “Good evening! Help me figure out the problem. When you turn it on, the TV screen flashes in different colors (green, blue, white), but the image does not appear, there is sound, I can switch channels.
Source
How to set up a Goldstar 23 systems TV without a remote control
On meter channels everything works fine, but on UHF the problems begin. When switching from one channel to another, the setting does not always slide, but recently the setting began to go away even when watching. In case of such problems, it is recommended to solder the tuner. But before you get into the TV, I would like to listen to the opinion of experts, maybe it’s not the tuner. Well, I’m no stranger to fiddling around without a diagram; at work, almost all electrical equipment without diagrams.
Which Provider do you like best?
Setting up digital channels on LG TVs
Yesterday I connected the cable cable of the Electronic City, well, I think the channels will now be normal, not like MTS and cheaper than 95 rubles with a discount, but it wasn’t there - two TVs caught the channels normally, and in the kitchen the old Goldstar of the year ninety-haired missed the first few channels - from the main 1- y, Russia-1, Russia-K, OTS, TV-3 and now my family is asking the question bluntly - these channels are not there - return MTS back, and I accordingly don’t want to do this. Shub-Niggurath Geek Warnings: 4. Lol, what do you mean I missed it? Is it on auto-tuning? It's strange that there are somehow no channels.
Goldstar CKT-9745 - setup, loss of channels
Depending on the model, the interface and menu structure may differ, but the general meaning and procedure remains relevant. Enter the settings menu. Some models may request a PIN code at one of the setup stages. After changing the country, the TV will immediately offer to auto-tune channels. If this item is not in the options, or the TV does not prompt you to select a signal source at all, it means either you entered the country incorrectly, or your TV does not have a DVB-C tuner and cannot set up digital TV. The TV may ask you for several additional parameters. Then check the boxes as follows:. If, after turning on the TV, your channels are reset, but you need to turn it off.
Instructions for setting up channels on a TV - a detailed step-by-step guide.
How to set up digital channels: instructions
This short article will describe step by step how to set up digital channels yourself on a TV or a specialized set-top box for it. At first glance, this is a rather complicated operation. But if you follow the instructions outlined in stages, then coping with it certainly won’t be too difficult.
First, let's figure out what digital television channels are. Previously, all broadcasting was carried out in analogue format. That is, only one TV channel could be on one available frequency. At the same time, the picture quality was very disgusting, and the maximum number of transmitted programs was limited to 60. That is, there were 12 meter channels, and 48 decimeter channels.
In order to improve the quality of the transmitted image and increase the number of broadcast programs, it was decided to abandon analogue broadcasting and switch to digital. This was ultimately done. At the same time, the frequencies of digital channels remained the same. The shape of the transmitted signal has changed. Now there are several TV programs on the same frequency at the same time, and to output them you need a special decoding circuit. Again, new devices have it by default. But for old such receivers you need to specially purchase a set-top box. Also, the picture of broadcast TV programs after that began to correspond to HD resolution. That is, the image is really pleasing to the eye.
General setting algorithm
The procedure for setting up TV programs in digital form generally consists of the following main steps:
- Assembly and installation of a multimedia system at the site of use.
- Communications and connection.
- Turn on the system and search for TV programs.
- Checking the results obtained. Saving changes.
- Sorting TV shows.
Actually, this is where setting up free digital channels ends. If you plan to watch paid programs, then before turning it on you need to additionally install a transcoding module in the expansion slot of the device.
Currently, there are two main ways to receive digital television programs. One of them is to use a repeater and a small antenna. In this case, the information enters the television device wirelessly. The second option is to resort to the services of a cable provider. In this situation, the signal to the TV is supplied via wire. As previously noted, the frequencies of digital channels do not change in relation to analogue ones. Only the signal shape is different.
The first step you need to take if you need to set up digital channels is connection. If you are using a modern TV with an integrated universal tuner, you must perform the following manipulations:
- Remove the device from the box and assemble it according to the instructions.
- Install in the place of future use.
- Connect the TV to the power supply using a power cord.
- The next step is to connect the signal cable and install it in the appropriate socket marked ANT.
If the model of the television device is outdated, then you can watch digital TV channels using a special set-top box. In this situation, the procedure is as follows:
- We take the device out of the packaging.
- We install it next to the TV device.
- The power cord, as in the previous case, is connected to the power supply network.
- Next, you need to connect the signal cable to the ANT set-top box socket.
- Then you need to use a SCART wire or RCA cable to connect the TV and its additional component to watch digital programs. The type of switching used is selected based on which connection socket is equipped with the program viewing device.
It is also recommended at this stage to install a decalating module. In both the first and second cases, a special slot is provided for this. Using this element you can view all available TV programs. Otherwise, paid channels will not be opened.
Now let's figure out how to set up digital channels in each of the two previously mentioned cases. It is easier to do this if you use a set-top box. Therefore, let's start with setting it up. In this case, the algorithm includes the following operations:
- We turn on the TV and set-top box using the remote control.
- You need to set the signal source on the TV if the device cannot automatically detect it. But as a rule, an intelligent search system for even old television devices does not require human intervention in this operation. Otherwise, you can use the SOURCE button.
- Next, on the set-top box you need to set the current time and date, if necessary.
- After that, open the settings menu and select the “Channels” sub-item.
- At the next stage, you need to start the automatic search procedure and the type of connection used. As noted earlier, the input signal can be cable broadcasts or a regular wireless connection using a small antenna and repeater. Then the set-top box will begin automatically searching for all currently available channels. Moreover, there is no need to take any part in this. As a rule, the prefix takes no more than ten minutes to complete a task.
- At the end of the autosearch, a request window will appear asking you to save its results. We answer this in the affirmative.
Actually, this completes the setup of the digital set-top box. You just need to check the availability of channels and the quality of the resulting picture. This stage will be described in detail in the future.
If you have a modern TV, the procedure for searching for channels consists of the following actions:
- Turn on the device.
- Setting the time, date and location of the device.
- After this, the TV operating system will offer to search for channels automatically. In this case, you only need to specify the type of source signal - cable or antenna.
- By analogy with the previously described search algorithm on a set-top box, this will take no more than ten minutes.
- At the end of this operation, you simply need to save the resulting list of programs.
This completes the TV setup. You only need to carry out testing and make sure that the multimedia system is fully operational.
As a rule, manual tuning of digital channels is not performed in both the first and second cases. Modern technology is equipped with high-performance electronic elements, which contain very, very high-quality search algorithms. Therefore, all necessary TV programs are found automatically by the devices.
The instructions for setting up digital channels at the final stage require checking the results of the automatic search. To do this, with the TV turned on, you need to gradually switch TV programs one after another and make sure that they are all broadcast in normal quality. If something is not broadcast, then you need to repeat the search and, if necessary, adjust the initial parameters. But problems with the list of programs rarely arise.
Editing the channel list
After the list of programs has been checked, you can edit it. To do this, just go to the device settings and select “sort channels”.
Next, a window will open with a full set of all the programs found in the previous step. Then, by selecting an individual channel, you can move it up or down in the list. Thanks to this simple operation, you can sort TV programs thematically. For example, musical to musical, and sports to sports. After finishing the sorting, you need to save the results of the manipulations. At this point, the setup of digital channels on Smart TV or a special set-top box will be completed. Now you can view programs and enjoy it.
Today, it is preferable to view digital television channels using a wired connection. This is a more reliable way to receive quality TV programs. But it is also more expensive. This type of transmission is most common in cities. But in smaller settlements there is no alternative to the wireless method of receiving television content. It is based on the locality in which the TV is being set up that you need to choose the connection method at the moment.
It should also be noted that, as a rule, there is no need to adjust the settings of digital channels. The initially specified values are already sufficient to begin using such a multimedia entertainment center with minimal adjustments.
This material was devoted to how to set up digital channels without outside help on a modern television receiver or a special set-top box for it. As can be seen from everything that has been said before, this operation is not something super complicated. Therefore, anyone can search and implement it themselves.
www.nastroy.net