Today, many providers offer subscribers to connect to digital cable television. This broadcast format gives the subscriber a lot of useful opportunities. Its main advantage is a very high-quality picture and image on the screen. The user can connect cable television through a digital set-top box or without it independently. We are talking about installing a wired network in an apartment. The connection diagram can be as complex as you like.
Advantages of cable digital television
Digital television is the latest development, with the help of which the user receives high-quality images and clear sound on his TV. Using this type of broadcasting, TV channels can be viewed in high HD quality.
The operating principle of the system is very simple. Manufacturers send the signal to the TV in encrypted form, and a special set-top box decrypts the image and transfers it in high quality to the TV screen. Digital TV is similar in principle to the connection between the Internet and a home computer.
Thanks to compression technology, producers can send more television programs to customers. But this is not the main advantage. Thanks to the introduction of digital TV, the functionality of the TV was expanded. Using technology, the user can pause his favorite TV program at any time or record data, sending it to the hard drive storage, in order to watch the program or movie at a more convenient time.
Main advantages:
- High picture quality.
- Clear sound.
- Media content in HD format.
- You can install different language versions of the same program
- Blocking unnecessary channels.
Setting up an old TV model
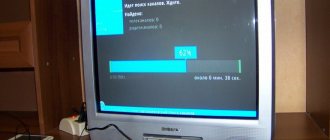
On an old TV without a remote control, settings are made using special controls located on the panel under the channel switching buttons. As a rule, in such models a drawer is pulled out where channel frequency controls are located - with their help, the TV is tuned to all active channels. Adjusting the image of an old-style TV is done only manually using the rotary control on the front panel; there are also similar volume and brightness controls.
Often, a TV configured in this way needs to be manually adjusted when turned on again, since they do not have a storage system.
What you need to connect digital TV
Full list of equipment:
- Cable antenna. If the tower is located close to home, then it is not necessary to spend a lot of money on purchasing the most modern models. An ordinary indoor antenna will do. If cable TV is connected to an apartment building, you will not have to buy an antenna. It should already be on the roof and set up by the cable signal supplier.
- Cable signal amplifier. If previously you had to use an amplifier to receive channels, you will also need one if you connect digital television. A high-quality device will provide good signal reception, even if the TV is very far from the tower. In order for cable channels to be shown without interference, it is advisable to purchase an amplifier with a 12 V power supply. But manufacturers sometimes reduce this voltage to 5 V. You need to find out such nuances by reading the instructions for your equipment. If there is no signal on the TV, then an amplifier is needed.
- Tuner. To receive a high-quality picture, you must use a special cable receiver. On modern models it is already installed in the TV. If this is not the case, you will have to purchase a special set-top box with a remote control. They also buy a special tuner for new TVs, connecting to a specific operator to get a larger number of channels.
- Cable. A modern cable is used to connect the antenna and cable TV. If your TV is a model, you will need RCA or S-video connectors. For modern devices, the preferred option is HDMI. It is important to clarify that when connecting via an RCA connector, good HD image quality cannot be achieved. The picture will be the same as with analogue television broadcasting. To improve the TV signal, if there are no HDMI inputs on the TV panel, you will need to additionally buy special adapters.
Necessary equipment
To watch digital broadcasting, as opposed to analogue, you will need a receiver that decodes the signal. Many modern TV models (Philips, Samsung, Sony, Toshiba, LG, Panasonic, etc.) are equipped with such a unit. To make sure of this, you should refer to the user manual, this brief instruction is included with each product. At the same time, check whether the built-in tuner supports the DVB-T2 format; if not, you will need to purchase a receiver.
Receiver Supra
Depending on the set of functionality, the cost of such a device can vary from 800 to 3000 rubles. Note that many digital cable television providers provide receivers for rent to subscribers.
In addition, we will need to receive a digital signal. In cities and large towns this will not be a problem; just contact your local providers. Residents of rural areas will need to install a UHF antenna or satellite dish. The latter is preferable, since it is not a fact that your home is within the coverage area of the nearest digital repeater. In addition, the option with a satellite dish provides a wider selection of television channels.
Cable TV connection process
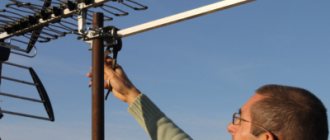
In order for the TV to receive a high-quality cable signal, it is necessary that the antenna is located towards the nearest television tower. For apartment buildings, this operation is carried out by specialists.
If a person installs the antenna himself, then it is advisable to study the map of digital television of Russia on the Internet. This way you can find out the distance from the nearest signal transmitter to your home. After this, you will be able to rotate the antenna in the required direction.
- How to set up your Erisson TV to receive digital and cable TV
A subscriber who is located in an area remote from the TV tower needs to buy an antenna with a high level of signal amplification.
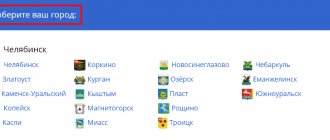
Setting up regional channels
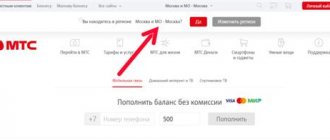
When you turn on the TV for the first time, the TV automatically searches for available regional multiplexes. You can turn on the channels you need for your region using the remote control. If there are no mandatory public channels in your region, then you can turn them on only after entering additional codes, which you will need to obtain at Russian digital television centers (Rostelecom, Tricolor, MTS, etc.).
How to find and add regional programs to the channel list?
To add a regional channel or channel package to your TV, you need to:
- Select “Menu” in the “Settings” section.
- Select "Advanced".
- Select the sub-item “Channel settings” (button 2).
- Select “Add new channel” (using the “right” buttons).
- Press the “Find” button (on the remote control).
- Press the “OK” (“UP”) button on the remote control - the channel search menu will appear.
- Click “Next” (blue button) – the “Information” window will appear.
- Enter the required access code (“Password”).
- Enter the name of the new channel (for example, “Sport”).
- Press the OK (“DOWN”) button on the remote control.
- Press the INFO button (“UP”).
- In the “Channel Settings” window that opens, click “OK” on “Navigation” (DOWN button).
- Press the “MENU” (“OK”) button on the remote control.
- In the “Channel Settings” menu that opens, select “Rename” and enter the name of the channel.
- In the “Advanced Settings” window, select the image type (format).
- Press the OK (“DOWN”) button, after which the satellite image will appear on the TV.
- To exit the adding channels mode, you must press the EXIT button or press the “MUTE” key on the remote control.
Setting up digital channels
To configure digital channels yourself, you can use several methods - automatic or manual.
Auto search
Most users choose automatic channel tuning, since during the operation they do not have to do anything other than launch the program. The equipment will make the necessary settings itself.
The procedure for connecting cable TV (using the example of setting up a search for a Samsung TV):
- Using the remote control, go to the main menu;
- find the subsection labeled “Channel settings”;
- select auto search and press OK to confirm the action.
Then the equipment will do everything on its own.
Manual method
If the user wants to configure digital channels himself, he must also go to the menu, but select manual tuning. On some TV models, this function may be called differently.
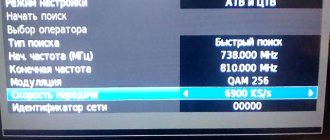
A new window will appear on the screen where you need to independently enter data about cable broadcasting and the frequency used. After this, you need to confirm the action by pressing the “OK” key. After each channel found, the person will have to click on the “Next” button or the right arrow to continue the search.
If the procedure went without errors, then the user will have 20 free channels with high-quality images.
How to set up a TV with Smart TV
Setting up your LG TV to receive digital TV:
- go to TV settings;
- select the network to use;
- Depending on the connection type, click on wireless or wired connection type. Then press the “Done” button;
- connecting cable TV on LG TVs, you must complete the registration process. There you should come up with a username and password and confirm all your actions by clicking on the link in the email;
- go to your personal account, enter your password and login. Download the ss-iptv program from the market;
- When you launch the application, a key will appear that you will need to paste on the official website of the program.
At the end, you will need to download the playlist so that it appears on your TV. Using this method, you can set up channels on your LG smart TV in about 15 minutes.
- Digital, satellite or cable: which television is more reliable and profitable?
Do you need auto-updates?
Many modern TVs have an auto-update function. It must be activated if you want to receive the latest settings for your television programs. If the current TV broadcasting parameters suit a person, then the auto-update function is optional.
Analogue television broadcasting in Russia is gradually being replaced by digital, which opens up access to a larger number of channels, and in high quality. Despite the rapid development of technology, many people still prefer to relax after a hard day on the couch, watching their favorite TV show. How to connect cable television to a TV, what are the features of this broadcast and what is needed for this - this is in the article.
Cable television is a broadcasting method in which signals are transmitted over a wire route.
Content
Setting up LG
In order to install cable channels on an Elgie TV of older models, you must change the country, because if you select the country Russia, the DVB-C format will not be available and to enable it you must set Finland or Germany in the TV parameters. After this, you can set up digital channels.
- Go to the menu, click on auto search and select Cable TV.
- You will be provided with a list of operators, select yours, if yours is not there, be sure to click on Others.
- Select Full Search
- Check the box for digital channels.
- Click on ok and wait for the search to complete.
Features of cable television
The advantage of digital cable broadcasting is high image quality (HD content) and clear sound. The system works as follows: the service provider transmits an encoded signal to the TV, which is decrypted by the set-top box connected to it, and a high-quality picture is displayed on the screen. The principle of operation is similar to how a computer “connects” to the Internet.
Compression technology allows the manufacturer to send a larger number of TV channels to the subscriber. But this is not the main advantage. With the advent of digital television, the functionality of televisions has expanded. Now the viewer can pause the broadcast at any time or record it and save it on the hard drive to watch later.
Advantages of cable broadcasting:
- detailed picture on the screen, without ripples, interference and distortion;
- the signal quality remains stable, regardless of the distance of the antenna;
- Both Russian and foreign TV channels are available;
- access to interactive applications, games, various utilities;
- If desired, you can connect HDMI channels, but provided that the equipment is capable of reproducing content of this resolution.
Cable television provides access to interactive applications and games.
Cable television connection is a service that requires a monthly subscription fee. The amount depends on the selected telecom operator.
How to connect cable TV to your TV
Cable television is widely used today to transmit television channels. All information comes from the cable outlet, which is located in the wall, and not from the antenna. The signal is transmitted to the cable output by the local television provider. You can install or rewire the cable in your home to have different options for service installation, including to provide channel viewing for multiple TVs.
Cable TV connection steps:
- First you need to decide whether it is necessary to install a modem in the cable television wiring. This device will provide an Internet connection using a network.
- Buy an intermediate amplifier. This equipment can be purchased at any electrical supply store. The device will be required if the splitter has more than two pins or if the wire length is planned to be increased in the future.
- An intermediate amplifier is being installed. Once the wiring is complete, the amplifier should not be installed and should be invisible. It must be left with the wire on the floor in an area where no one walks. The equipment must be located in the access area so that the wire can be connected.
- Next, an intermediate amplifier is connected. Connect the wire from the output in the house to the input of the amplifier. To do this, you will need RG6 coaxial wire with F-connectors on both sides of the cable. It can be purchased at electrical supply stores.
- Buy a signal splitter. Any splitter has 1 input and 2 or more outputs. Select a splitter with the required number of pins to connect all television devices and a modem.
- Afterwards, you need to install a signal splitter, but do not connect it. As a result, the splitter can be installed in a place where it will not be visible. In this case, you need to organize access to this device to connect the wires.
- Next, the splitter is connected. Connect the wire from the signal amplifier output to the splitter input port.
- Install the modem. However, it should not be in plain sight. Place it near the table where your home computer is located, which is used to access the Internet. The modem must be within range, as it may be necessary to make changes to the device settings.
- Next, the modem needs to be connected. Connect the wire from one of the splitter pins to the input of the modem port.
- Connect your TV equipment. Connect the separate outputs of the splitter to TVs where you need to watch cable television.
Recommendation: Before purchasing wires for connecting cable television, you need to think about the location of the elements of the television system. RG6 coaxial wires with connectors already on them can be of different lengths. When choosing the length of the wire between the physical elements of the network, you should try to choose the exact length so that there are no extra pieces of wire wound up.
You also need to pay attention to the following points:
- Do not lay wires on the floor in areas where people will walk. The wire can be damaged if you accidentally touch it, and the cable can also pose a tripping hazard.
- Do not install more than one splitter as the cable signal will be much weaker. Choose one splitter with the required number of pins for specific purposes, rather than connecting several splitters at once.
You can watch more details about cable TV wiring in your home in this video:
What you need to connect
To connect to television broadcasting of the new standard, you will need certain equipment. It will be easier for those who have a latest model TV at home, which already has an adapter that decrypts the incoming signal. With older TVs it’s more difficult - you’ll have to buy a separate receiver, or even change the antenna. The cable also plays a significant role in the stable operation of the system.
What do you need:
- cable antenna. There is one piece of advice here - if the operator’s tower is located close to home, it is not necessary to spend money on an expensive model. A regular indoor antenna will be sufficient. If the connection is made to a high-rise apartment, it will not be needed at all, since it is already installed on the roof;
- signal amplifier. In order for TV channels to be displayed clearly and without interference, take a device with a 12 V power supply. Some manufacturers deliberately lower the voltage to 5 V, which should be immediately checked in the instructions. An amplifier is a necessary thing if the TV receiver displays the message “No signal”;
- tuner. That's what the receiver is called. On new TVs it is set by default. The device “contacts” with the operator, after which the subscriber gets access to a large number of channels;
- cable. It connects the antenna to the television receiver. If the TV model is old, take a cord with an S-Video or RCA connector. For new ones, HDMI is preferable. It's worth noting that RCA, better known as "tulips", does not provide high image quality. The picture will look the same as with analog broadcast. To improve the signal (if there are no HDMI connectors), adapters are purchased.
HDMI cable.
Further setup on TVs from Samsung and other manufacturers is simple, which you can do yourself without the help of technical specialists.
- How to connect digital television to your TV yourself
Setting up HD channels
“High Definition Television” (HDTV) is a completely new standard that provides a much better picture when compared to analog and digital options. This format allows for highly compressed video and audio signals and uses only digital technology to transmit the signals, resulting in very impressive image fidelity and surround sound.
If you have already set up digital channels on your new TV, then to add channels in HD mode you need to automatically rescan - they will appear in the product list.
Connection and configuration procedure
Today, cable television is widespread because the signal comes from an outlet located in the wall, rather than from an antenna. And the signal to this output is supplied by the selected television operator-provider.
Connecting an antenna and tuner
Almost any antenna can receive a signal. Even the one that was used to watch analogue broadcasts (including the well-known “Polish” one) will do. True, they take into account the terrain and how far from the house the tower is located. If it is nearby, literally in the same city, an antenna may not be needed at all. If the tower is far away, the antenna must be with an amplifier. And this does not always improve the quality of the signal; in some cases it has to be raised onto a mast.
In apartment buildings, the antenna is adjusted by specialists, pointing it strictly at the tower. There is a lot of information on the network about where the signal transmitters are located, which will not be superfluous during manual installation.
If the TV is old, it probably does not have a receiver that decrypts the signal, then you will have to buy a set-top box separately. This is a compact device that connects to TV. The antenna itself is connected to it.
There are many digital set-top boxes on the market, and there are even sets that include an antenna. The difference between them is in price and functionality. Features of the consoles:
- many models have a USB port into which you can always insert a flash drive with a movie loaded onto it;
- allow you to record live broadcasts;
- many models connect to the Internet (via cable or Wi-Fi), which provides access to YouTube, IPTV channels and other services;
- There are devices running on Android OS. With such a set-top box, it’s easy to turn a regular TV into a Smart TV.
Digital receiver for TV.
The receiver is usually connected to older television receivers using RCA. For new models, it is preferable to use an HDMI interface, designed for high quality content. The corresponding cable is purchased separately.
A digital set-top box makes it possible to watch domestic and foreign channels even without an antenna. Weather conditions in this case do not affect the quality of the signal. There are 2 ways to set up TV channels.
Automatic setup
This option is chosen by the majority, since nothing is required other than launching the program - the TV will do everything itself.
Procedure:
- Press the “MENU” button on the remote control.
- In the items, look for the section “Technical configuration”, there “Setting up TV channels”. Menu names may differ depending on the TV model.
- Click "Auto Configuration".
The search will begin, now all you have to do is wait until the indicator reaches the 100% mark, which may take some time. You should not interrupt this process, even if the found channels appear and disappear on the screen. Upon completion, you just have to exit the menu (the “Exit” button).
Manual setting
This method allows you to configure TV channels manually. To do this, go to the menu and select “Manual setup”. In the window that appears, enter data about broadcasting and frequency. Next, confirm the actions by clicking “Ok”. To continue the search, you will have to press “Next” or the right arrow each time.
The signal with manual tuning is better, but the method takes longer. After successful completion, the subscriber will receive 20 free TV channels.
SONY setup
Setting up cable TV on Sony TVs is slightly different from other models where the actions are almost identical. Also on older SONY BRAVIA models you need to select the country Germany in the settings.
- Press the HOME button and find the Settings menu item.
- Next we look for the Digital Configuration.
- Open the item Auto-tuning of digital stations.
- Select the TV connection type: Cable or DVB-C.
- If a list of operators appears, select yours; if you don’t find the one you need, click on Others.
- Specify the scan type as Full, if you know the frequency of your operator, you can specify Network.
- Click start and wait for the channels to be fully configured.
How to connect a TV with an old plug
Before F-plugs appeared, products of a different design were used, however, they did not require soldering. When installing Soviet connectors, the soldering iron was the subscriber's best friend.
To connect, you will need the cable described in the article and a plastic plug (old style). The tools you will need are a knife, pliers or wire cutters.
Connection instructions:
- First, disassemble the plug. By rotating counterclockwise, the body and metal head are separated.
- The housing is placed on the cable.
- Remove 1 cm of plastic braid.
- About 5 mm of shielding foil is trimmed.
- Insert the plug into the cable (the screen and the central core should not touch).
- Use pliers to crimp the foil (without effort, the main thing is to ensure contact between the surfaces).
- Tighten the screw that secures the copper core.
- Connect the body to the metal part.
- Connect to TV.
Common problems when setting up TV channels and ways to solve them
The TV does not show channels, reasons:
- Incorrect antenna connection . Check that the antenna is connected correctly to the antenna output of the TV. If you connect the antenna to the TV through a multi-TV splitter, check that the power to the antenna is connected correctly.
- The antenna in the apartment is damaged or shifted to the side. This often happens when the antenna is mounted to the wall using regular copper wire rather than being screwed in tightly.
- Incorrectly configured signal - check that all television channels are received on the DEXP TV or any other, and if some program does not work, then correct the situation.
If you have old TV models, you shouldn’t count on connecting modern technologies to them. Especially if these are rarities like “Vityaz” or “Horizon”, or their analogues.
Connecting and setting up cable digital television
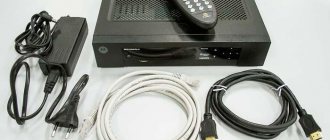
In addition to the TV itself, you will need:
- Antenna with amplifier . Of course, you can take it without an amplifier if the signal quality is good. However, if you plan to connect two or more TVs in the future, then it is better to take it with an amplifier. If the distance from the transmitting station is no more than 50 km, then take an inexpensive antenna with an amplifier Locus Meridian 07AF Turbo.
- Tuner (set-top box) . The tuner or receiver improves the quality of the image displayed on the screen. Most modern TVs have a built-in tuner, but older CRT models may not work with digital TV. On average, a normal tuner (set-top box) can be purchased for 1000-1500 rubles.
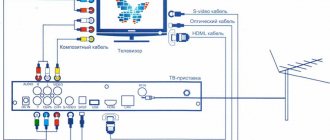
- Cable . You will need a coaxial cable from the antenna to the tuner and a cable with an HDMI connector to connect the tuner to the TV.
Step 1: Connecting Antenna and Tuner:
- We point the antenna at the television tower . There is a map of digital television in Russia online, where you can find out the nearest location of the TV tower.
- We connect the antenna to the tuner . Simply insert the plug into the appropriate connector, as shown in the picture.
- We connect the tuner to the TV . Connect the cable to the HDMI connector on the TV.
If you need to connect two or more TVs to one antenna at once, then find out how to do this in the previous article.
Step 2: Automatic Channel Tuning:
- After turning on the TV, the message “channels not tuned” will appear on the screen. To configure, press the “Menu” button on the remote control.
- In the “technical configuration” section, go to the “channel setup” item.
- In the “channel setup” section, select “auto tuning”.
Automatic channel tuning will last 2-3 minutes. However, there is a high probability of duplicate channels appearing, and even with poor quality of picture transmission. Such channels must be manually deleted immediately.
Manual tuning allows you to find channels with a good signal, but it takes much longer. If you still decide to configure it manually, then step 3 is for you.
Step 3: Manual setup:
- In the same “technical configuration” section, select the “channel setup” item.
- In the “channel setup” item, select “manual tuning” or “manual search” (depending on the TV model).
- Start the search using the volume keys; each channel found will have to be saved separately.
Setting up a Samsung TV
Setting up your Samsung to receive cable TV will not take much time.
- Enter the TV settings by pressing the Home or MENU button.
- Go to the Broadcast or Channel submenu.
- In the Antenna section we put Cable.
- Click on Autotune.
- Next you need to select the type of channels Digital and Analog
- The search mode must be selected Full. If you know the parameters of your network, you can select Network or Fast, but for these two modes you need to enter your network data in the cable search parameters.
- Click on Search and wait for the process to complete.
Connecting and setting up satellite TV
Satellite TV will require the same components as cable TV, but a satellite antenna will naturally be needed. Please note that some manufacturers sell a device that comes with a receiver and converter. For example, you can buy these from Tricolor, NTV Plus, MTS and others.
Step 1: pointing at the desired satellite:
When installing a satellite dish on the balcony of a high-rise building or the roof of a private house, it is important to position the device so that it is aimed at the corresponding satellite. Here is a list of satellites that have Russian channels and give a good signal in Russia:
Article continues after advertisement
In addition to these, there are still enough satellites that have both paid and free channels.
Step 2: Connecting Cables
As with cable television, the antenna cable must be connected to the receiver, which in turn must be connected to the TV. We will not describe this process in detail, since it is similar to connecting cable TV (see step 1 of cable digital TV).
Step 3: Setting up channels:
- Automatic setup . On the remote control, press “Menu” and in the “Channels” section select “Auto search”. In this section, select your provider and look for channels. Please note that, unlike digital TV, satellite auto search will find and save you a couple of hundred different channels, more than half of which will be in a foreign language. After finishing the auto search, you will have to sift out a lot of unnecessary ones.
- Manual setting . In the “Channels” section, select “Manual tuning”. Here, choose only those channels that you will actually watch at least sometimes. Channels about nature, travel and sports are very popular. They are mostly free.
general information
Recently, there has been an increase in the popularity of digital television. Unlike traditional analogue systems, this type of TV has a lot of significant advantages, providing maximum image and sound quality.
And when it comes to connecting “digital” to a TV, many people think that this is a very complicated process that requires professional help. But in fact, everything is resolved in a short time and does not require much effort. It should be noted that there are two types of digital TV offered on the market:
- Cable.
- Essential.
The first type is connected via a special television cable, and the second requires the presence of a special antenna. When the TV does not have a digital receiver, you will have to purchase it additionally. In stores, these devices are sold in the form of a special console.
If your home TV is already equipped with a digital receiver, then all that is required for operation is to install a digital TV smart card with connected provider services. After this, the device will automatically find a list of channels and save them in memory.
If you don't have a receiver, you need to buy a set-top box. It is very good if the TV has an HDMI output, since it transmits the best picture and sound.
Setting up Smart TV
Devices with the Smart TV function allow you not only to watch TV channels, but also to surf the Internet and even talk on Skype (if you have a camera and microphone). For normal operation, you need to connect the plasma to the Internet. There are two ways to do this.
Method 1: Connection via cable:
- We connect the LAN cable from the modem to the TV into the appropriate port (which is indicated in the picture).
- We check the presence of Internet in the modem or router.
Method 2: Connect via Wi-Fi:
- We turn on the router and use the smartphone to make sure that there is Internet access.
- We connect the Wi-Fi adapter to the TV (purchased separately) via a USB port. Some models have Wi-Fi, so you won't need an adapter.
- On the remote control, press the “Menu” button we already know (on some devices this may be the “Home” or “HAB” button) and go to the “Network” section.
- Select “Network Settings” and click “Start” - an automatic search for networks will begin.
- Select your network from the list and connect.
After connecting, we need to configure our Smart TV to work. The settings may differ slightly in different models, but the principle is the same everywhere.
Let's look at the example of LG TVs:
- After connecting to the Internet, you need to go to the device settings through the “Menu” button.
- In the upper right corner there will be an account login and registration form. Select registration.
- Then we will need to enter our email and create a password to log in.
- Using a computer or smartphone, we confirm registration at the post office.
- Log in to your account using your email and password.
After setting up, we look for suitable free or paid channels, watch videos on YouTube or other video hosting sites. You can download the apps you need from the LG Content Store.
Setting up Doffler, Polar, Dexp, Leben TVs.
The interface of these TVs is sometimes the same since they use the same software. To set up cable television on these TVs, you must first enable the DTV mode by clicking on Source.
- In the menu, use the down button to select Channel.
- Here you will need to do several steps by selecting your country and Current Cable input.
- Click on auto search.
- Select All channels, you can select which channels you need.
- Search type Full and click on Start.
The menu may differ on some models, but the basic steps are almost the same.
In what cases is a prefix required?
Digital TV broadcasting is carried out within certain standards. And in those situations when the reception takes place in Russia, you need to keep the following abbreviations in mind:
- DVB-T2 is the standard for European terrestrial television broadcasting of the second generation. This is where all Russian repeaters operate;
- DVB-C and DVB-C2 are cable broadcasting standards;
- DVB-S and DVB-S2 – satellite broadcasting formats.
If you have a relatively old TV and it does not support any of the above standards, you need to use a set-top box. Without it, digital reception is impossible.
We recommend checking online in 1 minute whether your TV supports digital TV.
Tuning channels on a TV without an antenna or set-top box
Without antenna
- Download the software “Tvom” or “Tv” (price difference).
- The TV has a connector for an HDMI cable, connect the cable and check if the TV works.
- Turn on the TV and set-top box.
- Take your time to press the “Search for Channels” button. Wait until all channels available on your TV appear.
- Click the Setup Channels button until you can find everything you need.
- Find the channel you want to tune in . Click the “OK” button.
Without prefix
Setting up digital terrestrial television is carried out using a decimeter antenna, so you need to know how to connect and install it yourself on Toshiba, Panasonic and other branded TVs:
- Essentially, an antenna is needed to tune in TV programs, and the set-top box needs to be plugged in and wait until it finds all available channels. If you don’t know where exactly the decimeter antennas are located, you can look for them yourself.
- Outdoor antennas connect directly to the TV and have an antenna socket connector on the rear panel. There are several connectors inside the TV that you can use to connect a signal amplifier to it. All this data is indicated on the device body.
- It is worth understanding that outdoor antennas may cost more than indoor ones. In addition, they have more complex equipment.
In what cases is a prefix not needed?
Do you like TV set-top boxes?
In the era of the Internet and modern communication equipment, there are options for connecting digital television without a set-top box. Let's look at all 4 of these methods.
| Subscription fee, rub. | Number of channels, pcs. | What you need | |
| Terrestrial TV | 20-30 | Digital TV with DVB-T2 support, UHF antenna | |
| Cable TV | from 250 | 50-150 | Digital TV with DVB-C support |
| IPTV on computer | from 0 to 1000 | No limits | High-speed Internet access (from 15 Mbit/s), PC |
| Smart TV | from 0 to 1000 | No limits | High-speed Internet access (from 15 Mbit/s), Smart TV |
Terrestrial TV on digital TV
Perhaps the easiest way to connect a TV. If the TV supports DVB-T2 reception due to the built-in tuner, then the connection procedure is as follows:
- A UHF antenna is installed, oriented in the direction of the nearest repeater and connected to the TV;
- The TV receiver switches to setup mode (usually using the “Menu” button on the remote control);
- Automatic or manual channel tuning is carried out.
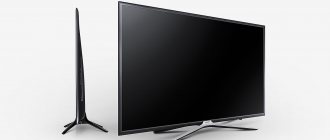
Connecting digital TV on a modern TV
Advantages:
No subscription fee.
Flaws:
Few channels.
“Radio shadow” may appear from hills, mountains, dense forests or permanent buildings.
There are places where the signal does not reach.
How to set up digital terrestrial channels
Setting up TV channels on modern TVs has been significantly simplified thanks to smart automation. But users who are inexperienced in these matters experience serious difficulties. In addition, in some cases manual adjustment of values is required.
You can set over-the-air channels using either a TV or third-party equipment: set-top box, console, receiver, etc. Let's look at the settings in automatic and manual mode, taking into account the TV brand.
General procedure
This is a universal and simplest method, available for almost all modern TV devices . We connect the antenna to the TV and perform the following procedure.
Important! UHF devices are extremely sensitive to the direction vector, unlike conventional meter-wave receivers. Therefore, they must be placed strictly on the base from which the signal originates.
Algorithm for setting up broadcast channels:
- Open the TV menu using the remote control.
- Go to the settings section.
- Click on the “Signal source” item.
- From the list, select the TV antenna or the corresponding output (AV, AV+).
- There should also be an item “Automatic channel search”.
- Go to the section and click on “Search”.
- At the end of the procedure, all found channels will appear.
- We save the set and change the numbering if necessary.
In rare cases, the TV will need to reboot, as indicated by the corresponding system message.
Manual setting
If the algorithm described above is not successful, then you should try setting up digital broadcasting manually.
Manual channel tuning:
- We switch to the RTRS service;
- By clicking on the desired locality, the parameters of the nearest towers will open.
- We record the TVC values.
- Open the menu on the TV and go to settings.
- Select the signal source (TV antenna).
- Click on “Manual channel tuning”.
- We fill in the field with the frequency (MHz) and multiplex number from the previously recorded data.
- Let's turn on the search.
- We save the data.
If the number of channels is less than 20, then you must repeat step 7, selecting the second multiplex in the values.
Connection methods
Next, we will look at all possible methods of how to connect a TV to the global “web”. Be prepared that some methods will not be possible to use due to the characteristics of your TV.
Direct connection via cable
The method assumes that the design has a built-in LAN input. Then you need to take a cable from your provider and insert it into the appropriate port. If the provider “distributes” a dynamic IP, no manipulations on the part of the user are needed. The TV will automatically receive its IP, and you will be able to open all Internet services.
If you are provided with a static IP, then set the settings manually. To do this, follow the instructions:
- In the Smart TV settings, find the Network/Network connection section.
- Click on the “Set up connection” button.
- Select “Manual setup” and then “Wired”.
- Set the IP and DNS provided by your ISP. Confirm the changes.
- The system will build a route map. Click "Done."
Now you can check the functionality of the services, since the Internet should work.
Via router
In most apartments and houses, the home network is organized using a router. It allows you to connect several devices to the network: computer, TV, laptop, and so on. Depending on the type of router, connect the TV via cable or Wi-Fi.
By cable
The method requires you to take the following steps:
- Connect one end of the LAN wire to the input on the TV, and the other to the input on the back of the router (usually marked yellow). The router has several LAN ports.
- Make sure the indicator light for the corresponding port is illuminated.
- Next, in the settings you need to select the type of IP used. If necessary, enter data manually.
- Check the TV's operation.
If problems arise, you can try updating the firmware of the router or the TV itself.
Via Wi-Fi
If you don't want to bother with wires, you can use a wireless connection. Your TV must have a built-in Wi-Fi module. To activate it, follow the instructions:
- Make sure your WiFi router is working correctly.
- Go to Settings and select "Network Connections". If you need to specify the type, then click “wireless”.
- A list of available wireless points should appear. Find yours and then click on it.
- Enter your password and wait for the connection.
Fast and convenient. Please note that some TVs support WPS technology, thanks to which you do not have to enter an access password.
What to do if there is no Wi-Fi module?
In stores you can buy special Wi-Fi adapters that will allow you to connect your TV to a wireless network. There is only one condition - the device must have a USB input. Wi-Fi adapters are visually similar to a flash drive, but they are relatively affordable. For home use, it is not necessary to buy top models.
Please note that for specific TVs there is a list of compatible adapters. As a rule, they are created by the TV manufacturer. Computer models are often incompatible. The most popular gadgets include LG AN-WF100, AN-WF500, Samsung WIS12ABGNX/NWT and PhilIPs PTA128/00.
We use WPS
If you have a login and authorization password on the router, use WPS. To do this, you need to make sure that the router supports this technology. Next do:
- On the back panel, press and hold the WPS button for 5-10 seconds. The corresponding light should light up, indicating activation.
- After a couple of seconds, activate the VPS on TV. Wait for synchronization.
- If necessary, enter the WPS PIN. You can find it in the router's web interface in the corresponding section.
This technique will bypass the entry of authorization data.
Via PC or laptop
Users can also connect the TV to a personal computer or laptop. In this case, the device can operate in two modes:
- Repeat image. The TV will act as a regular screen. You can use a browser or watch movies through it, but control will be carried out via a PC/laptop. It is enough to connect the device via HDMI or VGA.
- Reading data from a computer. When organizing a local network, you can open access to data on your computer. This allows you to watch movies or listen to music stored on your computer's hard drive.
The last point is an extremely convenient option if you do not want to watch movies via the Internet due to low speed. You can download them to your computer, and then watch them directly from the HDD without the help of a flash drive.
The setup details depend on the specific model, but in general you need to follow a number of steps:
- make sure that the TV is connected to your home local network (if using a router) or connected directly to the PC;
- you need to download and install the media server on your computer;
- add files to share and open them on your TV.
One of the most popular programs is Home Media Server. You can download it for free online. Let's look at an example of setting up this software:
- When you first start, you need to select your media device, as well as set other settings.
- In the “Media Resource Directories” window, you should make folders or local network drives visible. To simplify things, we recommend opening access to the entire local space at once. Check the boxes for the drives you want to open for reading/writing, and then click the “Scan” button.
- You can add directories manually.
- Start the server.
- Make sure the TV is detected by the program. Its name and icon will appear in the “Playback Devices” section.
- To launch a movie or other object, right-click on it (it must be in a folder with public access), select “Play on...” and specify your TV.
- To run on TV, find the AllShare item in the sources and select the directory. Run the desired file.
Try Plex, Serviio, Kodi as a media server. Each option has its pros and cons.
Via TV set-top box
Many providers offer to purchase an additional set-top box. It already has built-in services for watching TV, a browser and home theater. Essentially this is an analogue of SmartTV. The set-top box connects to the router via a LAN cable or Wi-Fi, and to the TV via HDMI. IP settings, if necessary, are already made in the sections of the set-top box itself.
You can also buy an Android console yourself. It is an analogue of a mobile phone, but with a redesigned interface for a large screen. You can download applications from the Play Market and use them from your TV. Messengers, Skype, mail and more will be available directly from TV.
Via PLC adapter
If you have a standard modem without Wi-Fi support and an STB receiver, then the connection can be made via an Ethernet cable. But this is not always practical if the wire has nowhere to hide. An alternative solution is a PLC adapter. This is a special device that transmits a useful signal through a standard electrical network. Connection using this method is offered by Rostelecom, Beeline and other companies.
The latest adapters support data transfer rates of up to 1 gigabit per second. Adapters must be inserted directly into the outlet, bypassing adapters and uninterruptible power supply devices. This will provide a better signal. The adapter and TV can be connected directly via Ethernet.
Connecting older TV models to the Internet
Despite the enormous popularity of Smart TV, many people are owners of older TV models that cannot connect to the Internet without additional devices. Cables, attachments and adapters come to the rescue. The easiest way to do without a Smart TV is to purchase a Wi-Fi adapter that connects to the TV panel using a USB port. Follow these steps:
- Select “Network” and type “Wireless” in the settings, then “Ok”.
- A menu will appear where you need to select the required connection.
- “Easy installation” – selected if the router is able to automatically connect to Wi-Fi.
- “By access point”, if you have authorization data.
- "Local connection", i.e. without Internet access.
How to install channels?
To set up digital television, you need to prepare tools and equipment, and strictly follow simple instructions.
Connection equipment
To install digital television, you need a special antenna, a separate tuner or a TV with a built-in decoder. To connect these elements, a special cable is used, which can be included in the kit or must be purchased separately.
Antenna
To receive a digital signal, a special antenna is required. Digital channels cannot be received with the old antenna, which was previously used to “catch” the analog signal. Their frequency ranges do not match.
Antennas come in different types: indoor, outdoor or amplified. The choice of device depends on the following factors:
- the distance of the home to the television tower;
- location of the apartment or private house: floor, direction of window exit;
- distances from large enterprises or other industrial facilities;
- the ability to connect to a collective antenna.
If the distance to the repeater is less than 5 km, then a small indoor antenna is quite suitable. At a distance of about 20 km, you need to install a standard street device. If the tower is from 20 to 80 km away, then you will have to take an antenna with an amplifier.
The closer the receiver is to the tower, the better the signal will be. Sometimes in a remote dacha the picture on TV is better than in the city. Antennas are either active or passive. The first option provides high signal quality, but requires connection to a power source, which is not always convenient. Practice shows: a passive antenna is also suitable for an ordinary residential area.
By design they are spatial, flat, unidirectional. The purity and strength of the signal largely depends on the correct selection of the antenna.
Receiver
A receiver, also known as a decoder or tuner, allows you to decipher the incoming digital signal. This device is connected according to a very simple scheme: antenna – receiver – TV.
The receiver is a small box with a dashboard on the front side and connection connectors located on the back. It comes with a remote control. It should be remembered that such devices are different. There are receivers for cable, terrestrial and satellite broadcasting. Each of these types has its own letter designation.
Receiver example
Typically, receivers for receiving terrestrial digital television broadcasts are capable of working with two signal formats: mpeg-2 and mpeg-4. For these devices, HDMI and “tulip” connectors are considered classic. They are capable of receiving a small number of channels.
The receiver allows you to watch not only free channels from two state packages, but also many others. However, in this case, you need to additionally purchase a CAM module, which will allow you to select channel packages to your liking.
Modern decoders have USB connectors and a built-in control program with which you can configure TV channels and switch them. More expensive models allow you to access the Internet via Wi-Fi or cable.
New TVs already have built-in decoders, so there is no need to buy this device. Owners of older TV models will have to fork out more.
Digital TV connection diagram