Analogue television, which was once used by millions of people around the planet, is no longer relevant. Nowadays, viewers can enjoy watching channels on cable or digital television. The latter type is the priority, because the transmitted signal in digital form is not subject to interference. We will tell you how to set up digital channels on a Samsung TV, as well as how to set up cable TV on a TV.
How to find out if your model supports digital TV
The development of the digital format has been carried out since 1990, the first televisions with its support began to appear in 2004. Mass production of models with a built-in digital tuner began only in 2010.
To transmit the picture in high definition, a special signal encoder is used in the DVB T2 format. New TV models are already built-in and access to watching programs in high quality is provided using one part - a cable. To connect, there must be a special connector on the back of the TV, which on Samsung TVs is usually called “Digital input”, which means “Digital input” in English.
You can find out whether your TV model supports digital broadcasting in the following ways:
- Visually inspect the TV. The rear panel should have corresponding letters above one of the connectors.
- After studying the instructions, section “Technical Specifications”. If there is a checkmark next to the value “DVB T2”, the purchase of additional equipment is not required.
- Having studied the features of the model on the official Samsung website.
- By contacting the manufacturer's support service. If the model is old and has been out of production for a long time, searching on the site may be difficult. In this case, consultants who can be contacted via the manufacturer’s hotline will be able to help.
If your TV does not have such a tuner, you will need to buy a special set-top box.
The tuner can receive several digital stream options:
- DVB-T, DVB-T2 – reception of terrestrial channels.
- DVB-C – cable television broadcasting.
- DVB-S, DVB-S2 – displaying programs using a signal from a satellite dish.
To view federal channels, it is important to have the DVB-T2 mark.
Tuners are also classified according to the following parameters:
- Signal standards that are capable of supporting;
- Type of connection to equipment;
- Operating system support.
Built-in tuners have almost the same capabilities as set-top boxes used as additional equipment, with the difference that there is no need to configure and connect individual modules.
Do you need a disc with a THX optimizer?
At the editorial office, we use special configuration templates before testing TV, and a disk with a THX optimizer can be very useful.
You can find the THX calibrator in the supplementary materials of many THX-certified DVDs and Blu-ray discs, such as Star Wars, Pirates of the Caribbean and Pixar films.
There are also free THX apps for Android and iOS. We will consider the main parameters below.
If you want to cancel the changes you have made and start over, select the “Restore Factory Settings” menu item.
How to find and set up digital channels on Samsung TVs
Finding and tuning digital channels on a Samsung TV depends on the TV model. The easiest way to configure it is on new models equipped with a digital tuner and on Smart TV.
For TVs supporting DVB T2 and Smart TV
If your TV is equipped with a DVB T2 connector, for setup you will need:
- Connect the antenna;
- Turn on the TV;
- Depending on the remote control, press the “Home” or “Source” button, select “Source” and press “TV”.
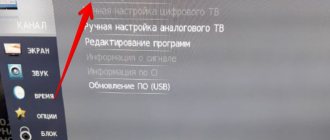
- Enter the menu and select the “Settings” section.
- Select "Broadcasts".
- Click “Auto Configuration”.
- Select "Start".
This manual is suitable for all Samsung TVs of the R series and higher. The channel search will begin after pressing the button. After all channels available in digital format have been found, you need to exit the menu. The channels will be saved automatically.
Setting up digital TV for TVs with Smart TV function:
- Go to the menu and select the “Broadcast” tab (usually indicated by an antenna icon);
- Select “Auto Configuration”;
- A menu will open in which you also need to select the “Auto Configuration” item;
- Click the “Start” button;
- Set the search mode to “Full” and press the “Scanner” button;
- Wait until the program finishes searching for channels and press the close menu button.
For older TV models
Older TV models equipped with a tuner for receiving digital broadcasts can be configured using the following step-by-step scheme:
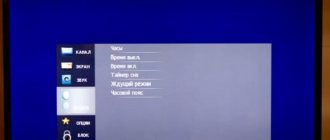
- Go to the menu, select the “Channel” section;
- Replace the value “Antenna” with “Cable”;
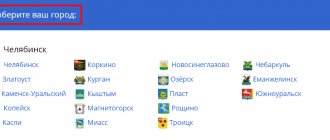
- Select "Country". The system will ask for a code; you can use four zeros, four ones, or a sequence of numbers from one to four. Specify Russia if it is in the drop-down list. If it is not there, select Eastern Europe or the “Other” value.
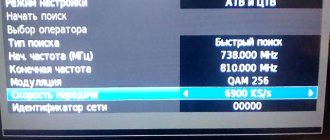
- Open the “Cable search parameters” item, where you will need to manually enter the frequency. The data can be taken from the website rtrs.ru or set to the standard value of 290,000 kHz. You can also change the transmission speed of 6875 KS/s, modulation of about 256 QAM.
- Check the boxes next to the “Full” and “Digital channels” values and start an automatic search.
After installing all the channels, you can close the menu or change the list of channels, creating a format that suits your needs.
How to connect a set-top box to an old TV
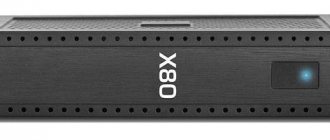
If your TV does not support the DVB-T2 data format, you must purchase a tuner (receiver) separately. There is a wide variety of models on the market that differ in their functionality, appearance and capabilities. All set-top boxes receive DVB-T2 format.
The receiver has USB ports on the back to which you can connect a flash drive, removable computer disk or other devices to view video files recorded on them. They are often equipped with their own capacious internal memory. The cost of the receiver directly depends on the number of ports. Some models have the ability to record TV shows from the screen to removable media. There are options for connecting via the Internet to YouTube channels. You can also choose a model that supports operating systems (Android), which can be used to broadcast channels using Smart-TV technology.
When choosing a receiver, you need to consider what requirements are placed on it. If you just want to watch free federal and local channels in digital quality, you can purchase the most inexpensive set. It can easily use data in MPEG-4 format. If you need HD video support, you should consider more expensive models.
TVs produced in the Soviet years may not support digital TV even if you buy a set-top box. Before buying, you need to inspect the TV for the presence of connectors and focus on them when buying a set-top box.
The following types of connectors can be located on receivers:
- RCA (tulip). Three plugs of different colors: yellow transmits the picture, red and white - sound. As a rule, it is suitable for all models of old TVs; new ones are not equipped with such a connector. The picture quality is average. Considering that such connectors are usually installed on panels with a small diagonal, you don’t need to attach much importance.
- HDMI. Similar to a USB port, it provides good transfer of picture and sound data to the TV. Audio is broadcast at a frequency of up to 192 kHz, video has a maximum resolution of up to 1080 pixels.
- SCART. An additional connector that allows you to connect a VCR or DVD player with the ability to record pictures from the screen.
- D-SUB or DVI. A blue trapezoidal connector transmits a picture; to transmit an audio signal, you will need to additionally connect tulips.
Instructions for connecting the set-top box:
- Turn off the TV.
- Connect the set-top box to the TV using the existing cables (tulips, HDMI or DVI).
- Connect the set-top box to a power source.
- Connect the antenna (satellite, UHF or via the provider’s cable) to the set-top box.
- Insert batteries into the remote control and turn on the console.
- Turn on the TV.
After this, you can proceed to setting up channels. All actions are similar to those on the TV, only when using a set-top box you need to use the remote control not for the TV, but for the set-top box.
Important! All actions to connect cables are carried out exclusively with the equipment turned off.
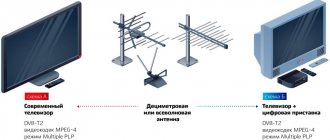
To access digital broadcasting, you will also need to replace the antenna. Equipment for receiving an analog signal - a meter antenna is not suitable in this case. All antennas are divided into three types:
- Indoor.
- Street.
- Satellite.
Indoor antennas are compact and relatively inexpensive. They do not require complicated installation; to watch programs, you just need to install them in a convenient place in the house. The disadvantage of this type is the poor quality of the signal and you can make a choice in its favor only if the distance to the repeater is at least 30 meters. Otherwise, constant freezing of the picture cannot be avoided. To improve the signal quality, you can use an amplifier.
Amplifiers come in two types: rod and frame. The first ones are equipped with antennae that fold or unfold depending on the signal level. Frame ones are a more modern type, capable of capturing decimeter frequencies. Despite this, amplifiers can only be used at a short distance from the transmission tower. The rest will require the purchase of external antennas.
Outdoor antennas are used at a significant distance from the repeater tower. You can’t do without them in remote settlements and suburbs. They are installed at the highest point, while trying to ensure that there are no obstacles around. Meter antennas pick up an analog signal, while decimeter antennas pick up a digital signal.
Satellite antennas are the most expensive type of antennas. They catch the signal not from the ground, but from a satellite, so to watch free channels, a receiver is used, which is used to decode the signal. Most often used for watching cable television.
When installing the antenna, it is important to follow the following rules:
- The choice in favor of an indoor antenna can be made only if the repeater tower is in sight;
- An external antenna is installed if the transmitter is located at a distance of up to 25 kilometers;
- At a distance of more than 25 kilometers, an active external antenna with a signal amplifier is required.
The easiest way for residents of apartment buildings is to connect to television through a telecom operator, who installs a common antenna on the roof at their own expense. The adjustment is also done by technicians.
Reference. The cost of a decimeter antenna, which is suitable for residents of rural settlements, varies between 800-1200 rubles.
Editing or deleting
When the setup work is completed, you can always edit the found programs. First of all, the user can organize individual TV channels, and to do this, simply go to the menu. There is a special “Broadcast” tab for this purpose, where the line “Change channel number” is provided. Moving is carried out when it is selected. A check mark should appear next to the program. Next, according to the instructions, the user must select the “Change number” item and press OK on the TV remote control. To move the program, you should use the up or down arrow buttons. More advanced users simply enter the number - it's much faster.
Important! After moving the program, you should not exit immediately, since you need to save, and to do this, press the OK button again.
Deleting a TV channel occurs according to the following scheme:
- Go to the main menu.
- Editor's choice.
- Confirmation of the operation (click OK).
- Go to the “TV Channels” tab.
- Select “Edit”
When all programs are displayed, all that remains is to enter the password. You could watch it when making TV settings. Additional functions will immediately be highlighted on the TV screen. In this case, select “Delete”.
The video clip will show clearly:
Manual way to search for channels
Important! To manually tune, you will need to enter the channel frequencies yourself. To do this, you can use the information on the RTRS website.
To set up digital television manually, you will need:
- Go to the menu using the remote control.
- Select the “Channels” section.
- Set the mode to “On Air”.
- Section "Manual configuration".
- Enter the desired frequency and start scanning.
- After the multiplex is found, click the “Save” button.
- Repeat with a different frequency.
Reference. Multiplex is a property of digital television that allows you to install several channels on the same frequency. This is why it happens that searching for channels for a long time does not produce any results, but after a minute several can be found at once.
Debugging Smart TV
You already know how to set up digital TV on Samsung. But if you purchased one of the latest versions of Samsung, then perhaps Smart TV is available to you. Adjusting such a TV is the simplest and will not take much time from users.
We insist on Smart TV: instructions
To set up the signal and find all TV channels in Smart TV mode, follow these steps:
- Turn on your device.
- On the control panel, press the “Menu” button located in the middle.
- Go to the “Broadcast” section, it is marked with an antenna icon.
- Find the “Auto Setup” mode.
- Another window will open, there also select the “Auto Configuration” option.
- Select the “Start” option.
- Another window will appear, click on the “Full” search mode.
- Go to the “Scanner” category.
- The device will begin searching for all available TV channels in your country.
- Wait until the search is completed, save your changes.
- You can exit the “Menu” section.
- These are all the manipulations necessary to adjust the television in Smart TV mode.
What to do if you can’t find and save digital channels on your Samsung TV
If you can't find or save channels after setup, the problem may be:
- Antenna. Perhaps the signal is simply not being picked up; you should try turning the antenna in the other direction and checking the signal quality. You can also pay attention to how the antenna is installed in your neighbors, who do not experience difficulties finding and watching channels.
- Cabele. You need to check all cables and their connections. Although the design of the connectors does not allow the cables to be reversed, this is still possible when using tulips. It is also possible that one of the connectors has failed. You should reconnect everything again and restart the TV. If the problem is in the connectors, you will have to contact a specialist.
Connecting your TV to the Internet
Online video streaming services are becoming increasingly popular with a huge catalog of TV shows and movies in different formats, including 4K, available on Netflix and Amazon Prime Video. To access all these treasures, you need to connect your TV to your home network. Time-lapse services such as BBC iPlayer and many other smart applications found on modern TVs also require an Internet connection.
Most often, this can be done in the “Network” section of the settings menu. Despite the convenience of connecting using Wi-Fi (especially if the TV is located far from the router), we traditionally recommend a more stable and reliable Ethernet connection.
This will be especially true for those who frequently watch streaming or broadcast content in 4K format - they will not have to deal with interruptions or stops in the signal.
How to watch digital TV without an antenna. Setting up IPTV
An antenna is needed to receive a signal from the tower. However, you can do without it if you have high-speed Internet connection in your house. In this case, the broadcast will be carried out via an Internet connection. To do this, just connect to a package from your Internet provider to watch home TV (this is a worthy alternative to cable television).
For this it is enough:
- Select the appropriate tariff on the provider’s website;
- Leave a request for connection;
- Wait for the technician to arrive (often there is no need to buy your own set-top box for this; they provide the set-top box for rent or in installments).
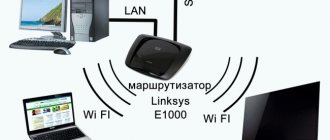
As a rule, the connection is made through a router, then the channels are configured in the router’s personal account. Connection instructions:
- Log in to your router’s personal account.
- Open the “Advanced Settings” section, in the “Network” subsection, select IPTV.
- Activate the IGMP Proxy standard, enable IPTV by setting the “Bridge” mode.
- Select the desired LAN port and connect your TV or receiver to it.
- Turn on the TV. Channels are found automatically without user intervention, depending on the connected package.
Preset Picture Modes
Most TV models have a few preset modes to get you started. They vary from manufacturer to manufacturer and model to model, and usually go by names like "standard", "dynamic", "cinema", "game", "sports", and the increasingly common "HDR".
Avoid the “dynamic” mode (sometimes called “live”): the picture in this case looks impressive, but oversaturation of colors and overheating of whites lead to a loss of detail.
It's best to start with "standard" or "cinema" (sometimes called "warm" or "pro"); the latter usually has the most accurate color palette.
4K HDR TVs automatically switch to HDR mode when playing 4K HDR content. It maximizes brightness and contrast to meet its standards.
There are some other modes that may be useful in certain circumstances. For example, owners of game consoles should choose “games”. It disables most processing technologies for faster response times, which is especially important for first-person shooters.
Also, many models today have an “eco” mode. But while we're all about protecting the environment, it's best not to choose it - it reduces screen brightness and can lead to image instability. For some models, the “eco” mode is located in another section of the general image settings; It makes sense to review its details and disable everything unnecessary, especially any options whose name hints at “room light sensor.” They have to adjust the image to its level, but as a result the picture becomes too faded.
And sports fans should not be tempted by “sports” modes, in which it becomes blatantly unrealistic.
Possible errors and their correction
Sometimes, even with seemingly correct installation of additional equipment, watching programs is still impossible due to poor quality or the complete absence of channels. Below is a list of standard possible errors when starting a search for digital channels:
- There is no picture on the TV. A possible reason is that the equipment is connected incorrectly, since even if there is no signal, the receiver menu should be displayed on the TV screen. To do this, you need to check that all parts of the equipment are connected correctly by completely disconnecting everything. Then try reconfiguring the channels again.
- Not enough channels found in automatic mode. First of all, you need to make sure that all the desired channels can be broadcast at your place of residence. This can be done on the official website or by asking your neighbors. Then check that the antenna is connected correctly - it should be in the connector for the set-top box, and not for the TV.
- Frequent freezing and disappearance of channels. The reason may be poor signal quality. To check it, you need to press the “Info” button twice on the channel with which the problem occurs, the signal check menu will open. If its level is below 50 percent, you need to correct the antenna.
Where to place the TV?
Installing the TV in a suitable place, and not at the first available point near an outlet, is the simplest thing that will help you achieve the best quality.
First of all, try to provide as many spectator seats as possible directly in front of the screen. When viewed at an angle, colored and black objects become faded - this is especially true for LCD TVs. For OLED models, the problem is less acute, since the image does not noticeably lose quality when viewed at an angle - but we still prefer to sit directly in front of the screen so that the entire picture is in the palm of our hand. If the dimensions or shape of the room do not allow this, a TV with a swivel stand will help.
Consider reflections: Most windows have curtains or blinds, and you can turn off the lights - but a dark room can also strain your eyes towards the end of a long film.
To provide ambient lighting without disturbing viewing, consider installing a lamp behind the TV to provide backlighting.
Brightness, backlight settings, color palette
Brightness
Despite the name, this setting actually adjusts the black level. We need to get maximum black depth without losing the detail of dark objects.
To adjust, raise the brightness level until the black bars above and below the frame turn gray, and then lower it until they turn black again.
There needs to be something dark on the screen to adjust the level on - for example, a jacket or shirt. Lower the brightness until the details begin to get lost in the shadows, then go back a little. Typically the brightness is set to around 50%.
Backlight
This setting adjusts the overall brightness of the image, allowing you to adjust it for different conditions.
You can choose different values for day and night, lowering it slightly in a darkened room to avoid eye strain.
The value of the parameter depends on the situation and personal preferences; start from the middle of the scale and change according to taste.
Color
You may not spend much time adjusting the color balance, as preset TV modes often automatically set it to about average.
Turn on a scene with a colorful color palette and make sure the colors look bright enough; if not, move the dial up to give them more energy. Conversely, if the colors seem oversaturated, turn it down a couple of points.
Then include a shot of people's faces to check if the skin tones are realistic. This is one of the most difficult settings to configure; take the time to achieve a natural shade.
Most TVs have a color temperature setting that ranges from cool (bluish tones) to warm (reddish); It's best to leave it as "neutral" or "normal" as possible.
If you cannot get the desired balance of brightness of colors and their authenticity, experiment with color and saturation; Often the best option is the basic option - around the zero mark or in the middle.
Setting up channels when using a set-top box from mobile operators
In apartment buildings, under certain conditions, it is possible to view IPTV. The abbreviation stands for Internet Protocol Television. This television does not require a separate connection to the network, but the Internet protocol is required for its operation. The operator provides digital cable to the apartment and gives the set-top box for temporary use. This device is engaged in decoding and broadcasting channels.
Connection and settings are carried out by specialists. However, in case of any failures or updates with the release of new broadcasts, additional configuration will be required. For this purpose, enter the menu, then select “Search for channels” in the settings and start “Auto tuning”. Usually everything is limited to this, without entering other data.