Of course, it would be a lot easier if people could record and play video and audio simply wirelessly from different devices onto their TV screens. However, while some progress has been made in this area and it is a viable solution, for now we are stuck with streaming and still need wires to watch media.
In this article we will give a detailed description of one digital connector, DVI-D, which is the most common interface for connecting widescreen LCD monitors today.
What is DVI output
since the DVI port , however, despite this, this interface
continues to enjoy fame. Previously, the introduction of a similar development made it possible to raise the display of video content on the display to a new level.
The port operates by sending information using TMDS, an encryption protocol created by Silicon Image. The image is transmitted sequentially, which is facilitated by the mentioned protocol.
Similar to HDMI
The socket in question implements broadband content protection, allowing devices to encrypt data.
VGA
output is backwards compatible with the DVI port.
What is DVI for?
The standard is intended for broadcasting video on displays, TV equipment, projectors and other devices. This becomes clear from the decoding of the abbreviation DVI and its translation into Russian - digital video interface.
Features of DVI output
The highest resolution is 1920x1080 pixels, but a number of video cards work with picture quality at 2560x1600 pixels. Below is the relationship between the size of the DVI output cable and the appropriate resolution:
- 10.5 meters is the maximum length of the cord through which a resolution of 1920x1200 pixels is transmitted.
- By increasing the specified length by another 7.5 meters, the highest resolution is reduced to 1280x1024.
A low degree of shielding can lead to transmission
information.
Placing near devices
that produce electromagnetic waves often results in artifacts when sending video via the Digital Visual Interface.
DVI port that connects to the appropriate cable
, does not support audio transport.
So for these purposes other communication channels should be used. The cord is 10 times larger than the Mini Displayport
.
The history of the DVI connector
Ten years ago, it was much easier to figure out how to connect a TV to another device, especially since most people only had one VCR at home. Our screens were smaller, the quality was worse, but the world was simpler.
With the advent of digital technologies, television broadcasting switched to a new digital format. Television has now become much better in quality and clarity, but consumers who receive local television signals through analog antennas must use converters to receive programs on their televisions.
A digital television signal is one of two ways to transmit data and images through television broadcasting, and today all television and radio stations transmit information in both forms: digital and analogue.
Basically, the two types of TV signals do the same thing, but they function differently. An analog signal appears as a wave going up and down in a similar way to the original transmission source. Changes in aspects of the signal cause changes in the wave, which leads to the process of decoding information.
A digital television signal works like a computer transmission: a packet of binary data is sent to decoders, which at the other end read the received data and reconstruct the image based on the received information.
This difference leads to several very important differences. An analogue signal is the actual picture transmitted by a broadcaster, while a digital television signal is a binary copy of it. This means that interference in the analog transmission causes ghosting or static distortion, but the image is visible even when the signal is poor.
Digital transmission will only work if the vast majority of the information to be displayed is accepted. If the decoder does not have a complete set of binary code, it simply will not be able to display anything, the TV screen will be solid blue.
The relative size of the two signals matters most. If it were possible to view two types of broadcast, then one would be represented as a wave with high peaks and valleys, and the other would be represented as a narrow band of binary code. The analog signal is very large compared to digital transmission.
And since a signal in digital format takes up much less space, it is capable of not only broadcasting high-definition television (HD), but also using its bandwidth for additional information about the program (channel name, composition, subtitles and even several versions of the same programs).
It is clear that analog interfaces are not suitable for working with a digital signal and will require their own digital connector. The incompatibility problem was solved by the creation of the innovative DVI interface, which can now confidently be called generally accepted.
The abbreviation DVI stands for Digital Visual Interface. It was introduced by the Digital Display Working Group in 1999, which was initiated by the American multinational corporation Intel Corporation. The group included representatives of such technology giants as Hewlett-Packard, IBM, Compaq, NEC, Fujitsu, Silicon Image.
The goal of their development was to create a basic computer interface that could be used in all video cards, monitors and other image output devices. In addition, the DVI cable is designed to maximize the quality of flat LCD screens.
Intel has also developed a unique broadband media content protection protocol – HDCP (High-bandwidth Digital Content Protection), which implements the option to prevent illegal copying of high-quality video signals. This technology is used in DVI standard interfaces.
Some DVD players, HDTVs, and video projectors with DVI connectors transmit an encrypted signal for copy protection using High-bandwidth Digital Content Protection Protocol (HDCP). Computers can be connected to HDTVs via DVI, but the graphics card must support HDCP to play Digital Rights Management (DRM) protected content.
Traditional AV cables, such as VGA and Composite, carry only analog video signals and are still in use today, but digital DVI or HDMI connectors are increasingly being seen on all modern LCD TVs and computer monitors. There are special DVI-VGA adapters for more convenient equipment compatibility.
The very first image transmission cables with a VGA interface had a D-Sub 15 connector and were remembered by everyone for their bright blue color, which was installed in a 15-pin socket. But today the era of such connections is over, and they have been replaced by more modern digital ports.
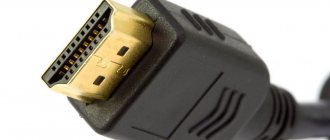
HDMI is a very common interface for televisions and most computer monitors. It is easy to use, inexpensive, and the most convenient thing is that it already includes audio transmission. The HDMI connector looks like this:
However, the HDMI standard has its limitations. For example, if your TV has an HDMI connection, then most likely it is version 1.4. Such a port can transmit a maximum resolution of 3820 x 2160 pixels, at 30 frames per second. This is quite enough for a high-quality picture, but if your display is 4K, then it can work at higher parameters, and HDMI 2.0 at 60 frames per second will be more suitable for it.
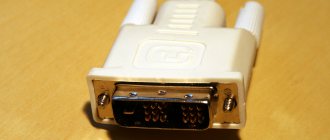
The video signal coming through the DVI port is basically the same as HDMI. Maximum resolution potential varies by hardware. The DVI output looks like this:
DVI cables transmit information using a digital format called TMDS (Transition Minimized Differential Signaling). Some cables have a single-channel structure (Single Link), while others have two-channel wires (Dual Link).
Single channel cables use one 165 MHz TMDS transmitter, while dual channel cables use 2 transmitters. Dual Link DVI effectively doubles the transmission power and realizes increased signal speed and quality:
- Single-Link DVI display can display resolutions up to 1920 x 1200;
- The Dual-Link DVI port is capable of transmitting a resolution of 2560 x 1600.
In addition, the official DVI specification requires that all equipment of this standard support a signal at a distance of no more than 5 meters. Please note that if you use long DVI-I cables, the digital image may not be displayed on the screen. When DVI performance is unstable, you may see artifacts and "flashing" pixels on your display, further degradation tends to flicker or jitter, and the ultimate sign of signal loss is a blank screen.
There is a common misconception about digital video cables that if the equipment is working properly, the signal will always be perfect. However, as with an analog connection, cable structure and length can affect picture quality.
Scope of application of the digital video interface
Equipment equipped with a digital video interface is capable of displaying images only in the quality intended by the developer. In order to ensure decent resolution, manufacturers of plasma panels and monitors
video
scaling began to be included in the design .
TMDS encryption appeared in the initial GeForce2 GTS models, but now it can also be found in components from Titanium. The integrated method of processing content through the DVI port is characterized by a low frequency, which affects the maximum image quality.
The resolution level increased to 1920x1440 when an external type transmitter appeared, and Titanium's GeForce GTX easily provided 1600x1024 quality. In addition to TMDS, ATI video cards are equipped with DVI - VGA adapters.
Types of DVI connectors
There are several common video interface
:
- DVI-A provides an analog
format for sending information (as indicated by the letter A).
In this case, it is possible to connect equipment using a plug in the wire - a physical representation of the type of DVI port. - DVI-I (I - integrated) is a built-in plug that includes both methods of broadcasting movies (digital and analog), which do not operate in synchronous mode. The device itself decides which channel to give preference to. The single subtype (Single link) is popular, and the double (Dual link) has 2 digital signals
that increase the level of content display. - DVI-D is a fully digital socket (D - “digital” in English) and is divided into Single and Dual link. The maximum resolution in the single version is 1920x1200, and devices cannot be analog. But the dual specification allows you to broadcast films in 3D.
Methods for connecting equipment and components
Devices that are connected via the DVI -A port work exclusively with analog broadcasting provided by DVI-A at the other end of the cord. Connectors
DVI-D is also only compatible with each other. To achieve versatility, just choose DVI-I.
Thanks to the dual mode, the wires can double the speed of movie transfer. The frequency and quality of the picture are increasing, and the development of 3D Vision from the manufacturer NVidia certainly requires the use of Dual link.
Another option is to use adapters
, although it is fraught with deterioration in the clarity of the received content and is limited by the design of the components.
In addition to the above-mentioned DVI - VGA adapters,
special adapters are also used
the DVI output to the computer
About HDMI (High-Definition Multimedia Interface)
The new format has become available to the general public since 2002 (founder: Panasonic). The biggest advantage of the format, as always banal, is transmission speed and quality. Currently, the HDMI format supports transmission speeds of up to 10.2 Gbps, and this is a video and audio signal simultaneously. The HDMI cable wire has 20 cores in a shielded sheath with a resistance of 100 Ohms. Ferrite beads are often installed on HDMI cables to protect against high-frequency interference (around 100 kHz)
Incompatibility of computer monitors and video cards
New video card models produced by market giants NVIDIA and AMD already lack a VGA
in its design.
In addition, DVI ( digital visual interface
) in such developments of companies recognizes exclusively the digital format of film transmission.
Those. DVI HDMI are compatible with the DVI-D specification.
Therefore it will not be possible to create a connection
components that support DVI-D, and old-style monitors.
DVI to VGA
adapters will not help here either However, there is still a solution to the question of how to connect DVI HDMI to obsolete monitors equipped with VGA. The current material will tell you about ways to “make friends” with old technology with the latest advances in the field of working with
video .
What to do if the video card and monitor do not have the same type of connector
Older monitor models only have one VGA connector. At the same time, modern video cards do not have such an output; there is only DVI and HDMI. In this case, you cannot do without purchasing a special DVI-VGA adapter.
It must be inserted into the DVI connector on the video card and secured with fixing bolts.
Next, connect the computer and monitor with a VGA cable. This completes the connection procedure.
Connection via HDMI cable is made less frequently. At the same time, it has a tremendous advantage: the cable length can be up to five meters, which is important for connecting monitors and TVs at a great distance from the system unit.
Connecting a TV and computer is done in the same way. There is nothing complicated in this procedure.
Without equipment to display text or graphic information, any computer turns into a meaningless collection of boards, wires and controllers, from which it is difficult to get any benefit. In order not to be left without your favorite game, movie or necessary document, find out how to connect a monitor to a computer.
Three interfaces are used for connection:
- VGA is an analog interface that was once the only option for playing a signal from a video card. At the moment it is obsolete and practically not used in computers.
- DVI is a modern format that provides high-quality images, and therefore is used most often.
- HDMI is a modern format developed on the basis of DVI, often used to connect to a TV system unit.
Before connecting the monitor, inspect the back wall of the system unit. Find the video output: as a rule, there should be a DVI interface here. If it is not there, but there is a VGA output, you will have to use it.
Next, check out the cable. It is impossible to find a monitor in the store that does not have a DVI output. But if you are connecting older equipment, the cable on it will most likely be VGA.
If the interface of the monitor and the video output on the system unit do not match, you will have to worry about buying an adapter or a new video card.
An adapter is not the best solution: it does not always cope with its functions, so the image may be displayed on the screen with significant interference.
The best option would be to buy a more modern video card that supports the required interface.
Attention: before starting work, the equipment must be de-energized!
If the interfaces are identical, you can connect the cable. After making sure that the connection is successful, turn on the system unit and monitor. If the screen remains black, turn off the computer and check the connection again.
After starting the computer, you need to configure the system to interact correctly with the monitor. Do this using the drivers that come with the kit. After installing them, you will be able to adjust the screen resolution, update the video card firmware, work with color and change other important image characteristics.
If you need to connect a monitor to a laptop, you will have to do this via HDMI or VGA.
It is these two interfaces that can most often be found on a laptop case, while DVI is practically never found.
Connecting via HDMI is no different from other types of connecting a monitor to a computer or laptop. You can also connect via this interface very quickly by simply connecting the corresponding ports using an HDMI cable.
The procedure here is no different from a similar procedure for a computer:
- Disconnect both devices.
- Examine the laptop. Find a port through which you can connect an image output device.
- Look at the cable and determine which interface it supports: VGA or HDMI.
- Connect the monitor to the laptop via the appropriate connector.
- Turn on both devices.
If you managed to connect the equipment correctly, an image should appear on the screen. If this does not happen, try switching to the image transfer mode to the monitor. This can be done using one button from the “F1-F12” row, which shows the screen. Press it simultaneously with the “Fn” key. For example, for Asus laptops this will be the combination “Fn+F8”.
All you have to do is adjust the screen resolution, its frequency and color display parameters.
Some people had questions about “is it possible to connect a second one to a monitor” or “how to connect a second display to a laptop.”
The article will describe possible ways to connect a second monitor. Follow the instructions carefully to avoid problems.
Every user wants to work in comfortable conditions, regardless of profession or field of work. A gamer, a schoolboy, a student - everyone can do tasks better on a computer if it is convenient.
The second screen is needed to facilitate the transition between browser tabs, windows, and documents (Figure 2). Agree, not everyone enjoys flipping through identical pages every thirty seconds. It's easier to work on one monitor and view other information on another. We also recommend that you read the useful articles section on our website. There you will find a lot of useful and interesting information.
Speaking of entertainment, the boundaries of what a second monitor can do is expanding. It's much more interesting to play your favorite games, feeling like you're in the center of the action. This way you can experience all the fun and atmosphere of gaming. Work with documents and watch TV shows at the same time.
First, you should check the availability of drivers for your monitor. If it is connected correctly, but does not work, first of all look for a problem in the drivers.
Connecting a second monitor will be related to the technical part. We will practically not work with the operating system of the PC itself. Depending on the technical characteristics of the computer, you can choose one of the suitable display connection options.
- Via HDMI cable (Special connector required);
- To the motherboard (There must be support in the motherboard itself);
- To the video card (VGA socket);
- Via Wi-Fi network.
Note : Some methods require new generation equipment, and some just require skill and time.
An HDMI cable is a wire that allows you to connect a new display to the motherboard. It often occurs on modern laptops, but if it is present, follow the instructions:
- Turn off the computer;
- We insert the cable from both sides (into the monitor and into the system unit) (Figure 3);
- Turn it on.
It should work. Elementary and fast. You can set it up yourself.
It's just as simple here. Second screen support may even depend on the processor. New models have this feature. The motherboard, in turn, must have a port. As above, we are looking for VGA and DVI sockets. Turn off, connect and turn back on
Nowadays, most video cards use HDMI, DVA, VGA and SVGA (an improved version of VGA) connectors. Depending on your monitor, use the correct connection type. Compatibility List:
- VGA - 640 by 480 pixels earlier. Today universal);
- SVGA - 1280 by 1024;
- DVI – analog and digital formats (Figure 4);
- HDMI – all possible sizes in high quality.
Note : Please check first if the required connectors are present.
According to the standard, video cards have VGA or two DVI ports at once. If there is support on the side of the video drive, you can install others (not recommended). If you are a fan of old games on your modern computer, then our article will be very useful for you.
The most modern way. To accomplish this, a receiver and transmitter are required. Both are similar to an access point. A screen with a resolution of 1024x768 is connected. There are no wires taking up space, but it does require some fiddling with adjustments. The VGA system is used. A keyboard, mouse, headphones and speakers are also connected.
Method for connecting a DVI monitor to HDMI
An HDMI to DVI adapter will allow you to connect a DVI monitor to HDMI . But, of course, only the interface
DVI-D can be safely
connected
to HDMI, since the latter does not understand the analog signal.
Regarding the exit
type VGA, present on a computer screen (
TV
), and a video card that is equipped with DVI-D/HDMI, adapters with a built-in converter are required.
A similar HDMI to DVI (VGA) cable is a wire
that must be
connected
to the video adapter.
Displayport to DVI adapter good
Suitable for connecting a display that has
a digital
video interface to devices with
Displayport
.
In the absence of an HDMI DVI -D connector, it acts as a socket
participating in the communication of devices.
Basic DVI-D Features
DVI cables have two important features:
- Unique Structure: Unlike other types, DVI cables contain two screws on each side of the pins. This guarantees a strong and permanent connection;
- Length restrictions: The average length of a DVI cable is about 5 meters. This is quite enough to connect the TV to third-party devices without signal degradation.
Differential transmission of signals with minimization of level differences (TMDS) is implemented in DVI using a UTP cable. This product has the following technical characteristics:
- The DVI Single Link connector contains four TMDS channels. Three of the four pins correspond to the green, blue and red RGB video signals, and the fourth signal is controlled by the sync channel. Single-channel connectors operate at frequencies up to 165 MHz and provide a throughput of 1.65 Gbps. They support resolutions up to 1920 x 1200 with a refresh rate of 60 Hz.
- DVI Dual Link connections provide double the total number of RGB TMDS pairs by eliminating the sync pair from parallel connections. This allows for a throughput of 2 Gbps and a higher resolution: 2560 x 1600 with a refresh rate of 60 Hz.
The DVI-D interface is a single 19-pin connector and a dual-link 25-pin connector. The DVI-D connector can only transmit digital video signals and is only compatible with DVI-D devices.
The dual-link connectors are completely backwards and compatible with single-link functionality unless the display mode is used for a pixel clock greater than 165 MHz. Therefore, in most cases, a double connection is always preferable to a mono connection.
How to connect DVI to a computer
Many computer monitors still only work with analog
VGA
interface .
On the other hand, modern computers are often equipped with a digital connector. Preference should be given to DVI on a PC , since it is capable of providing high quality displayed media content.
As for device communication, DVI-I has an advantage over DVI-D. After all, only this type of output in question will allow you to establish contact with an analog signal
.
To achieve this goal you will need to buy
special
adapter
from DVI to VGA.
Visually, such an adapter contains DVI at one end (which needs to be connected
to the system unit), and at the other end it
connector
.
Types of DVI connectors
Although all DVI cables look almost the same, there are differences between them, and this is what classifies them into categories. There are three types of DVI cables:
- DVI-D (Digital);
- DVI-A (Analog);
- DVI-I (Integrated).
DVI-D is true digital video. It is used for a direct digital connection between a video source and an LCD display. This provides faster and higher image quality compared to analogue transmission. All video cards initially generate a digital video signal, which is converted to analog at the VGA output, because this is what the computer monitor receives. Therefore, if you connect your computer to your TV using a DVI-D cable, you will be able to watch the picture without losing quality.
DVI-A is an analogue of high definition. This cable is used to carry a DVI signal to an analog display such as a CRT monitor or an older model LCD. Most often, DVI-A is used to connect to a VGA device because DVI-A and VGA carry the same signal. With this connection there is some loss of quality.
DVI-I is the best solution for everyone. Cables of this standard are built-in devices that are capable of transmitting both digital and analog signals. This makes it a universal solution for different situations.
Like any other format, DVI digital and analog devices are not interchangeable. This means that a DVI-D cable will not work in either an analog system or the digital version of DVI-A. To connect an analog source to a digital display, you will need a VGA to DVI-D converter. To connect the digital output to an analog monitor, you will need a DVI-D to VGA converter.
Note. Many manufacturers use DVI ports with all available pin holes. This does not mean that this is a DVI-I port. This is just a precautionary measure to prevent the pins from breaking if the wrong type of cable is inserted. Check the DVI port format on the label, manual, or manufacturer's website.
Process of connecting DVI to PC
Before connecting DVI to a computer ( laptop
), it is useful to examine the back of the system unit - there are outputs for working with
video
.
At the bottom there should be sockets for a digital
video interface, VGA or HDMI.
In their absence, the PC has an integrated video card
. Then you need to use those ports that are located on top of the rear panel, called video outputs of the motherboard.
Then you should inspect the display for the presence of a DVI connector, which may be missing in budget or outdated devices. If it is not there, then connecting
cable
type
VGA - VGA.
But when a TV
or monitor contains only VGA, then
an adapter is used transmit Although, as a rule, the need for such an adapter does not arise so often.
DVI HDMI connector connect the TV to the PC
The main video connectors are not entirely suitable for connecting to a TV. These are the well-known video signal connectors Scart, Video and S-Video. The most problems will arise if your TV screen is large. The picture in this case will not be clear, similar to the image of a TV signal. In other words, the image will be slightly, and on large screens, noticeably blurred. This is especially noticeable on text files. You must be at least 1.5 m away from such screens.
Therefore, it is advisable to connect the computer to the TV via a DVI or HDMI connector.
What do we need to know if we have a connection via DVI, HDMI connector
For example, we connected only a TV to the PC, without a monitor. In this case, as soon as we start the operating system, we will see our desktop on the screen. True, if the resolution of your TV is 1280 by 720 or 1920 by 1080 pixels. If the screen size of your TV is different, for example 1400 by 900 pixels, then it may not light up.
But not everything is so bad, the video card in this case can still be configured. In this case, we will make an additional connection to the computer using VGA or DVI connectors. The TV will provide a picture, thanks to which we will configure the required resolution using the video card driver.
How to insert cord lugs into slots
So, we are interested in the DVI port on the computer and a similar interface
on the display device where the wire should be
connected
. Once the cord is inserted into the appropriate socket, a pair of retaining screws are tightened on the side of the plug.
The screws themselves are under a plastic coating, and they are clamped solely by finger force. When the cable
is not connected as it should be, this is fraught with instability of technical communication. The final picture on the screen may also flicker.
Instead of DVI, a number of users prefer the HDMI port. Then there is no need to fix the screws simply due to the lack of them in this interface. You just need to insert the HDMI to DVI adapter for your PC into the desired connector on the rear panel and the HDMI jack on your TV ( monitor)
).
Monitor connectors for connecting to a computer
HDMI (various types available)
One of the most popular and popular interfaces today. Found on the vast majority of laptops and computers (can also often be found on tablets). Suitable for connecting monitors, TV (and TV set-top boxes), projectors and other video equipment.
- transmits both audio and video signals (simultaneously). In this regard, this is a big plus for the interface: no extra cables are needed to transmit the audio signal;
- Full support for FullHD (1920×1080) resolution, with 3D effects. Maximum supported resolution up to 3840×2160 (4K);
- The cable length can reach 10 meters, which is sufficient in most cases (with the use of repeater amplifiers - the cable length can be increased to 30 meters!);
- has a throughput from 4.9 (HDMI 1.0) to 48 (HDMI 2.1) Gbit/s;
- adapters from HDMI to DVI and vice versa are available for sale (very important for compatibility of old and new devices with each other);
- HDMI has several types of connectors: HDMI (Type A), mini-HDMI (Type C), micro-HDMI (Type D) (see photo above). On laptops/PCs, the classic size type most often used is HDMI (Type A). Micro and Mini are found in portable technology (tablets, for example).
If you have HDMI on your monitor and system unit (laptop), then the entire connection will boil down to purchasing an “HDMI-HDMI” cable (which can be bought at any computer store).
Please note that before connecting via HDMI, be sure to turn off both devices (PC and monitor). The port may burn out if this is not done.
Classic HDMI cable
Display Port
Display Port and Mini Display Port
A new interface that is quickly gaining popularity (a competitor to HDMI). Allows you to connect several monitors at once, supports 4K resolution, 3D image. There are two standard sizes: classic and Mini Display Port (the first option is found on regular laptops and monitors, see photo above).
- both audio and video signals are transmitted simultaneously;
- The maximum length of the Display Port cable can reach 15 meters;
- data transfer speed up to 21.6 Gbit/s;
- allows you to get a resolution of up to 3840 x 2400 at 60 Hz; or 2560 x 1600 pixels at 165 Hz; or you can connect two monitors at once with a resolution of 2560 x 1600 pixels and a frequency of 60 Hz.
- Please note that in addition to the classic Display Port, there is another form factor: Mini Display Port.
- By the way, the size of the Mini Display Port connector is about 10 times smaller than that of the DVI connector (about it later in the article)!
- the interface has a small “latch” that securely fixes the cable when connected to the port.
This interface is almost 20 years old and still enjoys wide popularity (it was released in 1999). At one time, I seriously improved the quality of the image on the screen.
The maximum resolution is 1920 x 1080 pixels (however, some expensive video cards can transmit data in dual link mode and the resolution can reach 2560 x 1600 pixels).
- Only the image* is transmitted through the DVI connector (the audio signal will have to be transmitted via other channels);
- resolution up to 1920×1200 pixels with cable length up to 10.5 m; resolution 1280×1024 pixels with cable length up to 18 m; in dual-channel data transfer mode - up to 2560 x 1600 pixels.
- There are three types of DVI: DVI-A Single Link - analog transmission; DVI-I - analog and digital transmissions; DVI-D - digital transmission.
- Various connectors and their configuration (DVI-A, DVI-D, DVI-I) are compatible with each other.
- Please note that this standard is more likely to experience interference: for example, if there are other devices near the cable that emit an electromagnetic signal (telephone, printer, etc.). This can also happen due to poor cable shielding;
- There are many adapters on sale from VGA to DVI and reverse;
- The DVI connector is quite large, larger
Pros of connecting a TV via DVI
Due to the fact that DVI provides digital
format for transmitting information, it significantly improves the quality of the resulting image.
Therefore, the best solution would be to connect your TV via DVI as opposed to analog outputs. The outdated sockets include both VGA
and its clone, a type of DVI called DVI-A, which are not capable of producing such a clear picture.
The standard in question was released after the implementation of HDMI. A distinctive characteristic of a DVI cable is the hardware separation of one
general signal.
This means that the communication between a laptop
or computer and TV occurs in two stages.
First you need to connect
the cable to the output on the video card that only works with images. Then the free plug is plugged into a port on the sound card (built-in or separate) or amplifier.
Problems sending audio content
But before implementing communication between computer equipment and TV, it is worth considering possible difficulties with transporting sound
unlike the
HDMI
.
The fact is that the transmission
of the audio stream is largely determined by the PC graphics adapter.
Those who have boards with ATI Radeon installed and want to connect their TV to DVI need to know that some similar models do not support audio reception via a digital video interface. On the other hand, this feature is present in video cards
from NVidia. A special DVI-D - HDMI cord will allow you to synchronously transmit image and sound to your TV. But only if the graphics adapter can work with sound.
DVI standard
This specification appeared in 1999 as a replacement for its predecessor, the VGA interface.
At the time of introduction, designers assumed that cathode ray tubes would exist for a very long time, so VGA lines are also included in this standard.
p, blockquote 5,0,1,0,0 —>
Currently, several types of such slots are used:
p, blockquote 6,0,0,0,0 —>
- DVI-A. A port that transmits an analog signal. Can be used with older CRT options, but is not suitable for modern LCD panels. Has 17 contacts.
- DVI-I. Can transmit both analog and digital signals. There are 18 main and 5 additional contacts. Capable of transmitting images in HD quality.
- DVI-D. Has 24 contacts, plus one extra. Transmits only “digital” Full HD images without loss of quality.
This standard supports multi-streaming signal transmission, so several copies can be connected to one slot on a video card at once, but only if the resolution of each does not exceed HD.
p, blockquote 7,0,0,0,0 —>
The maximum length of an inactive cable, that is, not equipped with a signal amplifier, is 15 m. It should be remembered that this port can only transmit images - it cannot work with sound. Supports a maximum hertz of no more than 165.
p, blockquote 8,0,0,0,0 —>
The maximum signal transmission speed reaches 3.96 Gbit/s, but the cable length should not exceed one and a half meters. It is also necessary to take into account that different types of ports are equipped with different keys. An unsuitable cable will not only not work, it will even be physically impossible to insert.
p, blockquote 9,0,0,0,0 —>
How to connect a TV via DVI port
In contrast to video cards, current TVs fully support working with a digital communication channel via DVI. Although there are several types of conductor classes, this is invariably reflected in the clarity of the broadcast content.
As mentioned above, it makes sense to give preference to DVI when connecting computer devices to TV. But if there is simply no such connector on the system unit or laptop, then all that remains is to use VGA.
If you decide to use VGA, you need to understand that this port is often already reserved for a monitor
.
Then you should pay attention to
DVI - VGA adapters
Before you connect the DVI connector to your TV , you need to understand that it does not work with audio. And to listen to movies, they resort to analog wires. It contains standard tips with a diameter of 3.5 mm on both sides and is widely used in devices that actively interact with sound.
Common inputs
Almost all TVs released since 2010 have the following ports:
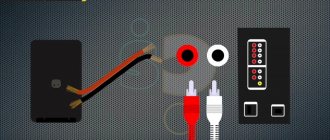
- AV (composite). Used for input/output of analog video and audio signals. Represented by a pair or three “tulip” connectors, often designated yellow and white (yellow is the Video signal, white and red are the Audio signal). This input was actively used in old equipment, including DVD players and satellite receivers. Nowadays it is practically not used, since the image transmitted through such a port has a low resolution.
- HDMI. Used for input/output of digital images in high resolution (up to 4K 60FPS), as well as audio signals (with support for multi-channel systems up to 12.1). There are several specifications for this port, which differ only in the maximum permissible resolution of the input/output image. One of the most common options for connecting a TV to a video source. Nowadays, game consoles, media players, modern satellite receivers, computers, laptops and even some smartphones (which have a MicroHDMI or MiniHDMI port) are connected to the TV via the HDMI connector.
- Component (YPrPb, component). Port for input/output of digital images in high resolution (up to FullHD 1080p). The cable is divided into 3 wires with “tulip” outputs, most often indicated in red, blue and green (one color is transmitted digitally through each port). Nowadays it is rarely used, since it has restrictions on the maximum resolution of the output image.
- DVI. Used for input/output of digital or analog images in high resolution. No audio signal is transmitted. More often, this connector is used to connect a TV as a monitor for a computer or laptop (which has a corresponding output).
- VGA. Used for high-resolution analog image input/output. Allows you to connect your TV as a monitor to a PC or laptop.
- S-Video. Unified connector for analog image transmission (signal separation is the same as for AV composite). Now it is practically not used. Found in old DVD players and satellite receivers.
- USB. Port for data exchange. You can connect a USB drive, an external hard drive to it, and some TVs also support Wi-Fi adapters with USB. Nowadays, along with USB, there are often also ports for connecting memory cards (the connection specification there is the same as in USB).
- RF. Antenna input (analog). There are several varieties, 13 in total (they differ in the division of the incoming signal). Their entire group is referred to as IEC75.
- SCART. Previously used to transmit high-definition images (digital or analogue). But it has a low maximum resolution. In older DVD players and satellite receivers, it was through SCART that it was possible to obtain a picture of the highest available quality. Now it is practically not used.
- LAN Found in smart TVs. Used to connect an RJ-45 cable for Internet data transfer. An actual option if your TV does not support Wi-Fi.
The following video provides a complete overview of all interfaces, connectors and cables:
In rare cases, you can find the following inputs on a TV (specialized):
- FireWire. Universal port for data/image transfer. Video cameras and some camera models are most often connected through it. Also at one time it was common in laptops.
- PCMCIA. Used to connect special adapters or memory cards. Some models use the newer PCMCIA specification - ExpressCard.
- SPIDF. Optical channel for high quality audio transmission. Before the advent of HDMI, it was the only option for getting good multi-channel audio without compression or conversion. Also used to connect some speaker systems.
The specified list of connectors (connectors on the TV) is mainly relevant for European countries. In Japan and Korea, TV models are often produced with proprietary connectors, that is, which are not found anywhere else.
In total, modern TVs really have quite a lot of ports. But their presence makes it possible to easily and quickly connect a computer, a game console, a speaker system of any class, and even an old DVD player to the TV.
What needs to be done to connect equipment
Below is a procedure for correctly and safely connecting a PC with a digital video interface to a TV:
- Unplug the power socket on both connected devices.
- Insert the plugs with the selected interface
into the PC and TV one by one. - Then the audio should be connected
using the AUX cord. -
audio
cable jack
on the TV. - After the completed operations, we finally provide power to the devices.
how to connect a TV to a computer via DVI in terms of hardware. Now it’s time to delve into the software settings in order to finally “make friends” of the connected equipment.
Computer connectors: their types and brief characteristics
You can connect the monitor to the system unit using a cord with one of the connectors: VGA, DVI, HDMI and DisplayPort.
Consider the possible options, their advantages and disadvantages, and choose the one that suits you.
This port is significantly better than VGA in any of the parameters. The main advantage is compatibility. Among the DVI types, the most popular are the following.
DVI-D is characterized by the presence of additional contacts for compatibility with the HDMI standard.
DVI-I – has pins compatible with both HDMI and VGA
The size of the cord, cable and conversion to digital format at the monitor input degrade the image.
Despite the resolution supported by the port, images on modern displays will not be clear
HDMI and DisplayPort are newer connection interfaces.
Corrects almost all the shortcomings of HDMI 1.4
There is a locking mechanism.
Can be converted to any formats.
Maximum resolution is 4K at 60 Hz. It is possible to transfer any data.
Multiple video streams over one connection.
High throughput
The connector does not have a locking mechanism
The maximum resolution of 4K is transmitted only at a frequency of 30 Hz.
No official support for wide formats such as 21:9 or multiple parallel video streams
VGA is an outdated interface that is used in inexpensive monitors. We recommend connecting the monitor to the system unit using this connector only if there are no other ports.
- Inspect the back of the system unit for video outputs. Almost at the very bottom, where the video card is connected, there is the required VGA port.
- Tighten the screws on the cable around the edges of the plug clockwise. Do not overdo it.
Read tips for choosing a monitor in the new article - “How to choose a good monitor?”
Software connection settings
In the TV settings, a special menu item is responsible for setting the incoming content stream. The remote control contains a button called SOURCE (i.e. translated from English as “source”) or INPUT (respectively “input”). The exact name of the button is determined by the specific TV manufacturer and display device model.
After pressing the SOURCE/INPUT button, a list will appear on the screen from which we need to mark the HDMI/DVI inscription. Then, using the remote control, go to the advanced settings of the TV and select DVI PC. This will be the signal
, which must be enabled before connecting.
The final setup step is to confirm the changes with OK
or Enter.
Popular questions about connecting and choosing a cable
Option 1: The monitor and computer have the same interface (HDMI or Display Port)
Perhaps this is the most favorable option. In general, it is enough to buy a standard HDMI cable (for example), connect devices using it and turn them on. No additional settings are required: the image is immediately displayed on the monitor.
Classic HDMI cable
Important!
Hot plugging HDMI may burn out the port! How to avoid this and what to do (if the monitor/TV via HDMI does not work) is described in this manual: https://ocomp.info/hot-hdmi-gorit.html
Option 2: devices have different interfaces. For example, on a laptop HDMI, on a VGA monitor.
This option is more difficult. Here, in addition to the cable, you need to buy a special adapter (sometimes the cost of such adapters reaches 30% of the new monitor!). It is better to buy both the cable and the adapter as a set (from the same manufacturer).
Also keep in mind that older PCs/laptops with VGA|DVI connectors may simply not produce a high-resolution picture if you want to connect a large monitor/TV to them.
HDMI to VGA adapter
Display Port to HDMI adapter
There are now quite a lot of adapters on sale that ensure the interaction of different interfaces with each other (VGA, Display Port, HDMI, DVI).
Almost any adapter can be ordered for next to nothing in a Chinese online store. The best of them are presented here: https://ocomp.info/kitayskie-internet-magazinyi.html
What if I take different versions of the HDMI connector?
If you mean form factor - i.e. Micro and classic size connectors, you need a special one to connect them. cable (possibly an adapter).
If we are talking about connecting a video card that supports the HDMI 1.4 standard (with 3D), say, to a monitor with HDMI 1.2, then the devices will work according to the HDMI 1.2 standard (without 3D support).
Does cable length matter? Which interface should you prefer?
Yes, cable length matters a lot. The longer the cable, the weaker the signal, the greater the likelihood of various interference, etc. Let's say, in the general case, it is undesirable for its length to exceed 1.5÷3 m.
Understanding PC settings
Now it’s the turn to install proper video
and audio stream. First, right-click the pointing device (mouse, touchpad) on the desktop monitor. In Windows versions seven and eight, a list will open in which you need to click on “Screen Resolution”. In Windows XP, instead of this inscription, there is the item “Properties: Display” and the “Settings” tab that appears in the window that opens.
In the monitor properties window, select the desired method
device operation. You can multiply the screen or simply increase its size and adjust the appropriate display quality.
Before you connect your TV to your computer (DVI ), it makes sense to take care of installing the latest graphics card drivers. If the TV is not identified, first give it power or reboot the system.