Television Setup
| Parameter | Start frequency | End Frequency | Symbol rate | Modulation |
| Meaning | 274000 kHz | 770000 kHz | 6750 KS/s | 256QAM |
| № | NAME |
| 1 | Instructions for reconfiguring LG TVs |
| 2 | Instructions for reconfiguring LG TVs / Old TV |
| 3 | Instructions for reconfiguring the LG 32LW575S TV |
| 4 | Instructions for reconfiguring Philips TVs |
| 5 | Instructions for reconfiguring Samsung TVs / New TV |
| 6 | Instructions for reconfiguring Samsung TVs / Old TV |
| 7 | Instructions for reconfiguring Samsung UE32FH4003W TVs |
| 8 | Instructions for reconfiguring Samsung UE43RU7400U TVs |
| 9 | Instructions for reconfiguring Toshiba TVs |
| 10 | Instructions for reconfiguring Sony TVs |
| 11 | Instructions for reconfiguring Sony KD-49XF7005 TVs |
| 12 | Instructions for reconfiguring Sony KD55XH8096 TVs |
| 13 | Instructions for reconfiguring the Sony KDL-32V5500 TV |
| 14 | Instructions for reconfiguring Thomson TVs |
| 15 | Instructions for reconfiguring the Thomson T42E04DHU-02B TV |
| 16 | Instructions for reconfiguring Thomson / Android |
| 17 | Instructions for reconfiguring Mystery |
| 18 | Instructions for reconfiguring the Mystery MTV 4223LT2 TV |
| 19 | Instructions for reconfiguring the TV BBK 22LEM-3082 |
| 20 | Instructions for reconfiguring the DEXP 42A9000 TV |
| 21 | Instructions for reconfiguring a JVC TV |
| 22 | Instructions for reconfiguring the DEXP F55B8100k TV |
| 23 | Instructions for reconfiguring a Haier TV |
| 24 | Instructions for reconfiguring the TCL L65P8US TV |
| 25 | Instructions for reconfiguring a Harper TV |
| 26 | Instructions for reconfiguring Samtron TV |
| 27 | Instructions for reconfiguring the Kivi 40F730GR TV |
| № | NAME |
| Instructions for setting up the TVIP S-Box | |
| Instructions for setting up the WRTech WR330 set-top box | |
| 1 | Digital cable receiver (DVB-C) Latel LC-808HD |
| 2 | Digital TV subscriber receiver BETO SS202 |
| 3 | Subscriber digital TV receiver DVB-C TLS 2005C |
| 4 | Subscriber digital TV receiver DVB-C TLS 2006C |
| 5 | Subscriber digital TV receiver DVB-C TLS 2007C |
| 6 | Subscriber digital TV receiver DVB-C TLS 2007C HD |
| 7 | Subscriber digital TV receiver DVB-C TLS 2007C HDCI |
| 8 | Subscriber receiver Intercross DVB-C IC*STB 500-41 |
| 9 | Cable tuner Lumax DV-2100C |
| 10 | Subscriber receiver Top Field TF 5100 PVRc |
| 11 | Subscriber receiver Top Field TF 6100 CoC |
| 12 | Digital cable receiver KAON KCF 220CO |
| 13 | Digital cable receiver KAON KCF 270CO |
| 14 | Digital receiver "Ufanet" |
| 15 | Digital receiver "Globo X1" |
| 16 | Digital receiver Skymaster hd xc2-03 |
| 17 | Digital cable receiver World Vision T62D |
Setting up digital TV on Samsung
Digital TV appeared in Russia several years ago and has been actively used since then.
And this is quite understandable. Firstly, having completed the setup just once, you do not need to constantly adjust the antenna or retune the TV in order to watch something else. Secondly, such television does not have interference in the form of stripes or snow. However, if there are any problems with the signal, then you will not be able to watch the programs. DTV format television is very popular among the population. If you want to connect free channels to your TV, you don’t have to call a specialist, since anyone can do it. The main thing is that your model supports DVB-C tuner standards.
Most devices released by Samsung have these standards. This can be either an outdated model or Smart TVs of the 6 series. Therefore, now we will talk about what should be done to set up digital channels on Samsung of modern and older series.
Instructions
Television Setup
| № | NAME | Instructions and firmware |
| 1 | Instructions for reconfiguring LG TVs | Instructions |
| 2 | Instructions for reconfiguring Philips TVs | Instructions |
| 3 | Instructions for reconfiguring Samsung TVs | Instructions |
| 4 | Instructions for reconfiguring Samsung TVs Option 2 | Instructions |
| 5 | Instructions for reconfiguring Toshiba TVs | Instructions |
| 6 | Instructions for reconfiguring Sony TVs | Instructions |
| 7 | Instructions for reconfiguring Thomson TVs | Instructions |
| 8 | Instructions for reconfiguring the Thomson T42E04DHU-02B TV | Instructions |
| 9 | Instructions for reconfiguring the Sony KDL-32V5500 TV | Instructions |
| 10 | Instructions for reconfiguring Samsung LE19C350D1W TV | Instructions |
| 11 | Instructions for reconfiguring the Mystery MTV 4223LT2 TV | Instructions |
| 12 | Instructions for reconfiguring the LG 32LW575S TV | Instructions |
| 13 | Instructions for reconfiguring the TV BBK 22LEM-3082 | Instructions |
| 14 | Instructions for reconfiguring the DEXP 42A9000 TV | Instructions |
| 15 | Instructions for reconfiguring a JVC TV | Instructions |
| 16 | Instructions for reconfiguring the DEXP F55B8100k TV | Instructions |
| 17 | Instructions for reconfiguring a Haier TV |
| № | NAME | Instructions and firmware |
| 1 | Digital cable receiver (DVB-C) Latel LC-808HD | Instructions || Firmware |
| 2 | Digital TV subscriber receiver BETO SS202 | Instructions |
| 3 | Subscriber digital TV receiver DVB-C TLS 2005C | Instructions |
| 4 | Subscriber digital TV receiver DVB-C TLS 2006C | Instructions |
| 5 | Subscriber digital TV receiver DVB-C TLS 2007C | Instructions |
| 6 | Subscriber digital TV receiver DVB-C TLS 2007C HD | Instructions |
| 7 | Subscriber digital TV receiver DVB-C TLS 2007C HDCI | Instructions || Firmware |
| 8 | Subscriber receiver Intercross DVB-C IC*STB 500-41 | Instructions |
| 9 | Cable tuner Lumax DV-2100C | Instructions |
| 10 | Subscriber receiver Top Field TF 5100 PVRc | Instructions |
| 11 | Subscriber receiver Top Field TF 6100 CoC | Instructions |
| 12 | Digital cable receiver KAON KCF 220CO | Instructions |
| 13 | Digital cable receiver KAON KCF 270CO | Instructions |
| 14 | Digital receiver "Ufanet" | Instructions || Setting up the remote control |
| 15 | Digital receiver "Globo X1" | Instructions |
| 16 | Digital receiver Skymaster hd xc2-03 | Instructions || Firmware |
| 17 | Digital cable receiver World Vision T62D | Instructions || Firmware |
Solve the problem yourself
Write to us in chat or
in a messenger convenient for you
Payment, date of next debit, chat with tech. support now in the mobile application
Source
Samsung setup
- Enter the menu and go to the “Channel” section;
- Go to "Country";
- If your TV starts asking for a PIN code, enter 1234, 0000 or 1111. These are classic passwords;
- In order to set up terrestrial or digital TV, go to “Other”;
- After this, you will need to go back and go to “Cable Search Options”;
- Here you will need to enter certain parameters. It is necessary to set the frequency to 290,000 kHz, the transmission speed to 6875 KS/s and the modulation to about 256 QAM;
- Now you again need to go back and go to “Auto Configuration”;
- Next, you need to click “Cable” as the signal source;
- Select "Digital". If you have not yet configured analog TV, then “Analog and digital”;
- Now, in search mode, go to “Network” and start the setup using the “Login” button.
Once everything is found, you will be able to watch the digital and terrestrial channels available in your region.
Which Search Type to choose: Full, Network, Quick.
Many people, when setting up their TV to receive cable channels, make mistakes by choosing the wrong type of channels. For example, when choosing Network, you will need to enter the starting and ending frequency, QAM modulation, and bit rate. These parameters are different for each operator, so don’t post anything here if you don’t know for sure. Therefore, by selecting Full search, the TV will tune in all available channels itself, only a little longer.
Setting up Samsung Smart TV
On TVs of the latest series that have the Smart TV function, it is easier to set up analog television. To do this, you need to perform fewer steps.
- Go to the Menu and go to the “Broadcast” tab, marked with an antenna;
- Now you need to select "Auto Configure";
- In the next menu also select “Auto Configuration”;
- Click on "Start";
- In the window that appears, select the full search mode and go to the “Scanner” menu;
- Wait until the TV detects all available channels and click “Close”.
Now you can enjoy watching TV.
Source
How to pay for Internet Ufanet
Connect high-quality satellite television and enjoy watching: rating of the best tricolor receivers in 2021
Payment for Ufanet Internet is possible in different ways. Some provide the possibility of remote payment, others require a mandatory visit to the company’s office.
You can top up your Ufanet account in the following ways:
- .
- Pay for the Internet using services.
- Top up your balance using .
- By transferring funds from an electronic wallet.
- Payment in cash.
Pay online on the website
You can pay for Ufanet with a bank card via the Internet in the user’s personal account. To do this, you need to, and then go to the “Account Management” section.
In this section, the client can find out the balance and also make online payments for Ufanet services.
When paying for the Internet in the Ufanet personal account, the client needs to click on the “Top up account” button. Next, a form will open in which the user’s phone number and payment amount are entered. After confirming the operation, the client will be redirected to the Sberbank payment page, where he can pay for Ufanet Internet with a bank card.
An alternative payment option is to use a special online payment form on the provider’s website. The procedure is as follows:
- On the main web page you need to find the “Express payment” button (not available in all cities).
- Select a payment method - by address or contract number.
- Provide relevant details.
- Then you need to select a contract.
- Enter the payment amount and click the “Pay” button.
- After this, the client will be redirected to a page with a payment form through Sberbank, as indicated in the payment option through a personal account.
How to pay for Ufanet through Sberbank online
Another option to top up the provider’s personal account is to pay for Ufanet through Sberbank online. The payment procedure via a bank card looks like this:
- You need to log in to Internet banking by logging into the Sberbank online service website;
- Among the available sections, you must select the “Payments and Transfers” menu;
- find a Ufanet provider;
- indicate the number of the agreement with the company and select a card for payment;
- enter the payment amount;
- Double-check the specified details;
- Pay for Ufanet with a Sberbank card.
Other payment methods
In addition to the options described above, other Ufanet payment methods are available to customers.
If the client has active electronic wallets Yandex Money, QIWI or WebMoney, then he can pay for Ufanet Internet under the contract, indicating its number in the payment purpose.
You can also deposit funds into your account in cash through Ufanet payment points. You can get information about which office top-up is available on the Internet provider’s website. In offices, the client can pay for Ufanet Internet using the contract number or make payment for Ufanet at the connection address. To do this, just give your login or address and give the cashier the funds to deposit into your account.
In addition, on the site you can get information about bank branches and self-service devices that allow you to pay for Ufanet according to the agreement or the user’s address.
Another way to pay for Ufanet with a bank card using an address or login is to use the Internet banking of various financial institutions (VTB, Alfa-Bank, RosselkhozBank, UBRD and others). Scheme of payment in Internet banking of various Internet banks. You need to log in to the service and find the section with payments. Next, use the search form to find the provider or enter its details. The service allows you to pay for Ufanet Internet by address or make a payment to Ufanet by contract number.
Instructions for reconfiguring Samsung TVs
Setting up digital channels on Samsung TVs (using the example of the LE -32C 530 model)
Depending on the model, the interface and menu structure may differ, but the general meaning and procedure remains relevant.
Step #1. Enter the main menu by pressing the [] button on the remote control.
In the "Channel" section, select "Country"
Step #2. The TV may ask for a PIN code.
If you haven't installed your own, try entering one of the standard ones: 0000, 1111, 1234
Step #3. The following country settings must be set:
Digital channel - Others
Step #4. Next, in the “Channel” section, select “Cable Search Options”
Attention! On models released later than 2010, this item may not be in the main menu, but may appear during Auto Configuration
Step #5. Enter Cable Search Options:
Start frequency 282000
Ending frequency 770000
Symbol rate 6750
Modulation 256 QAM
Step #6. Return to the “Channel” section of the main menu and select “Auto-tune”
Step #7. Specify the following options:
Signal source - “Cable”
Channel type - “Digital”
Step #8. Set the search mode to “Full” and click on the “Search” button
Step #9. If everything is done correctly, the TV should find about 190 TV channels and about 10 radio channels
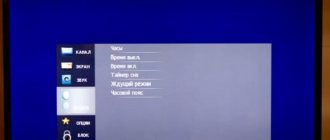
Step #10. After searching for channels, you need to adjust the TV's internal clock.
To do this, return to the main menu and in the “System” section, select “Time”
Step #11. Select “Clock” and specify the following parameters:
Source
Results
Ufanet digital television can be set up in minutes on any TV. The procedure for different equipment is very similar and consists of several elementary steps. Finally, let’s add that after searching for all TV channels, you can set the internal clock (GMT zone and “Auto” clock mode, this is done in the System - Time menu).
Ufanet is a popular provider in the Republic of Bashkortostan; the company specializes in providing access to TV and the World Wide Web. Digital television from Ufanet represents the best combination of high-quality sound and video, thanks to which you can experience genuine emotions when watching the action on the screen. When connecting to digital TV, users are completely immersed in their favorite shows and movies.
In order to configure channels for Ufanet correctly, it is important to know the procedure. The instructions described below will help you set up Ufanet digital TV for Samsung devices.
Checking if your Samsung TV supports digital TV
Before we begin directly searching for channels, let’s make sure that the TV is generally capable of receiving “digital”. Samsung's lineup includes many series and even more individual models. Not all of them have a built-in digital tuner, and some, although equipped with one, are made for the old DVB-T standard, and not DVB-T2, which is now used in Russia.
To do this, enter the model number in the “Search” line. If you find one, you can proceed to configuration.
| Model | Diagonal | DVB-T2 support |
| 19H4000 | 19 | + |
| LT19C350EX | 19 | + |
| LT22C350EX | 22 | + |
| LT23C370EX | 23 | + |
| LT24C370EX | 24 | + |
| LT27C370EX | 27 | + |
| PE43H4000 | 43 | + |
| PS43E497B2 | 43 | + |
| PS43F4900AK | 43 | + |
| PS51E497B2KXRU | 51 | + |
| PS51E537A3 | 51 | + |
| PS51E557D1 | 51 | + |
| PS51E6507 | 51 | + |
| PS51E8007G | 51 | + |
| PS51F4900AK | 51 | + |
| PS51F5500AK | 51 | + |
| PS51F8500AT | 51 | + |
| PS60F5000AK | 60 | + |
| PS64D8000 | 64 | + |
| PS64E8007 | 64 | + |
| PS64F8500AT | 64 | + |
| T24D310EX | 24 | + |
| T24D390EX | 24 | + |
| T24D391EX | 24 | + |
| T24D590EX | 24 | + |
| T27D390EX | 27 | + |
| T27D590EX | 27 | + |
| T28D310EX | 27 | + |
| UE22F5000AK | 22 | + |
| UE22F5400AK | 22 | + |
| UE22F5410AK | 22 | + |
| UE22H5020 | 22 | + |
| UE22H5600 | 22 | + |
| UE22H5610 | 22 | + |
| UE24H4070 | 24 | + |
| UE24H4080 | 24 | + |
| UE28H4000 | 28 | + |
| UE32EH5007 | 32 | + |
| UE32EH5047 | 32 | + |
| UE32EH5057 | 32 | + |
| UE32EH5307 | 32 | + |
| UE32ES5507 | 32 | + |
| UE32ES5537 | 32 | + |
| UE32ES5557 | 32 | + |
| UE32F4500AK | 32 | + |
| UE32F4510AK | 32 | + |
| UE32F5000AK | 32 | + |
| UE32F5020AK | 32 | + |
| UE32F5300AK | 32 | + |
| UE32F5500AK | 32 | + |
| UE32F6100AK | 32 | + |
| UE32F6200AK | 32 | + |
| UE32F6330AK | 32 | + |
| UE32F6400AK | 32 | + |
| UE32F6510AB | 32 | + |
| UE32F6540AB | 32 | + |
| UE32F6800AB | 32 | + |
| UE32H4000 | 32 | + |
| UE32H4270 | 32 | + |
| UE32H4500 | 32 | + |
| UE32H4510 | 32 | + |
| UE32H5303 | 32 | + |
| UE32H5500 | 32 | + |
| UE32H6230 | 32 | + |
| UE32H6350 | 32 | + |
| UE32H6410 | 32 | + |
| UE37ES6710 | 37 | + |
| UE39F5000AK | 39 | + |
| UE39F5020AK | 39 | + |
| UE39F5300AK | 39 | + |
| UE39F5500AK | 39 | + |
| UE40EH5007 | 40 | + |
| UE40EH5047 | 40 | + |
| UE40EH5057 | 40 | + |
| UE40EH5307 | 40 | + |
| UE40ES5507 | 40 | + |
| UE40ES6307 | 40 | + |
| UE40ES6547 | 40 | + |
| UE40ES6557 | 40 | + |
| UE40ES6857 | 40 | + |
| UE40ES6907 | 40 | + |
| UE40ES7207 | 40 | + |
| UE40ES7507 | 40 | + |
| UE40ES8007 | 40 | + |
| UE40F5000 | 40 | + |
| UE40F6100AK | 40 | + |
| UE40F6130 | 40 | + |
| UE40F6200AK | 40 | + |
| UE40F6330AK | 40 | + |
| UE40F6400 | 40 | + |
| UE40F6500AB | 40 | + |
| UE40F6510AB | 40 | + |
| UE40F6540AB | 40 | + |
| UE40F6650AB | 40 | + |
| UE40F6800AB | 40 | + |
| UE40F7000AT | 40 | + |
| UE40F8000AT | 40 | + |
| UE40FH5007K | 40 | + |
| UE40H4200 | 40 | + |
| UE40H4203 | 40 | + |
| UE40H5003 | 40 | + |
| UE40H5020 | 40 | + |
| UE40H5203 | 40 | + |
| UE40H5270 | 40 | + |
| UE40H5500 | 40 | + |
| UE40H6230 | 40 | + |
| UE40H6240 | 40 | + |
| UE40H6350 | 40 | + |
| UE40H6410 | 40 | + |
| UE40H6500 | 40 | + |
| UE40H6650 | 40 | + |
| UE40HU7000 | 40 | + |
| UE42F5000AK | 42 | + |
| UE42F5020AK | 42 | + |
| UE42F5300AK | 42 | + |
| UE42F5500AK | 42 | + |
| UE46EH5007 | 46 | + |
| UE46EH5047 | 46 | + |
| UE46EH5057 | 46 | + |
| UE46EH5307 | 46 | + |
| UE46EH6037 | 46 | + |
| UE46ES5507 | 46 | + |
| UE46ES5537 | 46 | + |
| UE46ES5557 | 46 | + |
| UE46ES6307 | 46 | + |
| UE46ES6547 | 46 | + |
| UE46ES6857 | 46 | + |
| UE46ES6907 | 46 | + |
| UE46ES7207 | 46 | + |
| UE46ES7500 | 46 | + |
| UE46ES7507 | 46 | + |
| UE46ES8000 | 46 | + |
| UE46ES8007 | 46 | + |
| UE46F5000AK | 46 | + |
| UE46F5020AK | 46 | + |
| UE46F5300AK | 46 | + |
| UE46F5500AK | 46 | + |
| UE46F6100AK | 46 | + |
| UE46F6330AK | 46 | + |
| UE46F6400AK | 46 | + |
| UE46F6500AB | 46 | + |
| UE46F6510AB | 46 | + |
| UE46F6540AB | 46 | + |
| UE46F6650AB | 46 | + |
| UE46F6800AB | 46 | + |
| UE46F7000AT | 46 | + |
| UE46F8000AT | 46 | + |
| UE46F8500AT | 46 | + |
| UE48H4200 | 48 | + |
| UE48H4203 | 48 | + |
| UE48H5003 | 48 | + |
| UE48H5020 | 48 | + |
| UE48H5203 | 48 | + |
| UE48H5270 | 48 | + |
| UE48H5500 | 48 | + |
| UE48H5510 | 48 | + |
| UE48H6230 | 48 | + |
| UE48H6350 | 48 | + |
| UE48H6410 | 48 | + |
| UE48H6500 | 48 | + |
| UE48H6650 | 48 | + |
| UE48H6800 | 48 | + |
| UE48HU8500 | 48 | + |
| UE50ES5507 | 50 | + |
| UE50ES6907 | 50 | + |
| UE50F5000AK | 50 | + |
| UE50F5020AK | 50 | + |
| UE50F5500AK | 50 | + |
| UE50F6100AK | 50 | + |
| UE50F6130 | 50 | + |
| UE50F6330AK | 50 | + |
| UE50F6330AK | 50 | + |
| UE50F6400AK | 50 | + |
| UE50F6500 | 50 | + |
| UE50F6650 | 50 | + |
| UE50F6800AB | 50 | + |
| UE50HU7000 | 50 | + |
| UE55ES6307 | 55 | + |
| UE55ES6547UXRU | 55 | + |
| UE55ES6557UXRU | 55 | + |
| UE55ES6857 | 55 | + |
| UE55ES6907UXRU | 55 | + |
| UE55ES7507 | 55 | + |
| UE55ES8007 | 55 | + |
| UE55F6100AK | 55 | + |
| UE55F6400AK | 55 | + |
| UE55F6800AB | 55 | + |
| UE55F7000AT | 55 | + |
| UE55F8000AT | 55 | + |
| UE55F8500AT | 55 | + |
| UE55H680 | 55 | + |
| UE55H6500 | 55 | + |
| UE55H6650 | 55 | + |
| UE55HU7000T | 55 | + |
| UE55HU7500T | 55 | + |
| UE55HU8700T | 55 | + |
| UE55HU9000T | 55 | + |
| UE60F6100AK | 60 | + |
| UE60F7000AT | 60 | + |
| UE65ES8007 | 65 | + |
| UE65F6400AK | 65 | + |
| UE65F8000AT | 65 | + |
| UE65F90800 | 65 | + |
| UE65HU7500T | 65 | + |
| UE65HU8700T | 65 | + |
| UE65HU9000T | 65 | + |
| UE75ES9000 | 75 | + |
| UE75ES9007 | 75 | + |
| UE75F6300 | 75 | + |
| UE75F6400AK | 75 | + |
| UE75F8200 | 75 | + |
| UE75HU7500T | 75 | + |
| UE78HU9000 | 78 | + |
| UE85S9AT | 85 | + |
| UE105S9 | 105 | + |
"Service information"
In the subsection, the subscriber can check the tariff plan or change it, track the Internet speed at different times of the day, activate one or another tariff option, check the total cost of services operating at a given time, and receive a report on operating hours.
The tariff plan begins to operate the first time you log into the network, if the balance is positive. It is valid from the date of activation for 30 days. But it is also possible to change the tariff to another one with a higher speed. The main thing is that there is money in the account.
One of the important and pleasant features of Ufanet tariff plans is activation upon receipt of the subscription fee. For example, if a person went on vacation for a month or two, then there is no need to pay anything for communication. And the contract is not suspended, and money is saved.
In addition, he can create a “passphrase” in this subsection. This is the name of the subscriber’s personal password, with the help of which he can obtain complete reference information on the volume of services provided, on the balance of his personal account, as well as traffic details and other data.
The option is actually very convenient. All you need to do is dial 09388 from your mobile phone (the call is free), give the code phrase and get all the necessary information. Or tell the code phrase to an employee at the operator’s office.
In this case, you need to be careful and not share the code phrase with other people, because it can easily be used to obtain the subscriber’s personal information, including his contact phone numbers.
Also in this subsection you can change passwords and use a new one. It allows you to view either archived recordings or online video from cameras installed in the yard if a force majeure situation occurs.
Determining the series: deciphering the model number
Digital channel setup varies depending on which series a particular Samsung model belongs to.
Therefore, we first need to determine which specific TV receiver we are dealing with.
You can do it like this:
- Take a look at the back panel.
There should be a factory sticker with basic information about the TV: power type, year of manufacture, etc. At the very top there will be a combination of numbers and Latin letters - this is the model code; - Go to the TV menu.
Select the “Support” item and the “Contact Samsung” item, information about the equipment will appear, including the desired combination of letters and numbers.
Let's decipher the found number in order to determine the letter denoting the series:
in 2014 it was designated as AU (U);
AT (T) - 2 x DVB-T2/C/S2.
| UE | Screen type | UE / LE - LCD TV; PS / PE - plasma TV. |
| 40 | Screen size (inches) | From 19″ to 105″ |
| J | Series (corresponds to production date) | |
| — | Matrix type (sometimes not specified) | P—plasma. |
| 5200 | Model | Just a digital designation |
| AU | Digital tuner type |
Go to the settings interface
After connecting your computer to any LAN port via a patch cord, do not immediately supply power to the router. Check that the network card is set to "auto" IP and DNS. You need to open the parameters of the TCP/IP v4 protocol:
Setting up a wired connection on a PC
But even if all the selectors were set correctly, right-click on the connection icon and select the “Fix” line. Lastly, turn on the corded harvester itself.
The device will boot up in about a minute. Then you open your browser and go to this address: 192.168.0.1. For non-D-Link devices, the address ends with "1.1". A form with an authorization request will appear in the browser window. For the model we are considering, the administrator login and password are the word “admin” without quotes. After successfully logging into the interface, we recommend switching the language to Russian.
What is displayed when you log in
It is important to know that if you cannot go to the interface using standard methods, do the following. After loading the router, press the reset button on it, holding it for 10-12 seconds. As a result, all settings will be reset (each of them will return to its default value). Then, you can repeat the steps discussed in this chapter - everything should work as it should.
Automatic tuning of digital channels on Samsung
The easiest way to set up your antenna connection yourself is to run an automatic search. Let's take a step-by-step look at how to organize the reception of digital TV channels for models of different series and years of manufacture.
M, Q and LS Series
After the cable from the indoor, outdoor or communal antenna is connected and the TV itself is turned on, you need to do the following:
- Turn on the general menu using the “Home” button on the remote control.
- Select the "Source" item. In it you need to indicate the “TV” option.
- Turn on the menu again using the same button, select “Settings”.
- Go to the “Broadcast” line and select “Auto Configuration”.
- Click the Start button. A warning will appear on the screen stating that as a result the existing list of TV channels will be deleted.
- Select the signal source. You can specify “Antenna” (for terrestrial digital TV), “Cable”, “Satellite dish”, etc., depending on what kind of television you connect.
- Select channel type. You can specify “Digital” or “Digital and Analog”. In the second case, you will not have to further configure the connection of each local analog channel if they are broadcasting.
- If you are setting up paid channels, the interface will ask you to specify an operator. For cable, select Other. Since terrestrial television does not have this parameter, we simply move on.
- Specify the mode in which the search will be performed. Select the "Full" option. In this case, the system will search for everything that can be caught from the antenna.
- Start the procedure by clicking the "Scan" button.
- The found channels will begin to appear on the screen (both TV, separately digital and analogue, and radio stations) and an indicator showing which part of the range has already been scanned.
- After the completion message, press the “Close” button and exit the menu (on the remote control - “Return”).
You can start watching.
H, F, E and J Series
For models in this series, the setup process will look slightly different:
- Turn on the TV and use the “Source” button on the remote control to select “TV”.
- Open the menu (using the button of the same name or “Keypad” and selecting the “Menu” position on the screen).
- Select "Broadcast" and then "Auto Configure".
- Activate auto-tuning again.
- At the message warning you about changing your settings, click the Start button.
- Select the source from which the signal will come: “Antenna”, if you are setting up to receive free broadcasting of the DVB-T2 standard, or “Cable”, if you are connecting cable television.
- Specify the channel type. Here it is better to select “Digital and analog”, so as not to repeat a separate setting for the remaining analog programs on air.
- Select scan type. To catch as many channels as possible, you need to select the “Full” option.
- The “Scan” button is pressed.
- After the process is completed, click the “Close” button and exit the menu.
The new Ufanet service allows you to watch your favorite programs wherever and whenever it is convenient
The developers have put together functions in the application that make it possible not to “share” the TV in the family.
Does it often happen that you missed your favorite show or movie on air because you returned home late from work? Or at home the husband wants to watch a football match, the wife wants to watch a TV series, and the child can’t wait for an exciting cartoon to start on TV, but there is only one TV in the house!
The service for Ufanet TV subscribers will help in these situations! The developers have put together convenient functions in this application for smartphones, tablets and TVs that allow you not to “share” the TV in the family, as well as watch your favorite programs in the archive and even outside the Ufanet network* (for example, if you went to the countryside or on vacation ).
Television “Ufanet TV” is:
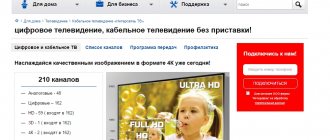
· More than 220 TV channels
There is something to choose for every family member: a large collection of children's TV channels, news and information, film, nature and travel TV channels and much more!
· Favorite programs at a convenient time!
You can watch your favorite programs within 14 days from the date of broadcast**.
· Movies every day
At Ufanet TV you can find a movie to your liking for an evening! The choice will be made easier by sorting by genre, release date and other parameters in the application library.
· Pause and rewind the broadcast
If you miss something interesting, you can always rewind the broadcast recording. And if you suddenly need to leave, just pause the broadcast and continue watching later!
Television “Ufanet TV” can be installed both on “gadgets” and on televisions – both modern, with support for the Smart TV function, and on “regular” ones (a special set-top box is provided for rent).
Up to 5 people in a family can use the application with one login and password: they will have separate accounts within the application. Each profile can be named differently: “Mom”, “Dad”, “Child”, etc., it will have its own viewing history and its own recommendations.
It’s also convenient that in “Ufanet TV” you can start watching a movie or program on one device (for example, a TV in the living room), and continue on another (smartphone) by simply logging into your account: the stopped program will start playing from the moment on where you stopped!
Additional subscriptions to the Amediatreka and MegoGo services are also available directly in the application at a special price.
Ufanet TV (Ufanet TV) is a television service of Ufanet JSC using the technology of delivering TV channels using the Internet protocol.
*The list of channels available outside the Ufanet network is determined by the TV channel broadcasters. **The list of channels through which the archive is available, as well as the archive storage period, is determined by the TV channel broadcasters.
JSC "Ufanet", OGRN 1050204596914. Services are provided subject to technical availability. Reception and viewing/listening of channels depend on the characteristics and settings of the subscriber equipment.
Source
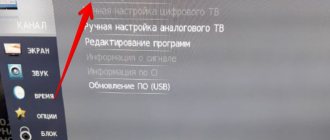
Manual channel search
The oldest Samsung models do not support Auto Configuration. In them, digital channels must be configured manually, and for cable or satellite television, you must also indicate the frequency and other key parameters. In general, a manual search will look like this:
- The menu opens.
- Select the “Broadcast” item.
- The signal source is indicated (cable, antenna or satellite).
- If the “Country” item appears in the menu, you must indicate “Russia”.
- Select the “Manual configuration” item.
- Select the “Set up digital channels” item, where you need to click the “Create” button. In this case, additional TV channels will be added to the existing ones, and will not replace them.
- A tab with parameters will open. Here you need to specify the broadcast frequency, module and baud rate. This information should be obtained from the operator providing access to the cable or satellite signal. For terrestrial TV, indicate the broadcast frequencies of multiplexes.
- After pressing the “OK” button, the TV will begin searching according to the specified parameters. After a while, a list of found channels will appear on the screen. You need to save them - and you're ready to start watching.
Connecting the cable
Router connection diagram.
First, take a cable equipped with a connector at both ends, called a patch cord. Plug the router into a power outlet, and connect one end of the cable to the network card of your device, and the other to the Ufanet router. You can connect to any of the four ports that are highlighted in yellow.
Then we will need an Internet cable that goes from the entrance to your living space. It needs to be connected to the router via the blue connector intended for the Internet. That's it, the connection is complete.
Adding local analogue channels
If from the very beginning during auto-tuning it was indicated that both digital and analogue broadcasting were being searched, then there is no need to add anything, all TV channels have already been found. You also need to remember that some modern TV models no longer support manual tuning of over-the-air channels; they need to rescan the entire range again in auto-tuning mode.
The algorithm of actions here is as follows:
- Turn on the menu, open the “Broadcast” tab.
- Select the signal source. In our case, this is an antenna.
- Switch to Manual Configuration mode.
- Specify the search for analogue channels only.
- Select "Create".
- Searching for analogue broadcast channels will take a few minutes.
Features of viewing channels through a set-top box
Outdated TV models do not support digital television. They are able to recognize new channels only through special equipment - set-top boxes. They can be purchased at digital equipment stores or ordered an Internet and TV connection from cellular operators that serve a multi-story building.
When choosing a digital set-top box, you should pay attention to the connecting cable connected to the TV. Look what connectors you have: HDMI 2.0 or 2.1, tulips
Buy an adapter to connect the set-top box and TV.
How to connect and configure the set-top box
Before setting up digital television on Samsung TVs via a set-top box, you need to assemble and connect the equipment. To do this, do:
- Check the installation of the antenna, which should match with the set-top box. Installation and configuration instructions are included with the equipment. Cellular operators offer cable connection through a common wire installed in the entrance.
- Select and purchase a suitable receiver. It is selected according to the number of additional options. There are options with the ability to record information, media player, scheduler, and TimeShift functions.
- Look at the option of connecting the receiver to the TV: tulips, HDMI, antenna cable. Buy an adapter.
- Connect the equipment and turn it on. Configure 20 basic channels available for free viewing.
If you want to watch more channels, you will have to buy a special CAM module for a receiver with an antenna. Then the number of TV shows will depend on the selected package.
Channel tuning: automatic, manual
General scheme for searching TV programs for receivers:
- On the remote control of the set-top box, find the “Menu” button, most often this is the Source key
- In the window that opens, click HDMI 1 – digital broadcasting will go through it.
- Find “Autosearch” and press start. The set-top box itself will select the appropriate frequency and save TV programs.
The exact sequence of searching for TV channels depends on the selected model of the receiver or the cellular operator to which you connected to watch digital television.
What to do if the TV does not see channels when searching
Automatic digital TV setup on Samsung does not always go smoothly. The causes of failures may lie in the antenna, receiver, or proper connection of the TV to the equipment. To eliminate and restart auto search you must:
- Check that the receiver is connected correctly to the TV. If the connection is incorrect, the TV will not recognize the device and when you press HDMI 1, the “no signal” information will be displayed.
- Reset the receiver settings to factory defaults - perform a full reboot. To do this, go to the menu, find the “Settings” item and “Reset” or “Restore factory settings”. If a password is required, enter 0000, 1111 or 1234.
- Try reconfiguring or reconnecting the antenna. You can purchase a signal amplifier that will provide a high-quality connection. Consider the location of the house relative to the tower. The further away it is, the stronger the antenna is needed.
Exact recommendations for additional digital television settings on Samsung TV depend on the equipment model.
Removing unnecessary channels and adjusting the order
To remove unnecessary channels, proceed as follows:
- Open the menu, go to the settings section and select “Broadcast”.
- Go to "Change Channels".
- Using the “Enter” button, you need to check the boxes that need to be deleted.
- Select “Delete” from the side menu.
- Press the Yes button to confirm and switch the TV to normal mode. Immediately after this, you can make sure that unnecessary channels are gone.
If we are talking about Samsung Smart TV, then removal is easier:
- Using the “Smart Hub” button you need to go to the system hub.
- In the form with the listed channels, you need to select the editing section (usually it is on the right at the top of the table).
- Guided by the system prompts at each step, you can select all unnecessary TV channels and delete them.
As for the order of channels, the TV arranges them in two ways:
- independently in the order in which I was able to find them during auto-tuning;
- using a list sent by the operator (as, for example, when connecting to NTV+ channels).
In the second case, sorting is impossible: you cannot reconfigure what the operator has installed, you can only delete unnecessary channels. In the first, the sorting looks like this:
- Go to the menu, select “Settings”.
- Click on “Broadcast” and go to the “Advanced Settings” tab.
- Select "Change" channel numbers" and specify "Enable" if the item is highlighted. If it is inactive, then proceed to the next step.
- Select “Change channel number” or go to the “Live broadcast” section (depending on the interface option).
- Here you need to open the “Channel List” tab and go to the “Change Channel” item.
- The desired TV channel is selected using the “Enter” button on the remote control; the check mark next to it lights up.
- Select the “Change number” option and use the arrow keys on the remote control to drag the channel to a new location.
- By pressing “Enter” again, the check mark is removed and the result is recorded.
If necessary, the procedure is repeated the required number of times.
When sorting channels on Samsung TVs, you need to take into account one of their features: if the digital ones in the general list are signed and have names, then the analog ones have only serial numbers. Accordingly, when sorting, the picture will be as follows:
- The digital channels will move in the list and one of them will take the position of the other.
- The list of analogue ones will not change, only a different program will be accepted under the old number.
Setting up a PPTP connection
We hope that the provider's cord is already connected to the WAN port of your router. If this is not the case, then know that you can make the connection when the device is completely de-energized. The following information must be written on the sheet:
- Ufanet subscriber login;
- The value of his password;
- VPN server domain name (it is always: pptp.ufanet.ru).
The digital address of the VPN server used at the time of writing this review is 10.8.0.1. This value can be substituted for the domain name, but the provider does not recommend this to anyone, be aware of this.
Actually, the interface of most home routers allows you to set an HTTP address, and not a set of numbers for the IP address. And we must use this. By explicitly specifying the VPN IP, we do not take into account the fact that the provider itself has the right to change the value of this IP at any time. And the network harvester that we are setting up allows you to set a name (a sequence of letters of the HTTP address) in the “VPN server” line.
Go to the WAN port settings tab
Open the GUI as discussed above. Switch it to the “Advanced Settings” mode, click on the “WAN” link.
Main page of the web interface
A tab will appear on which you need to click the “Add” button. A page with connection parameters should open.
Now we will set up a connection with Ufanet. You need to do the following:
Internet channel parameters tab (start)
- In the top list, select the value “PPTP + Dynamic IP”;
- Be sure to uncheck the “Enable IGMP” checkbox; you can do the same with the “Ping” option;
- Scroll down the engine on the right side of the tab;
- Fill in the fields with an asterisk: login, password, its confirmation, VPN server address;
- Select the authentication algorithm “CHAP” (but you can leave “AUTO”);
- Uncheck the “Ping” box and click the “Save” button.
Internet channel parameters tab (continued)
Finally, you need to remember the changes you made. To do this, select the “Save” item in the top menu. and Reboot", and after the combine is rebooted, it will connect to the provider automatically.
Some important setup notes
The device that we configured contains the “correct” parameter values by default. This will not always be the case, and it is important to know the following. The “Keep Alive” checkbox, which is contained in the settings tab, must be checked in any case. And for D-Link routers this applies to two more options - “NAT” and “Firewall”. Without them, the connection does not work at all, even regardless of the protocol type.
But what will happen if you use the “Ping” option (in other models it is called “WAN Ping Respond”). Just like a computer connected directly to an ISP, a router receives a specific IP address. From the external network, ping requests can be sent to this address. We did not enable this option so that our router would not respond to these requests.
When will iPad mini 5 come out?
2021-11-08 15:36:05
Operation timeout: causes of error and methods for fixing it
2021-11-03 11:08:16
Recovering the hard drive
2021-10-29 17:53:41
How to set up digital TV on an old Samsung that doesn’t support digital TV
If it turns out that the television receiver is not capable of receiving the current broadcast standard or is not equipped with a digital tuner at all, the user can do the following:
- Buy a new TV. Not the most affordable option.
- Connect a digital set-top box-receiver. If you only need to watch programs, then this option will cost several times less than buying a second TV.
There may be a separate difficulty associated with using the receiver: it does not pick up analogue television signals. If you want to watch both local and national programs, take care not only of the appropriate type of antenna, but also of a splitter for the antenna cable. It is needed so that the signal reaches both the receiver and the antenna socket of the TV at the same time. Then the transition between different types of broadcasting will be carried out as follows:
- a digital channel is required - the TV switches to AV mode;
- you need analog - switch to TV mode.
Advantages of digital TV
If we compare digital with analog television, then all the facts speak in favor of the first type of data transmission. This TV is based on signal transmission by encoding not only images, but also sound. To transmit the processed signal, TV channels in MPEG format are used (this is a generally accepted standard).
This TV provides the following:
- clear, high-quality images with realistic color palette;
- high sound quality;
- three-dimensional picture;
- one frequency range is capable of supporting several TV channels;
- the signal transmitted through such a TV channel is protected from external interference;
- Signal transmission is resistant to interference - resulting in no white noise (or sand) and no white horizontal lines.
From our article, the reader learned how to set up cable and digital television, as well as how to search in the Smart TV format.
Did this article help you set up your TV?
"Service management phone"
By activating this useful service in your personal account, the subscriber will never forget to top up his balance on time. You will receive messages on your phone a day or two in advance about the need to top up your account.
Connecting is simple - just enter the phone number and the number of days for which messages should be received in special windows on the site. Disabling the service is also easy - you just need to delete the previously entered phone number and messages will no longer bother you.
In addition, through this service the company will inform the subscriber about ongoing promotions, new services, and special offers.
The service also allows you to recover your lost password, Internet login credentials, and track auto payments.