Digital terrestrial television - what is it, what are the advantages and what is the difference?
I will try to explain everything in simple words.
Terrestrial television is television that is transmitted using a signal that is broadcast using television towers. Terrestrial television can be divided into:
- Analog. The old format, which is now being actively disabled in many countries. Including in Ukraine and Russia.
- Digital. A new format that allows you to receive and watch channels in the best quality. The digital format is less sensitive to interference. Can broadcast more channels.
Until recently, our televisions received analogue television using a regular antenna (they may still receive it now, if it has not yet been turned off in your country). As technology develops, analog television is simply outdated. Therefore, a smooth transition to digital television in the DVB-T2 format began a long time ago.
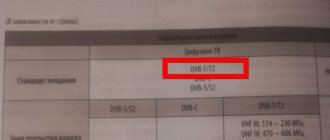
DVB is a set of digital television standards. DVB-T is an outdated format. DVB-T2 is a new format.
Digital TV has many advantages over analogue. The first and very big plus is signal compression. Due to this, the maximum number of on-air channels that can be broadcast has increased. At the same time, the quality of image and sound has improved, which is simply necessary for modern, large TVs. It also became possible to transmit information about a TV show, information about the following programs, etc.
Depending on the country, channel broadcasts are divided into packages. In Ukraine, for example, you can watch 32 channels in digital quality for free. These are 4 packages (multiplex) of 8 channels. For example, due to a bad signal, I only receive 2 packets (16 channels). In Russia there are two free packages. Each broadcasts 10 channels.
It's like there aren't many options. If we want to watch terrestrial television, then we will have to switch to T2. Or install a satellite dish, connect IPTV, or cable television. In villages and small towns, most likely there are only two options left: satellite TV, or terrestrial T2. Which is better is up to you to decide. Perhaps later I will write an article on this topic.
How to set up digital channels on an old TV
Digital TV is connected to an old TV using a set-top box (DVB-T2 tuner). The cost of such a device ranges from 600-1500 rubles. The tuner receives the signal and converts it into a supported format. It’s cheaper and easier to buy a set-top box than a new TV, but this also has its own nuances - you can’t always set up a digital set-top box.
Set-top box for watching digital TV
What TVs are digital set-top boxes suitable for?
Almost every modern TV is equipped with a connector for a special cable that transmits the signal. New TVs can receive and process it, as well as use additional functions of such broadcasting. Older models cannot do this, but if there is a tuner, then this task is assigned to it.
It is important to understand that by old we mean models that were released in the late 90s and early 2000s or later. These already have connectors that allow you to connect a tuner to them.
Older models, for example, Soviet tube models, are not suitable for receiving digital broadcasts, even if you use a tuner. Older models simply do not support connecting third-party devices.
Look at what TV you have. If it has SCART or “Tulip” connectors (Multi-colored cables, usually red-yellow-white), then this means that it is suitable for receiving TV channels.
If your TV has such connectors, you can easily connect a digital set-top box.
If they are missing, you won’t be able to watch TV. There are no additional adapters or connectors to which the tuner could be connected on very old (pre-90s) models.
By the way, we recommend: the top 10 best digital set-top boxes of this year.
Connecting a digital television set-top box on an old TV
To watch digital TV from an old TV, . After this you need to buy a DVB-T2 set-top box. Any one will do for an old TV; they may differ in the number of channels. Before purchasing, you need to understand what connector you have. There are two types:
via SCART connector
Looks like a plug. Combines audio, video and other connectors. In order to connect to it, you need to buy a special adapter (if the tuner is not already equipped with such a cable).
via "Tulip"
3 connectors of different colors, mainly red, yellow and white (other variations may occur). Most tuners are equipped with just such an input.
So, you have decided which connector you have and whether you need additional adapters for connection. Now, let's find out how to connect a digital set-top box to an old TV.
Setup procedure - connection instructions
Turn on the TV to make sure it is working. We take our DVB-T2 tuner and connect an antenna to it. We have a special cable for this. To connect, screw the cord into the tuner, making sure the cable fits snugly into the input. Next, you can start connecting the tuner to the TV.
There are two options - Scart connector or “tulip”. If you have a “tulip”, then simply connect three wires to the TV, and then to the set-top box. It is important to do everything according to the colors, that is, white to white, yellow to yellow and red to red.
If you have a SCART connector, then you will need an adapter to connect “tulips” to it. On one side of the adapter there is a Scart connector, and on the other there are tulip inputs.
After connecting the tuner, check if it works. To do this, turn on the TV and tuner. The tuner comes with a separate remote control, so now you will have to constantly turn on the TV and the tuner separately. If you did everything correctly, then it should work, and you will be able to receive broadcasts and watch channels.
Necessary equipment for connection
As with any other connection, the appropriate components are required. In fact, the kit is very basic and all its elements should not cause difficulties in understanding. The list is as follows:
- set-top box with digital broadcasting support;
- antenna for “catching” a DVB-T2 signal;
- connection cables;
- RF modulator is for TVs that can easily be called “veterans”. It will be needed if the TV operates based on a lamp design. They don’t have even close to the concept of connecting via a “tulip” or any other connector.
Having prepared all the equipment, you can move on to the next stage - connection methods.
List of free terrestrial digital television channels
The DVB-T2 digital terrestrial television system allows, unlike analog television, to transmit up to ten channels at once on one carrier frequency. Therefore, the list of channels approved for free broadcasting is divided into groups of ten channels each.
A selection of ten channels are broadcast over the air using one set of equipment called a Multiplex. To eliminate mutual influence, each Multiplex operates on its own carrier frequency in the decimeter range (UHF) 470-862 MHz, in which analogue programs were also broadcast. Therefore, to receive a DVB-T2 digital signal, there is no need to change the antenna and cables if they are designed for UHF reception.
| List of channels of the RTRS-1 multiplex | ||||
| Number | Channel name | Logo | Genre | Founder |
| 1 | First | The main TV channel in Russia. News, politics, educational and entertainment programs, films | VGTRK | |
| 2 | Russia 1 | The flagship of VGTRK. Has single air windows for all regional branches. News, politics, educational and entertainment programs, films | VGTRK | |
| 3 | Match TV | Sports programs and everything related to sports | Gazprom-Media Holding | |
| 4 | NTV | The first private TV channel is a serious competitor to state channels in terms of professionalism and quality of programs | Gazprom-Media Holding | |
| 5 | Channel 5 | It is the successor of Leningrad Television. News, politics, educational and entertainment programs, films | National Media Group Government of St. Petersburg | |
| 6 | Russia-Culture | The TV channel presents viewers with a wide range of programs dedicated to various areas of cultural and social life | VGTRK | |
| 7 | Russia 24 | News, politics, finance, analytical programs | VGTRK | |
| 8 | Carousel | TV programs for children and youth, cartoons, educational programs | VGTRK, JSC "Channel One" | |
| 9 | Public television of Russia | A platform for discussing the most pressing issues that concern society, as well as a means of open and direct interaction between the authorities and citizens of Russia | ANO "Public Television of Russia" | |
| 10 | TV Center | TV Center devotes most of its airtime to covering the political, social and cultural life of Moscow | The government of Moscow | |
In the first multiplex RTRS-1, in addition to television channels, three radio stations are broadcast.
| List of radio stations of the RTRS-1 multiplex | ||||
| Number | Radio station name | Logo | Genre | Founder |
| 1 | Vesti FM | News, conversations on current topics with famous politicians, public figures, publicists. Educational and entertaining programs | VGTRK | |
| 2 | Lighthouse | State broadcasting company. News, educational and entertaining programs | VGTRK | |
| 3 | Radio Russia | Produces all types of radio programs - informational, socio-political, musical, literary and dramatic, scientific and educational and children's | VGTRK | |
| List of channels of the RTRS-2 multiplex | ||||
| Number | Channel name | Logo | Genre | Founder |
| 1 | REN TV | Specializes in materials that are alternative history, conspiracy theories and ufology | LLC "Acceptance" CJSC "National Media Group" | |
| 2 | Saved | Forms a worldview and a system of moral coordinates based on Orthodox values | Russian Orthodox Church SPAS-Media LLC | |
| 3 | STS | Entertainment Russian federal TV channel | JSC Network of Television Stations STS Media | |
| 4 | Home | Targeted at a female audience from 25 to 59 years old, films, TV series | JSC "New Channel" STS Media | |
| 5 | TV-3 | An entertaining and first mystical TV channel specializing in TV series, feature films and pseudo-documentary films of a mystical nature | LLC "Telekanal TV3" JSC "Gazprom-Media Holding" | |
| 6 | Friday! | The channel’s broadcast network is built on original entertainment programs of its own production, as well as those produced by Ukrainian TV channels | LLC "Tele" | |
| 7 | Star | The channel's broadcasting is based on information and analytical programs dedicated to history, culture, science and sports, educational and educational programs | OJSC "TRK VS RF "Zvezda"" | |
| 8 | World | Introduces viewers to modern life and history of the countries of the former Soviet Union, forms cultural, social and economic ties | CJSC "Interstate TV and Radio Company "Mir"" | |
| 9 | TNT | The channel has an entertainment focus, the content is based on TV shows and comedy series | JSC TNT-Teleset JSC Gazprom-Media Holding JSC | |
| 10 | Muz TV | Russian federal entertainment music channel | LLC "Muz-TV Operating Company" | |
In Moscow, a test broadcast of the third RTRS-3 multiplex is currently being conducted from the Ostankino Tower at a frequency of 578 MHz (channel 34), which in the future is planned to be organized throughout Russia.
Thus, thanks to the launch of digital terrestrial television broadcasting DVB-T2, almost anywhere in Russia you can watch 20 TV channels in high quality and listen to three radio stations for free.
History of the enterprise development
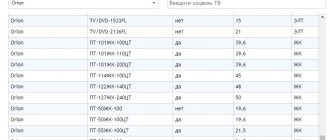
In the spring of 1976, the Vitebsk Television Plant was created. A year later, the first color TV, Vityaz-722, appeared. During the year, the company collected 500 copies. Within a year, production volume increased 100 times and amounted to about 50 thousand copies. Another year of work allowed us to double production volume. Already in 1884, the half-millionth television set rolled off the assembly line. It took another 4 years to reach the 1 million milestone.
In August 1985, production of integral modular models began. One of the first was the Vityaz Ts381D model.
By 1989, the enterprise became self-sustaining. It was renamed the Vityaz production association. In addition to producing televisions, the company began to engage in other activities. By 1990, production of medical equipment began. A year later, a wood processing workshop was opened.
The company paid great attention to quality. For this purpose, our own certification workshop was opened. This happened in 1991.
The network of branches grew. They appeared not only in Belarus, but also in the neighboring Baltic countries, Ukraine and Russia. By 1993, more than 70 branded shopping centers were opened in the CIS countries.
Since 1995, television production has been carried out using self-made mono-chassis. In 1998, they began assembling the analogue digital TV “Vityaz” (37-54 centimeters diagonally). Within a short time, the company mastered the production of more than 30 models. Their size was increased to 34-72 centimeters (14-29 inches).
In 2002, models with a completely flat screen appeared. It was a Vityaz TV, 54 centimeters diagonally. By 2007, the kinescope size of some models had already reached 42 inches.
How to connect cable digital TV
If you want to connect to digital television, then follow the following step-by-step instructions:
- Insert the smart card into the CAM access module.
- Insert the CAM into the PCMCIA connector on the cable receiver.
- If your TV is not equipped with a cable receiver, then repeat the same procedures with an external receiver, after connecting it to the TV via HDMI or DVI connectors.
- When you have connected the equipment, press “Menu” , then go to “Options” .
- Select Automatic Setup .
- The next window you should see is selecting a signal source. Select Cable and click Start .
- Go to “Search Mode” and select “Network Search ”. After this you will receive 20 free channels for your digital TV.
TV remote control GoldStar
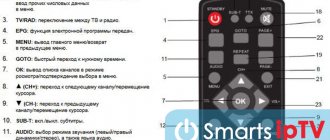
Remote control for GoldStar TV
The remote control for GoldStar TV is designed for setting up and adjusting all functions. Purpose of the remote control buttons:
- I - turn on the TV / go into standby mode
- MUTE - sound blocking. To disable the lock, press the button again
- NICAM/A2 - stereo mode in TV mode
- ASPECT - selecting the GoldStar TV screen format
- PMODE - picture mode
- SMODE - sound mode
- 0-9 - Numeric buttons for entering TV channel numbers
- -/— Field selection button for switching TV channels whose numbers consist of 2 or 3 digits
- O - switch between the current TV channel and the previous one being watched
- DISPLAY - display information about the source/number/name of the TV channel on the screen
- FREEZE - freezing (fixing) an image
- GOTO select a specific place/time to start playback in MEDIA mode
- Colored buttons correspond to colored teletext/menu items and are used to quickly navigate to them
- SLEEP - setting the time to turn off the TV
- SOURCE - switching between signal sources
- Cursor - Navigation buttons for the settings menu
- ENTER - input/confirmation
- CH /CH - switch to next / previous channel
- VOL /VOL - increase/decrease volume level
- MEDIA - switch to MEDIA mode
- TEXT - switch to or exit teletext mode
- REVEAL - shows hidden text in teletext mode. To hide the text, click this button again
- SIZE - teletext window size (normal, enlarged upper part, enlarged lower part)
- INDEX - goes to the main teletext page (page 100 - teletext menu)
- HOLD - holding the current teletext page
- S.TITLE - activation and selection of subtitles
- S.PAGE - jump to teletext subpages
- FAV - switching through the list of favorite TV channels (if it was compiled in the settings menu)
- DU - Play/Pause button in MEDIA mode
- TS - fast rewind/forward in MEDIA mode
- H - stop playback in MEDIA mode
- PO - Buttons for moving to the previous/next file in MEDIA mode
On our website you can download the TV remote control, location and designation of remote control buttons, as well as instructions and User Guide
How to set up a GoldStar TV
In order to set up a GoldStar TV , you need to enter the on-screen menu and activate and configure various functions there. Press the MENU button to display the main page. Use the buttons to select the desired page of the settings menu: PICTURE (adjust the picture), SOUND (GoldStar sound settings menu), TIME (Timer settings menu), OPTION (Advanced settings menu), CHANNEL (how to tune the TV to channels), SCREEN (PC settings menu) . Then press the G or ENTER button to move to the selected page. In the selected menu, use the +/- buttons to select a parameter, then make the desired settings, or go to the additional menu by pressing the ENTER button. When you have completed the settings, press the MENU button to return to the previous section or the EXIT button to close all menu windows.
How to adjust the picture on your GoldStar TV
- Picture Mode - Image mode
. By selecting the desired picture mode, you can simultaneously adjust the brightness, contrast, saturation and sharpness of the image. You can also select the picture mode by pressing the PMODE button. - Contrast - Contrast
. Allows you to adjust the ratio between light and dark areas of the image. - Brightness - Brightness
. Allows you to make the image brighter or lighter - Color – Color saturation
. - Sharpness - Sharpness
. Allows you to sharpen or soften the image. - Tint – Tint
. This setting is only available in NTSC mode. - Color Temperature - Color temperature
. Highlight this option and press the ENTER button to go to the additional menu, where you can select the desired mode: Medium, Cool or Warm. - Aspect Ratio - Screen format
. Set the screen format. In PC mode, you can choose either 4:3 or 16:9. - Noise Reduction - Noise reduction
. Highlight this option and press the ENTER button to go to the additional menu, where you can select the desired mode: Off, Low, Middle, High. - PC Setting – PC mode settings
. Highlight this option and press ENTER to access the secondary menu (available in PC mode only)
How to set up sound on your GoldStar TV
- Sound Mode - Sound mode
. You can select one of the following modes: Standard, Music, Movie, Sports, User. You can also set the sound mode by pressing the SMODE button on the remote control. - Treble - High frequency timbre
. Perform settings using the DE buttons. - Bass – Low frequency timbre
. Perform settings using the DE buttons. - Balance - Balance between left and right speakers
. Highlight this option and press the ENTER button to go to the additional menu where you can set the desired balance. - Auto Volume – Automatic volume adjustment
. This feature automatically adjusts the volume when changing channels. You can enable (On) or disable (Off) the function. - Surround Sound - surround sound
. You can enable (On) or disable (off) this function.
Digital set-top box
Tuner bbk
Without a tuner, watching digital television is impossible. There are a huge number of digital set-top boxes and, in fact, they receive almost the same signal.
Therefore, to choose a set-top box and not overpay, proceed from your needs, because many of them have additional options and capabilities:
- If you want to watch not only television, but also, say, be able to view files from removable media, then you need to purchase a model with exactly these characteristics.
- Some models have the privilege of recording any television broadcast at a specific time, even without your presence. You just need to set the time periods for the start and end of recording in the settings.
- There are also tuners with a very powerful processor and a large amount of RAM. The set includes a control panel for both this set-top box and the TV itself.
But if it is intended purely for receiving a signal and watching TV, then buy the most ordinary and inexpensive set-top box. For example, BBK.
Read also: How to connect a computer to a TV? Wired and wireless methods
View submitted: TOP 15 smart TVs of 2021
Almighty TV or TOP 15 best applications for smart TV
back to menu ↑ back to menu ↑
How to connect 2 or more older TVs to a set-top box
The connection method is similar, with the difference that if you use the same connection on different TVs, the image will be the same. By connecting one with a tulip and the other with a scart, you can get receivers independent of each other. What it looks like:
- all equipment is unplugged;
- the equipment is connected to the tuner by wires, on one there are tulips, on the other there is a scart;
- are connected to the network, the digital mode is activated on the remote control.
A picture with the brand name of the receiver appears - confirmation of a successful connection. Go to settings and start automatic channel search, save after completion.
HDMI
Many modern users, wanting to connect digital to an outdated TV set, choose HDMI. This connector is present in more modern LCD and plasma models. This method has fairly high picture and sound quality. Users get the opportunity to watch movies and TV series in Full HD format. Previously, this method had one significant drawback - it was difficult to support analog TV channels. Since they are currently disabled, the problem no longer exists.
LAN
Digital TV of this type operates via the Internet. There is no need to connect to Wi-Fi or a regular network. IPTV is carried out by providers who offer paid packages of TV channels. The number of these channels will depend purely on the individual preferences of the subscriber and the size of the monthly subscription fee. To set up and connect digital TV on an old TV via a LAN connector, you will need the help of professional technicians. If problems or difficulties arise, the subscriber can always get help by calling the provider's hotline. Such services are sometimes provided by volunteers for free.
Errors and problems when connecting digital television
Digital technology is more complex, so it is not always possible to connect it the first time and get everything to work. There are a number of common mistakes when setting up digital television reception that you can deal with yourself.
Outdated receiver firmware
The receiver cannot operate without suitable software. If the firmware is outdated or was initially installed incorrectly, the following problems may occur:
- digital television setup error;
- some channels do not work;
- the TV does not receive the signal well;
- poor image quality.
To flash the receiver firmware, it is not necessary to take the device to a service center. If the set-top box included an installation disk with software, you need to connect via a USB cable and start installing the firmware.
If the kit does not include an installation disk, the problem can also be solved. Having basic skills in working with technology, you can reinstall the software yourself using this algorithm.
- Find the official website of the manufacturer that released the console.
- In the software section, find the model name of the receiver that needs to be flashed.
- Download the archive with the software to your computer and unpack it into a separate folder.
- Send the folder with the contents to a removable USB drive.
- On the manufacturer's website, find step-by-step instructions for installing software for the selected model.
- Connect the media to the set-top box and install.
Manufacturers offer firmware downloads completely free of charge. If it requires registration, payment or sending an SMS, it is most likely a scam site.
Antenna problems
If the antenna does not receive a signal the first time it is connected, there is no need to immediately run to the store and ask for it to be replaced. It is worth checking the following nuances:
- correct connection;
- frequency on the interactive map of CETV;
- serviceability of the cable and contacts.
If no problems are found, most likely the wrong antenna type was selected. If the antenna is not powerful enough to receive a high-quality signal, purchasing and installing an amplifier can help. You can also look for a more suitable type of receiving device.
If the problem cannot be solved on your own, you should contact a specialist. Perhaps the problem lies in the equipment that simply needs to be replaced or repaired under warranty.
Troubles at the TV station
In 80% of cases, problems with digital TV reception are caused by malfunctions in the user's equipment or errors made during the installation process. But there are situations when there is no point in looking for a breakdown or errors in the settings.
Since the complete transition to digital television has not yet occurred in all regions, failures often occur directly at the station. Prevention is also carried out periodically; during such periods, digital channels are also unavailable.
If there is a problem with the image or access to packet digital channels, but all equipment and settings are in order, you should call the provider’s hotline. Companies providing digital television connection services constantly inform about planned maintenance or other causes of failures, but in the event of unforeseen breakdowns, it is impossible to notify subscribers in advance.
Satellite set-top boxes
In addition to DVB-T2 receivers, you can find DVB-S2 on sale. DVB S – what is it? These set-top boxes are designed to transmit digital satellite broadcasting signals. They need a satellite dish, which will allow you to receive images in HD quality almost anywhere in the world.
How to connect the Tricolor set-top box to your TV:
- connect the receiver to the antenna by screwing the F-connectors onto the coaxial cable;
- Insert a wire into the set-top box and TV that matches the available connectors - HDMI, SCART or antenna RF OUT;
- turn on the devices, in the TV select as the signal source the port into which you inserted the cable from the set-top box;
- run a channel scan.
Issues regarding the operation of GoldStar TVs
Setting up TV channels
3.3.2019 GoldStar LT-26A310R I don’t know how to set up channels 14/2/2019 GoldStar 2012 LT-19A300R Help me figure out how to set up 20 digital channels on this TV model 11/09/2021 20:36:09 GoldStar CF-20B70Y Good evening, we bought T2 Have you connected it, turned on searching for settings, but it doesn’t find anything?
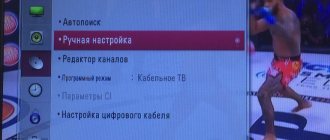
To set up digital terrestrial TV channels, you need to connect the TV to a known-good antenna, go to Menu/Settings/Channels, select Auto search. Be sure to set the dvb-T2 over-the-air tuner option in the settings.
Possible problems and their solutions
When setting up digital television, various problems may arise in the operation of electronic equipment. To eliminate it, you need to know the possible causes of interruptions in the operation of devices.
Channels are not picked up at all
If TV channels are not detected during scanning, then the problem is a faulty coaxial cable, an incorrectly oriented antenna, or the use of an inappropriate antenna. TV channels are not detected when using a set-top box that does not receive a DVB-T2 signal.
Only part of the channels are caught
If TV channels are only partially detected, this may be due to incorrect settings of the receiving equipment.
Weak signal
If the set-top box signals the presence of weak signal strength, then most likely the receiving television device is located at a great distance from the relay tower or it is located in its radio shadow. The strength of the TV signal is significantly affected by environmental conditions and weather.
No signal
The reasons for the complete absence of a signal are a breakdown of the receiving equipment, a break in the cable connection, or maintenance work at the relay tower or at the TV signal supplier.
The image slows down or freezes
The slowdown of a picture relayed from a satellite or tower is most often caused by interference in television broadcasting, the use of outdated software, or a conflict in television equipment.
There were channels, but they disappeared
If the reception of channels has stopped, then the reasons for such a malfunction may be routine maintenance during maintenance of the relay tower, a breakdown in the equipment for transmitting a video signal or a device for receiving a television signal.
How to switch a device from Smart TV to terrestrial television?
All the latest models of the Japanese manufacturer Sharp have the Smart TV function , which means “smart television”. This TV expands its capabilities by connecting to the Internet. Smart TV allows the user to:
- communicate in online chats;
- take part in online games using a simple TV as a console;
- watch movies in digital format;
- conveniently view media content;
- it is possible to connect a keyboard and mouse;
- record an interesting program or a necessary film.
Preparing the TV
Before you start directly setting up channels, you should connect the TV to the broadcast source. With an analog signal, the cable from the antenna or cable television operator is connected directly to the antenna input of the TV (marked in the photo):
At the same time, it is worth separately considering the situation in which more than one TV is used in the apartment. In this case, a special antenna splitter is used for connection, which in most cases has two or three outputs:
Product quality
The production of quality products is the main goal of the enterprise. TV "Vityaz" is competitive, safe, and affordable. It meets all the requirements that buyers have. To this end, special attention is paid to the following tasks:
- market analysis;
- introduction of modern equipment and the latest technological processes;
- using only high-quality materials;
- development of marketing strategy;
- availability of service centers;
- professional training and advanced training of personnel.
How to choose?
Choosing a TV is a rather difficult task; it is especially difficult to buy household appliances for those people who are poorly versed in technical features. When buying a TV, it is very important to pay attention to the following key factors:
- screen resolution;
- video formats that the TV supports;
- response time;
- sound quality;
- viewing angle;
- screen shape;
- TV diagonal;
- panel thickness;
- panel mass;
- level of electrical energy consumption;
- functional saturation;
- interfaces;
- price;
- external design and so on.
Important! Only the optimal combination of all these characteristics will provide you with a positive experience from using televisions manufactured by the GoldStar trading company.