All modern TVs have one or more ports that allow you to display images from a computer on them. Both desktop computers and laptops can display images on a TV, provided they have the appropriate cables.
In this article we will discuss several ways to display an image from a computer to a TV. To get the best results, we recommend reading the instructions in order.
If you only have one cable to connect your desktop or laptop to your TV, it depends on the connectors you have on your devices. It will be worse if there is a big difference between devices. As a rule, it is the latter.
Unfortunately, compared to the previous two digital connections, this is only an analog transfer of image information, so the image quality is not as high as digital transfer. We have presented the three most important options for connecting a desktop computer or laptop to a TV. There are also many other abbreviations and translators among the various signs on the market. Only use these if you are unable to use any of the above methods.
Determine available connections
The first step in order to display images from a computer to a TV is to determine the available ports on the computer and TV. Once you have found the appropriate connections, you will need the appropriate cable to connect the devices to each other. Let's look at a few of the most popular compounds.
If you connect a laptop, it is often necessary to switch to another device using shortcut keys. Look in the manual from your laptop to find and download the manual. Also, look for the icon on your keyboard. Basic and usually such good configuration can also be done automatically by the operating system itself. As a rule, there is no need to interfere with the resolution setting. This way you can check the operating system if it really did it and choose the most suitable resolution.
HDMI
The HDMI connection is one of the most popular for outputting images from one device to another. Almost all modern TVs are equipped with HDMI ports. Most computers and laptops support HDMI. Thus, displaying an image from a computer to a TV is not a problem.
The operating system also detects the second display device and you only set it as the primary display. However, for more detailed settings, you must use the graphics card driver settings. You can duplicate the image. Both monitors display the same.
What is good for connecting a laptop to a TV
It's a pleasant evening, you sit down with your family on the sofa, turn on the TV and find out that you are not interested in today's program. Just read this “How to Connect Laptop to TV”. You don't have to cower at a desk or share an uncomfortable workspace with others—sit on the couch and enjoy the convenience of this technology. Consolidating a computer with a TV offers a wide range of applications.
In the image below you can see an example of an HDMI cable.
HDMI has gained high popularity due to its high signal quality and the ability to transmit both audio and video signals.
VGA
A VGA connection is another popular connection type. This connection is used in most projectors and some TVs, especially LCD TVs and LED TVs.
Checking the signal through different connections
Take a look at photos or videos from your vacation or even watch your favorite movie! Linking a computer to a TV is not a science, it is a very simple process. There are also sites with online movies for free. It may seem that connectivity can only be achieved with the latest technology. Don't be afraid, you can handle even older things. There are 4 main cables for image transmission.
Connecting the TV to the network
Let's start with the most common thing that has been on television for decades. It can transmit video from both sides, so you can also use it to record video from your TV. Its interconnection may be reminiscent of deactivating a bomb in action movies - there are three connectors: red, green and blue. But we can assure you that this link, unlike the dangerous bombs, is a toy. The downside of component video is its inability to convert audio, but we'll show that another connector can do this.
A VGA cable has a 15-pin connector on each end that connects to the VGA port on your computer and TV.
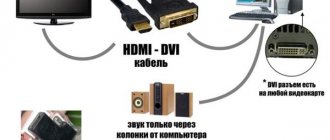
DVI
The DVI connection is newer than VGA, so it provides clearer images. Although the DVI port is quite popular among projectors, it is not as common on TVs. DVI is most often found on desktop computers for connecting monitors.
If component video is the best quality laptop connection with an analog TV, then the best digital broadcast connection should be here - the best way to connect. We recommend using it only in case of emergency because you may not be able to enjoy the photo due to the poor quality.
How do I set up a link on my computer?
Popcorn ready, correct cables? Now everything you need to do is set up on your computer. There are two simple settings available. You either duplicate the monitor, duplicate it, or set up the transfer directly in the operating system. Each operating system works a little differently, and I have the most common and simplest ones.
Since DVI is not available on all TVs, we recommend using an HDMI cable to display the image from your computer to your TV.
Note:
There are special cables that convert from DVI to VGA or DVI to HDMI, and vice versa.
S-Video
An S-Video connection is common on TVs, but rarely on computers. This connection, like composite video, is obsolete. However, you can still use it to output images from your computer to your TV.
Video on how to connect a laptop to a TV
How to get to screen settings.
You will then open a window with the “Multiple Monitors” option, here you choose which image will be displayed on the TV. Now just select the movie or photos you want and the fun can begin! Free How-To: 13 Tips to Extend the Life of Your TV. Do you want to significantly extend the life of your TV beyond 20 years? Simply enter your email address, name and submit your request using the button. In particular, it offers the lowest prices on the market. Measuring a monitor with a remote meter with an unsatisfactory diagonal, poor quality chairs and a keyboard still under your nose may not appeal to some users.
USB
All computers have a USB connection, but it cannot be used to connect to a TV. To display an image you must use one of the connections above.
Method #1 Changing the projection mode
If you have correctly connected the monitor to your video card, but nothing is displayed on it, then you can try changing the projection mode. The problem could simply be because your graphics card didn't know what to do with the second monitor you connected. Now we will show you how to change the projection mode on Windows 10. Although, the same can be done on operating systems such as Windows 8 and Windows 8.1.
- Press the key combination Windows + P .
- Then you will see a menu for selecting a projection mode, which will contain four settings. Select the setting according to your preferences and click on it.
Well, has the second monitor finally come to life? If not, then that was not the issue and we move on.
Output image from computer to TV
Once you've determined what connections are available on your computer and TV, you're ready to connect the cable. If the same connection is not available for both your computer and TV, then you need to purchase a video converter cable that converts one signal to another compatible signal. To display images from your computer to your TV, connect the cable to your computer and TV. If the image does not appear immediately, then you should change the screen settings.
This doesn't have to be a rule, everything can literally work instantly and you can display your holiday photos, make family videos or watch movies in the comfort of your home and on your big TV. Every audiovisual work consists of sound and image. There are many ways to get both from your device, so you're sure to find a method that suits you best. It should be noted that the article does not attempt to be a comprehensive brochure full of technical concepts and data, the emphasis is mainly on highlighting the problem and should also be evaluated.
- Press the Windows
(or
Start
). - Type the text " Display Settings
" and press
Enter
. - Click on " Discover
" and select your TV. - Click on " Apply
" then "
OK
".
Switch input signal to TV
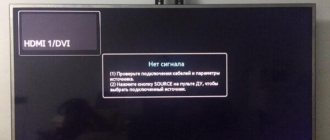
If you are connecting your computer to your TV, make sure the TV is switched to the correct input channel. For example, if you connected an HDMI cable to the “HDMI 2” port on your TV, you need to switch to the “HDMI 2” input channel on your TV. Usually, this can be done using the TV remote control.
Let's move on from the boring introduction to practice. There are many image outputs, differing both in transmission quality and additional capabilities. Let's imagine the first output, which is probably the case for all laptops that I have the opportunity to see.
Types of connectors that a TV may have
The most general solution, which probably applies to everyone. Unfortunately, many laptops only have an analog output, and you can only imagine the digital quality. The disadvantages of this interface are twofold: the video signal is analogue only, and you can't do audio over a single cable.
That's all! As you can see, displaying images from a computer to a TV is quite simple if you have the appropriate connections and cable.
Every laptop owner has the thought that it would be nice to connect it to an LCD or plasma panel, because watching FullHD video is much more comfortable on a big screen. In this article, we have collected most of the available methods for displaying an image from a laptop to a TV.
An old and not very used standard. Once upon a time, the music of the future was an ordinary thing. The video signal is finally digital, so the image is either perfect, cocooned, or not at all. Even this interface can't make sound. The single interface allows you to output audio from one cable at a time, which is another nice feature.
Some of you may be missing two more outputs: composite video and component video. If you have an old TV, it will limit you in connection with your laptop. Let's imagine it now. Let us now move on to the issue of reduction, which is an equally important criterion when choosing the right connection.
Before describing the methods for displaying images, we will tell you what the user will see after the connection is established, because if the connectors, cable lengths are selected correctly and the software works normally, then the whole procedure takes no more than 15 minutes and you need to understand how to proceed further. So, after connecting to a laptop, the TV can work in two ways:
Spells with reduction or activation
In the following paragraphs we will discuss all the interfaces that laptops have and see what we can connect to using the shortcut.
It should be noted that this connection is only within 18 meters, and when this distance is exceeded, there is already a significant degradation in the quality of video and audio transmission. Of course, use a shielded cable, otherwise you won't be able to reach 18 meters. So there is no point in looking at this link and it will be better to look for another abbreviation, luckily available. It shouldn't work with all TVs, and it's hard to tell which ones to work with. The maximum cable length is approximately 10 meters. In the next chapter we will finally look at the software side of the problem.
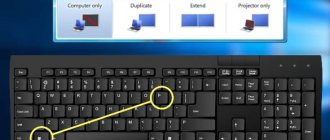
1. As an additional monitor. All “non-Smart” TVs will support only this mode, and in Smart it is turned on when you select the connector to which video is supplied (HDMI, VGA, etc.) in the corresponding menu. From the laptop side it looks like this, using Windows 7 as an example:
You can extend the desktop onto the TV, which makes it possible to “send” a video player to it and continue working, or enable duplication mode, when everything that happens on the laptop screen is copied to the second monitor.
Without good software it won't work
Software support is always important when connecting a computer and a second device.
Display settings don't know much
The primary two stones when connecting a computer to a TV are surface expansion and surface cloning. Both solutions are completely different: the first time you use it, you will only see the desktop background, the Start button, no icons, purely and exclusively just the wallpaper.
Change resolution and create your own
Individual graphics drivers offer much more. In the subsection of the “Screen” section we start with the first item “Change resolution”. Here you can change the resolution, refresh rate and color depth, nothing the system's Display Settings tool couldn't do. What gets interesting is the “Add Permissions” entry, which contains the following.
2. As an external storage for videos, photos and music. Control is carried out from the Smart TV system, and the laptop works like a flash drive or external hard drive. You need to keep in mind that the files will be played by the built-in player, which may not support the required format.
It looks a little better, you can choose different refresh rates in terms of resolution. But the most interesting one is the “Create a custom permission” option. The ability to create a completely custom resolution for your TV is very important, even offering a choice of custom refresh rates.
If you're having color problems, there's nothing easier than adjusting it to your image using the controls. Basically, this element is deactivated and the settings are transferred to the application. Enjoy the ability to customize individual color components, the second option is to change all three colors at once. If you haven't provided the link on the right, you can choose from two others.
Now let's move directly to ways to output images from a laptop to a TV. You may wonder why describe seemingly outdated standards such as VGA or S-Video. But computers and televisions are different, and if a laptop does not have an HDMI connector, this does not mean it is impossible to connect it to a modern LCD or plasma TV, and vice versa: a TV even ten years old can be used to watch videos even from a MacBook Air.
Basic Display Manager Settings
Clicking on the arrows immediately turns on the image, making this procedure easier. This would be sufficient for basic image editing. The Display Manager menu contains the most basic settings. You can clone an image by right clicking on the two right ones. Enjoy the presence of a "Detect Displays" button if the second display doesn't want to show up.
Additional settings in display options
Below are the options to set the resolution, color depth, and refresh rate. Under Display Options, you will find this feature to force a specific refresh rate. Next is setting up the detection of new displays, where you can choose to automatically detect or when you click the Detect Displays button in the Display Manager.
Why can’t the TV receiver see my computer or laptop and what should I do?
Let's take a closer look at why we can't connect a laptop, there is no signal, the interface doesn't transfer files and doesn't show an image on the TV screen, what could be the problem.
Cord fault
To do this, you need to connect another cable to your computer and TV, or this one, but to another computer or TV.
The communication port on one of the devices may be damaged . In order to check this, you need to connect your cable to another TV or computer.
How to set up your TV correctly?
You have selected the wrong port number in the signal source in the TV settings. For example: you connected an HDMI cable to the third port, and selected the second one on your TV. To do this, you need to look at the port number indicated on the back of the TV (they are labeled) and compare the port number selected in the settings.
Monitor settings
Windows 7. On the desktop, right-click and select “Screen Resolution”. A window will open in front of you in which the computer will notify you that there are multiple monitors.
The operating system has two ways to work with monitors:
- Screen duplication . Two monitors will show the same image. This method is suitable if both monitors have the same extension. Otherwise, one monitor will be cut off on the sides by black frames. This method does not allow you to configure each monitor separately.
- Expansion of screens . In this case, you can configure each screen separately. This method is best used when devices are connected with different screen resolutions from each other. For example: TV and computer. The computer screen can be configured by default, it will display the operating system, and a large screen (TV) for example: a movie.
Screen duplication
In this method, it is enough to select the resolution (it is best to choose the maximum):
- In the “Multiple Screens” item, select “Duplicate these screens”.
- Next, click “Apply” then “OK”, you’re done.
The same picture will be broadcast on both screens.
Expanding screens
This method is a little more complicated than the previous one:
- First you need to decide which monitor you will use as the main one and which one as the secondary one. Most often, the computer monitor is chosen as the main one, and the connected monitor as the secondary one.
- In the “screen” item, you need to select the monitor that you want to make the main one, check the “make the main monitor” checkbox.
- Next, we set the extension for each monitor; it is recommended to take the maximum for a clearer picture.
We recommend using additional settings. Click the “advanced settings” link and select the “monitor” tab. We recommend setting the maximum frequency. We always select 32 Bit color rendering.
In the “advanced settings” screen expansion mode, you need to configure each monitor separately.
Windows 10
If the image from the connected laptop does not display on TV, and Windows 10 does not see it, you must:
- Go to the Start menu and click Settings.
- Select "System".
- Click on the “Display” tab.
- In the window that opens, you will see all the available settings for connecting the display.
- Scroll down the page to the “Multiple displays” item and set the necessary parameters.
- Save your settings.
Windows XP
Despite the fact that the official update of this operating system has been discontinued, it allows you to connect modern TVs to your computer:
- On the desktop, right-click on an empty area of the screen and select “Properties”.
- A window will appear in which you need to select the “Options” tab.
- Find the “Display” menu.
- In the image output device section, select the monitor.
Other OS
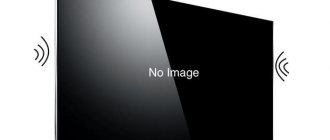
Method 2. How to display an image from a laptop to a TV via Wi-Fi
If your laptop or TV does not support Wi-Fi, you will need to purchase an appropriate external adapter. Manufacturers offer their branded products, but as practice shows, there is usually no difference in performance when using “non-original” devices. Also, external Wi-Fi adapters can better “maintain the network” if the laptop and TV are not in line of sight.
You can establish a Wi-Fi connection in two ways:
1. Direct connection between laptop and TV using WiDi/Miracast technology
WiDi/Miracast technology is supported in many models of SMART TVs, and if it is not included in the basic package, you can purchase a special adapter that connects to the HDMI connector. To display images, you must install the Intel Wireless Display program on your laptop and activate the WiDi/Miracast function in the “Network” section of the TV menu.
A router is not required for this type of connection because two devices form their own local Wi-Fi network. The transferred images and videos are pre-compressed, which requires significant laptop power.
2. Wi-Fi connection via router
The TV is connected to the home local network as a regular Wi-Fi device. For correct operation and communication with the laptop, you may need to configure the TV’s network parameters in the “Network” section and enter a password to access the wireless network.
When working via Wi-Fi, you should remember that the data transfer speed greatly depends on external factors, such as the distance to the router, the presence of obstacles (walls, etc.), the number of simultaneously operating devices and other wireless networks. And if when viewing photos, the connection speed does not play a big role, then when viewing videos, significant delays can be observed, especially on “heavy” files in the MKV format. And transmitting FullHD video over Wi-Fi is almost impossible.
Method 3: Connect via local area network (LAN)
The most convenient way to fully use all SMART functions for viewing network video, IPTV and Internet access. The LAN connection diagram is as follows:
The network settings of the TV must be assigned automatically by the router, otherwise you will have to configure them manually in the “Network” section. If terms such as IP address or “subnet mask” cause confusion, contact any computer service or support team for advice.
After connecting to a local network or via Wi-Fi, you need to install a DLNA home video server program on your laptop, which provides network access to audio, video and photos for TVs, tablets and smartphones. For each type of device, the most optimal audio and video format is selected. Many programs have been developed for creating a home video server, for example Home Media Server or HMS:
All major SMART TV manufacturers have their own official programs for creating video servers, for example AllShare from Samsung:
We have looked at “computer” methods for transferring images from a laptop to a TV, now let’s move on to the connectors, of which there are many on the back panel of any modern model.
Method 4. Display the image from the laptop to the TV via HDMI
The most common connection method for transmitting high-definition (FullHD) and ultra-high-definition (4K) video. Present in all modern TVs and laptops. The main difference of the HDMI standard is the transmission of not only video, but also sound over one cable. Latest modifications HDMI 1.4 and 2.0. allow you to simultaneously transmit up to 4 audio tracks, eight-channel surround sound, support up to thirty speakers and 3D images. The picture shows the HDMI ports on the laptop and the back of the TV:
There are three types of HDMI connectors:
- Type A, which is installed on most TVs
- mini HDMI (Type B) – a smaller connector for laptops and video cameras.
- micro HDMI (Type C) – usually installed in digital cameras, tablets and smartphones
All types of connectors are compatible with each other through appropriate adapters. HDMI cables come in two types:
- “Standard” for transmitting images with a resolution of 720p and 1080p at a frequency of 74.5 MHz
- “High Speed” for 1080p and 2160p resolutions and 340 MHz frequency
Both categories, with high-quality materials, can easily withstand a distance of up to 15 meters, although in the basic version the HDMI standard recommends no more than 1.8 m. You can increase the length to 30 meters using signal amplifiers, which can be built directly into the cable.
If you need to transmit an HDMI signal over even longer distances, this can be done over twisted pair cable, coaxial cable or optical fiber using special amplifiers and adapters.
Connecting a TV via HDMI in Windows 10
1. Make sure your computer and TV are turned off.
1. Connect one end of the HDMI cable to the TV in the HDMI connector, the other to a laptop or desktop computer.
2. Turn on both devices.
3. On the TV you need to select the signal source. There should be a special button on the remote control, usually it is labeled INPUT or SOURCES or HDMI (see the instructions for the TV). Click on it and select the HDMI connector to which you connected the cable as the source.
4. On the computer, press the [Win]+[P] keys simultaneously.5. In the “Project” window that appears, select the projection type, depending on your preference: - Computer screen only (Display desktop only on the first screen) - Repeated (Duplicate screens) - Expand (Extend screens) - Second screen only (Display desktop only to the second screen).
You may need to adjust (change) the screen resolution on your computer to a resolution that your TV supports (see your TV manual). If you do not synchronize image extensions on the monitor and TV, then on one of the devices it may turn out to be cropped.
6. Confirm the changed parameters “Apply” - “Save changes” - “OK”
7. To properly connect sound, you need to right-click on the computer the sound adjustment icon on the taskbar (notification area - tray) and select “Playback devices”.
Method 5. Use DVI
DVI (Digital Visual Interface) is a digital video transmission standard that can be considered intermediate between VGA and HDMI in terms of the time of its creation, but not in quality. The DVI-D and DVI-I currently in use are capable of transmitting video in FullHD quality and in 3D format. Audio transmission is not supported here, so you will have to use a separate speaker system or if there is a separate audio input on the TV. The connector looks like this:
The DVI standard does not contain a maximum cable length, since it depends on the amount of video information transmitted over it. For video with a resolution of up to 1920x 1200 pixels, the length can reach 10 meters, for lower resolutions it can be easily increased to 15 meters. If possible, always test the cable before purchasing.
Special signal amplifiers with separate power supplies can transmit DVI video signals over a distance of up to 60 meters.
Method 5: VGA or PC IN
This connector can be found on many LCD and plasma TVs. It was the VGA connector that was used when monitors were “non-flat”. Despite the fact that more advanced standards have been used for a long time, VGA is not going to lose ground and can be seen on many laptops and netbooks from two to three years ago. Let's see what PC IN looks like:
Please note that the TV has an additional audio jack because The VGA interface does not transmit sound. The maximum possible video resolution is 1600x1200, there are video cards capable of transmitting 1920x1080 i.e. FullHD, but this is very rare.
The length of a standard VGA cable is usually 1.5-1.8 m, the maximum length according to the standard is 15 meters, but on the Internet you can find offers up to 20-30 meters or more in length. If the cable is made of high-quality materials and has good protection from external interference, then there are no technical obstacles to such distances.
Method 6. S-Video
At one time it was called super video, but those days are long gone. But, despite its venerable age, connecting using the S-Video standard remains the best way to transfer images to analog CRT TVs, where this connector was present on any model. Of course, laptops with S-Video have not been produced for a long time, but you can use an adapter.
You can’t count on FullHD and surround sound with this connection, but it’s quite suitable for watching videos on an old country TV. The maximum cable length depends heavily on the quality of the materials used and protection from external interference. There are examples of signal transmission over distances of up to 300 meters, but usually acceptable playback quality is within 10-15 meters.
Method #8 Tricks for laptop owners
If you are trying to connect a second monitor to a laptop, then we can recommend you to perform a couple of tricks that may help when connecting a second monitor:
- Try closing your laptop while the monitor is connected (this will make the laptop display temporarily disabled). The second monitor should now be marked as the main monitor. As soon as you open the laptop, both displays should start working at once.
- Try putting your computer into sleep mode while a second monitor is connected to your computer, and then waking it up.
Method 7: RGB or Component
Sometimes we are forced to connect a TV to a laptop via the RGB output, better known as “tulip” because of the appearance of the connectors. The transmission of video from the TV to the laptop is divided into three channels: red (Red), green (Green) and blue (Blue). Cables and connectors on the TV have corresponding colors, and, despite the presence of HDMI and DVI, they continue to be installed on modern models. The picture shows the back panel of the LG LB653v series released in 2014 and we see the component input (circled in red) and “tulips” for sound (circled in green).
It is not found in its original form on laptops and is connected via an adapter, usually from a VGA connector. they have the same three-channel principle of color formation. As with S-Video, it is recommended to use cables no longer than 10-15 meters.
Method 8. Connect using SCART
Sometimes SCART is called a Euro connector, and despite the fact that the standard was developed back in 1978. its “comb” can also be seen on modern models, as in the picture above. At one time, it was a real breakthrough in the standardization of video transmission. It allows you to connect almost anything using the appropriate VGA to HDMI adapter.
Of course, using SCART if there is an alternative in the form of more modern interfaces will not be the best solution, but for the “friendship” of modern laptops with old TVs it will be a good solution. Without video distortion and signal attenuation, the maximum cable length should be no more than 10-15 meters. Finding a SCART cable of this length is currently problematic: the cost of high-quality cables is approaching a hundred dollars or more.
Method #9 Activating Multiple Displays
If you are an Nvidia graphics card user, then you can try enabling the multiple display option in the Nvidia Control Panel.
- Right-click on the Desktop and select Nvidia Control Panel.
- Go to the "Display" section.
- Click on the “Install multiple displays” subsection.
- Check the box next to connected to your computer.
- Click "Save" and close Nvidia Control Panel.
Method 9. Transferring images from APPLE laptops
All APPLE laptop models with Retina displays have an HDMI port and there should be no problems with direct connection. If you have an older MacBook model or your TV does not have HDMI, you need to select the required branded adapter on this page. Let's remember what the ports look like:
There is a wide selection of adapters for most connectors, including VGA. Only a SCART adapter is missing, but there is a Moshi Mini DisplayPort to HDMI (4K), which allows you to connect to 4K TVs via Thunderbolt 2 and DisplayPort ports.
DisplayPort and Thunderbolt connectors, despite their good characteristics, have not spread beyond Apple technology and are currently almost replaced by HDMI.
Method No. 6 Roll back the driver for the video card to the previous version
Perhaps the problem with detecting the second monitor lies in the driver for the video card that is currently installed on your system. To resolve this issue, you can try rolling back your video driver to a previous version. This is done, again, through the Device Manager.
- Go to Device Manager, go to the Video Adapters section and find your video card.
- Right-click on it and select Properties.
- Go to the "Driver" tab.
- Click on the "Roll Back" button.
Once the driver for your computer has rolled back, try connecting two monitors to it again. If this time everything went well and you did accomplish your plan, then the problem was definitely the driver for the video card.
Adapters and converters
The variety of video connectors has naturally led to the appearance of a large number of adapters between them in almost any combination. You can find any connection option, for example:
- mini HDMI to VGA with audio support
- DVI to HDMI
- Bidirectional adapter between SCART, 3RCA or “tulip” and S-video
As you can see, you can connect anything to anything. Adapters can be branded, as is the case with Apple, and third-party manufacturers, which, at a lower price, are often not inferior in performance.
Is it possible to make a lan from several TVs?
If all TVs have a LAN port, then there is no obstacle to connecting them to a single network, for example, through a router. Each TV will be a separate network device and can play video, audio and view photos from the home video server independently of the others.