Another homemade product for those who are bored at home
I needed a couple of antennas for digital, in places with “not the best reception”... I went shopping (this was before self-isolation - if it’s relatively budget-friendly, then it’s complete G. The more expensive one looks decent, but how it works is questionable.
I decided to make something homemade. It was somehow awkward to “twist” an antenna from a piece of cable (although rumor has it it works) - I wanted something simple, but more decent and advanced
In fact, the one I made is not radically more complicated, but somehow more “solid” or something. And the results of its testing were very encouraging, so I decided to sketch out a short description of what and how, in case someone else finds it useful 
... even if my street cats have a “normal” antenna on their house, what can you do without an antenna?!
The wire is not all finished yet, now we’ll assemble something!
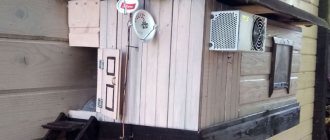
In the places described, I previously used home-made broadband log-periodic antennas, probably since the “beginning of perestroika.” They worked well in analog and not only on UHF, but “for some reason, digital was too tough for them.” I didn’t really delve into the essence of the reasons, I removed them and began to think about what to replace them with. Here is one of them, waiting for a place in the trash
A little history
In the early 60s of the last century, our compatriot Kharchenko K.P. developed a simple flat zigzag antenna with good characteristics.
Copyright certificate No. 138277 for an invention called “Band directional antenna” was issued to Konstantin Pavlovich Kharchenko in 1961 (according to his application dated June 16, 1960). In the same year, materials were published in the magazine “Radio” for repetition by radio amateurs.
The antenna is not critical to materials and dimensions during manufacturing, has a simple good match with the reduction cable, and it successfully combines multiple elements of a common-mode antenna array with a single feed point.
Selecting the first HF transceiver
When choosing the first transmitting device (transceiver), novice radio amateurs need to consider:
- Dimensions and weight - the radio station must have such dimensions and weight that it can be easily carried in hands or in a backpack.
- Functionality - for a beginning radio amateur, a transceiver with a small number of basic settings (resonant frequency, power, SWR) is sufficient;
- Reliability and warranty - like any other equipment, a shortwave radio station must have a warranty period;
- Possibility of programming equipment using a personal computer.
Transceiver
Beginner radio amateurs are not recommended to purchase expensive shortwave radio stations that are very difficult to operate and maintain. It will be very difficult for a beginner who is interested in amateur radio to understand such equipment; if they lose interest in this matter, selling such an expensive radio station for the same amount as it was purchased will be very difficult.
Theory and calculations
The described antenna, in theory, has a horizontal “figure-of-eight” radiation pattern and a relatively high gain, which can be further increased by using a reflector/reflector.
To obtain maximum gain on all channels, it is necessary to make an antenna approximately in the middle of the range between the multiplexes used.
Finding (for calculations) the frequencies of multiplexes used in your region is easy,
for example, a request like “dvb-t2 channel frequencies” + “Krasnodar”
I found something like this:
The middle, between “my” two multiplexes, is 700 MHz - we will calculate the antenna at this frequency.
As a basis for calculating the dimensions of the antenna, we take the drawing of its author
Calculate the wavelength: λ = 300 / f [m]
300/700 = 0.428m, approximately 43cm length of each side of the rhombus
λ/4
=43/4= 10.75
The total length of the material we need (11cm*8=88cm) is less than a meter. The distance between the reduction contacts, where we will solder the cable, is 10-12mm (the standard value for this antenna for frequencies below 900 MHz).
I will make a simple antenna, without a reflector, however, to further increase the gain of this antenna, it is quite possible to install it behind it
for example, from a metal mesh/grill, foil material or simply a metal plate. Its dimensions should be approximately 20 percent larger than the dimensions of the antenna and it should be located at a distance of ƛmax/7. For my case: wavelength (channel 39) 300/618, it turns out...49/7= that is, about 7cm
For those who are too lazy to do the calculations themselves
— you can use an online calculator, the results will differ only slightly from those I received. Here, for example, this one - here you immediately enter the frequencies of two multiplexes and get the dimensions of the antenna (without a reflector) Or another option, with a reflector - I really want to note that in the second option a slightly different calculation option is used, different from the author’s. An antenna with angles other than 90° is assumed and the reflector distance is calculated as λ/8
To make the antenna sheet, it is recommended to use aluminum or copper (copper is easily soldered) with a diameter of 3 mm and higher - the larger the diameter, the more broadband the antenna is. You can use tubes; the thickness of the walls is not important, since only the surface of the material is used (in fact, you can wrap any dielectric with foil to obtain the required material). However, in my opinion, the easiest way is to buy a meter of large-gauge copper wire at an electrical supply store.
Antenna for digital TV from cable: how to quickly make
To assemble this circuit, you only need a piece of coaxial TV cable about a meter long, a knife, and a soldering iron, although you can do without it.
The loop operates in a reliable reception area and has good performance even inside dense buildings of multi-storey buildings made of reinforced concrete slabs. Since a fairly simple assembly took me about 5 minutes of time, it can be checked at least for the sake of curiosity.
I explain the installation technology.
The size of the circle of the assembled loop corresponds to the wavelength of the electromagnetic oscillation. For me, as shown above, it is 48 cm.
I cut one end of the coaxial cable to a distance of about 5 centimeters. For clarity, I placed a matchbox with standard dimensions 3x5 next to it.
From the beginning of cutting, I measured the distance of the half-wave: 24 centimeters. Next you need to make a section where the shielding braid will be torn.
We make its distance 2 cm. On this segment, carefully check the absence of wires and electrical connections. Only the polyethylene insulation of the central core should be visible.
Then, along the length of the cable from the created gap, I again measure 24 cm and remove the upper protective sheath of polyethylene along a ring 1 centimeter wide.
You have to work carefully. The shielding braid and its electrical connections must be preserved .
I show this area close-up.
Now only a little remains: I check the absence of corrosion on the stripped braids, tightly twist the conductive screen with the central core together with my fingers. They must be short-circuited.
A twisted end about 5 centimeters long is formed. All that remains is to wrap it tightly around an open section of insulation 1 cm wide. The loop is ready.
A plug is soldered on the back of the cable for connection to the TV socket. I omit this trivial operation. There are no difficulties in it.
An antenna for digital TV made from a cable with its loop plane is oriented perpendicular to the direction of the transmitting station.
The positive point: the material of the loop is made of the same material as the subsequent feeder for connecting to the TV. They have the same wave impedance. Nothing needs to be agreed upon.
Antenna assembly
Let's remove the insulation from a piece of wire one meter long.
I got a wire with a diameter of 4.5mm
The tools you will need are a vice and a hammer. Measure approximately 11cm each and bend at an angle of 90°
The end result is to get such a “geometric” figure
We cut off the excess and solder the ends. It should look something like this...
Solder the cable as shown in the photo.
We lay the cable along one side of the square and secure it with clamps. This arrangement of the cable is necessary for its coordination (there are different opinions, not everyone agrees with this statement).
When using a reflector, the antenna sheet at the extreme points of the squares can also be secured using metal stands, for example, soldered onto the remains of the same copper wire - there are points with zero potential (highlighted in green). In other places, fastening is allowed only through a dielectric.
DIY vertical HF antenna
The most popular for DIY production are short-wave transmitting devices such as vertical antennas.
The simplest and most effective of them is done as follows:
- A wooden column 2.5-3 meters high is dug into the ground;
- The distribution box is secured to the buried post using self-tapping screws;
- A high-frequency choke is placed in a fixed box - a coil with turns of insulated coaxial cable wound on it;
- A two-core stranded copper cable with a cross-section of 2 mm is connected to the inductor output;
- The wire is threaded through the guide rings of a cheap 6-meter carbon fiber rod;
- The end of the wire is secured to the tip of the rod using a regular plastic tie;
- A round platform with guy wires is fixed in the middle of the rod;
- On the top of the post, 2 clips and one clamp holder (KTR) for polypropylene pipes with a diameter of 32 mm are attached;
- Using clips and a holder, the rod with the emitter (wire threaded through the guide rings) is secured to the pole;
- Using guys, the mast with the emitter is leveled and securely fixed. Guys are secured to stable, nearby poles, trees, and hooks screwed into the supporting structures of buildings and permanent structures.
The supply wire for HF antennas of this type is used with a characteristic impedance of 50 Ohms.
Maintenance of such a device comes down to periodically checking the integrity of the emitter by testing it with a multimeter, replacing mast knees broken by the wind, and adjusting the tension of the guys.
Tests
And finally, a performance check and a rough
assessment of the quality of the resulting antenna.
In fact, everything is simple with the test - turn it on, it works! And to evaluate whether the game was “worth the candle,” let’s compare the parameters of the received signal from the manufactured antenna with the one I’m already using at the dacha, with a declared gain of 11dBi
The antenna is installed in the attic of a country house, at a distance of approximately 16 km from the tower.
Signal level: factory stationary antenna on the left / homemade on the right
At first glance, the difference is only 1% (95 versus 94) - but this is not a completely correct comparison, since my external antenna is connected through a splitter, which further weakens the signal.
How a digital antenna for a TV works: I’ll explain it simply
Before you start assembling any of the four models of receiving antennas, you should have a good understanding of the processes that should take place in them.
Electromagnetic waves propagate in all directions of the horizon from the electrical signal transmitter generator installed on the television tower.
They have sufficient power for their coverage area, but their signal weakens as distance increases. Its magnitude is also affected by the terrain, various electrical and magnetic obstacles, and the state of the atmosphere.
In a vibrator oriented perpendicular to the movement of the electromagnetic wave, voltage is induced according to the laws of induction. The positive and negative half-waves of the harmonic create their own sign.
The voltage reaches its maximum value - amplitude at points of time corresponding to ¼ and ¾ of the period or 90 and 270 degrees from the sinusoid of electromagnetic wave intensity.
Any shape and size of active vibrators are created for the most effective voltage induction with minimal energy loss. The position of these points is calculated using the wavelength or harmonic frequency.
The voltage, closed to the internal resistance of the television receiver, generates an electric current in the created circuit. Its shape and direction change and proportionally repeat the signals of the transmitter on the active load.
Due to the use of various types of digital modulation on the transmitter side, information signals are received and processed within the television receiver circuit.
I will not go further into considering the question of how a digital antenna for a TV works during its creation.
What technical characteristics of the antenna determine the quality of TV signal reception?
The antenna is classified as a reversible device because it works the same on the transmitter and receiver sides. When analyzing the characteristics, its inclusion is used as a generator.
To effectively receive a digital signal, it is necessary to take into account that on the generator side, the emitter of electromagnetic waves can be positioned at any angle to the horizon, but only two directions are legally accepted: horizontal and vertical.
Our task is to repeat this orientation for our own TV.
The direction of polarization and other digital signal transmission data can be found on the operator’s website through a search engine.
We go to the website and select the required information.
We are primarily interested in 3 characteristics:
- channel number and its frequency, for which we will create an antenna according to strict dimensions;
- the radius of the transmitter service area, which affects the signal quality and the choice of vibrator design;
- direction of polarization.
The distance the TV is located from the transmitting tower greatly affects the design of the antenna.
The higher the antenna is installed, the better the quality of the received signal, but the length of the cable can weaken it significantly . In this regard, residents of the upper floors of multi-story buildings have a significant advantage over their neighbors below.
For a reliable reception zone, I tested the simplest Kharchenko models and loop assemblies made of coaxial cable and wire, which have a wide range of reception frequencies.
For long distances it is better to assemble a wave channel or a log-periodic circuit. Of the simple designs, the Turkin antenna, modified by Polyakov, has proven itself well.
For example, in my area the distance from the TV tower was 25 km, which is within the zone of reliable reception, and the signal frequency is 626 MHz of vertical polarization.
I calculate the length of the electromagnetic wave through the speed of light by frequency: λ=300/626=0.48 meters. The half wave will be 24 cm, and the quarter wave will be 12.
Based on these characteristics, I made 4 test antennas for digital television with my own hands, which I describe below.
Assessing the performance of the antenna
Let's try to make a more correct comparison by connecting through the splitter input.
Well, in addition, for clarity, let’s add the number of participants List of antennas taking part in the comparison:
1. External antenna Funke BM 4551 external long-range,
declared gain, from some sources (bought at Yulmart), up to 16dB
2. There is an old UHF loop antenna, from TV Electronica 313d, I must say, despite its simplicity, it’s a very good antenna, that’s why it’s been preserved
3. I went to the store and bought for comparison in the review one of the cheapest, such as a symmetrical vibrator (100% the most purchased by pensioners, due to the low price).
I will carry out all “measurements” at one point, located as close as possible to the external antenna - its location was experimentally selected based on the maximum signal, so we can say that the conditions are approximately the same
So, we have already seen the signal level from the external antenna at 95% (at the time of current measurements it showed 94%), we take it as a standard. All comparisons are made by connecting antennas to the input on the splitter, to which an external antenna is usually connected.
Loop antenna, from Electronics 82% on 39 multiplex and 66% on 60
Budget with “horns” - 62%/38% (on the verge of losing the broadcast)
Double square - 92% on both multiplexes, about a couple of percent less than the external one
Out of curiosity, I decided to check the work of the reflector, which is easy to make from any metal mesh, plate or even foil... It REALLY works noticeably! The level rose to 96%!, which is even higher than the stationary one, with a declared gain of 11dB.
The most interesting thing is the object that I used as a reflector!
There was no foil in the house; the only thing available with a metal surface of the required size was... a laptop cover (I have a metal case). But the main thing is the result! It’s clear that I’m not going to “tie” the laptop to the antenna, and its amplification is enough for me without a reflector
Notes from a programmer
After working on the air for a while, and reading about propagation, antennas, matching devices and such, I had a better idea of what I needed from an antenna. It was decided, taking into account the accumulated knowledge and experience, to make a new antenna that would better suit my current limitations and interests. I also wanted to get the cheapest and simplest antenna possible so that other beginning radio amateurs could replicate it.
Formulation of the problem
Lately I've been using a multi-band delta. The antenna served me faithfully for more than a year, providing access to all HF bands from 10 to 40 meters, and, with a noticeable loss of efficiency, even to 80 meters. Many QSOs were made across a variety of modes, including a number of intercontinental ones, all with good reports. Overall, it turned out to be a normal antenna.
So what are her problems:
- The lower part of the antenna sheet is at the level of human height. That is, relatives or neighbors may be located almost close to the antenna. In the daytime, you have to either constantly look out the window or work on a transmission with reduced power;
- The antenna is located close to the house, and therefore has a high noise level and collects sudden impulse noise. The difference compared to a dipole located 10 meters from the same house is noticeable to the naked eye;
- The radiation pattern and polarization of the antenna on each band is not very clear. The simulation results disagree with the observed data, the same input resistance. I would like to have a rough idea of which direction the signal is going and with what amplification;
- Unknown losses in the matching device and 1:4 balun. The video How much power is your QRP antenna coupler losing by Peter Parker, VK3YE, clearly demonstrates that typical losses in a matching device can be on the order of 1 dB, or 20% of the power;
- To change the range you have to turn the knobs. This problem can be solved using the mAT-30 autotuner. But then the antenna will be tied to a limited number of transceivers compatible with it, which I would like to avoid. In addition, the auto tuner is extra wires. Also, let me remind you that when using this autotuner, the Yaesu FT-891 reduces the output power in proportion to the SWR;
- The antenna bandwidth could be wider. In winter, the antenna can bend under the weight of snow, causing the input impedance to change. As a result, a newly matched antenna may become unmatched after ten minutes. Appears only during snowfall;
- The antenna was made of P-274M wire. This is a fairly thick black wire. I would like the antenna to be less conspicuous. So, just in case;
- It feels like I've worked with almost everyone I could with this antenna. It is quite rare to find new correspondents. It is worth saying that now I am most interested in working in the telegraph office, and sometimes in SSB. There are enough new correspondents in FT8, but I’m not very interested in working there;
According to the magazine, 75% of radio communications during my entire time on the air were carried out in the ranges of 20 and 40 meters. I was ready to sacrifice the rest of the ranges, leaving only the two most often used by me in practice. To access other bands, I can always deploy some kind of temporary antenna.
Preparatory work
There are not so many simple and at the same time effective antennas - these are a dipole, a vertical and a loop antenna. I don’t have space for two independent antennas, so I need one antenna for two bands. It is possible to make a multi-band frame, but it is quite troublesome. The vertical, so that people don’t walk near it, needs to be placed on the roof. The roof of the house is metal, which is good for vertical. But I don't want to climb onto the roof in the middle of winter in case something happens to the antenna. Thus, a dipole remains.
A multi-band dipole can be made using either two pairs of arms, ladders, or a 1:4 balun. I settled on the first option because it is the simplest. It was decided to power the antenna using an RG-213 cable, since this produces small and known losses, and the cable can be used of any convenient length. Thus, it was necessary to make a 1:1 current balun.
The last time I made a balun it was heavy and expensive because I used a FT240-31 ferrite ring. It was decided to wind the balun on a cheaper and lighter ring with a similar initial magnetic permeability, and see what happens. For the ring I chose M1500NM3, 45x28x12. The ring is large enough to wrap an RG-58 cable around it. But I wanted to use bifilar winding, simply because I had never used it in baluns before.
The following photo shows the balun itself and how the dependence of the winding impedance on frequency was measured:
The impedance, as well as the SWR at an equivalent load of 50 Ohms, turned out to be as follows:
A graph similar to the first one, only for the FT240-31 ring, was previously presented in the post Antenna Analyzer FAA-450 (EU1KY). It can be seen that the M1500NM3 copes worse. However, at frequencies from 1 MHz to 14 MHz we see an active resistance of more than 500 ohms, which means the balun does a good job of suppressing common mode currents. I note that if you use RG-58 cable instead of a bifilar winding, the graph will be the same.
I was much more worried about the SWR. It can be seen that at 14 MHz the balun begins to introduce significant reactivity. The working version was that this reactivity would be compensated by the length of the arms of the antenna itself. The balun was also tested at an equivalent load when delivering a carrier power of 100 W. Nothing in the balun overheats anywhere. This indicates that the balun is working correctly.
The final look of the balloon turned out like this:
I noticed that a PVC pipe with a diameter of 20 mm is ideally inserted into the wound ring. I used it as a frame. An SO-239 connector is inserted into the tube from below, and a loop is attached to the top. The loop was cut from the grill grate using tin snips. The grate was bought new and turned out to be too small for the grill, so it lay idle. With the same success, you can use thick copper wire or any other available materials. Everything is held on with epoxy glue.
As an experiment, an inverted-V antenna was made for the most difficult range for a balun, 20 meters. The antenna was raised on a telescopic rod to a height of 7 meters. I made the lengths of the arms exactly 5 meters, and on the first attempt I got almost where I needed them:
It looks as if the theory of reactivity compensation is being confirmed. Several test radio communications were carried out on both CW and SSB. They all went through without problems. This way I made sure that the balun works as it should even in the 20 meter range.
Final decision
This is what a two-band antenna looks like:
SWR charts:
The results are similar to those obtained when making a fan dipole from a two-wire line. This time the arms were located almost in the same plane, which did not greatly affect the properties of the antenna. Interestingly, the SWR graph on the 20 meter band can be manipulated by adjusting the distance between the arms from the ground. The closer the arms are to each other, the lower the frequency the resonance will be at 20 meters. This time it was not possible to get “bonus” ranges. On bands other than 20 and 40 meters, the SWR does not fall below 5.
Unlike the previous version of the antenna, here we have significantly lower losses in the power line. In addition, the line can be of any length. The wires and fishing line used were the same as last time. This makes the antenna not very noticeable against the sky. Closer to the ground, the fishing line was covered with electrical tape. This is done to prevent anyone from accidentally bumping into it. Insulating tape also gives the fishing line additional protection from friction against the fence in case of strong winds.
I made a little mistake with the choice of mast. A 20 meter long telescopic fishing rod was purchased on eBay. I hoped that I could use 15 meters for the mast. But it turned out that in this case you need at least two tiers of guys, otherwise the mast bends too much in the wind. And my relatives are not enthusiastic about the idea of stringing ropes all over the yard. As a result, the height had to be limited to 10 meters, and the fishing rod had to be secured only at the base, tied to the fence. From past experience, I know that this design can withstand any strong wind, even when using much thinner rods.
Fun fact! Alternatively, the mast can be soldered from copper pipes. It is advisable to choose thicker pipes, with a diameter of at least 20 mm. Such a mast itself can be used as an antenna element.
To prevent the rod sections from collapsing in the wind, I secured them with reinforced tape. To prevent the tape from peeling off over time and to prevent water from flowing under it, it was coated with Plastik 71 varnish on top. The insulation of the junction of the coaxial cable with the balun is made according to the same principle, only instead of reinforced tape, several layers of electrical tape are used.
Important! Do not use spray varnish. If the wind blows unfavorably, the varnish will get into your eyes or people passing nearby.
Ten meters is a very good height for inverted-V on the 20 meter range. The antenna is well suited for long-distance communications. For the 40 meter range the height is λ/4. The radiation pattern leaves much to be desired. Many radio amateurs will say that such an antenna is not good for anything at all, since it “radiates to the zenith.” But I'll venture to argue.
Firstly, even if so, we already have an antenna for long-distance communications. Why not configure the second one to be better suited for short-range communications? Secondly, in fact, even at this height, the antenna can compete in gain at angles of 20-30 degrees with the vertical:
The real problem is not the amplification itself, but the fact that signals from distant stations can be blocked by signals from nearby ones. But if we are talking about the telegraph, then two stations simultaneously using the same frequency is a rare phenomenon. The telephone is still not the best type of communication for DX.
Thirdly, the book Propagation and Radio Science by Eric Nichols, KL7AJ convincingly shows that radio waves do not literally reflect from the surface of the earth. In fact, radio waves penetrate underground, and much deeper than is commonly thought. Thus the “reflection” occurs underground. As a result, the low-hanging inverted-V performs better than it should because its effective height from the ground is greater.
Important! Be sure to use an ESD choke with this antenna. The inductor must be properly grounded.
Test results using WSPR at 5 W are encouraging:
Here we see that my signal was received basically all over the world, both on 20 meters and 40 meters.
Indeed, it is often possible to make long-distance communications with this antenna. Japan (7500 km) and the USA (8600 km) are still leading in the range of 20 meters in distance. In the 40 meter range, I was able to make QSOs with radio amateurs from Brazil (12,100 km), Australia (12,500 km), and also New Zealand (16,150 km). It happened during the context of CQ WPX CW 2021. All radio communications are in the telegraph.
This is an interesting result. Although it would seem that the antenna pattern at 20 meters is better and the noise level in this range is much lower. UPD: Later, no less long-distance communications were carried out in the range of 20 meters than in the range of 40 meters.
Conclusion
The result was just a normal antenna, devoid of all the shortcomings mentioned at the beginning of the article. I've been using it for one month. The mast holds up, the fishing line doesn’t break, and the neighbors don’t complain. The antenna is recommended for repetition and use by beginner shortwave operators.
If after reading the article you still have questions, do not hesitate to ask them in the comments. It would also be interesting to know in which amateur radio bands you usually work, what antenna you use as your main one, and what kind of radio communications you can make.
Addition: Refinement of the antenna is described in the post Experiments with ladders of various designs.
Tags: Antennas, Wireless, Ham Radio.
Conclusion:
I can confidently recommend repeating it!
Simple, “cheap and tasty”... One of the simplest, indoor antenna mounts... with ordinary suction cups - if you’re lucky with the direction to the television center
The next antenna "recommended for repetition" is... log periodic
“Crazy hands” were with you. Good luck and good mood to everyone! ☕
Video
Coffee capsule Nescafe Dolce Gusto Cafe O Le Coffee with milk, 3 packs of 16 capsules each
1305 ₽ More details
Coffee capsules Nescafe Dolce Gusto Café Au Lait, 16 pcs.
435 ₽ More details
Shockproof smartphones
Dipoles
The simplest and most effective antennas are half-wave vibrators, also called dipoles. They are powered in the center: a signal from the generator is supplied to the dipole gap. Amateur radio portable antennas can operate as both transmitters and receivers. True, transmitting antennas are distinguished by thick cables and large insulators - these features allow them to withstand the power of transmitters.
HF dipole on the roof of a house
The most dangerous place for a dipole is its ends, where voltage antinodes are created. The maximum current of the dipole is in the middle. But this is not scary, because the current antinodes are grounded, thereby protecting receivers and transmitters from lightning discharges and static electricity.
Note! When working with powerful radio transmitters, you may receive shock from high-frequency currents. But the sensations will not be the same as from a blow from a socket. The blow will feel like a burn, without shaking in the muscles. This is due to the fact that the high-frequency current flows over the surface of the skin and does not penetrate deep into the body. That is, the antenna can burn the outside, but the inside will remain untouched.
Second day…
Well, the second day has come, and I have done almost nothing. But I bought 50 meters of nichrome wire and fiberglass in A4 format and 8 mm thick. I was only able to make insulators for stretch marks. Construction is in full swing at home and the antenna is in the background. But I post photos of insulators. While making these insulators, I was itching all evening. While you are processing them, all the fiberglass dust sits on you, then you sit in the bathroom for an hour. Well, in short, here's a photo. To be continued tomorrow.
Antenna 5/8 lambda at 2 meters (144 MHz) - showing off my workhorse.
Antenna 5/8 lambda at 2 meters
And here is a short manufacturing process, without the SWR or frequency response of the meter it will not be possible to adjust it, but he promised to show me, below are instructions on how to construct such an antenna.
The same type of antenna works for rk9ugt, here's what he says about it.
- Dielectric plate.
- Vibrator, 5/8 wavelength
- Matching coil
- Metal plate (tinned sheet)
- 1/4 length counterweights
- Stud, washers, nuts
- Coaxial cable
1- Any insulating and moisture-resistant plate, size
Pin 2 is attached to it using clamps, screws, wire, etc., the length of which is 5/8 of the wavelength of the desired range (in our version 144 MHz), depending on the diameter the length will be:
- diameter 4-5 mm bimetal – length 1270 mm,
- diameter 10-14 mm aluminum – length 1200 mm,
It’s better to take it with a reserve – it will come in handy when setting up.
Next, we wind coil 3 on a frame with a diameter of 15 -18 mm (a marker was used in the original) - 9 turns of wire, almost any kind, bare copper, silver, etc. with a diameter of 1.5-2.5 mm (not critical). After winding, stretch the coil to a length of 34-35 mm.
We solder the upper end of the coil or screw it through the petal (depending on the materials used) to antenna pin 2, the lower end to plate 4 made of tinned sheet metal 25x35 mm, which is fastened with bolt 6, or better yet, with a pin to the main plate 1.
We make counterweights 5 from bimetal or other suitable wire with a diameter of 4-6 mm. The length is a little more than 1 meter (don’t forget about the reserve for adjustment). We bend them into the Greek letter OMEGA with a long mustache. OMEGA should be in the middle. We attach the two resulting OMEGAs to stud 6 from different sides using nuts and spread the mustaches in different directions at an angle of 90 degrees.
We attach cable 7 to plate 1 in any way (we pass it through drilled holes, tie it with wire or waxed threads, etc.) We solder the braid to plate 4, and the central core to 3 and 1/3 turns on top of coil 3.
We take a bottle, cut off the bottom, make a hole in the cork and four holes or slits at the bottom for the counterweights and put it on pin 2. The result is a “bottle” antenna.
I think you can do the mounting of the antenna to the mast yourself.
SETUP. It is best to tune the antenna using an frequency response meter (optimally X1-48), and not using an SWR meter, as many do.
Tuning is to achieve resonance at the desired frequency by changing the length of the pin and counterweights, and compressing or stretching the coil turns. And by moving the connection point of the central core of the cable, you can already obtain a minimum SWR; by the way, it is consistent with any reasonable cable resistance.
Source: immetatron.com