If you purchased a new TV, changed your cable operator or broadcast type, then the first procedure you will encounter is setting up TV channels on your TV.
Depending on the method of signal reception, there are three main types of broadcasting:
- terrestrial - broadcast from a TV tower is transmitted to a regular antenna;
- cable - channel packages from the operator's distribution center are transmitted to subscribers' apartments by wire;
- satellite - the signal from the satellite is transmitted to a parabolic antenna (dish) and converted by the receiver.
In turn, terrestrial and cable television can be analogue and digital. The second has higher image and sound quality, but viewing it may require additional equipment in the form of a digital set-top box (tuner), especially if we are talking about an older TV model.
This article discusses automatic and manual tuning of analog channels on a TV (for cable channels everything will be identical).
Preparing the TV
Before you start directly setting up channels, you should connect the TV to the broadcast source. With an analog signal, the cable from the antenna or cable television operator is connected directly to the antenna input of the TV (marked in the photo):
At the same time, it is worth separately considering the situation in which more than one TV is used in the apartment. In this case, a special antenna splitter is used for connection, which in most cases has two or three outputs:
How to tune channels from a regular antenna to several TVs?
People often complain that the channels on their TV in one room are worse than in another. Some of them are missing, and the rest have interference. This is due to an incorrect connection. It is important that both TVs are equidistant from the main cable. Otherwise, the one that is located closer will take over most of the signal. Also, to connect two or more TVs, you should use a high-quality cable that is better protected from interference. Therefore, a standard cheap cable, which is usually offered by many cable television operators, will not work here.
What is the difference between digital television and analogue?
Almost the entire world already uses digital broadcasting (DV). Unfortunately, our country is still an outsider and the gradual transition from analogue to digital television began quite recently.
These two broadcast standards are fundamentally different from each other. A digital signal is a set of digital codes.
Thanks to this, the data reaches the user equipment without distortion, while the analog signal is subject to interference and is affected by the distance of stations. As a result, it can be stated that digital data transmission is ideal.
The set of codes is received by a special receiver, which decrypts them and broadcasts them to the TV. Such a unit is already built into modern TVs by the manufacturer, but in the case of outdated television receivers, it is necessary to connect additional equipment - a “receiver” or, as it is popularly called, a “set-top box”.
There is a large selection of devices on the market today, but the essence of the process of connecting them is the same for all models.
After connecting the set-top box, even to an outdated TV, the user will be able to enjoy the quality of digital television and watch their favorite shows and movies in high definition.
How to automatically tune channels on your TV
This is the easiest way to set up and requires a minimum of effort and knowledge. The TV itself finds all available channels and remembers them.
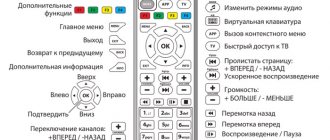
To switch to automatic tuning mode, enter the TV menu by pressing the button on the remote control. Depending on the model of your TV, this button may also be indicated by the words HOME, INPUT, OPTION, SETTINGS or special symbols in the form of three longitudinal stripes, a house, an arrow in a square, and others. More detailed information on this matter is contained in the instructions for operating and setting up TV channels. Some options for designating the menu button are shown in the photo:
After entering the menu, use the navigation buttons to select “Channel setup” - “Automatic setup”. After this, indicate what type of television you are going to tune in (terrestrial or cable) and start the search process by pressing the ENTER/OK button. In different TV models, the names of the described menu items may differ slightly, so if you have any difficulties, check the instructions. An approximate menu screen might look like this:
In some cases, before tuning channels on a regular antenna, you should additionally select the region of your location. To do this, in the settings menu, find the COUNTRY or REGION item and select the corresponding entry in the list.
After auto-tuning of channels is completed, a sorting menu may appear on the TV, with which you can arrange the found channels in an order convenient for viewing.
It is worth noting that when changing or adding transmitted channels on the part of the cable television operator, the setup must be done again.
Types of connections
Depending on what connectors the TV and set-top box are equipped with, the connection methods also differ.
The receiver can be connected to the TV via:
- “Tulip” - RCA wires;
- "HDMI";
- Coaxial cord (antenna).
RCA cable
This is the most common and widely used method of connecting a set-top box to a TV.
Although the video broadcast resolution is not as high as with the “HDMI” option, the difference is practically not noticeable to the naked human eye on a TV with small screens.
Due to the fact that each connector and plug of the Tulip connection is painted in a bright individual color, it is very difficult to make a mistake during the connection procedure.
The meanings of the color designations are as follows:
- Yellow for video signal;
- Red for audio output;
- White for audio input.
The user is only required to insert a plug of a certain color into a connector of exactly the same color. Then install the cable coming from the antenna into the “RF IN” connector.
If the TV does not have color “RCA” connectors, then the use of “Combs” is allowed.
It is labeled “SCART” on the back of the TV. You will need to use a cable with the appropriate plugs, as shown in the figure below.
HDMI connector
If the equipment has this type of connectors, then the quality of the image and sound will be significantly higher. In this case, you will need to make a connection via an HDMI cable.
It allows you to provide video resolutions reaching 1080p, and audio quality – 192 kHz.
Antenna cable
When the TV does not have more modern interfaces other than the antenna input, the set-top box can be connected to the TV via the “RF-OUT” connector.
For this purpose, it is necessary to use a special cord, as shown in the photo below.
Unfortunately, this connection method will lag far behind in broadcast quality, but consumer requirements for an outdated or old TV are initially low.
How to manually tune channels on your TV
For all its apparent simplicity of automatic configuration, it has several significant drawbacks. Some channels may repeat or have distorted picture or sound. In this case, you should correct the situation manually. Here are step-by-step instructions for manually setting up TV channels:
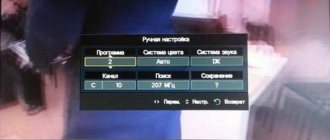
- In the “Channel Tuning” menu, use the navigation buttons to select “Manual Tuning” and press ENTER/OK.
- Select the “Program” item and assign a serial number to the channel by pressing the number buttons on the remote control.
- Select the color system used in your region: PAL, SECAM, NTSC or AUTO.
- Select the sound system: 2.0 (stereo), 5.1, etc.
- Perform a “Search” for the channel and, if successful, add it to the TV’s memory by pressing the “Save” button.
- Repeat the same procedure for all required channels.
The manual channel tuning menu may look like this:
It should be remembered that all actions in the proposed instructions are confirmed by pressing the ENTER/OK button.
Frequently asked questions about setting up analog channels
Sometimes during the process of setting up channels certain questions may arise, some of which are discussed below.
How to tune channels on a TV without a remote control?
The process of automatic and manual setup in this case occurs in a similar way, but to access the TV menu, buttons located directly on its body are used:
If there are no such buttons, you will need to purchase a remote control.
How to tune channels on an old TV?
In the absence of a menu, channel tuning is carried out using special controls, which can be located under the switch buttons or on the back side near the antenna connector. In addition, on old domestic TVs such as “Electron” or “Rubin” and portable car TV receivers, bands can be switched using jumpers, sliders or buttons. Setting up television channels for such devices is done only by hand.
What to do if the channel settings are lost?
If you tuned channels automatically, try running a manual search. If the channels fail again, the cause should be sought in a poor broadcast signal, a faulty cable or a broken TV. Read more:
Find the Menu button on your remote control and press it; in the menu that appears, select Channels
In the Channels item, first select the Broadcast Country; it is recommended to select the country Germany.
Next, find the TV Mode item, where you need to select your broadcast format. If a simple indoor antenna is connected to your TV and you want to receive twenty free digital channels, then choose this broadcast format.
Click on Auto channel search and select ALL to search for all Digital and analogue channels, if you only need digital, select only DTV.
If you are setting up cable TV, then you will see the following item where you need to select Full search, if you know the parameters, you can select Network, click on Start and wait for the end of the search for channels on the Polar TV.
To manually search for channels, enter the Manual search for DTV item and see the parameters of your network.
After your Polar TV has completed searching for channels, you can edit your favorite channels, adjust the screen color, set the time, and change the sound settings.
In order to change the digital TV broadcast format, you need to switch to digital TV mode by pressing the Source button and select DTV.
The Polar TV setup may vary, but the steps are all the same. This setting is suitable for many other brands of TVs such as LEBEN, DOFFLER, DEXP since they use the same software.
Polar TVs: characteristics, best models, operating and repair tips
->How to set up a Polar TV
| Polar brand TVs are products of the Russian company POLAR, which has been producing TVs for more than twenty years. The Polar line of TVs is diverse; it includes simple LED TVs and new models of smart TVs that are in no way inferior to global trends. If you purchased a Polar TV and cannot configure digital channels on it yourself, follow the instructions below for searching for digital channels. New Polar TV models have the ability to receive digital television in DVB-T2 and DVB-C formats, which gives you the opportunity to watch twenty digital channels without using a digital set-top box. Find the Menu button on your remote control and press it; in the menu that appears, select Channels In the Channels item, first select the Broadcast Country; it is recommended to select the country Germany. Next, find the TV Mode item, where you need to select your broadcast format. If a simple indoor antenna is connected to your TV and you want to receive twenty free digital channels, then choose this broadcast format. Click on Auto channel search and select ALL to search for all Digital and analogue channels, if you only need digital, select only DTV. If you are setting up cable TV, then you will see the following item where you need to select Full search, if you know the parameters, you can select Network, click on Start and wait for the end of the search for channels on the Polar TV. To manually search for channels, enter the Manual search for DTV item and see the parameters of your network. After your Polar TV has completed searching for channels, you can edit your favorite channels, adjust the screen color, set the time, and change the sound settings. In order to change the digital TV broadcast format, you need to switch to digital TV mode by pressing the Source button and select DTV. The Polar TV setup may vary, but the steps are all the same. This setting is suitable for many other brands of TVs such as LEBEN, DOFFLER, DEXP since they use the same software. |
| ->Category->:My articles | ->Added->:IVAN1111 (01/21/2019) |
| ->Views->:19838 | | | |
| ->Total comments->: 32 | 12» |
| Comment order: | |
| 1-1011-18 |
->
Content
Domestic Polar TVs allow you to enjoy quality at an affordable price. Popular Russian models are no worse than their foreign counterparts. This manufacturer is considered the best in the budget price segment. When used correctly, the equipment does not frighten its owners with serious breakdowns. And customer reviews will allow you to finally decide on the choice of a specific Polar TV model.
Peculiarities
Polarline TVs are products manufactured by Polar. Household appliances of this brand are produced in Russia. The brand has existed in our country since the 1990s, but Polarline TVs began to be produced only in 2005. The manufacturing plant is located in the Kaliningrad region. But the company assembles part of its assortment in the city of Alexandrov, Vladimir region.
The company strives to produce modern televisions that will meet all the requirements of domestic consumers. They are suitable for watching analog, cable, digital television, are affordable and resistant to power surges in the network.
It is worth keeping in mind that the company's developers are constantly engaged in the creation and design of new models. At the same time, they are guided by market conditions, and also use only the latest developments.
For your convenience, the company has opened official representative offices throughout the country: both stores and service centers.
Advantages and disadvantages
The country of origin of Polar TVs is Russia. The company is located in Kaliningrad. The range consists of budget TVs with a small diagonal. The company produces HD, FHD and 4K lines. Each type of TV from Polar has its own advantages and disadvantages. Panels with HD image quality (1366×768) are considered the simplest and most affordable. The manufacturer has 6 models in this line. Main advantages:
- affordable price;
- viewing angles 178°;
- Russian-language menu;
- function of storing programs when searching for them;
- low power consumption.
HDTVs are lightweight, hang on the wall, and look attractive. Main disadvantages:
- built-in speakers are weak;
- smart TV is slow;
- small amount of RAM.
The line with FHD screen resolution includes 9 models. The TVs have a built-in tuner, which allows you to watch over-the-air and cable channels. There is proprietary DGView technology. It converts the analog signal to digital, which significantly improves the quality. The main advantages of the line:
- many channels - 1299;
- built-in browser and Youtube;
- wired Internet connection;
- the ability to fine-tune contrast;
- some models have smart TV;
- you can install programs from a USB flash drive;
- low power consumption according to class A.
Among other things, the Full HD line is lightweight and has control buttons on the rear panel. Disadvantages of the models:
- The sound of the built-in speakers is not very good;
- the control panel is inconvenient;
- there is no button to turn off the power, you can only unplug the cable from the socket;
- a small amount of RAM, because of this the smart TV works quite slowly.
There are Polar TVs with 4K and smart functionality. The line consists of 4 models. Main advantages:
- you can use Wi-Fi;
- built-in browser and Youtube;
- RAM up to 1 GB;
- 3D digital filter;
- There are various audio modes.
TVs with maximum screen resolution make it possible to use Dolby Digital. Main disadvantages:
- on some models there are highlights at the bottom of the matrix;
- low frame rate, which is noticeable when playing particularly dynamic scenes;
- Sometimes the screen flickers.
TVs from the domestic manufacturer Polar have an affordable price compared to their foreign counterparts. More modern models allow you to enjoy movies and shows.
It is worth noting that most models have built-in speakers that are not powerful enough. TVs look quite stylish and laconic and will fit into any interior.
The lineup
Many users prefer TVs from this manufacturer. The entire range consists of 19 models. All of them have LCD TFT matrices, which are free from glare even in bright light.
- HD screen panels: 32PL13TC-SM, 32PL13TC, 20PL12TC, 32PL12TC, 24PL12TC, 39PL11TC.
- Panels with FHD screen: 22PL12TC, 40PL51TC, 43PL51TC-SM, 43PL51TC, 40PL52TC-SM, 40PL11TC-SM, 50PL51TC-SM, 40PL51TC-SM, 43PL52TC-SM.
- Panels with 4K screen: 50PL52TC-SM, 43PU11TC-SM, 55PL52TC-SM, 55PU11TC-SM.
Here are the most popular models and their characteristics.
- Polarline 32PL52TC-SM. A TV costs about 10,000 rubles. The 32-inch diagonal screen corresponds to HD format. Frame update - 60 Hz. The TV has Android OS installed. There are 2 built-in speakers of 14 watts. The Android OS system automatically equalizes the sound parameters. Users have 1299 channels at their disposal. There is a child lock system and a TV timer. The device supports quite a few formats and has a high-quality picture at a low price. A variety of connectors allows you to connect additional peripherals. There is a Smart TV option. Among the shortcomings, it is worth noting the small amount of built-in memory.
If you install more than 2 programs, the TV will work slowly. The speakers may experience noise at high volumes.
- Polarline 40PL51TC. TV with a screen size of 40 inches and Full HD resolution. The frame refresh rate is low, only 50 Hz, so dynamic scenes are not reproduced as we would like. The speakers have a total power of 12 watts. It is possible to record programs on a USB drive. Many connectors allow you to connect additional devices. It is worth noting that this model does not support Smart TV.
- Polarline 40PL52TC-SM. Many characteristics are similar to the previous model. The frame refresh rate is higher here – 60 Hz. There is support for Smart TV. The cost of the model is about 13,800 rubles. Good picture quality is combined with large viewing angles. It is possible to connect the equipment to a computer and use it as an additional monitor. The sound is quite powerful, which is an advantage. The device is fully worth the price.
- Polarline 43PL51TC-SM. The TV has a 43-inch screen. Users have 599 channels at their disposal. The built-in speakers have a power of 14 watts. The cost is about 16,000 rubles. It is possible to use Smart TV. Thin frames make the model especially stylish and attractive. High-quality images and a large diagonal allow you to enjoy watching movies and other programs.
- Polarline 50PL52TC-SM. This model has a 50-inch screen with 4K UHD resolution. The manufacturer priced the TV at approximately 20,500 rubles. The built-in speakers have a power of 14 watts. The model received DOLBY DIGITAL support, making the sound surround. One of the few models that can work with WMA and DIVX. It is possible to use Smart TV and connect the TV to Wi-Fi.
It is worth noting that the device has a very small set of built-in programs.
Settings
TVs from Polar do not cause any particular problems. You can configure channels like this.
- Using the remote control, you need to enter the “Menu” by pressing the corresponding button.
- Select “Channels”.
- In the “Broadcasting country” column, many experts recommend indicating Germany.
- In the “Broadcast mode” item you need to select the appropriate format.
- Click “Autosearch” and select the “ALL” category. If you need to connect only digital channels, then you should click on “DTV”.
When setting up cable television, you must enter network parameters. After you finish searching for channels, you can separately set up your favorites for quick access. Additionally, in the settings you can select parameters for colors on the screen and sound. You can also set the time, which will subsequently be displayed.
AV/TV mode
To set up in this mode, you need to enter “AV/TV” using the TV remote control.
After this, the settings will be displayed on the screen, where the following columns are present:
You need to specify the column corresponding to the physical connection of the devices, for example, if the set-top box is connected to the TV via a tulip, then click “AV”.
Specify “HDMI when connecting with an HDMI cable.” When using a “comb” - SCARD.
Some TVs, after entering the “AV” menu, automatically switch to “AV1”, ..., “AV5”, etc.
In this case, you need to experimentally find the menu by simply searching through them and make the settings.
Operation and repair
The instructions for the TV fully describe all the actions that can and cannot be performed with this equipment. There is a diagram of how to use all additional connectors. It is possible to connect a phone, video camera, computer, soundbar and much more. It happens that the device begins to behave atypically. Here are common problems with Polar TVs and their causes.
- Channels do not change, the remote control is broken. In this case, you can try to send it in for repairs. If it cannot be repaired, then a universal remote control will do. Some models have buttons on the body. Then you can turn on any channel without the remote control. Otherwise, you will have to not use the equipment at all during repairs.
- The TV does not respond to commands from the remote control or control buttons. There may be several reasons. The most common ones are that the remote control or buttons were damaged as a result of mechanical damage. If this option is excluded, then the problem is that the software is not working properly. In this case, you will have to update the firmware.
- The equipment does not respond to external devices. We are talking about an antenna for analogue, digital television or a TV set-top box. It happens that the TV simply does not output a signal through a particular port. First you need to try setting up channels manually. If this does not solve the problem, then you will have to contact a specialist. The equipment behaves in a similar way if the connectors are damaged or the functionality of the motherboard is impaired. In some cases, the failure is systemic - then you need to change the firmware.
- The TV turns on, but the color reproduction is disrupted. The picture ripples or appears negative. The reason may be mechanical damage to the display or malfunction of its cables. Rarely does the problem lie in the video signal processing board.
- After turning on there is sound, but no image is displayed. The problem lies in the display backlight lamps. The technician can make a replacement.
- The TV does not connect to Wi-Fi. It happens that the signal disappears suddenly. You can try restarting the router and TV. If this is your first connection, you should contact your provider. Sometimes router settings prevent connection.
- The screen narrowed. You can expand the image quite simply. Just go to the “Menu” and select the “Image” item. So you should find “Image size” and set the necessary parameters. You can also perform the default setting.
Required Equipment
To view DV you definitely need a receiver. First, it is recommended to study the instructions for the TV, since many TVs, for example, from and Philips, are already equipped with the necessary equipment.
This is indicated in the user manual and in this case there will be no need to incur additional financial expenses for the purchase of the set-top box.
If the TV is not equipped with such a unit, then based on the user’s personal needs, you need to buy a receiver with a suitable set of functions.
For example, if a TV owner prefers to use flash drives to watch movies recorded on them, then it is better to ensure that the set-top box has a USB connector.
The components included with the device include everything necessary to quickly put it into operation.
Typically this list includes the following:
- Instructions;
- “RCA” wire or as people used to call it: “Tulip” or “HDMI” cable;
- The tuner itself, that is, the set-top box;
- Cardboard box with a picture of the device and its brief characteristics;
- DU;
- Batteries for remote control;
- Power unit;
- Warranty documents.
Sometimes the list of components of individual budget models may lack a cable or other important element, without which it becomes impossible to connect the equipment.
In this case, you need to separately purchase the missing components and only then proceed to connect the device to the TV.
Review Reviews
Buyers claim that for such a price Polar TVs are good. The image quality of most models is satisfactory. The pleasant design of the case itself allows you to successfully fit the equipment into any interior. TVs are good for those who need a temporary solution or a simple panel without unnecessary add-ons.
Users note that the price of the entire model range is more than acceptable. For that kind of money, the manufacturer offers good quality. The remote controls are quite high quality. However, replacing the element with a new one is problematic. In the event of a breakdown, you can only use a universal remote control, because it is almost impossible to purchase a branded one.
Many users complain about the sound quality. Volume adjustment on some models is not smooth enough. Too little frequency range. Some buyers claim that additional speakers solve all problems with sound quality.
For a review of the Polar TV, see below.
Almost all cable providers provide digital television services, and many operators have also retained the analogue broadcast format, which means that subscribers do not need to purchase digital set-top boxes.
Setting up cable TV
When searching for cable channels, you will need to select which channels you want to watch digital or analogue, you can also select both lists in the settings.
- Press the MENU button on your remote control.
- Find the CHANNELS menu section.
- Next you need to enable Auto channel search.
- Select a country, Germany or Finland is recommended for older TV models, for new ones choose Russia.
- Antenna selection - choose Cable, Cable TV or DVBC.
- Type of channels DTV is only digital, ATV is analog.
- Search mode Full and start the search.
- We are waiting for the installation of channels to be completed.
Setting up your Samsung to receive cable TV will not take much time.
- Enter the TV settings by pressing the Home or button.
- Go to the Broadcast or Channel submenu.
- In the Antenna section we put Cable.
- Click on Autotune.
- Next you need to select the type of channels Digital and Analog
- The search mode must be selected Full. If you know the parameters of your network, you can select Network or Fast, but for these two modes you need to enter your network data in the cable search parameters.
- Click on Search and wait for the process to complete.
In order to install cable channels on an Elgie TV of older models, you must change the country, because if you select the country Russia, the DVB-C format will not be available and to enable it you must set Finland or Germany in the TV parameters. After this, you can set up digital channels.
- Go to the menu, click on auto search and select Cable TV.
- You will be provided with a list of operators, select yours, if yours is not there, be sure to click on Others.
- Select Full Search
- Check the box for digital channels.
- Click on ok and wait for the search to complete.
Content:
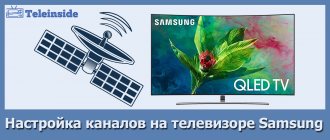
During 2021, broadcasting of analogue channels was switched off in Russia. A smooth transition in different regions was given from 1 to 3 months. New TVs did not require the purchase of set-top boxes, while old ones required additional equipment. But, despite the duration and smoothness of the transition, not all users have learned how to set up digital channels on Samsung TVs.
SONY setup
Setting up cable TV on Sony TVs is slightly different from other models where the actions are almost identical. Also on older SONY BRAVIA models you need to select the country Germany in the settings.
- Press the HOME button and find the Settings menu item.
- Next we look for the Digital Configuration.
- Open the item Auto-tuning of digital stations.
- Select the TV connection type: Cable or DVB-C.
- If a list of operators appears, select yours; if you don’t find the one you need, click on Others.
- Specify the scan type as Full, if you know the frequency of your operator, you can specify Network.
- Click start and wait for the channels to be fully configured.
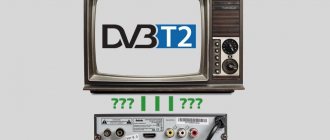
Instructions for models with a DVB-T2 tuner
Digital broadcasting on modern TVs that receive signals without a set-top box must be configured through the menu. It is better to run Auto-Tuning, which will automatically read all available TV programs and save them under numbers. If you choose the “manual” option, you will have to adjust each channel for a long time.
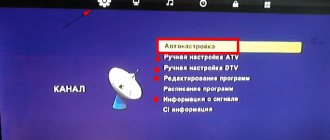
Instructions for setting up digital channels on Samsung TVs with a built-in DVB-T2 tuner in automatic mode:
- Go to the TV menu. Looking for the “Broadcasts” section.
- Open the “Auto Configuration” item.
- Indicate the signal source: antenna, cable, satellite.
- Determine the type of channels - choose digital broadcasting.
- Click on the “Search” button and select the “Full” option and “Scan”.
- Wait for the setup to complete. Find “Save” and enjoy the number.
There are situations when automatic tuning does not work, then you have to search and save channels manually.
Manual search: instructions
So, how to manually configure digital channels on a Samsung TV:
- Go to the menu, select cable instead of antenna.
- Click on the country item - Eastern Europe.
- If necessary, enter the PIN code: 0000, 1111, 1234.
- In the parameters, select frequency limits from 298 to 362 thousand kHz.
- Go to settings and set the channel type to “digital”.
- In search mode, put “network” and click search for available options.
- Save the channels you find.
If necessary, unnecessary programs can be removed. To do this, just go to the “Broadcasts” subsection and open “Dispatcher” there. Removal occurs through the “Tools” button.
Setting up Doffler, Polar, Dexp, Leben TVs.
- In the menu, use the down button to select Channel.
- Here you will need to do several steps by selecting your country and Current Cable input.
- Click on auto search.
- Select All channels, you can select which channels you need.
- Search type Full and click on Start.
The menu may differ on some models, but the basic steps are almost the same.
Which Search Type to choose: Full, Network, Quick.
Many people, when setting up their TV to receive cable channels, make mistakes by choosing the wrong type of channels. For example, when choosing Network, you will need to enter the starting and ending frequency, QAM modulation, and bit rate. These parameters are different for each operator, so don’t post anything here if you don’t know for sure. Therefore, by selecting Full search, the TV will tune in all available channels itself, only a little longer.
Setting up a digital cable box.
Cable operators use different digital set-top boxes. Setting it up is not difficult, sometimes it’s easier to do than on a TV.
- After you have connected the set-top box to the TV with the appropriate cable, enter the set-top box menu.
- Turn on Auto Search, Full broadcast mode.
- We are waiting for all channels to be scanned, this may take some time.
If you do everything right, you can enjoy the many benefits of cable networks. After all, unlike terrestrial channels, you will have access to additional TV channels of different topics: music, cinema, TV series, children's, TV shopping, news, but for a subscription fee. Remember, providers are required to service the line, so for a fee or free of charge they can configure your equipment and troubleshoot problems.
Sources used:
- https://telev-sat.ru/publ/kak_nastroit_televizor_polar/1-1-0-61
- https://stroy-podskazka.ru/televizor/brendy/polar/
- https://tv-nastroy.ru/kak-nastroit-kabelnoe-televidenie.html
To reset the M430 to factory settings
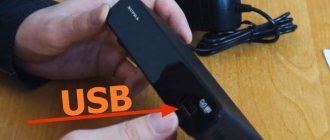
If restarting your M430 didn't help, you can reset the M430 to factory settings. Note that resetting the M430 to factory settings empties all personal data and settings from the M430, and you need to set it up again for your personal use. All data that you have synced from your M430 to your Flow account is safe.
- Connect your M430 to the computer's USB port.
- Open settings in FlowSync.
- Press the Factory Reset button.
Now you need to set up your M430 again, either via mobile or computer. Just remember to use the same Polar account in the setup you've used before resetting.
source