Soon there will be no analogue channels left in Russia at all, but only digital ones, which will undoubtedly ensure high quality “picture” and sound on at least 20 main federal channels, plus the regions will also have their own, and commercial highly specialized ones will gradually appear on the territory of the Russian Federation.
They say that there will be paid packages over time, but the 20 main ones will always remain free.
Get exclusive discount coupons from our website for the November AliExpress sale! Here on this page there are discount coupons for 100, 150 and 200 rubles!
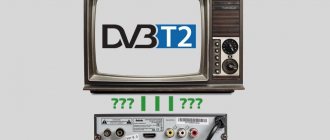
All this is good, but what should owners of TVs that cannot reproduce “digital” do? You just need to buy an additional console. By the way, it can support even more functions than the built-in digital set-top boxes in new TVs.
Manual
Page 2
- Image
- Text
Manual
2
content
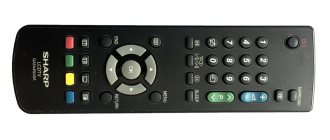
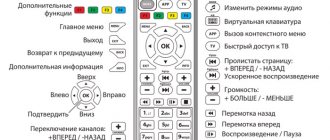
Operating and safety rules ………………………………………………………………………………………….3 Equipment ………………… ……………………………………………………………………………………………………………………………………3 Tuner controls ………………………………………………………………………………………………………………4 Remote control … ……………………………………………………………………………………………………………5 Preparing the tuner for operation ………… ……………………………………………………………………………………………………………..7 Initial installation ………… ……………………………………………………………………………………………………………….7 Tuner settings… …………………………………………………………………………………………………………………………………… 7 Video recording…………………………………………………………………………………………………………………………… ………………..13 Safe decommissioning………………………………………………………………………………………… …………….13 Troubleshooting …………………………………………………………………………………………………………… …………..14 Technical characteristics…………………………………………………………………………………………………………… ………….15
DEAR BUYER!
Thank you for choosing products manufactured under the SUPRA brand. We are pleased to offer you products developed and manufactured in accordance with high requirements for quality, functionality and design. We are confident that you will be pleased with the purchase of a product from our company.
Electricity can perform many useful functions, but it can also cause harm and property damage if used incorrectly. While safety has been a priority in the design and manufacture of this product, incorrect use may result in electric shock. For your safety and to prolong the life of the product, please read this manual carefully before using, installing, operating and cleaning the player.
Take care to keep this manual safe and use it as a reference material for further use of the device.
NOTE:
All images in this manual are examples only, actual product may vary
from the image.
How to choose and where to buy
I chose based on price/quality ratio and after reading a large number of reviews, comments and posts on forums, Yandex Market, and social networks. I also watched quite a few unboxing videos on YouTube.
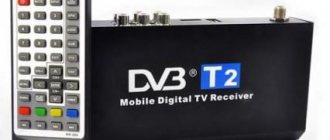
The choice fell on a set-top box for digital television of the Supra brand, SDT brand. I especially liked that you can order on Aliexpress in the Tmall section, which guarantees fast delivery from a warehouse in the Russian Federation and a local guarantee, instructions in Russian, all documents.
Also, these models are also produced under the Lumax brand in slightly different cases, but the filling is the same.
I took it, it cost about 650 rubles then. If something is wrong, then type the phrase “DVB-T/T2” in the Aliexpress search. Average prices are 10-15$.
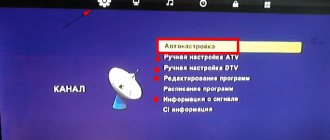
Automatic search for digital channels on Supra
The easiest way to set up your Supra TV is in automatic mode. To do this, connect the antenna, check the signal level and follow the instructions:
- Press the “TV Setup” button on the remote control. The setup menu will open.
- Select the "Preset" item and activate it.
- Several lines will appear, from which you need to select “Auto search”.
- Auto-tuning will begin. It will start from the lowest frequencies available to the model and gradually increase. The search takes about 5–10 minutes.
- At the end of the process, all channels will be saved. You can start watching.
Setting up a Supra TV with a different interface will look like this:
- Press the "Menu" button on the remote control.
- In the menu that opens, select “Settings”.
- Indicate the country (Russia) and the source of the signal (for terrestrial TV - “antenna”; for cable TV - the adjacent line). When setting up cable or satellite TV reception, you will need to specify the technical parameters of the broadcast. You can find them on your provider’s website or by calling their support phone number.
- After the choice is made, you need to find the “Auto search” position and indicate which channels will be searched. ABOUT.
- At the end of the list, select “Search” and activate it. The TV will begin the setup procedure.
Important: If you select “Digital and Analogue”, you will not have to additionally search for local broadcast channels later. However, if the antenna only receives UHF, which broadcasts digital TV, you should select the “Digital” item.
Adding local analogue TV channels
Analogue channels, which may be on air from local TV stations, are added at the auto-search stage if the “Digital and analogue” item was selected. If this has not been done, they can be added manually later.
To do this you need to do the following:
- Activate the menu.
- Select settings mode.
- Specify the antenna as the signal source.
- Select analog channels (ATV).
- Perform manual configuration and save the found ones. The procedure is similar to that for digital channels.
Important: When using a UHF antenna, analog programs will not be found: they broadcast in a different range, which requires a UHF or all-wave antenna.
How to set up digital channels on your Supra TV
First, you should analyze the components that are available, and then begin connecting and setting up channels.
Step 1. Find out whether the Supra TV supports digital television
To watch TV channels on Supra DVB T2, you need to find out whether the TV supports this format. You can find out information using:
- Operating brochure, which shows the characteristics of the equipment;
- DVB-T2 support identification mark on the TV.
If there is support for an encoded DVB-T2 signal, connect the cable to the TV and start setting up. TV devices no older than 2011 can support it. If your TV is older, or your model does not support DVB-T2, you need to purchase a special set-top box - a TV tuner. With its help you can receive a digital signal and display the image on your TV.
Step 2. Configure
Further setup is fundamentally independent of whether the TV cable is connected to the TV or interfaced with the receiver. The sequence of actions is the same for both connection methods.
How to set up your Supra TV for digital TV:
- A television cable from an indoor or outdoor antenna is connected to the connector of the TV or purchased receiver. The tuner, in turn, outputs picture and sound to the TV through “tulips”.
- Using the remote control, press the “DVD/TV” button.
- When the device enters the TV channel reception mode, click the “TV Setup” .
- In the window that appears, perform step-by-step adjustments to the background, saturation, contrast, language, and image width.
- Also, go through the main system options: “duplication”, “interchange of channels”, “sound”, and TV standard - for the Supra TV you need to select digital broadcasting.
- Finally, specify the activation and deactivation times, sleep mode, etc.
When all the parameters are set, you can start looking for digital channels.
Useful: How to connect and configure digital TV
Automatic
Watch your favorite movies and TV series on any device thanks to More TV for only 299 rubles per month. Don't miss out on your 7 days FREE subscription! Subscribe
An easy way to search and save found digital channels is done using automatic search. For this:
- On the remote control, press the “TV Setup” .
- Then click "Preset" .
- Select “Auto Search” . Read also: Review of Wintel W8 Pro on Windows 10 - computer or TV box?
The search is carried out from low frequencies to high ones. The process will take up to 10 minutes. Upon completion of the operation, the TV will start showing the first channel found from the list.
Manual
If the Supra set-top box does not find channels during automatic tuning, you can manually scan the frequency range. For this:
- Enter the menu by pressing the “TV Setup” on the remote control.
- Then click manual mode. On TV, the Supra is labeled "Search" .
- Press the 3/4 buttons. The search for channels is activated, each time it is detected, you will have to save them by selecting a number and pressing OK.
If your Supra TV is paired with a tuner, you will need to press the Menu . After the “Auto Scan Pan” , you can begin searching for channels.
Feedback and withdrawal
The future has already arrived! You can now get a high-quality picture anywhere in Russia without a satellite dish or cable! I really liked the Supra DVB-T/T2 set-top box for digital television. Now I recommend it to all my friends and acquaintances.
By the way, if you have high-speed Internet at home via cable or wi-fi, you can watch directly YouTube, videos from social networks, online movies from websites and play games using another set-top box - Eachlink smart set-top box, TV BOX X96 or Vorke Z6 plus - reviews via links.
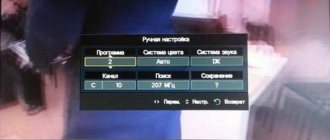
Manual setting
If for some reason you are not satisfied with the results of the auto search, you can conduct a manual search.
The procedure looks like this:
- Click the TV Setup button and select Preset.
- Select the manual method (“Search”).
- Using the “3” and “4” buttons (or volume up and down, depending on the model), the digital tuner “chases” up and down the range.
- Opened channels must be saved manually by pressing the “Enter” button.
- After this, using the buttons to increase and decrease the number, you need to go to the next one and repeat the setting.
- After completing the setup, you need to exit the menu. The channels will be saved in the TV memory.
In the second version of the interface, the procedure will be slightly different:
- After going to the menu and activating the “Settings” item, you will need to select not “Auto search”, but “Manual DTV search”;
- Here you will need to specify frequencies and other broadcast parameters. For cable and satellite, information is taken from the provider, for terrestrial - according to the instructions for searching for CETV frequencies. The received data must be entered.
- Use the cursor buttons to change the search range. The found channels are saved using the selection confirmation button.
Functional
The second reason for choosing the Supra SDT is the enormous capabilities it offers. In addition to standard viewing of digital channels, you can also watch from a flash drive, and also record broadcasts on this flash drive.
Record and pause
There is a delayed viewing function. Simply indicate the time for which you need to record a specific broadcast on a specific channel and the set-top box will turn on and record. For example, want to watch the Eurovision festival but don't want to wait until midnight? Just record the recording time and you don't even need to keep the TV on!
It’s also fun to pause during live broadcasts. You just press pause and go about your business for a while, and then come back and start watching from the right moment. It’s just that at this time the Supra SDT set-top box records into memory, and then starts showing from memory, while simultaneously continuing to record the live broadcast. Then you can skip the ads.
Everything recorded can be sped up at two or three times, etc. once. Maximum - 16 times.
List of programs
The list of favorite programs is also very convenient. You can switch between them simply by using a cross, rather than choosing a number.
Connection
A regular TV with a handset can be connected via tulips, and more modern LCD and plasma TVs can be connected via HDMI or the same tulips. You can also connect a monitor from a computer, but if it does not have a built-in speaker, then you will need to connect an external audio system (speakers) or headphones.
A small life hack
Do you have an unnecessary PC monitor at home? Just connect it to such a set-top box, then buy any cheapest USB-powered speakers at any computer or electronics store. Connect the speakers to the USB connector of the Supra set-top box and then they will turn on/off automatically with it.
You will get a TV with digital channels and stereo sound from a regular monitor!))
Let's check if your Supra TV supports digital TV
First, let's make sure that your model has the right tuner. Not everyone can receive digital television, and among those who have this opportunity, not everyone supports the second-generation European standard DVB-T2, used in Russia.
Is SUPRA a cool TV?
Cool! Sucks!
There are two ways to check a specific brand:
- Search for information online on the websites of official dealers. Not the most reliable option: sellers, even those who cooperate directly with Supra, often confuse the models.
- Insert the model number of your TV into the “search” line. If it is found, the ethereal “digit” is almost in your hands.
Didn't find your model in the list? We recommend that you read the instructions for determining whether your TV supports DVB-T2.
Manual setting
If for some reason you are not satisfied with the results of the auto search, you can conduct a manual search.
The procedure looks like this:
- Click the TV Setup button and select Preset.
- Select the manual method (“Search”).
- Using the “3” and “4” buttons (or volume up and down, depending on the model), the digital tuner “chases” up and down the range.
- Opened channels must be saved manually by pressing the “Enter” button.
- After this, using the buttons to increase and decrease the number, you need to go to the next one and repeat the setting.
- After completing the setup, you need to exit the menu. The channels will be saved in the TV memory.
In the second version of the interface, the procedure will be slightly different:
- After going to the menu and activating the “Settings” item, you will need to select not “Auto search”, but “Manual DTV search”;
- Here you will need to specify frequencies and other broadcast parameters. For cable and satellite, information is taken from the provider, for terrestrial - according to the instructions for searching for CETV frequencies. The received data must be entered.
- Use the cursor buttons to change the search range. The found channels are saved using the selection confirmation button.
Let's check if your Supra TV supports digital TV
First, let's make sure that your model has the right tuner. Not everyone can receive digital television, and among those who have this opportunity, not everyone supports the second-generation European standard DVB-T2, used in Russia.
Is SUPRA a cool TV?
There are two ways to check a specific brand:
- Search for information online on the websites of official dealers. Not the most reliable option: sellers, even those who cooperate directly with Supra, often confuse the models.
- Insert the model number of your TV into the “search” line. If it is found, the ethereal “digit” is almost in your hands.
| Model | Diagonal | DVB-T2 support |
| STV-LC19T410WL | 19 | + |
| STV-LC19T860WL | 19 | + |
| STV-LC22T400FL | 22 | + |
| STV-LC22T410WL | 22 | + |
| STV-LC24T400FL | 24 | + |
| STV-LC24T400WL | 24 | + |
| STV-LC24T410FL | 24 | + |
| STV-LC24T410WL | 24 | + |
| STV-LC24T850WL | 24 | + |
| STV-LC28T400WL | 28 | + |
| STV-LC28T850WL | 28 | + |
| STV-LC32T250WL | 32 | + |
| STV-LC32T400WL | 32 | + |
| STV-LC32T410WL | 32 | + |
| STV-LC32T420WL | 32 | + |
| STV-LC32T500WL | 32 | + |
| STV-LC32T850WL | 32 | + |
| STV-LC32T860WL | 32 | + |
| STV-LC32T871WL | 32 | + |
| STV-LC32T900WL | 32 | + |
| STV-LC32ST880WL | 32 | + |
| STV-LC40ST900FL | 40 | + |
| STV-LC40T420FL | 40 | + |
| STV-LC40T850FL | 40 | + |
| STV-LC40T860FL | 40 | + |
| STV-LC40T871FL | 40 | + |
| STV-LC40T900FL | 40 | + |
| STV-LC42T410FL | 42 | + |
| STV-LC42T900FL | 42 | + |
| STV-LC48T400FL | 48 | + |
| STV-LC50T400FL | 48 | + |
Didn't find your model in the list? We recommend that you read the instructions for determining whether your TV supports DVB-T2.
If the TV does not support digital
What should I do if, based on the results of the test, it turns out that a particular Supra TV cannot receive DVB-T2 itself?
There are two options here:
- Buy a new TV. This is a radical, but preferable method, since even relatively new TV receivers that are not designed for digital broadcasting often do not support all the capabilities of DTTV (high definition, teletext, etc.);
- Install a digital set-top box (aka receiver, decoder or external tuner). This will be enough to watch 2 federal multiplexes with 20 channels.
Adding local analogue TV channels
Analogue channels, which may be on air from local TV stations, are added at the auto-search stage if the “Digital and analogue” item was selected. If this has not been done, they can be added manually later.
To do this you need to do the following:
- Activate the menu.
- Select settings mode.
- Specify the antenna as the signal source.
- Select analog channels (ATV).
- Perform manual configuration and save the found ones. The procedure is similar to that for digital channels.
Important: When using a UHF antenna, analog programs will not be found: they broadcast in a different range, which requires a UHF or all-wave antenna.