Content:
Before you can enjoy watching your favorite movies or TV shows, you need to configure the channels on your device.
Setting up a TV is a rather complex and responsible procedure, which, firstly, includes searching for channels, and secondly, it will allow you to remove unnecessary things and rank the list by frequency of views. This procedure is especially relevant in our time, when the list of channels is regularly updated, which leads to failure of all previously specified settings. When working with cable and satellite television, the task of setting up a TV becomes more complicated.
Chassis design and operating principle
The chassis consists of three boards: the main board (Main-board), the kinescope board (Y-board) and the board with bass input/output connectors (AV-board). Let's consider the paths of audio and video signals, as well as the main elements of their processing.
Video path
To receive and process television signals, an analog tuner A101 type TDQ-5B6M is used. To control the tuner, its inputs VT, BL, BH, BU receive signals from the microcontroller (MK) N001. The tuning voltage is supplied to the VT tuner input. It is formed from a voltage of 33 V using a filter V001, C003, C118, RT01, R007, controlled by a PWM signal from the MK (pin 2). The tuning voltage varies from 0.5 to 30 V, which allows you to adjust the receiving frequency within the selected range. The VHF-L, VHF-H, UHF bands are selected by applying a high potential (5 V) to the corresponding tuner input BL, BH, BU. For this, keys VE01-VE03 are used, which are controlled by an MK with pin. 8-10. The AGC signal, necessary to maintain the output signal of the IF tuner at the required level, is generated by the N201 chip (pin 8). It is sent to the pin. AGC tuner through filter RE06, RE05, R108, CE05, C117. To power the tuner at its pin. The VM is supplied with a voltage of 5 V.
The output IF signal with a frequency of 38.9 MHz is removed from the pin. The IF of the tuner and through the buffer on the transistor V102 is supplied to the bandpass filter Z101, which forms the necessary frequency response of the intermediate frequency channel. The output antiphase signal from the filter is supplied to the input of the N201 microcircuit - pin. 6, 7.
Further signal processing is performed by the N201 microcircuit of the TB1238AN type. The microcircuit includes image and audio IF paths, a video detector, an audio demodulator, a synchro selector, AGC circuits, an automatic frequency converter, a synchroprocessor, a PAL/NTSC color decoder and a video processor. The microcircuit is controlled via the I2C digital bus (pin 26, 27) by signals from microcontroller N001 (pin 37, 38). From the output of the video detector (pin 47 N201), the full color video signal and the 2nd IF audio signal are fed through the V202 buffer to the inputs of the L2O5 Z204 and L207 Z202 filters, which separate the IF audio signal from the video signal. Depending on the audio standard, the MK via the I2C bus using the N202 switch turns on the necessary filter in the video signal circuit. From the output of the switch (pin 13 N202), the video signal is supplied to the input of the color decoder of the N201 chip (pin 43). If the video signal is encoded in the SECAM color system, then it is processed using an external decoder - an N203 chip of the TA1275Z type. For this purpose, the video signal from the pin. 35 N201 is sent to the pin through the V201 buffer. 13 and 15 N203. On the pin. 17 N203 three-level SCP gate pulses are supplied with pin. 34 N201. The output color difference signals of the decoder are removed from the pin. 3 and 5 and are fed for further processing to the N201 chip. The video processor of the N201 chip has an RGB signal switch. The external input of the switch (pin 13-16) receives video signals of the “inset” OSD image, which are generated by the MK (pin 22-25). The output RGB signals are taken from the pin. 18-20 N201 chips and through the XS808 connector are supplied to the kinescope board.
The output video amplifiers are located on the kinescope board. All three channels are assembled using an identical single-stage circuit and have no special features. Unfortunately, the circuit does not provide for the stabilization of the dark beam of the kinescope rays. The output video signals are fed through current-limiting resistors R917-R919 to the cathodes of the kinescope. To power the video amplifiers, voltages of 190.12 and 9 V are supplied to the kinescope board.
Sound path
As already noted, the audio signal is processed in the N201 chip. The signal of the second IF sound is removed from the pin. 47 N201 and through buffers V202 and V204 is supplied to the inputs of filters Z202, Z204, Z205, Z207, Z208, which form the frequency response of the IF sound path. The required filter is included in the audio IF signal circuit using the N202 switch, controlled by the MK via the I2C bus. The audio IF output signal from the switch (pin 3) is sent for further processing to the N201 chip (pin 53). Depending on the operating mode of the TV, the output of the N201 chip receives a signal from the audio demodulator or an audio signal from the audio input, which is supplied from the XSA03 connector to the pin. 55 N201. The sound signal is removed from the pin. 2 N201 and is fed to the input of the UMZCH - pin. 7 N601 type TDA 2611A (output power - 5 W), from the output of which (pin 2) through the XSA10 connector it goes to the TV speakers.
To block sound, the MK generates a high potential on the pin. 4, which through diode D005 opens key V602 and the input of the UMZCH microcircuit is closed to a common wire. The V503 transistor circuit is used to block sound until the image appears.
UMZCH N601 is powered by a voltage of 18 V (pin 1) from the TV power supply (PS).
Synchroprocessor, vertical and horizontal scanning
To operate horizontal and vertical scanning, the synchroprocessor of the N201 chip generates trigger pulses.
The synchroprocessor is powered by a voltage of 9 V.
Pulses for starting horizontal scan with pin. 32 N201 are supplied to the V501 driver and from its output to the horizontal scanning output stage on the V502, TDKS T100 elements. The output stage generates deflection current in the H-COIL horizontal coils (connected via connector XSA07), the supply voltage of video amplifiers (190 V) and other circuit components (5.14 and -27 V). S-raster correction capacitors C512 and C515 are connected in series with the horizontal coils. Capacitors C504 and C505, connected to the collector of transistor V502, determine the flyback time (RO) of the horizontal scanning, and therefore the horizontal size of the raster. Horizontal linearity is adjusted by coil L506. Reverse pulses for horizontal scanning synchronization are removed from winding 4-10 TDKS T100 and are supplied to the pin via circuit R512, G518, R511. 30 N201. To synchronize the OSD image, OX pulses are removed from winding 4-7 of the TDKS T100 and sent to the pin through the divider R509 C514, R510. 26 N001. Line scan is powered by 24 and 115 V voltages generated by the TV's power supply.
The timing capacitor of the vertical scan generator C219 is connected to the pin. 22 N201 chips. Personnel sawtooth pulses are removed from the pin. 24 N201 microcircuits are supplied to the vertical scanning output stage - N401 microcircuit of the TA8403 type. The microcircuit contains a power amplifier, an OX pulse generator and a thermal protection circuit. The V-COIL OS frame coils are connected to its output (pin 2) via connector XSA07. To stabilize the vertical size, the feedback voltage is removed from resistor R410, included in the frame coil circuit, and supplied to the pin via circuit C408 C407 R403. 23 N201. The same signal is used by the circuit on elements V504-V509, which generates the “east-west” correction signal. To synchronize various components of the MK (in particular, OSD images), OX frame scan pulses from the pin. 7 N401 through the inverter V010 are supplied to the pin. 27 MK. Capacitor C405 serves to double the supply voltage of the output stage during reverse vertical scanning. This is necessary to ensure the required duration and rate of rise of the deflecting current during the reverse stroke of the vertical scan.
To operate the beam current limiting (ABL) and automatic contrast limiting (ACL) circuits, a voltage proportional to the kinescope beam current is removed from the capacitor C520, connected in series with the secondary winding of the TDKS T100. It charges capacitor C218. If the voltage across it becomes less than a certain value, diode D204 opens and the pin. 21 N201 (ABCL) a low potential is formed, which leads to the activation of the ABL and ACL circuits.
Microcontroller
The basis of the TV control system is a television microcontroller N001 type TMP87CM38N from TOSHIBA based on an 8-bit processor. The chip has a 32 KB ROM, 1 KB RAM, six 8-bit ADCs, and two I2C interfaces. For the initial reset of the chip nodes to its pin. 33, when the power is turned on, the circuit on transistor V002 generates a RESET signal - a pulse of negative polarity. The microcontroller is synchronized by an internal oscillator, the frequency of which is stabilized by a quartz resonator VS01 (10 MHz) connected to the pin. 31 and 32 microcircuits. Setting parameters and operational adjustment values are stored in non-volatile memory N002 type AT24C08, which is connected to the first I2C interface (pin 5, 6). The N201 microcircuit is connected to the second I2C interface (pin 37, 38). To pin. 16 and 17 N001 are connected to the control panel buttons, and to pin. 35 — output of photodetector IR01.
To switch the IP to standby mode, microcontroller N001 generates a high potential on the pin. 7, which opens the key V805 and the cathode of the optocoupler N801 is connected to the common wire. As a result, the error amplifier on transistor V806 stops working and the IP begins to operate in the minimum power consumption mode.
The microcontroller is powered by a voltage of 5 V from a linear stabilizer based on elements D828, V801.
Power supply
The TV's IP generates constant stabilized voltages of 115/130, 24.18 and 5 V and is implemented according to a pulse converter circuit, the basis of which is a self-oscillator on the V804 transistor and a T804 pulse transformer. The positive feedback circuit (POC) includes winding 1-2 T804 and elements R808 and C816 connected to the base of transistor V804. These elements determine the operating frequency of the converter. To start the converter, use circuit R804-R806, connected between the output of the mains rectifier and the base circuit V804. To stabilize the output voltages, a feedback circuit is used on elements V806, N801, V802. The node on elements V806, D812 controls the 115 V horizontal scan supply voltage and generates an error signal, which, through galvanic isolation (optocoupler N801), controls the node on transistors V802, V803. This node changes the duration of control pulses based on V804, which leads to stabilization of the output voltages of the IP. The secondary channels have no special features, except that the 5 V voltage (used to power the MK in standby and operating modes) is generated using a linear stabilizer based on elements D828, V801.
Why doesn't automatic tuning of TV channels work?
Modern models of television receivers support both manual and automatic channel tuning. Most TV viewers use automatic search, which copes with the assigned tasks perfectly; the user can only remove unnecessary channels from the presented list.
However, for various reasons, sensitive equipment may not be able to recognize the scan range or signal source. In this case, the procedure must be carried out manually.
As practice shows, there are no particular advantages in choosing one or another method of setting up channels. And if the automatic mode can save the user’s time and is suitable even for inexperienced TV viewers, then the second option will require more time and special knowledge, but at the same time provides more detailed channel settings even with poor reception quality.
In particularly difficult cases, you should use the services of a professional teleworker. The cost of his services will depend on the region of residence, distance from the workshop and the company’s pricing policy. In addition, today there are a number of volunteer organizations that help everyone switch to the new broadcast format free of charge.
Standard designations
Let's assume that the TV's manual control panel has been detected, but how exactly to use it? Regardless of what brand of TV you use: LG, Samsung or Sony, the set of buttons and their meaning will be identical:
- POWER – key to turn TV on/off. Mostly it is located separately from other buttons.
- MENU – a button to enter the menu; in some models this key is used to turn on the TV.
- OK button – necessary to confirm a particular command. For example, by clicking on it, you can select a specific menu section.
- < or > – these buttons are needed to switch TV channels. They must also be used to switch between menu sections.
- The – and + are used to adjust the sound.
We should also talk about changing the signal source. This is mainly done through the menu, namely in the appropriate section. However, older models are equipped with a special button, which is labeled “AV”; you just need to press it. This is very convenient if a tuner or media player is connected to the TV.
Modern TV models from Samsung, Panasonic, Philips are equipped with a manual control panel that visually resembles a gaming joystick.
How to set up a new TV
In order to set up a new TV and connect it to a regular antenna, you need to select your native language on the device. To do this, you need to connect the antenna cable to the successor, then by long pressing the “OK” button on the remote control, go to the Menu, where you select the LANGUAGE item. We mark the language RUSSIAN, after which all settings will be automatically translated into Russian.
Features of automatic channel tuning
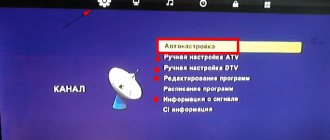
How to set up your TV automatically? To complete the procedure, you will need to perform the following algorithm of actions:
- We turn on the receiver, after which a message will appear on the screen stating that “Channels are not configured”;
- Using the remote control, go to the Menu, where we select “Channel settings” - “Automatic tuning”;
- Don't forget to indicate the type of broadcast - digital or analogue.
- Press ENTER/OK.
After completing all the steps, the TV will begin tuning channels, scanning the frequency range available to it. On average, Auto Tuning takes no more than a few minutes, after which all saved TV channels are displayed on the screen. If nothing works out, don’t panic. We carefully study the instructions for the device. It must provide detailed descriptions of the settings for this model.
If the operator adds new channels, the setup will have to be done again using the editing option. In this case, the previously created list of TV channels is saved, new items are simply added to it. You can delete the old list using the appropriate command, after which you will have to search again.
Manual channel tuning
If the automatic tuning of TV channels does not work correctly, then you need to use the manual search option. With its help, the viewer decides which channels he wants to add to the saved list.
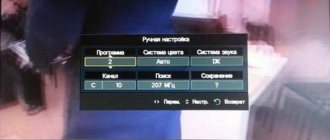
The algorithm for manual configuration is as follows:
- Turn on the receiver;
- In the Menu, select “Channel settings” - “Manual tuning”;
- Select the “Programs” command and assign numbers to them;
- Additionally, you need to select a color system: PAL or SECAM, sound: 2.0 (stereo), 5.1, etc.;
- We perform a “Search” for channels and save the required TV channels.
The resulting list can be updated or deleted if necessary.
Protection
On all TV models, including Supra, Vestel, Funai. Sharp, child protection is provided. Once activated, the control panel is locked. The device does not respond to commands from the buttons. Even if the device shows a channel after connecting to the network, you won’t be able to switch to another without the remote control. Therefore, if it breaks, you need to quickly repair it or purchase a new one. Be sure to read the instructions. On some models, you can unlock the device by entering a specific password.
Setting up satellite channels
In general, setting up satellite channels is not difficult:
- We connect the TV and receiver using a special cable. We switch the TV to monitor mode.
- Using the remote control we set the satellite settings.
- In the menu we start scanning the satellite. The best option would be to use an automatic search, which will carry out all the necessary actions without user intervention.
- We edit the list of saved channels, remove from it TV channels that most likely will not be viewed by viewers;
When using satellite television, remember that deteriorating picture or sound may be caused by rain, wind or thunderstorms, which negatively affect reception conditions.
What difficulties may arise
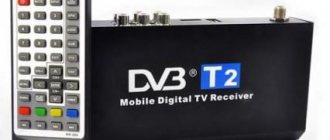
There are times when it is not possible to set up DVB T2 reception. If there is such a problem, you need to make sure that there is no damage to the antenna. If it is intact, you need to check the direction. The antenna should be directed towards the tower. It is also necessary to install it outdoors; if you place it indoors, it will block the signal. If the user does not know where exactly the tower is located, torsion of the antenna will help. It must be moved very slowly and smoothly. As soon as the antenna makes contact with the tower, the device will work.
Attention! There are errors during the automatic channel search process. For example, the receiver found few channels or did not find them at all. A manual search will help.
It is also possible that the TV has found channels, but the quality of their display is very poor. This means that the antenna is turned towards the tower, but the contacts with it are bad. Try moving it a little. This problem can occur in bad weather.
Setting up digital channels
High-definition digital television is a modern television broadcasting standard that provides the highest picture quality under any reception conditions. To set up digital TV channels on your TV, it must be equipped with an HD viewing function. In recent years, an increasing number of TV equipment models equipped with this technology have been produced.
To configure channels on such television receivers, it will be enough to carefully study the manufacturer’s instructions. For most devices, the algorithm of actions is as follows:
- Menu - Options - Automatic settings - Start;
- Select the Digital Channels section and press start again;
- In Search Mode, select “Full”;
- You will need to enter the following numbers in the fields that appear on the screen: frequency (kHz) - 314,000 (314 MHz), modulation - 256 QAM, speed - 6875 kS/s.
All modern TVs are equipped with a network search option. For those viewers who do not want to waste time manually setting up channels, just turn on network and search and wait a few minutes, which the receiver will need to scan and create a list of saved TV channels.
The lineup
And it’s appropriate to start the review with portable – car, or camping, Rolsen TVs. RTV-700 is deservedly considered a good example . Thanks to the digital receiver, it is possible to process DVB-T, DVB-T2 signals without set-top boxes. The system also has an analog tuner, so watching some regional and commercial TV channels will not be difficult. Users can record video information on SD and MMC cards.
The main characteristics of this model are as follows:
- diagonal 7 inches;
- picture resolution 800x480;
- format 16 to 9;
- complete Russification of the menu;
- electric battery capacity 1200 mAh;
- remote control included.
Plasma-based TVs are no longer produced by Rolsen.
At least all such models on the official website have been moved to the archive section. It is stated that such devices guarantee excellent sound and clear pictures. But all current models only come with an LCD screen. This is exactly what the more advanced portable device RTV-1000 is like.
The battery capacity is the same as the previous model. The ability to work autonomously for up to 3 hours in a row is declared. The brightness is 500 cd per 1 sq. m, and the contrast is 400 to 1. The viewing angle of the screen in both planes is 135 degrees.
Also provided:
- antenna input;
- composite audio-video input;
- Screen resolution 1024x600.
- How to set up a Samsung Smart TV - step by step instructions
Among home devices, the D1307 LED series stands out. Model RL-28D1307T2C is equipped with a thin front frame. OLED backlighting means that all LEDs are placed evenly behind the screen. The designers have provided for playing MKV files via USB input. The TV has a special CI+ interface that allows you to view encrypted digital channels.
The video recording option is used. Moreover, it can be recorded even in full HD quality. There is also a TimeShift function, as well as signal distribution via HDMI to any devices that support ARC. The TV will even reproduce pictures in JPG format. Playback of FLV video files is also available.
The D1309 LED series also deserves attention. related model RL-28D1309T2C The designers provided for the use of the ultra-modern DVB-T2 television signal standard. The dynamic contrast is 200,000: 1. The viewing angles in both planes reach 176 degrees.
2 speakers produce 5 watts of sound power. There is a YpbPr component connector. There is also a coaxial digital output. Please note: there are no Rolsen TVs with a built-in DVD player in this format.
The E1301 LED series may also be attractive. For example, model RL-28D1309T2C . The screen brightness of this TV is 330 cd per 1 square meter. m., its diagonal is 28 inches. Nicam and A2 sound systems are available. There is a special PC Audio output.
Other parameters:
- frame rate 60 Hz;
- headphones cannot be connected;
- Teletext function is provided;
- sleep timer;
- surround sound and equalizer with original settings;
- Freeze frame and parental control functions.
Setting up Smart TV on modern TVs
We live in the era of “smart” technology. Today, refrigerators, washing machines, dishwashers, and televisions have their own intelligence. The Smart TV feature is an innovative technology that is completely dependent on the Internet. It allows you to convert an ordinary TV into a full-fledged computer, with which you can make purchases in online stores, view news on information resources and enjoy your favorite programs in high quality.
Leading home appliance manufacturers create full-fledged operating shells for their smart TVs, while many other brands use Android, Linux and Windows for these purposes. You can configure TV channels on Smart TV using special applications.
Features of searching and tuning channels without a remote control
Don't panic or get upset if your TV remote control gets lost or stops working. You can cope with the situation and configure the equipment using control buttons, the functions of which are described in detail in the instructions for the equipment.
When setting up a TV without a remote control, consider the following nuances:
- The key is not available on all devices. Sometimes, in order to get into the settings, you need to simultaneously press the buttons that control the volume;
- To confirm the actions taken, you can use the “OK”, “” or “Vol+” buttons;
- On Sony brand TVs, you can start automatic search and tuning of channels by long pressing the “” button;
- Philips TVs cannot be set up without a remote control.
In recent years, Russians have almost completely abandoned conventional antennas, giving preference to more modern and high-tech receivers - special digital set-top boxes that receive signals from a satellite or via the Internet. Such devices operate similarly to smartphones or tablets: they have an operating shell (Android) installed, in which settings and work with channels were carried out using mobile applications. Users can download the necessary software from the PlayMarket store.
Setting up channels on older TV models
If desired, you can watch digital channels on an old TV; all you need to do is manually configure the TV receiver and connect a DVB-T2 set-top box to it. Perhaps the only drawback of outdated TV models is the small amount of memory for saving frequently watched channels; most often, you can add no more than six positions to this list.
To search for and configure older TV models, you can use not only remote controls, but also physical control buttons on the TV itself.
We use button control
If you remember the first Horizon TVs, they had a large button panel on the front. All the buttons were of impressive size and had additional prompts, so there were no problems with controlling the old devices.
Domestic devices have been replaced by foreign-made models, where all the signatures are in a foreign language. Moreover, the buttons became smaller and smaller. In modern models, there is only a screen in front, so many people believe that the remote control is the only tool for communicating with the TV. In fact, all TVs come with a manual control panel. However, you need to look for it on the back or side wall. It can be so compact that you can simply not notice it.
The final stage of setup is working with image quality
Quite often there are situations when, after completing the search and settings of the program, they are broadcast in poor quality. In order to improve picture clarity and eliminate other defects, you can perform the following steps:
- enable the HD option in the settings;
- select the picture broadcast mode, for example, for Samsung and LG TVs, the “Cinema” mode is considered the best option;
- manually set the contrast, brightness and colors of the image.
As practice shows, you only need to spend time and effort once to understand the TV settings and compile a list of saved TV channels, in order to subsequently comfortably watch any films and programs, without being distracted by annoying little things and problems that can ruin anyone’s mood.
Source
Answers to questions on Rolsen TV
How to unlock parental controls on Rolsen C21sr68s
Is it possible to unlock the parental control code without the remote control? 11/10/2018, Yoshkar-Ola.
On the Rolsen C21sr68s plat TV, parental controls can be set and removed only from the remote control. The only possible option is to physically replace the memory chip, or flash it using a special programmer.
How to set up the ROLSEN RP-32h20 without a remote control?
I can't tune channels on my TV. Doesn't go to channel settings automatically. There is no original remote control, I bought it as if it were my own. Yes, it turns on, the sound, switching channels, everything works, but I can’t go into the channel settings. 09/09/2018. Bataysk.
On the body of your ROLSEN RP-32h20 TV, on the side panel, there are control buttons; settings can be made using the Menu, +/- Volume, +/- Channel and Source buttons. Unfortunately, replacing the original remote control does not always allow you to use all the standard functions, including tuning channels. You need to look for a new original remote control or try to repair the old one if it is still there.
Connecting a set-top box
8.9.2019 Rolsen C29r70t Plat City Ekibastuz I have a TV brand listed above, I want to connect to an Internet package that has channels, they told me the TV should have an input for bells, but for some reason I didn’t find it there. Can you tell me where on this TV the input for the bells is?
18/2/2019 Rolsen RL-17L1002U Moscow The TV does not work in the digital range when connecting the COLOR DC1302HD set-top box. A passive indoor antenna is connected to the set-top box. Doesn't work via tulip or HDMI. When searching for inputs with the source button on the TV remote control, it only sees the TV output, does not see the rest (including AV and HDMI) and writes “no signal”. I connected the same set-top box and antenna to another TV via a tulip - everything works fine (I found 29 digital channels). The Rolsen itself, when an antenna is connected directly to it, also works well, picking up all channels in the meter and decimeter range. We bought the set-top box when we found on the website that this TV model does not support the DVB-T2 broadcast format. Please tell me what can be done so that the TV sees the set-top box and starts receiving digital channels.
On TVs, in addition to the so-called “bell” connectors, Scart type connectors are used to connect external equipment.
A working digital set-top box always immediately produces a splash signal when power is applied. If there is no signal at the TV input (due to a malfunction of the set-top box or connection cables), the message “No signal” is displayed on the TV screen
Setting up your TV
10/2/2020 rolsen RL-22L105UF Vladikavkaz TV setup
Connecting external equipment
Page 20
- Image
- Text
Connecting external equipment:
You can connect external equipment to the TV, such as a VCR or DVD.
Connection examples are given below. Antenna connection:
1. Connect the RF output ( RF OUT
) VCR with an antenna connection socket (
ANT
) on the back of the TV.
2. Connect the antenna cable to the antenna input on the VCR. 3. Tune in and record into the TV memory the program on which the VCR is running. Refer to the Manual Configuration
of this manual.
4. Switch the TV to the program corresponding to the VCR. 5. Press the PLAY button on
the VCR.
COMPONENT INPUT:
1. Connect the composite video output jacks (
Y Cb Cr
) of the DVD player to the
COMPONENT INPUT
on the TV.
2. Press TV/AV
to select
Composite
.
3. Press the PLAY button on
the DVD player.
A/V-IN connectors:
1. Connect the audio and video output jacks of the VCR to the
A/V-IN
on the back of the TV.
2. Press TV/AV
to select
Video
.
3. Press the PLAY button on
the VCR. The image played back by the VCR appears on the TV screen.
Note:
When using a monaural VCR, connect the audio output jack on the VCR to the
L
(
MONO
) jack on the rear of the TV.
A/V OUT connector:
1. Connect the audio outputs (
L, R
) of the TV to the audio inputs (
AUDIO IN L, R
) of an external video playback device or amplifier. In the latter case, you will have the opportunity to listen to the sound through the speaker system of your music center. 2. Connect the video output of your TV to the video input of your external video playback device.
20
Comments
Select → I found the instructions for my TV here! #manualza
- Click →
I am now reading the instructions for the drug Nurofen. Indications for use: - Used for headaches, toothaches and other pains. Side effect: headache...
Manualza!manualza.ru