Home > Manufacturers > PHILIPS > Philips TVs
Televisions from the world famous manufacturer Philips are manufactured using a variety of innovative technologies. The company always strives to keep up with the times; all products today are equipped only with modern technologies and innovative solutions are used.
By visiting our website you will find a user manual for a Philips TV of absolutely any model. Download, save and read with pleasure before use.
You purchased this TV, thank you for your trust. This is ru...
Philips TVs
- Image
- Text
- Content
You purchased this TV, thank you for your trust.
This guide is intended to help you install
and use your TV.
We advise you to read them carefully.
Installation
Installing the TV…………………………………………………………………………………………..2
Buttons on the TV………………………………………………………………………………………………….. 2
Buttons on the remote control………………………………………………………. 3
Selecting language and country………………………………………………………………………………………… 4
Automatic setup………………………………………………………………………………….. 4
Sorting channels……………………………………………………………………………………………………………4
Manual setting…………………………………………………………………………………………………………….5
Program name……………………………………………………………………………………………………………5
Preferred channels…………………………………………………………………………………. 5
Use
Image settings……………………………………………………………………………………………………………. 6
Sound settings ………………………………………………………………………………………………………… 6
Setting the characteristics…………………………………………………………………………………..7
Channel list………………………………………………………………………………………………………….. 7
EasyLink function ………………………………………………………………………………………………………………….8
Directory NexTView/Teletext ………………………………………………………………………………….. 8
Using the NexTView function………………………………………………………………………………….. 9
Teletext …………………………………………………………………………………………………………………. 10
16:9 format
11
Recording
VCR…………………………………………………………………………………………………………… 12
Other equipment………………………………………………………………………………………………………………. 12
Connections to side connectors ………………………….12
Amplifier…………………………………………………………………………………………………………… 12
Menu Configuration………………………………………………………………………………………………………………….. 13
VCR, DVD or Satellite buttons…………………………………………………………………………………..13
Practical information
Tips…………………………………………………………………………………………………………….. 14
Glossary …………………………………………………………………………………………………………… 14
Disposal instructions
Your TV contains recyclable materials
or disposal. To minimize emissions to the environment
specialized enterprises collect disused
TVs to dismantle them and save materials suitable for
reusable (check with your dealer).
1
- TV installation
- Buttons on the TV
- Buttons on the remote control
- Selecting language and country
- Automatic setup
- Sorting channels
- Manual setting
- The name of the program
- Preferred channels
- Image Settings
- Sound settings
- Setting characteristics
- Channel list
- EasyLink function
- NexTView/Teletext Directory
- Using the NexTView feature
- function 16/9
- Recording
- Menu Configuration
- VCR,DVD or SateMite buttons
Model User Manual:
- 14GX3517
- 14GX8512
- 14PT1347/01
- 14PT1353/58
- 14PT1374/58S
- 14PT138A/58R
- 14PT138A/59R
- 14PT1563/60
- 14PV125/58
- 14PV162/02
- 14PV162/58
- 15PF4122/10
- 15PFL4122/10
- 20PHH4109/60
- for TV 21″
- 21GX54B
- 21PT1321/60R
- 21PT133A/58R
- 21PT137A/60R
- 21PT1342/58
- 21PT1354/58
- 21PT1654/58C
- 21PT5407
- 21PV267
- 221TE4L
- 22PFL3507T/60
- 22PFT4000/12
- 22PFT4000/60
- 22PFT4031
- 23PHH4109/60
- 24PHT4031
- 24PHH4109/60
- 24PHT5619/60
- 28HT5404
- 28PT4457/58
- 28PT8703/58
- 29PT8507/12
- 29PT8508/12
- 29PT8509/12
- 29PT8609/12
- 29PT8641/12
- 29PT8811S/60
- 29PT9416/58R
- 32HFL7403D/12
- 32PEL5206H/T
- 32PF9631D/10
- 32PFH4101/88
- 32PFH4309/88
- 32PFL3312S/60
- 32PFL3517T/60
- 32PFL3605/60
- 32PFL420BT/60
- 32PFL4418T/60
- 32PFL5332S/60
- 32PFL5403D/12
- 32PFL5405H/60
- 32PFL5507T/60
- 32PFL77620/12
- 32PFL9604H/60
- 32PFT4101
- 32PFT4109/60
- 32PFT4309/60
- 32PFT6549/60
- 32PFT6559/60
- 32PHH4309/60
- 32PHT5109S/98
- 32PW8718/12
- 32PW9586/12
- 37PFL5322S/60
- 37PFL5405H/60
- 40PFH4201
- 40PFL5007T/60
- 40PFL7007
- 40PFT4309/60
- 40PFT4509/60
- 40PUS6809/60
- 42FL3007H/60
- 42PFK7179/12
- 42PFL3507T/60
- 42PFL3605/12
- 42PFL3605/60
- 42PFL5405H/60
- 42PFL6007T/12
- 42PFL7406H/60
- 42PFS7309/60
- 42PFT5609/60
- 42PFT6309/60
- 42PFT6559/60
- 42PFT6569/60
- 42PUS7809/60
- 42TF994512
- 43PFS5301
- 43PUT6101/
- 46PFL7007T/L12
- 47PFL766H/12
- 47PFS7309/60
- 47PFS7509/12
- 47PFT5609/60
- 47PFT6309/60
- 47PFT6569/60
- 48PFS8159/60
- 48PFS8209
- 49PUS7809/60
- 50PUS6809/60
- 55PFS8109/60
- 55PFS8159
- 55PFS8209/12
- 65PUT6121/12
- 65PUS6521/60
- A68ERF042X044
- BDS4241V/00
- PV162/58
Philips TVs have many features and capabilities. Wireless keyboard and SmartTV compatibility are features that make them a great alternative to tablets. High-quality images and a large screen allow you to watch multimedia materials: films, videos, etc.
All TV models are equipped with classic analog tuners, which allows you to receive television signals. Also, some models are equipped with digital modules, with which you can provide maximum coverage of television broadcasts. This makes it possible to watch any programs, films and broadcasts that you want.
Only the instructions for using a Philips TV can give you detailed information about the correct handling and correct operation of your equipment.
You can download the Philips TV operating manual on our website, in Russian, without passwords or registrations.
Settings
To create a wireless connection, follow the instructions:
- make sure your Wi-Fi router is working correctly;
- go to “Settings” - “Network connection settings;
- select “Wi-Fi”, open the list of available networks;
- connect to your home network by entering your password;
- in the submenu that appears, set Easy access by clicking “OK”;
- smart tv is ready to use.
With a wired connection, the algorithm looks like this:
- connect the Ethernet cable to the TV connector marked LAN/Network;
- go to “Settings” - “Network”;
- select the connection type – “Wired”;
- click “Connect to network”;
- After setting up the connection, click “Finish”.
When you connect for the first time, a user agreement will appear on the TV screen, which you must agree to.
Possible difficulties
Smart features can only be used with an active Internet connection. As a rule, all problems are associated with its absence and low speed. To fix the problem:
- reboot your router and TV;
- check that the settings are correct;
- make sure that the Internet has not been disconnected for debts;
Sometimes, some services may not work due to technical work on the service provider's service.
It may also be due to outdated firmware that does not support the new version of the program. In this case, update the firmware using the appropriate item in the service menu.
Philips smart TV provides access to sites, applications, games, and other new features that were previously unavailable. Now you don’t need to pull wires to watch terrestrial television, just connect to the Internet.
My-chip.info — Diary of a beginning TV master
Hi all. Lately, you can often see articles and videos about converting old matrices from laptops and dead monitors into full-fledged TVs. This kind of alteration will be discussed in this article, but before that, a little background.
The content of the article
- Background
- What is needed to convert a monitor to a TV?
- Choosing a scaler
- Implementation of monitor backlight
- Selecting a cable from the scaler to the monitor
- power unit
- The process of converting a monitor to a TV
- Scaler firmware
- Links
About a year ago, they brought me a monitor for repairs in which the backlight power cord had caught fire. The matrix itself was not damaged, but part of the organic glass, which serves as a diverging lens, burned out. Also, 2 backlight lamps burst and the inverter itself burned out. Having told the owner the cost of repairs, he decided not to repair it. After some time, I bought this monitor for spare parts.
A few months later, I decided to try to restore this monitor, using a minimal budget. Since I couldn’t expect a beautiful picture, instead of CCFL 12 volt LED strip , having previously selected the brightest one on the radio market. To turn on the backlight, I used a field-effect transistor that supplied power to the LEDs, receiving a signal to turn on the backlight from the main board. I will describe how this is implemented below. The monitor started working, and I was very pleased with the picture quality. If you look closely, you could see small covenants on top, but they didn’t bother me.
So the monitor worked for several months, exactly until I needed another TV, not a large diagonal. To implement this task, I decided to use a universal scaler (monitor controller).
What is needed to convert a monitor to a TV?
For the remodel we will need:
- The scaler itself
- Inverter for backlight
- Plume
- power unit
Choosing a scaler
In fact, there are a huge variety of scalers, but I will only consider those that are suitable specifically for converting a monitor into a TV. These boards are not called universal for nothing, since they support almost all matrix models that exist. After reading various articles about these boards, I found out that 3 universal scalers are most suitable for implementing my task.
- Scaler on chip TSUMV29LU. The board itself is called LA.MV29.P. This scaler model can do almost everything, receive television channels, and has inputs on board HDMI, RCA, VGA, as well as a headphone output. There is also a USB connector, but it is only used for firmware. You won't be able to view files from a flash drive on this scaler.
Scaler LA.MV29.P
- Model scaler L.A. MV56U . They differ only in the chip, but unlike its predecessor, it can already read USB flash drives.
Scaler LA.MV56.U
- Scaler with T2 . Model of this scaler: Z. VST.3463.A. The type is all inclusive. Recently, my friend and I converted his monitor into a full-fledged TV with a T2 tuner, using this particular scaler. Very good product, T2 + analog channels work great.
Scaler with T2 support
I posted all the links to the scaler at the end of the article. The sellers are personally verified, so you can be sure of the quality.
Monitor backlight
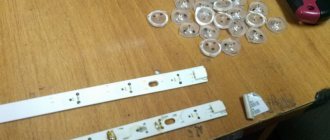
The monitor backlight can be done in 2 ways: using CCFL lamps or Led LEDs. To determine the type of backlight, you need to disassemble the monitor and get to the matrix.
After disassembly, pay attention to which wires come out from the side of the matrix. If the connectors are of the same type as in the picture below, then you have lamp-based backlighting, the so-called CCFL backlight.
CCFL backlight
In this case, you need to order an inverter for CCFL lamps.
Connecting a universal 4 CCFL inverter to a scaler
The number of lamp connectors determines how many channels an inverter is needed for. Typically, monitors use 4-lamp inverters. If you want to remake the matrix from a laptop, then only one lamp is used, and an appropriate inverter is needed.
If there are no such wires, and there is a 6-pin connector at the bottom of the monitor, then you are using LED backlighting. Then you need an LED inverter.
LED inverter
If no wires come out from the matrix, but one cable is connected, then you do not need an inverter, it is already on the matrix board itself.
Selecting a cable from the scaler to the monitor
The choice of cable must be taken very seriously, since the performance of the entire system depends on it. I didn’t buy the cable, but remade the old one according to the datasheet, but you can buy a ready-made one. Decide for yourself what to choose, but I will describe both methods.
To determine the type of cable, go to the website https://www.panelook.com and enter the name of our matrix in the search bar. You can see the name itself on the sticker located on the back of the matrix.
sticker on the matrix. Model CLAA170EA 07Q
After this, we receive all the necessary information that we also need to select the firmware.
Matrix information.
Let's look at it in more detail. — Diagonal Size: The size of our matrix. In our case, 17 inches. — Pixel Format: Screen expansion. Key information for selecting scaler firmware. In my case, 1280(RGB)×1024 - Interface Type: This is our connector for the cable. My matrix requires a 30-pin cable, the LVDS bus must have 2 8-bit channels. I will post links to popular trains at the end of the article. I will remake this cable from an old one, I will describe the process later. — Power Supply: Matrix supply voltage. In my case it is 5 volts. — Light Source: Here is all the information about the backlight. CCFL [4 pcs] means that a 4-lamp backlight is used, so an appropriate inverter is needed. Above, I described how to choose a suitable inverter without using this site.
power unit
The power supply requires 12 volts. Its power depends on the diagonal of the monitor and must be at least 4 amperes. If there is not enough space in the monitor case, then it is better to buy a remote power supply, but I will use a tablet-type power supply, which I will install in the monitor case.
The process of converting a monitor to a TV
Since my monitor is not the latest, I chose a scaler without support for all the bells and whistles, that is, LA.MV29.P. If you choose any other scaler, their connections are identical, you will just use the appropriate firmware.
Delivery was only 15 days. The kit includes the board itself, a remote control and an IR receiver. I actually got the remote control with Chinese inscriptions, but in the links all the scalers will have an English keyboard.
I will be remodeling the LG Latron 17 inch monitor
First of all, I disassembled the monitor and removed all the insides.
Removed all the boards, along with the metal casing
After disassembling, I began to look for the most convenient place to install the scaler. Since I have an old-style monitor and there is a lot of free space in it, the board fits freely there along with the power supply. I installed the board in the upper part of the monitor, and used a soldering iron to make holes for the scaler outputs.
Scaler installation location
It turned out something like this.
In order not to forget, I immediately set the matrix power jumper to the 5 volt position. You choose the position based on the datasheet for your matrix, or use the panelook.com website and look at the value in the Power Supply field.
Jumper that determines the matrix supply voltage
Next, I started connecting the buttons. The buttons connect very easily. On the old keyboard panel, I removed all the extra resistors and jumpers, and left only the buttons. Next, one end of all the buttons was soldered together with a conductor, and connected to the GND pin (to ground “-”), and the wires were brought out from the board to the second. Which button will do what on the old board, decide for yourself. I only have 5 buttons on my panel, so I sacrificed the OK button.
Designation of connections
Explanation of symbols
K0 - Power button K1 - Volume + K2 - Volume - K3 - Selection button (OK) K4 - Menu button K5 - Channel + K6 - Channel -
connecting buttons on the diagram
The GRN and RED pins indicate the status of the LED. This was done for two color LEDs with 3 legs. One leg is connected to ground “-“, the second and third legs are connected to GRN and RED. I didn’t have such an LED, so I connected only the red LED, which lights up when the TV is in standby mode, and goes out when the TV turns on.
According to the IR receiver, there should be no problems, everything is described in the picture.
I didn’t find a connector, I just soldered the wires to the pins.
This is how I laid out the wires
As I said earlier, I used my own cable. It was inserted into the scaler connector normally, but had a completely different pinout. To avoid confusion, I removed all the wires from the connector by pressing the corresponding tab on the contact.
The process of removing wires from the connector
Next, I installed the block in the scaler and began to connect the matrix one by one, according to the diagram. The scaler pinout is shown below.
Scaler pinout
I took the matrix pinout from the datasheet. This is what she looks like.
CLAA170EA07Q matrix pinout
The connection turns out to be inverse, on one side of the Vcc these are contacts 28,29,30, on the matrix side these are 1,2,3. Please note that the signals leaving the scaler are preceded by the letter “ T” (transfer) , and the matrix is marked with R(received) .
For example, we connect the signal from the scaler TXO1- to the pin of the matrix RXO1-, to put it simply, we just don’t look at the first letter.
Next, I installed the block on the scaler and began connecting the contacts one by one.
Connector set.
When I finished with that, I started connecting the backlight. Since my backlight is not standard, but already modified, I had to use a field-effect transistor as a switch that would turn on the backlight when a signal from the scaler is supplied. For those who are interested in how I connected the transistor, the diagram is below.
Connecting an NPN field switch as a key
In your case, you will only need to connect the inverter to the connector, and everything will work.
Designation of pins for the monitor backlight
Consequences of a previous monitor failure, traces of a burnt wire for the backlight
Next, I installed the power supply. I used a tablet power supply that had been lying idle for a long time. It is more powerful than necessary, namely 5 amperes.
Having collected everything to the heap, all that remains is to flash the scaler.
Scaler firmware
The choice of firmware must be taken seriously, since if you choose the wrong firmware, you can only reflash the scaler through the programmer.
Let's consider the choice of firmware for the CLAA170EA 07Q matrix.
Matrix information.
We get the following information: 2 channels, 8 bits, extension 1280 x 1024, power supply 5 volts. After downloading the firmware, we look for a similar one among the files.
Firmware selection.
In the file, select the desired extension, bits and matrix supply voltage. We go into this folder and see a file that needs to be unzipped and placed in the root of the flash drive.
We connect the flash drive to the scaller and supply power to the board. The LED on the panel should start blinking. We wait until the LED stops blinking, after which the TV can be turned on using the remote control or button.
The firmware is here:
- LA.MV29.P
- L.A. MV56U
- For a tuner with T2, the seller sends the firmware to the cutter after purchase. He sent me this one: Z. VST.3463.A
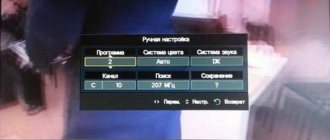
After the firmware, I immediately went to the language settings and set the language to Russian. Next, I launched an auto search.
Auto channel search.
The scaler receives channels perfectly. I ordered the speakers later, so I temporarily glued the ones I had on hand with thermal glue.
Final assembly of the monitor. The speakers are set up for testing. Later they were replaced with small ones.
The IR port was brought out from below, and additionally glued with super glue.
Result of the work:
Everyone is here.
Links
Scalers: LA.MV29.P LA. MV56U Z. VST.3463.A
Inverters: 1 lamp inverter 2 lamp inverter 4 lamp inverter
Universal LED inverter
Cables: LVDS 30pin 6bit LVDS 30pin 8bit 40Pin 2 Channel 6 Bit 51pin cable LVDS 2ch 8bt Power supplies: Power supply Tablet power supply Speakers for scaler
All the tools and consumables that I use in repairs are located here.
If you have any questions about repairing television equipment, you can ask them on our new forum.
( 15 ratings, average: 4.60 out of 5)
Selecting channel search mode
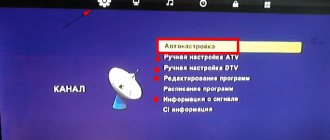
Go to the main menu of the device. To do this, you will need to use the button on the control panel, which shows a “house”. In the menu that opens, there is the “Configuration” section, and then “Channel settings”. You will have access to searching for digital and analogue channels.
How to select channel tuning mode:
- Complete reinstallation . All previously configured broadcasts will be replaced with new ones. If you are setting up TV for the first time, choose this mode. All digital channels will be located at the beginning of the list, analogue ones will be after them.
- Update . All already available programs will remain, new channels will appear immediately after them.
Sometimes there is a malfunction in the TV settings or an incorrect antenna connection, this can lead to the TV not finding channels through auto search. But remember that each user can fix these problems on their own.