The GS 8304 receiver is designed to view channels from the Tricolor satellite television provider. The device supports modern broadcast formats. The Tricolor TV provider recommends using the GS 8304 receiver model to work with channel packages that are broadcast by the Eutelsat W4W7 satellite and support MPEG-2/MPEG-4 formats, for example the “Unified” package.
A user using this model has 150 channels available. If payment for services is not made on time, 4 free TV channels will remain available for viewing. It is not possible to view HD quality channels on the receiver.
. Before Use This receiver is manufactured with…
Page 5
- Image
- Text
Content
1. Before use
This receiver is manufactured in compliance with international safety standards. Please read the safety instructions carefully.
1. POWER SUPPLY
From an alternating current main with a frequency of 50-60 Hz and a voltage of 110-240 V. Connect the receiver only to a power supply with the voltage indicated on the marking.
If you are unsure of the electrical standard in your home, contact your local electrical company. Use only compatible power supplies. 2. OVERLOADING
Do not overload outlets, extension cords or adapters as this may cause fire or electric shock.
3. LIQUIDS
The receiver should not be exposed to liquids, including splashing or dripping.
Do not place objects filled with liquids, such as vases, on it. 4. CLEANING
Disconnect the receiver from the power supply before cleaning.
Use a soft damp cloth for cleaning, do not use solvents. 5. VENTILATION
The ventilation holes on the top of the receiver must be open to allow free air circulation.
Do not place the receiver on upholstered furniture, carpets, sofas, beds or similar surfaces. Do not place other electronic components on the machine. When installing the receiver on bookshelves or cabinets, make sure there is adequate ventilation. 6. CONNECTING THE CABLE FROM THE SATELLITE ANTENNA CONVERTER AND TV
Plug the power cords into the outlets only after all components have been connected.
Disconnect the receiver from the power supply when connecting any cables, TV and other satellite and TV equipment to it and disconnecting all of the above components from it. 7. LOCATION
Install the receiver indoors, avoiding exposure to sunlight and rain.
Do not install it near heat sources or heaters. Make sure that the receiver is located no closer than 10 cm from sources of electromagnetic radiation - televisions, video recorders, etc. Do not place the receiver on unstable surfaces where it could fall. If it falls, it can cause serious physical damage to both a child and an adult, as well as malfunction. 8. THUNDERSTERMS AND LONG BREAK IN USE
Disconnect the receiver from the power supply during a thunderstorm or during long breaks in use. These steps will help prevent damage to the receiver from lightning and power outages.
5
1.1 Safety regulations
Software update via satellite
To update software via satellite, the receiver must be connected to a configured satellite dish.
1.Unplug the receiver's power cord from the outlet, and then plug the receiver back into the power supply.
2. Switch the receiver to channel number 333 in the general list.
3. After a few seconds, the following message will appear on the screen indicating the need for a software update:
4. When this message appears, select the “Yes” option and press the “OK” button on the remote control. Updating the receiver software takes about ten minutes.
After agreeing to the update, the receiver will go into bootloader mode, and service messages about the software update process will appear on the screen. The type of messages is shown below:
5. When the software update is complete, press the “OK” button on the remote control. The receiver will reboot and enter channel viewing mode.
6. After rebooting the receiver, go to the “Status” menu and make sure that the receiver software version has changed to 1.6.1:
7. Important! After the update, you need to perform a factory reset and search for channels.
To do this, press the “MENU” button on the receiver’s remote control, select “Settings”, then “Factory settings” by pressing “OK” on the remote control.
Confirm resetting the receiver to factory settings by first pressing the red “F1” or “Info” button on the remote control, and then selecting the “Yes” option.
Next, the receiver will reboot and turn on in Setup Wizard mode; go through all the steps of the Setup Wizard.
After downloading the list of regions, select the one that suits you.
Attention! There is no need to select “Main”.
Wait for the channel search to complete and save the found channels.
8. At this point, the software update of the receiver and module is completed, and the receiver is ready for further operation.
. Before using...
Page 6
- Image
- Text
1. Before use
1. Before use
6
9. FOREIGN OBJECTS
Do not place any foreign objects into the openings of the receiver, as this may cause damage to parts or electric shock.
ATTENTION!
1. Follow the instructions below to avoid damage to the power cord, plug and power supply:
• Do not disassemble or attempt to repair the power cord and plug yourself. • Do not twist or bend the power cord. • Always unplug the power cord by holding the plug, not the cord. • Make sure that the power cord does not pass near heating devices to avoid the possibility of melting the insulation.
2. Follow these guidelines to avoid electric shock:
• Do not open the receiver or power supply housing. • Do not place metal or flammable objects inside the receiver. • Do not handle the power cord with wet hands. • Unplug the power cord during lightning storms.
3. Do not operate a faulty receiver, it may be dangerous. In case of malfunction, contact your nearest service center. 4. Do not place foreign or metal objects into the smart card slot. Doing so may damage the receiver and reduce its service life. This receiver is manufactured in compliance with international safety standards. Please read the safety instructions carefully.
Connecting equipment
The required package includes:
- Receiver.
- Remote controller.
- Power adapter.
- Instructions.
- Cable.
The receiver can only be started after the card has been activated.
The equipment must be connected after first disconnecting from the power supply. Connect the satellite dish cable to the receiver (use the F connector). Connect the device to the TV. If you are using a connection via SCART, then you need to connect one end of the connecting cable to the TV connector on the tuner, the other to the SCART connector on the TV.
. Before using...
Page 7
- Image
- Text
1. Before use
1. Before use
7
1.2 Scope of delivery
1. Digital satellite receiver; 2. Remote control; 3. Two AAA batteries for the remote control; 4. Connecting cable 3RCA-3RCA; 5. Power supply; 6. User manual; 7. Warranty conditions.
NOTE!
Contents may vary depending on region. The receiving equipment can only be activated with a smart card.
How to update the Tricolor channel list on the gs 8304 receiver
To find new channels, do the following:
Why do you need to update the channel list?
Updating the channel list may be required in several cases:
1. To find new Tricolor TV channels that are not on your receiver 2. After carrying out maintenance work on the satellite 3. During the initial setup of the equipment 4. When changing broadcast parameters (changing frequencies) of some channels 5. Preventatively twice a year
The GS 8304 receiver is designed to view channels from the Tricolor satellite television provider. The device supports modern broadcast formats. The Tricolor TV provider recommends using the GS 8304 receiver model to work with channel packages that are broadcast by the Eutelsat W4W7 satellite and support MPEG-2/MPEG-4 formats, for example the “Unified” package.
A user using this model has 150 channels available. If payment for services is not made on time, 4 free TV channels will remain available for viewing. It is not possible to view HD quality channels on the receiver.
The receiver is equipped with the necessary options “MAIL”, “Pause”, “Timer”, “Subtitles”. It is possible to update the software, and there is also a built-in USB port, thanks to which you can update settings, edit and change the list of channels and satellites.
The recess for the Smart card is installed on the front panel of the device (the card is installed with the reading chip facing up). The USB connector is designed for software updates only.
The main disadvantage of the model is that it is quite outdated. Therefore, in many ways it loses to more modern tuners. The advantages include good image quality
The device also has
a convenient and intuitive interface
.
. Before using...
Page 8
- Image
- Text
1. Before use
1. Before use
8
1.3 Front panel
1. STANDBY BUTTON
Turn the receiver on and off.
The button is intended to switch the receiver from standby mode (StandBy) to working mode and back. 2. TV/RADIO BUTTON
Switches between TV and radio channel reception modes.
3. CHANNEL BUTTONS
Buttons for changing channels.
4. DISPLAY
Displays the number of the received channel, a special character indicating signal reception, TV/radio mode, StandBy mode, mail icon, and the current time.
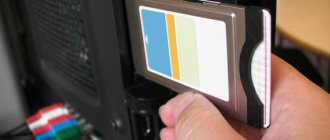
5. SMART CARD SLOT
When you install a DRE Crypt smart card in this slot, you will have access to channels encrypted by the DRE Crypt conditional access system.
Software update via satellite
To update software via satellite, the receiver must be connected to a configured satellite dish.
1.Unplug the receiver's power cord from the outlet, and then plug the receiver back into the power supply.
2. Switch the receiver to channel number 333 in the general list.
3. After a few seconds, the following message will appear on the screen indicating the need for a software update:
4. When this message appears, select the “Yes” option and press the “OK” button on the remote control. Updating the receiver software takes about ten minutes.
After agreeing to the update, the receiver will go into bootloader mode, and service messages about the software update process will appear on the screen. The type of messages is shown below:
5. When the software update is complete, press the “OK” button on the remote control. The receiver will reboot and enter channel viewing mode.
6. After rebooting the receiver, go to the “Status” menu and make sure that the receiver software version has changed to 1.6.1:
7. Important! After the update, you need to perform a factory reset and search for channels.
To do this, press the “MENU” button on the receiver’s remote control, select “Settings”, then “Factory settings” by pressing “OK” on the remote control.
Confirm resetting the receiver to factory settings by first pressing the red “F1” or “Info” button on the remote control, and then selecting the “Yes” option.
After downloading the list of regions, select the one that suits you.
Attention! There is no need to select “Main”.
Wait for the channel search to complete and save the found channels.
8. At this point, the software update of the receiver and module is completed, and the receiver is ready for further operation.
. Before using...
Page 9
- Image
- Text
1. Before use
1. Before use
9
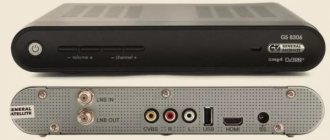
1.4 Rear panel
1. LNB IN
Connector for connecting the cable from the satellite dish converter.
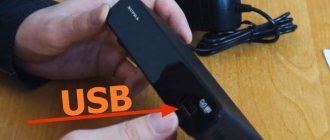
2. USB
connector for updating the receiver software.
3. CVBS
Video output for composite connection of the receiver to a TV.
4. "R", "L"
Audio signal output, right and left channel.
5. TV
TV connector for connecting a digital satellite receiver to a TV.
6. External POWER connector
Allows you to connect the digital satellite receiver to the power supply.
How to update the Tricolor channel list on the gs 8304 receiver
To find new channels, do the following:
Press “MENU” on the remote control of your receiver Select “Search “Tricolor TV” => “OK” Wait for your region to load and click “Start Search” Your receiver will scan all currently available channels Click “Save” (button “OK” on the remote control) Next, press the “Exit” button on the remote control twice ALL!
Why do you need to update the channel list?
Updating the channel list may be required in several cases:
1. To find new Tricolor TV channels that are not on your receiver 2. After carrying out maintenance work on the satellite 3. During the initial setup of the equipment 4. When changing broadcast parameters (changing frequencies) of some channels 5. Preventatively twice a year
ATTENTION! Never turn off the power to the receiver until the update procedure is complete! Otherwise, the receiver may fail!
It will be impossible to return the previous version of the software!
. Before using...
Page 10
- Image
- Text
1. Before use
1. Before use
10
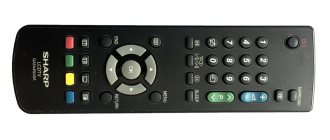
1.5 Remote control
1. STANDBY button
The button is used to switch between standby mode and operating mode.
2. “TIME” button
Pressing the button once causes the time to be displayed on the receiver display.
Double-clicking displays the current time in the upper right corner of the TV screen. 3. SOUND button
Used to temporarily mute the sound.
4. Button “VX.
SIGNAL* 5. “TV/RADIO” button Used to switch between modes of receiving television and radio channels.
6. Number buttons
~
Used to call channels by number and enter numeric data. 7. “TV CHAT” button
TV Chat button.
Detailed instructions for using this service can be found from your satellite TV operator. 8. “MENU” button
Calls up the Main Menu.
In menu mode, used to exit the menu and return to channel viewing. 9. Button block
/ / /
Cursor buttons. Used to navigate between menu items, as well as to select options for any settings. When viewing channels, buttons
/
switch to channel forward/backward in the list; buttons
/
adjust the volume.
10. TV GUIDE button
Calls up the Electronic Program Guide.
11. Red button “F1”
Pressing it once while viewing a channel brings up an information banner.
Pressing again brings up detailed information about the program and channel. Has additional functions when operating the on-screen menu. 12. Green “F2” button
Used to call up a list of audio tracks available for a given channel. Has additional functions when operating the on-screen menu.
Comments
Select → I found the instructions for my satellite here! #manualza
- Click →
All I understood from the instructions was that they were instructions.
Manualza!manualza.ru
Still not with us?
How to find channels yourself
Both when you turn it on for the first time and after resetting it to factory settings, the GS 8304 receiver needs to search for channels. This will also need to be done in the following cases:
- to search for channels that are not on the receiver;
- after routine preventative maintenance has been carried out by the provider;
- in the case when the receiver does not find channels;
- when some broadcasts disappeared from the list of available ones;
- when broadcast frequencies change.
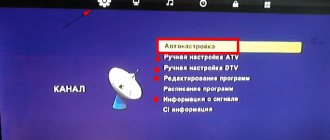
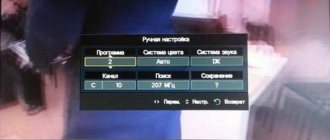
You can configure the GS 8304 Tricolor TV receiver yourself as follows:
- press the Menu button on the remote control;
- Use the arrows to select “Search Tricolor TV”;
- press the OK button on the remote control;
- After loading the region, you need to select the “Start Search” item and press the OK button on the remote control.
Setting up channels takes some time, during which the set-top box checks whether the broadcast parameters match the data transmitted by the provider. After this, press the OK button on the remote control to save the found list. Next, you need to double-click the Exit button to return to the channel playback mode.
When you turn it on for the first time or after resetting the set-top box to factory settings, setting up the GS 8304 receiver is a little more complicated.
- The language of the menu, the main audio channel, and the additional one is configured.
- The configuration of the video and audio outputs is indicated, as well as the image scale and the standard for its display.
- The time zone is set.
- In the “Channel Search” block of Tricolor TV, the mode of operation with the input signal, its frequency and the type of power supply to the port are indicated. It is not recommended to change all these parameters.
To search for channels, in the last field, select the name of the Tricolor provider and indicate the desired region. After this, the search is performed automatically by clicking the Next button. All that is required from the user at the end of the process is to confirm saving the found list of broadcasts.