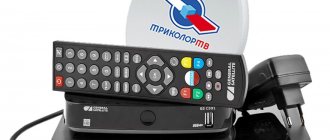
When deciding to switch to satellite television, the population wants to see a beautiful, clear picture in good quality on the TV screen, as well as a wide range of TV channels to choose from. In the Russian market, the operator Tricolor TV enjoys great confidence, supplying equipment for everyone who wants to switch to satellite television.
Modern general satellite Tricolor receivers provide a good signal level for broadcasting TV programs. Each gs satellite receiver model has not only standard functions, but also new ones are added. This is evidenced by the new model of the GS A-230 Ultra HD receiver. This is the only receiver that supports 4K format. In this article we will review existing gs satellite television set-top boxes from Triolor.
Description
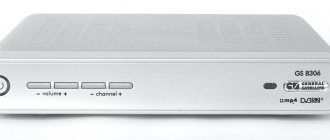
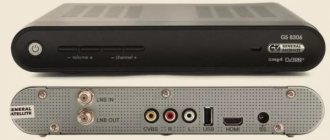
The GS 8306 receiver from Tricolor went on sale in 2012, has two colors: black (GS 8306b) and silver (GS 8306s), they have the same functionality. It is believed that the GS 8306 tuner is the most compact of the entire line of devices presented by the provider. The receiver is equipped with all the necessary connectors, and there are also ventilation holes that protect the device from overheating.
On the front panel there are buttons for controlling TV channels, sound and operating mode of the device, and there is a backlight. The card slot is on the side of the tuner.
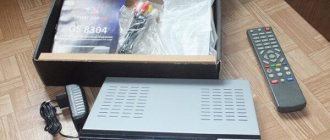
The receiver itself is quite modern and stylish, so it will fit organically into any interior. The equipment set includes:
- receiver;
- instructions;
- remote controller;
- connecting wire;
- power adapter;
- access card;
- antenna.
Experts recommend that you carefully study the user manual before installing the device; this action will help you avoid many mistakes during setup.
Instructions for setting up and connecting the tuner
First of all, you need to connect the receiver to the TV (both devices must be disconnected from the power supply). Then you need to connect the antenna wire to the receiver, and then connect the equipment to electricity.
The Tricolor TV GS 8306 satellite receiver is configured according to the following scheme:
- Connect the tuner to the network, after which the “Setup Wizard” will start.
- Select the desired language.
- Set the region from the list offered by the device. When you select the main region, all channels that are in the provider’s broadcast area will be found.
- The procedure for searching for television channels and radio, this action will begin after setting the region.
- If you need to repeat the search procedure, then to do this you need to go to the main menu and activate the “Search for channels” option. The satellite dish parameters are not configured, since the receiver only works with a standard set of equipment.
Reviews
Alexander, 38 years old, Yekaterinburg. About four years ago, we decided to install satellite television at our dacha. There is no need for this in the city. I wanted to diversify my TV shows. We consulted with the sellers, told us what we wanted and they advised us GS8300 m. At the time of our purchase, it was one of the latest models. The installation and configuration was carried out by a master. But imagine our disappointment when, after a few weeks, all the settings simply went wrong for unknown reasons, and the TV did not show. They called a technician to set it up because they couldn’t set it up on their own. When turned on, it started giving an error. We contacted technical support by phone, following their recommendations, turning on one channel and not switching for about an hour, they set up the receiver remotely. The device does support all packages. You can watch channels in fairly good quality.
Polina, 28 years old, Odintsovo, Moscow region. We bought the GS8300 m back in 2010. At that time he was considered an excellent receiver. Provided good picture quality. Served honestly. They replaced it after 7 years because it started to get very hot and stripes started appearing on the screen.
Receiver functions
The receiver software supports the following options:
- TV program schedule for 7 days.
- Teletext and subtitles.
- TV chat. This service allows you to send SMS from a mobile phone. Messages are displayed on the TV panel screen.
- Mail. The user receives information sent from the Tricolor company website.
- Banners. Advertising banners appear when changing TV channels.
Cinema hall. A list of films available for viewing, as well as their genre and showing time, appears in a special column.
Channel management
The tuner's memory can contain up to 1 thousand television and radio channels. Their location is somewhat different from the standard Tricolor package. Channel numbering starts from zero; there are several variations for displaying the channel list (1 or 3 rows). You can also choose the channel sorting method. But the manufacturer does not provide an option for editing the list. A person will not be able to change the name or delete an unnecessary channel. There are no age restrictions for viewing.
If the receiver goes into sleep mode, this will result in the loss of the last viewing data. When turned on again, the last selected channel will be broadcast. In the “Subscriptions” section you can find out information about available TV and radio channels.
Instructions for the receiver Tricolor TV GS 8306
The main menu of the GS 8306 is called up by pressing the “MENU” button on the remote control. To select a main menu item, use the “Volume” / “Volume” and “Channel” / “Channel” buttons, to confirm the choice - the “OK” button, to exit the main menu - the “EXIT” button. The main menu and all its subsections are full screen.
Note!
Some receiver features may require you to enter a PIN code (you will be prompted to enter a PIN code on the screen). The default code is 0000 (four zeros). 5.1 “Tricolor TV” (Search for television and radio channels)
You can quickly find all TV and radio channels of Tricolor TV or update existing ones.
5.2 Tricolor TV channels
In this section of the menu, the following items are available to the user: “Organize channels” and “Arrange favorites.”
Organization of channels
The “Channel Organization” menu contains items for grouping programs according to certain criteria: - “TV/Radio” - contains 2 lists: TV and Radio. — “Transponder” — contains a list of transponders from which television and radio channels were found.
To select a group element, move the cursor to the name of the group element using the “Channel” / “Channel” buttons. Next, to open the lists of group elements, click the “OK” button. Using the “Channel” / “Channel” buttons, select the list element of interest and press the “OK” button, after which a window with a list of television and radio channels of this group will appear on the screen.
To the right of the list of TV or radio channels is a field with the parameters of the selected TV channel or radio station (satellite, service provider, frequency, polarization, bit rate (SR), FEC, scrambling). Coded TV channels and radio stations are marked with a $ symbol. It is also possible to delete and block TV channels and radio stations.
Editing TV channels and radio stations
To move through the list of TV channels or radio stations, use the “Channel” / “Channel” buttons. To highlight a TV channel or radio station, press the OK button. The selected TV or radio channel is marked with a tick. To cancel the selection, click OK again. There is the possibility of group operations for blocking and deleting TV channels or radio stations. Select several TV channels or radio stations using the "OK" button. To invert the selection of TV and radio channels for group operations, press the green “F2” button.
Removal
Select the TV channel/radio station or group of TV channels/radio stations that you want to delete. Press the red "F1" button. Using the "Volume" / "Volume" buttons, select "Yes" and press "OK".
Blocking
Select the TV channels/radio stations you want to block and press the yellow "F3" button. Use the number buttons to enter a valid PIN (the default PIN is 0000). A special lock symbol in the form of a stylized lock will appear next to the TV or radio channel number. To view/listen to blocked TV channels/radio stations, you must enter a PIN code (the default PIN code is 0000). To unblock, you need to select a blocked TV channel / radio station, press the yellow “F3” button and enter the current PIN code (the blocking symbol in the form of a stylized lock will disappear).
Renaming
To rename the selected TV or radio channel, press the blue “F4” button. Use the on-screen keyboard to enter a new TV or radio station name.
Organize favorites
The “Arrange Favorites” menu allows you to create favorite lists, add TV channels and radio stations to lists according to certain parameters (filter), select, delete, rename, move and sort TV and radio channels alphabetically. Initially, 5 favorite lists are installed: FAV1 - FAV5.
Moving through favorite lists is carried out using the “Channel” / “Channel” buttons. To rename the selected list, press the blue “F4” button and use the on-screen keyboard to enter a new name. To delete a favorite list, press the red “F1” button. Use the Volume/Volume ( buttons to select “Yes” and press the “OK” button. To cancel the deletion request, select “No” and press the “OK” button or press the “EXIT” button. To add TV or radio channels in the list, select the desired list and press the "OK" button. From the list of TV and radio channels that appears, move the required TV and radio channels to the favorite list using the green "F2" button. To transfer all TV and radio channels, press the blue "F4" button To simplify the selection of TV channels/radio stations, you can use alphabetical sorting (press the yellow “F3” button) or a filter (press the red “F1” button).
Using a filter, you can select television or radio channels according to the following parameters: type (TV, Radio), encoding. To filter TV or radio channels by any criterion, press the red “Fl” button; to reset the filtering parameters, press the green “F2” button. To exit the filter without saving the settings made, press the yellow “F3” button.
To move TV or radio channels through the favorite list, select a TV or radio channel and press the green “F2” button. A special icon will appear in front of the TV or radio channel number. Select a new TV or radio channel position using the Channel/Channel buttons. Press the green "F2" button again to save the TV or radio channel at the new position, or press the "EXIT" button to return the TV or radio channel to its original position. To remove TV and radio channels from the list, press the blue “F4” button.
Setting up A/V outputs
In this menu item you can make settings that correspond to connecting the receiver to your TV. Use the “Channel”/“Channel” buttons to move the cursor to the line of the required setting. Switch installation options using the “Volume” / “Volume” buttons.
Video output
This item specifies the connection interface to be used.
The video output is selected from CVBS (set by default when initially turned on) and HDMI. Note !
The audio/video signal is supplied to only one interface (CVB5 or HDMI), depending on the interface set in the “Video Output” column or the “Input Signal” button on the remote control.
The TV reproduces image and sound only if the type of physical connection of the receiver to the TV matches the type of interface set in the “Video Output” column. Otherwise there will be no picture or sound!
To connect the GS 8306 receiver via the HDMI interface (being connected via the CVBS interface), you must follow the following sequence of actions: 1.
Physically connect the RCA3-RCA3 and HDMI connecting cables with one end to the receiver and the other end to the TV.
2.
In the “Video Output” column, use the “Volume” button to select HDMI, then confirm the switch by selecting “Yes” and pressing the “OK” button.
3.
The CVBS video input will turn off (the image on the screen will disappear).
4.
Switch the TV to the selected video input (HDMI interface). After a short period of time (within 30 seconds), an image will appear on the TV screen.
Note !
Connecting to a TV using HDMI is only possible if your TV supports 1080i resolution. Otherwise, the signal will automatically be sent to the composite video input (CVBS interface).
To connect the receiver via the CVBS interface (being connected via the HDMI interface), you must follow the following sequence of actions: 1.
Physically connect the RCA3-RCA3 and HDMI connecting cables with one end to the receiver and the other end to the TV.
2.
In the “Video Output” column, use the “Volume” button to select CVBS, then confirm the switch by selecting “Yes” and pressing the “OK” button.
3.
The HDMI video input will turn off (the image on the screen will disappear).
4.
Switch the TV to the selected video input (CVBS interface). After a short period of time (within 30 seconds), an image will appear on the TV screen.
Note !
Switching between connection interfaces in the “video output” column can be done by pressing the “Input Signal” button on the remote control.
TV Standard
In this menu item you can set the color coding standard for the composite video signal. Possible options: PAL, SECAM. Confirm your choice by clicking the "OK" button.
Note !
The SECAM receiver output may not be displayed correctly on some TV models.
Audio output
In this item, you can set the audio signal that will be output from the audio outputs of the AUDIO L/R connectors. The audio channel type can be selected from Stereo, Mono. If you select the Mono type, the sound will be output in monaural mode, even if the program has stereo sound. In this case, the same monaural signal is output from both jacks/pins. The audio of a TV or radio channel is displayed in stereo only if the TV or radio channel has a stereo soundtrack and Stereo is selected in this item.
Screen mode
Possible screen format options are 16:9, 4:3. 16:9
- in this case, a control signal is output, informing the TV that the image has a wide format with an aspect ratio of 16:9. A standard format image on a widescreen TV will be displayed in full screen with distorted proportions.
4:3
- in this case, a control signal is output, informing the TV that the image has a standard format with an aspect ratio of 4:3. A wide format image on a standard TV will be displayed in LETTER BOX mode: the image will be framed by black bars at the top and bottom of the picture, but its aspect ratio will be 16:9.
Display Format
Possible options: “AS IS”, “LETTER BOX”, “PAN SCAN”, “COMBINED”. With the “AS IS” format, the image occupies the entire screen area, but the proportions are distorted if the image and TV formats do not match. With the “LETTER BOX” format, the image proportions are maintained, but black bars are added on the screen (for a 4:3 image - left and right, for a 16:9 image - top and bottom). With the “PAN SCAN” format, the image is cropped on the left and right (for a 16:9 image) or top and bottom (for a 4:3 image) while maintaining the proportions. With the “COMBINED” format, distortion occurs, characteristic of “LETTER BOX” and “PAN SCAN”, but reduced by half.
Language setting
In this menu item you can make language settings for the menu, program audio and subtitles. Use the “Channel”/“Channel” buttons to move the cursor to the line of the required setting. Switch installation options using the “Volume”/“Volume” buttons. Menu language
— move the cursor to this line, if you want to change the language in which the menu will be displayed, select the menu language.
Audio language 1
— move the cursor to this line and select a language. The language selected in this line will be used by the receiver automatically as the program audio language.
Audio language 2
— move the cursor to this line and select a language. The language selected in this line will be used by the receiver automatically as the audio language of the program if the language specified in Audio language 1 is not among the audio languages available on this TV or radio channel.
Note!
The correctness of the automatic selection of audio language also depends on the information transmitted on air by the broadcaster.
If the broadcaster does not provide the correct audio language name information, the automatically selected audio channel may not match your settings. Subtitle language 1
—the language set in this line will be selected by the receiver automatically as the program subtitle language (if subtitles are transmitted by the broadcaster as part of a television or radio channel signal). The selection is made in the same way as selecting the Menu Language.
Subtitle language 2
— the language set in this line will be selected by the receiver automatically as the subtitle language of the program (if subtitles are transmitted by the broadcaster as part of a TV or radio channel signal), if the language specified in the Subtitle language 1 item is not available.
Screen Settings
Transparency
— in this section of the menu, the degree of transparency of the image of an information banner, a window for a list of TV channels or radio stations, etc. is set. The value varies from 0 to 50% in increments of 10%. The values are changed using the "Volume"/"Volume" buttons
Window display time
— in this section you set the display time of the information banner. The duration of display of the info banner can be changed from 3 to 10 seconds in 1 second increments. The values are changed using the "Volume"/"Volume" buttons.
Scale display
— Selecting “Yes” means that when adjusting the volume level, a volume scale will be displayed on the screen. If you select "No", the volume scale will not be displayed on the screen. The choice of option is carried out using the “Volume” / “Volume” buttons.
Timeout scale
— In this section you set the display time of the volume scale. The duration of the volume scale display can be changed from 3 to 10 seconds in 1 second increments. The values are changed using the "Volume" / "Volume" buttons.
Show subtitles
— “Yes” and “No” options are available. Once you have made your selection, confirm it by clicking the “OK” button.
Setting the time
In this setting you can set the time and date. Possible time mode options: automatic, manual.
Auto
— to set the system time and date, the receiver will use the data transmitted by the broadcaster as part of the signal from the satellite.
Manual
— the receiver will use the date and time set manually using the “Volume”/“Volume” buttons. To set the value in the New time field, use the number buttons.
Timezone
— In this section you can set the difference between your time zone and UTC (Greenwich Meridian time). The values are changed using the "Volume"/"Volume" buttons.
Blocking
This feature sets viewing restrictions and prevents unauthorized access to certain menu items on your receiver using a four-digit PIN code. By default, the PIN code is set to 0000 at the factory. If the PIN code is entered incorrectly, you will not be able to advance to the next mode. To change the PIN code, you must enter the current PIN code in the “Old PIN” column using the number buttons, and enter the new desired PIN code in the “New PIN” column. To confirm the operation, you must repeat the new PIN code in the “PIN Confirmation” column.
Note!
If you forget the PIN code, you will have to contact the customer service department of the company where you purchased the receiver, so try to remember it.
Factory settings
In this menu item, you can restore all default settings, with the exception of the main menu item “Settings” - “A/V output settings” - “Video OUT”. When resetting the receiver to factory settings, all information about the tuned TV channels and radio stations, favorite lists, etc. will be lost. To load factory settings, select “Yes” using the “Volume” / “Volume” buttons and press the “OK” button. After resetting, the receiver will proceed to Step 1 of the Setup Wizard.
5.3 Conditional access
The GS 8306 receiver allows you to access programs broadcast using the DRE Crypt conditional access system.
Note!
When switching to TV channels in DRE encoding, decoding may be delayed for several seconds and the information message “Encoded channel (DRE)” may appear during this time.
In this menu item you can get basic information about the smart card: serial number, software and hardware version.
Subscriptions
— in this menu item you can get information about the subscriptions available on the card and their validity period.
Module
— in this menu section you can get information about the conditional access module, implemented in software based on the main Neotion NP6 processor.
System information
— this section contains information about the hardware and conditional access module. DRE Information This section contains information about the software and the conditional access module.
Help
— This section of the menu contains a list of frequently asked questions regarding the cost of services, services provided by Tricolor TV, settings, malfunctions, etc.
Indicator
For ease of use, the receiver is equipped with indicator lights that help you determine the operating mode of the device. How to determine in which mode the tuner is operating:
- The diode is not lit - the device is turned off, but it could also be sleep mode.
- The indicator lights continuously - the receiver is performing the boot procedure after turning on or exiting sleep mode.
- The indicator is flashing - the tuner is in standby mode.
- The lower part of the indicator is lit - the receiver is in operating mode and the HDMI signal is being supplied.
- The upper diode is on - the device is also in operating mode, but the signal is sent to CVBS.
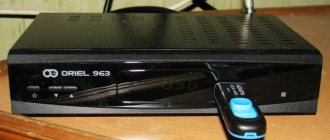
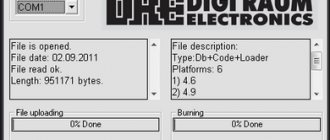
How to update software
To update the firmware you need to follow the instructions below:
- download new software to the drive;
- insert the flash drive into the tuner;
- disconnect and then connect to electricity;
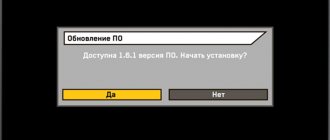
- after 30-50 seconds, a message will appear about loading new software for the gs 8306 receiver;
- after updating the firmware, a test notification about the completion of the operation will also appear on the monitor;
- remove the flash drive;
- reboot the device.
The software update procedure is completed. You should know that after updating the software, the receiver will be reset to factory settings.
Specifications
Here are the main features of this receiver:
- Supports HD, MPEG 4, MPEG 2 formats. Does not play HEVC, 4H Ultra HD and DVB-T2.
- There is no recording using a pre-set timer.
- Receiver 8306 is compatible with Tricolor Center and Siberia.
- Video output in maximum resolution up to 1080i.
Connectors:
- Stereo audio output;
- composite video output (CVBS);
- HDMI;
- connector for satellite antenna (LNB);
- USB port (it is intended exclusively for updating the firmware);
- loop type output (LNB);
- smart card slot – located on the right side panel of the device;
Other features include a separate power supply - often it is built-in, which greatly complicates repairs. The receiver also does not have a digital display, which reduces the power consumption of the device.