BBK SMP129HDT2
Quite recently, I already wrote about the installation and configuration of terrestrial digital television according to the DVB-T2 standard in a private house in the Moscow region. But that was about a TV that was already equipped from the factory with a DVB-T2 standard module and capable of receiving all the necessary channels out of the box.
But what should the owners of millions of old televisions, maybe even CRT ones, do? Throw it away and buy new? There's no need to rush. In order to upgrade your old TV set into a new modern high-quality digital TV signal receiver, you just need to connect a digital set-top box with DVB-T2 to it.
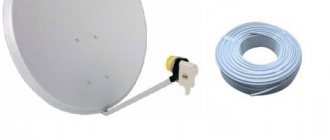
Of course, your location must be within the coverage area of the digital signal broadcast and the antenna connected to the TV must be UHF and provide at least some reception of the signal from UHF channels. Otherwise, you should first decide on the antenna, and only then set your sights on the set-top box. There are a number of DVB-T2 receivers on the market, designed as set-top boxes. They are produced both here, in Russia, and in a distant country in the east.
In terms of quality and functions, they are not much different, because they are made using almost the same components. Globalization, motherfucker, go ahead! But if you look at it, then more is not required.
These functions are even a little too much for the average household consumer. It would be enough to just watch channels in the DVB-T2 standard and that’s it. It's good, of course, but it doesn't make any sense. You can console yourself with the hope that someday, in my Vydropuzhsk, someone will launch commercial digital terrestrial television, I will buy a module and will enjoy paid channels. Yes, and other standards, if you really have them, then such a receiver is worth considering. Otherwise, as usual, it’s money down the drain and dust in the eyes.
Bbk smp125hdt2 circuit diagram
kotnatanRemember that repairing a DVB-T2 set-top box is quite a painstaking job. If you are not confident in your abilities, it is better to contact a service center. This material is presented purely for informational purposes. The author is not responsible for your actions when following the recommendations written on this page. If you do not have the appropriate skills and knowledge, your actions can lead not only to complete failure of the device, but also to electric shock.
Recently, quite often, friends and colleagues bring DVB-T2 TV tuners (or set-top boxes for receiving digital television) for repair with various damages. Most of them are built on the same basic components, and even the board layout of these devices is similar to each other. Tuner malfunctions are also similar and can be systematized.
First, let's figure out what such a prefix consists of. It contains: a power supply (IP 220V -> 5V), converting an alternating voltage of 220 volts into a direct voltage of 5 volts, a number of voltage converters to generate power for the processor 3.3 1.8 and 1.2 volts, RAM, microprocessor , flash memory containing the device firmware, demodulator and tuner that receives the signal from the antenna.
I start diagnosing malfunctions of the DVB-T2 set-top box by turning it on. If “BOOT” does not appear on the LED indicator, I remove the tuner cover and measure the voltage supplied by the power supply. This can be conveniently done using Schottky rectifier diodes installed at the output of the power source. There may be two or one, depending on the device model.
If there is no voltage, it is quite possible that the reason is not the power supply, but a short circuit in the +5V circuit on the device board. This can be checked by simply measuring the resistance between the cathode of the same diodes (diode) and ground (it is most convenient to connect the negative wire of the tester to the tuner body). If the resistance is 2 - 3 ohms or less, you need to find the short circuit.
As a rule, it cannot be determined visually. To find the reason, the tuner is disconnected from the network and a +5V supply voltage is artificially applied to the cathodes of the diodes for 5 - 8 seconds from a laboratory power source. This time is enough for the faulty component to become very hot.
Typically, such an element is one of the voltage converter microcircuits that generate voltages for the processor to operate. A ceramic choke and an electrolytic capacitor are installed near each of them. In good condition, all power circuits have a voltage of 3.3, 1.8 or 1.2 volts at one of the inductor terminals.
If you can find a hot microcircuit, it must be replaced with a working one, usually from a “donor” - another faulty tuner. This is where the repair usually ends. You can read more about these microcircuits here; you can select the type of microcircuit by marking here.
It’s another matter if there is voltage at the output of the power source, but it is below normal. In most cases, the “culprit” for this is a dried-out electrolytic capacitor, smoothing out the ripple of the supply voltage of the PWM controller of the power supply. This is a small capacitor with a capacity of 10 to 50 microfarads, a voltage of 25 to 50 volts, installed near the power supply chip.
If the parts of the power supply are burned out and shattered into pieces, or it simply does not want to be repaired, and when external power +5 volts is supplied to the output Schottky rectifier diode, the set-top box comes to life, you can repair it as follows: solder the serviceable parts from the power supply (they may be useful when repairing another set-top box). Then we solder the power adapter from the cell phone with the plus on the cathode of the diode, the minus on the common wire and enjoy. It is important that the voltage on the adapter is 5 volts and the maximum current is more than 0.5 amperes. If you don’t have one at hand, you can order it for about 200 rubles using this link.
If all power circuits are working properly, and the DVB-T2 set-top box “freezes” at the “BOOT” inscription, then further diagnostics are carried out. I start it by installing three hard pins removed from the motherboard of a faulty computer into the holes for installing the diagnostic connector. It is easy to find by the inscriptions on the board GND, RX, TX. I connect a low-voltage diagnostic port - UART, to the terminals with conductors, which can be purchased for about 100 rubles. The USB connector of the port is inserted into the computer, and the HyperTerminal program is launched. I set the connection speed to 115200 bps, the number of bits - 8, parity - none, stop bit - 1, connect the power to the TV tuner and watch the download process.
Then the tuner itself will tell you about its malfunction.
For example, repeated inscriptions “Demod IIC write error” and “Demod IIC read error” indicate the need to replace the MSB1236C demodulator chip. The inscription “Error decompressing file” indicates damage to the firmware or Flash EEPROM 25Q32 chip.
There are times when it is not possible to flash a device with factory firmware via a USB port. In this case, on the Internet I am looking for a BIN or HEX image of the EEPROM 25Q32 chip. The microcircuit is unsoldered, connected to the programmer, read and saved (just in case, in order to be able to roll back), then it is cleared, and the firmware downloaded from the Internet is written to it. Then it is installed back into the tuner.
To program a microcircuit, you can purchase such a programmer for about 200 rubles.
If you don't have a desoldering tool for the 25Q32 chip, don't worry. Just don't throw away your old disposable razors. Each of them hides such a thin steel blade.
By heating the pins of the microcircuit one at a time and slipping such a blade under them, you can painlessly unsolder the microcircuit for installation in the programmer. This should be done without much effort so as not to damage the tracks on the tuner board.
To avoid cutting yourself with the blade, you can purchase a very inexpensive special tool. It is much more convenient for them to work; in addition, the set includes 27 blade tips of various shapes.
To change the firmware of a TV tuner, you can do without soldering at all by purchasing a clip like this with an adapter. It is placed on top of the chip, and the cable is connected to the programmer through an adapter. In order not to overload the programmer, before connecting the adapter, it is recommended to cut the power path coming to pin 8 of the microcircuit. After reading, the track must be restored.
A more complete list of various tools and accessories for repairing DVB-T2 set-top boxes can be found in our tools section.
In conclusion, here are a few links to electronic components often found in tuners:
TV repair in Russian/forum: BBK SMP129HDT2 – TV repair in Russian/forum
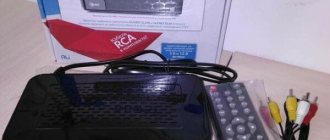
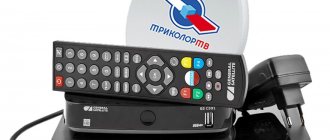
The transition from analog television broadcasting to digital DVB-T2, adopted as a federal standard in the Russian Federation, influenced not only the computer TV tuner industry. The fleet of TVs either without support for digital terrestrial broadcasting or with support for the first version of DVB-T turned out to be more than impressive, while many models simply did not have time to become obsolete in terms of diagonals and resolutions. Delivery set The compact box has a traditional BBK white and blue color scheme, explanatory inscriptions are localized. In addition to the receiver itself, the kit includes: remote control; 3 RCA - 3 RCA composite cable for analog video and audio connections; user guide. The device is available in two colors - Black and Dark Gray, the second option was tested.
What to do if the digital set-top box does not work?
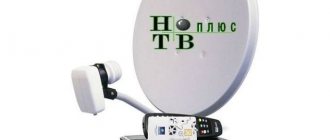
SMPHDT2 is a digital television receiver, the distinctive feature of which is its miniature size and minimal weight. The timeshift function will allow you to watch the missed fragment of the live broadcast, and the electronic TV guide will introduce you to the TV program schedule. To ensure more reliable signal reception, it is additionally recommended to use a digital television antenna from the wide BBK model range.
All the variety of channels and high quality images of digital television will be available to you thanks to the SMPHDT2 receiver. The TimeShift functions for recording broadcast TV programs and delayed viewing allow you not only to conveniently plan your time, but also to manage recorded programs - skip advertising blocks or pause them. TV program schedule is available thanks to the EPG function. For high definition signal transmission, there is an HDMI connector on the rear panel of the device. Digital television receivers What is the period of warranty and post-warranty service?
To read the instructions, select the file in the list that you want to download, click on the “Download” button and you will be redirected to a page where you will need to enter the code from the image. If the answer is correct, a button to receive the file will appear in place of the picture. If there is a “View” button in the file field, this means that you can view the instructions online, without having to download it to your computer. If you think the material is not complete or you need additional information on this device, for example a driver, additional files, such as firmware or firmware, then you can contact the moderators and members of our community, who will try to quickly respond to your question. You can also view instructions on your Android device.
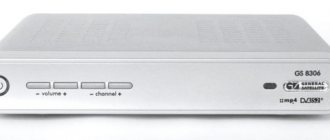
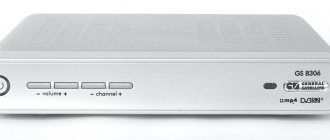
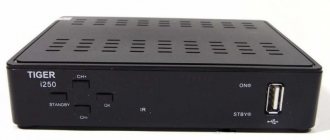
This console has quite miniature dimensions. The power supply is built-in, which is definitely a plus. The top cover of the case has a mirror glossy surface, which certainly looks elegant. This model does not have a display; the front panel contains: an LED status indicator, an IR receiver and a USB port.
Review, testing and configuration of the DVB-T2 receiver BBK SMP125HDT2.
Today we will get acquainted with a digital television receiver of the DVB-T2 standard, from the BBK company, with the help of which we can receive up to twenty free digital television channels, as well as three radio channels, without dishes and subscription fees. The model is called BBK SMP125HDT2. The VVK Electronics group of companies was founded in 1998 and since then has been developing and manufacturing consumer electronics under the BBK brand. The production of television equipment is one of the priority areas of the company's activities.
- The BBK SMP125HDT2 model is created on the Ali 3812 chipset. It has an on-air receiver of the DVB-T/ DVB-T2 standard, as well as MPEG-2/MPEG-4, these signals are received on a regular home antenna. There is a built-in HD media player with MKV support. The set-top box has HDMI and composite (bells) output.
- The package includes: a low-frequency cord for connecting to a TV, a receiver, a full-function remote control, as well as a user manual combined with a warranty card (12 month warranty).
- The BBK SMP125HDT2 has a plastic body, everything except the bottom surface is glossy. Neat and high quality assembly. On the front side there is a USB port and a power indicator. When the set-top box is on, the green LED is on, when off the red LED is on. The USB port is used to connect a flash drive or hard drive.
- On the rear panel there is a power cord, antenna input, composite (bells) output and HDMI. An HDMI cable is not included in the package; if necessary, it must be purchased separately.
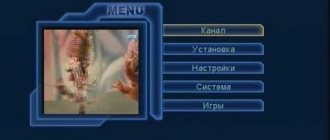
We connect the receiver to the network, connect it to the TV with an HDMI cable and connect the antenna to the receiver. Turn it on by pressing the power button on the remote control. The BBK SMP125HDT2 menu is standard. When turned on, a preliminary menu appears. Press the EXIT button on the remote control and go to the main menu. Select the “installation” item and select “channel search”. Select the frequency channel relevant for your region and go to “search”, and click OK. Within a few seconds, the set-top box will scan this frequency channel and tune in to television channels. Thus, you can configure the first multiplex, to configure the second multiplex, do the same steps, specifying the next frequency channel. You can tune in to channels in auto search, but it will take more time. You can see a video review of the BBK SMP125HDT2 digital receiver below.
Like
- < Back
- Forward >