We continue to talk about how, with a small amount of time and skills, you can build a multimedia combine with the additional capabilities of a home server based on Kubuntu 20.04 and KODI, capable of working 24/7/365.
First part of the publication
The publication examines in detail the hardware platform, what hardware and peripherals are used. The OS has been installed, the basic settings of the Kodi server and media center have been carried out. Read more →
Watch YouTube
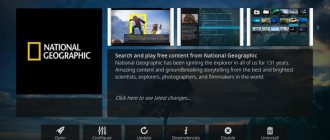
It would be strange to have a modern media center without the ability to watch videos on the most popular video hosting site - YouTube. For this purpose there is an add-on of the same name from the official repository. The add-on interacts well and synchronizes history, channels, subscriptions, etc. Everything is like everyone else. I don’t see any point in describing or reviewing anything in particular.
The only problem that may arise is with authorization on the service. To do this, you need to create an API project in the Google Application Console and get the client ID, API key and client secret code. Only with this data can you authorize the add-on. There are a sufficient number of step-by-step instructions on the Internet. For example, one of them is on overclockers.ru.
But there is a much more elegant, convenient and faster way to play YouTube videos on the KODI media center - using a mobile phone and the standard YouTube application in it. However, no additions or settings are required in the media center itself. We will return to this a little later, when we look at controlling the media center using a mobile phone.
A significant advantage of watching YouTube on the KODI media center on Linux (unlike its Android counterpart) is that there are no ads out of the box. This also applies to additions and broadcasting from the phone.
Setting up Kodi addon on YouTube
The YouTube Kodi add-on works out of the box, but there are a few settings you'll want to review once the installation is complete.
Setup Wizard
When you first launch the YouTube Kodi addon, you will be asked if you want to run the setup wizard.
Running the wizard is not necessary, but I like to click yes
button and step after it to set your language and country. You can change these settings later in the YouTube Kodi addon options menu.
Select your language from the list and click on it to move to the next step.
Then select your country and click on it. That's all there is to the setup wizard.
Keep in mind that these settings only control the videos you see and the language in YouTube. If you want to access YouTube content from other countries, you'll still need to install a VPN to control what content you're allowed to watch.
Linking a YouTube account
Most people will want to link their existing account to the YouTube Kodi add-on. Once your account is linked, you will be able to view subscribed channels, have access to your favorites, and view playlists that have already been created.
Start by choosing to log in
menu item at the top of the main menu.
You will be warned that you will have to repeat this process twice. This is normal and easy enough to do. Click on Ok
button to move to the next step.
A screen will then appear with a confirmation code and a progress bar. You need to log into YouTube and confirm each code before the progress bar fills. It takes just over 5 minutes to fill completely, so you have plenty of time.
Start by opening https://www.youtube.com/activate and enter your verification code, then click next
button.
Then you need to click on Allow
button to link your YouTube account with the YouTube Kodi addon.
Keep in mind that you will need to repeat this step again to fully link your account. You will then have access to your subscriptions and other information associated with your YouTube account.
Other settings
There are a few other settings that I would recommend you change or at least take a look at. I like to set the resolution and change which folders are shown by default.
You can access the settings menu for the YouTube Kodi add-on by going to the end of the list and clicking the settings
menu item.
The YouTube Kodi addon will not automatically select video quality, so set it where you want it. I prefer 720p for my screen, but there are options available for 1080p all the way up to 240p.
Next, click Folders
menu on the left and see what is displayed by default.
In my opinion, the list of displayed items is too long. At least I like to turn off the show Didn't like the video
because I probably clicked dislike for a reason.
Also, take note of maintenance
menu. If you are having problems with your YouTube Kodi addon being slow or crashing, you should clear your cache from this menu.
2.1. Managing qBittorrent (web interface and mobile application on Android)
Don’t forget that our media center is also a background and 24/7 torrent downloader. And, in order not to interfere with your household watching cartoons or news, you can easily manage your downloads. Nobody will even notice it.
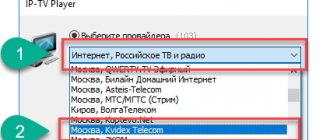
To do this, enable the use of the web interface in the qBittorrent settings by setting the login/password and port. I indicate 8081, if you remember port 8080 we specified in the KODI settings, it is already occupied.
Now we can check the availability of the web interface. It completely replicates the interface of the application itself, works flawlessly - I recommend it!
In addition to the web interface, I also use an application on Android devices - qBittorrent Controller. Setting up a connection to your server is not difficult. You will need the same port, login and password.
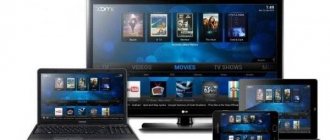
What is Kodi?
Kodi is a streaming media application that connects to your TV or runs on your mobile device. It's compatible with any major phone, tablet, and streaming equipment. Kodi is a great solution, whether you've connected your computer to your TV with an HDMI cable or want to unleash the real power of your Firestick.
As of this writing, the latest stable version of Kodi is 17.4. The latest release is available for download here.
2.2. Managing KODI Android Device (Yatse, Kore)
We've sorted out the management of the system and the torrent downloader, all that remains is the most important thing - managing KODI. With this, your media center will be in complete order.
For Android platforms there are two options to choose from:
- Kore is the official free application;
- Yatse - 3rd party paid ($3.56). For most people, the free functionality will be enough.
Both options do their job perfectly. To connect, use port 8080 and the login/password specified during the initial setup of KODI. Both applications allow you to control the viewing of IPTV and content from the library, add-ons. The library is cached and accessible without connecting to a media center; you can view information about films and TV series outside your home network. I would like to note that Yatse copes with this a little better. For example, my library, filled exclusively with online content from Elementum, is displayed with all posters and images, Kore - displays only local ones. Both can handle channel logos from the m3u8 IPTV playlist.
Among the distinctive functionality of both applications, I would like to highlight the integration with Android. On any media file, you can select “Play on KODI Media Center” from the context menu. In total, you can send any photo, video or audio file to the big screen of your TV in just a few clicks. Even better, from the YouTube on your phone/tablet, you can tap “Share” and also select “Play on KODI Media Center” and the video will instantly start playing on your TV. For this reason, by the way, I do not use the YouTube add-on, which was recently discussed, even though it is installed and connected to my account. It’s much more convenient and faster to play videos from your phone than from an add-on.
And another not obvious life hack in the era of distance learning. Using the Yatse “share” function described above, it is very convenient to broadcast to children various tasks, illustrations, etc., sent to various groups on the parent’s phone.
Desktop widgets are only supported by Yatse. Only he, by the way, can send text to the media center. Convenient when you need to type text - it’s much faster to type on a phone than to enter from an on-screen keyboard, even with an air mouse.
Which one to choose is up to you. Personally, I prefer Yatse. More features even in the free version, flexible settings and a more attractive interface.
More about Yatse
The best Kodi remote, easy controls, streaming and more since 2011!
Yatse is the only Kodi management app you need to have complete control over all your devices. Not only is it simple, beautiful and fast, it also gives you everything you've always wanted to improve your Kodi experience, including many features you never thought possible.
Monthly updates, fast and efficient support offer more features and earn a higher rating than many competitors since 2011.
Unique features • Stream Kodi, Plex and Emby media to Android device, UPnP, AirPlay, Chromecast, Roku and Smart TV * • Stream media from phone to Kodi, UPnP, AirPlay, Chromecast, Roku and Smart TV* • Plex™ server support and Emby™ * • Voice commands • Android Wear and Auto support • Offline media* to sync Kodi, Plex and Emby media files to your device for offline playback or streaming • Audio player * with gapless playback support • Widgets for quick access to controls, playback details, etc. • Cloud storage * to backup and restore all your settings, hosts and commands • Unlimited custom commands to access various Kodi features • AV Receiver Plugins * to control the volume of supported receivers from Yatse
Other features: • Modern and clean interface, optimized for phones and tablets • Customizable to suit your preferences • DashClock / Muzei extensions • Notifications and controls on the lock screen • Quickly find media using sorting, filtering and global search • Playback granularity with choice of subtitles (including downloading and synchronization) video and audio • Support for Wake on Lan (WOL) and power management options • Plugins for SMS, calls, notifications, remote launch of Kodi • Send media from YouTube or browser to Kodi • Optimize speed and power consumption even on older phones • Theme support * • API for controlling Kodi and Yatse from other Android applications • Tasker plugin
Help and support: • Official website: https://yatse.tv • Installation and use: https://yatse.tv/wiki • FAQ: https://yatse.tv/faq
The free version is fully functional and contains no ads. But some additional features (marked with * ) require an unlock key.
Note: • Many plugins and PVRs cannot be used for streaming due to Kodi limitations • Kodi does not support transcoding, so media files must be compatible with your player • This app allows you to manage all versions of Kodi, including the latest alpha Leia | https://kodi.tv/ • Forks such as SPMC, OSMC, MrMC, Librelec, Openelec are fully supported
Screenshots of Yatse In this simple way you can play any media file from your phone on your TV.
The same works in the YouTube application Screenshots Kore
Important: How to use Kodi safely
Before you start, I highly recommend installing a VPN. YouTube is known for restricting your content based on where you live. If you're in the US, that means a pass to the BBC, including all their sports coverage and additions to popular shows like Dr. Who.
And personally, I have concerns about ISP monitoring of streaming content. I think it's pretty clear that ISPs are just dying to pass legislation against net neutrality, so they might start paying attention to how much bandwidth you use to stream video and then charge extra for it.
Connecting to a VPN encrypts that traffic so your ISP has no idea what you're doing with your internet connection, which is as it should be.
IPVanish is the only VPN we've tested that delivers the speeds you need for streaming with low latency connections worldwide. It also works with the widest range of devices, including FireTVs and Firesticks, which no other VPN can do right now.
You don't need to change any settings, just register on IPVanish, install the client on your device and connect to the server anywhere in the world. I've been using IPVanish for several months and I think the convenience, privacy and speed are worth paying for.
2.3. KODI and Elementum web interface
The media center also has a web interface for remote control. For access you need the same port (8080) and login/password. The functionality is quite limited, but it is quite enough for viewing and launching content from the library and IPTV. Interaction with add-ons is also supported. The appearance of the web interface can be changed; several options are available from the standard official KODI repository.
The Elementum add-on also has its own web interface. Allows you to view the current status of torrents, add new ones from a file or magnet link, and also delete existing ones. From it you can also directly start playing the torrent on the media center.
Screenshots of the KODI and Elementum web interfaces
Media center traffic accounting (vnStat + web interface)
Monitoring the volume of incoming/outgoing traffic for a media center, of course, is not entirely relevant, but over the “long distance” it is interesting information. There are many programs to implement this task, including for Ubuntu. If we leave in this list only those that include a graphical interface (web, for example) and data analysis, there are very few suitable ones, due to their scale, since these will be full-fledged network administration applications with a huge range of capabilities and, as a result, , high resource intensity. I wouldn’t want to load the media center with unnecessary tools at home.
For simple accounting and display of statistics, vnStat is a great choice - a lightweight program for monitoring network traffic for the Linux operating system using a command line interface. The program will “monitor” not our KODI, but the network interface. This is exactly what you need, since in addition to KODI, qBittorrent also works.
Out of the box it comes without a web interface, but thanks to enthusiasts, there are several options on the Internet that interact perfectly with vnStat. I liked the jsvnstat option. The developer’s website also has a “Demo” section, where you can feel how it looks and works.
jsvnstat was developed back in 2013 and, unfortunately, has not been updated since then. In this regard, the web interface does not support the current version of vnStat itself. Not a problem - the capabilities of older versions will be enough for us.
By brute force I found the latest supported version - vnStat 1.14. It is no longer available in the Ubuntu repositories. You can download it from my GitHub repository.
Download and install the required version
wget https://github.com/arboozov/kodi/raw/master/vnstat_1.14-1ubuntu2_amd64.deb sudo dpkg -I vnstat_1.14-1ubuntu2_amd64.deb
We block the update of the vnstat package so that during system updates you do not receive the latest version and are left without a working web interface
sudo apt-mark hold vnstat
We create a database for our network interface (in my case it is enp1s0 )
vnstat -i -u enp1s0
Install and launch the web server
sudo add-apt-repository ppa:ondrej/php sudo apt-get update sudo apt-get install apache2 php5.6 php5.6-gd wget libapache2-mod-php5.6 sudo service apache2 restart
Now we need to download and place the web interface itself on our media center. You can use the original version from the developer’s website, or my slightly modified version. I didn’t make any global edits, but I slightly tweaked the appearance, colors, removed unnecessary things, and adjusted the calculation of the total volume of incoming/outgoing traffic in TB.
For example, we load my version
wget https://github.com/arboozov/kodi/raw/master/jsvnstat.zip
Unpack the archive along the path /var/www/html/stat/
unzip jsvnstat.zip -d /var/www/html/stat/
$interface parameter to our network interface with which we will work, save the changes
mcedit /var/www/html/stat/settings.php
The setup is complete, go to https://IP-address_of_your_mediacenter/stat/ . If everything is done correctly, our web interface will be displayed with traffic analysis from the moment the package was installed. The default database will be updated automatically every 5 minutes.
Backup KODI
The media center with KODI on board, equipped with additional features based on Kubuntu 20.04, is fully configured and ready to work. At this point, it's worth thinking about backing up and keeping everything you've done in that original state. Let's not underestimate the stability and reliability of our operating system, but in the event of a hardware failure, the same SSD drive, for example, we would like to be able to quickly restore operation, and in the same condition, with the least effort. Installing and configuring from scratch again is a dubious pleasure.
I recommend having at least one copy (for example, the original state) of the entire system. I saved the disk image using Clonezilla. Having such a copy, without much difficulty, in a couple of clicks, we can change the drive and install Kubuntu with all the settings. I will not describe in detail the procedure for removing or installing the image. For those who have not encountered the work of Clonezilla, there are good instructions in Russian with screenshots on losst.ru.
As for backing up KODI itself, I copy it using the “Backup” from the official repository automatically once a week. No participation is required from me in this, you just need to set everything up correctly once.
Since my media center is running and connected to the network around the clock, I configured the scheduler to copy all KODI data weekly on Monday at 4:00 a.m. and store two copies in the archive. That is, conditionally, in the third week, during backup, the oldest copy (from the first week) will be deleted.
But where to store backups? Storing it “underneath” on the same disk is a shot in the foot; you don’t even have to waste time on such a backup. A network directory on another home host is not an option in my case, all PCs are turned off at night, and there is no constant schedule during the day. Turning on, for example, every Monday night (according to my schedule) my home computer is dubious automation. I would like not to participate in this process at all.
Installing the Kodi addon on YouTube
The Kodi YouTube addon is available for download from the official Kodi addon repository. To install it, you need to go through the list of video add-ons. Here's how to do it.
Start by clicking on Addons
menu item on the Kodi home screen. Your menu may have more entries than mine, as I've hidden many of the ones I don't use to reduce clutter. This is usually at the bottom of the list.
Then click Download
menu item.
Go to Video addons
and click on it to open a list of available video add-ons.
Then scroll down until you find YouTube
menu item and click on it.
Then click install
button in the lower left corner to begin the installation process.
Once the Kodi YouTube addon has started loading successfully, the icon in the list will change.
The icon will change to verify once the installation of the YouTube Kodi addon is completed.
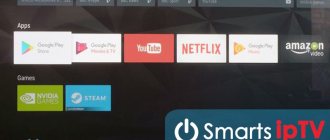
Now you can launch YouTube from addons
menu.
Dropbox
The add-on supports integration with this popular file hosting service. Connection is not difficult. You need to create an application to work with the API through the console in your personal account of the service, give it the necessary access (read, write and delete), and indicate the received keys to the add-on and log in. For authorization, Backup will generate a link, following which Dropbox will generate a validation code for confirmation. Everything works very well, with one exception. Authorization is “enough” for one session. After restarting KODI, you must log in again. Without authorization, of course, the backup copy will not be uploaded to the hosting. As a result, the process again requires our intervention - this option does not suit us.
Yandex.Disk
The add-on does not support working with this cloud service, but no one is stopping us from mounting it on the system and specifying it in the Backup settings as a local directory, and the add-on does not need to know that it is not local. This option suits us - let's get to work.
In the “Account Management” section of Yandex.Disk, create an application password using the WebDAV API .
To work with the WebDAV API in Ubuntu, install the davfs2
sudo apt-get install davfs2
We create a directory where we will mount our Yandex.Disk and assign rights
sudo mkdir /mnt/yandex.disk sudo chmod -R 0777 /mnt/yandex.disk
We add our Yandex account to davfs2, where: login - username in the Yandex service, without @domain password - ID created in the Yandex.Disk account application passwords
echo “https://webdav.yandex.ru login password” >> /etc/davfs2/secrets
Mount it in the directory /mnt/yandex.disk
sudo mount -t davfs https://webdav.yandex.ru /mnt/yandex.disk
We configure fstab so that Yandex.Disk is mounted into our directory automatically when the system starts
sudo mcedit /etc/fstab
Paste at the end of the file
https://webdav.yandex.ru:443 /mnt/yandex.disk davfs user,rw,_netdev 0 0
All that remains is to specify our directory in the Backup add-on settings.
Let's not wait until next Monday night and start creating a backup manually. After a year of using KODI, the amount of data for backup is 1.61 GB, after archiving - 1.35 GB. Information about the progress of the backup will be displayed in the upper right corner.
Google Drive
By analogy, you can set up a KODI backup for a service from Google. The only difference will be in mounting it into the system. Let's get started.
We will need the google-drive-ocamlfuse . Add a repository to the system, update the list of packages and install
sudo add-apt-repository ppa:alessandro-strada/ppa sudo apt-get update sudo apt-get install google-drive-ocamlfuse
Create a directory where we will mount and assign rights
sudo mkdir /mnt/google.drive sudo chmod -R 0777 /mnt/google.drive
Now you need to run the command from the console as a user ( not sudo ) authorized in the system
google-drive-ocamlfuse/mnt/google.drive
You will be redirected to your browser to log in. Upon completion, Google will ask you whether to allow KODI to manage your disk - confirm.
Done, you can go to the /mnt/google.drive and see your files in the cloud there.
As with Yandex.Disk, Google Drive will not automatically mount your drive after a system restart. Let's set up auto-mounting ourselves.
Creating a script
mcedit /usr/bin/gdfuse
Paste content
#!/bin/bash google-drive-ocamlfuse -label $1 $* exit 0
Assign execution rights and copy to root
sudo chmod +x /usr/bin/gdfuse sudo cp -r /home/username/.gdfuse /root/
All that remains is to configure fstab
sudo mcedit /etc/fstab
Paste at the end of the file
gdfuse#default /mnt/google.drive fuse allow_other 0 0
Now your cloud disk will always be mounted on the system automatically.
To conclude the topic about KODI backup, I would like to add that, in addition to the standard backup data, you can add your own directory. The only limitation is that the directory must be in the path /home/username/.kodi/ . For example, I have a wiki directory there with some of my notes, scripts and settings. To do this, in the Backup add-on settings in “File types,” change the mode from “Simple” to “Advanced” and add the desired directory - it will now also be added to the backup archive.
Thus, with a small amount of time and skills, we get a multimedia combine with additional capabilities of a home server and many comfortable control methods, capable of working 24/7/365, an analogue of which I have not yet found, perhaps only because I was not looking for it - it completely and completely suits me and my household.
Continuation and additional features - in other publications
Unfortunately, the volume of one publication on Habré is limited, so everything that I would like to share cannot be fit into one post. Divided into several parts... Part 1 . Hardware, OS preparation, basic server setup and Kodi Part 2 . YouTube, qBittorrent, Yatse and Kore management, VnStat traffic accounting Part 3 . Retro games Part 4 . IPTV Archive Part 5 . Yandex.Music Part 6. MariaDB and media library synchronization Part 7. Managing an iOS device Part 8. Telegram bot for qBittorrent Part 9. Spotify Part 10. IVI and Netflix
Expansion of options
The features described above are already enough to use the Kodi player as a separate media platform. But these are only its “official” functions; in fact, its capabilities are much wider.
Installing a third party repository
To expand the functionality of the Kodi player, you will need to perform several complex steps.
You need to install a repository, which is a more serious analogue of the add-on browser:
- download this file to the device memory;
- go to “Settings” => “System” => “Add-ons”;
- enable installation from unknown sources;
- in the main menu go to the “Add-ons” section;
- select “Install from ZIP file” and add the file you just downloaded.
The repository will be installed, which you can open and a list of codecs will appear.
The repository list of extensions is installed in one file, an assembly of codecs, players, applications. Add-ons will significantly expand the player's functions.
Loading plugins
To download a plugin, just open the repository in add-ons, select it and click “Install”.
You can download the following applications in Kodi player:
- Online cinemas. IVI, OKKO, YouTube services are available. Their interface is exactly the same as that of the mobile versions.
- Players. A player in a player, that’s what you can call the ability to download programs such as OTTPlayer, VLC. Already in them you can use IPTV playlists (without the Kodi interface).
Important ! All plugins installed through third-party resources are stored in the “Add-ons” section.
When choosing utilities, it is worth adding a few words about the applications themselves and their work.
The Kodi player is not a separate platform, but just a multi-emulator for several operating systems with a stylized interface for the player. All installed modules are versions of programs on well-known platforms Android, MSDos, iOS, etc. Therefore, when you open the codec, an already known interface opens, which is found on a phone, computer or TV.