With this player you will get access to all existing IP television programs. You can download the best-of-its-kind tool for monitoring online content IPTV Player at the very bottom of this page, but for now let’s look at all the features of the application.
Each of the channels here is configured individually, and you can record the broadcast on your hard drive. JTV format channels are also supported. The program interface is made in Russian, it won’t be difficult to understand, especially if you read our instructions to the end. A good quality of IP-TV Player is the ability to watch video from a secure SHTTP channel.
The developers have equipped the software with support for TV tuners via WDM. This support is not complete yet, but this will be fixed in the future. You will also work with IP-TV Player through the keyboard; this makes the process easier, albeit with the proper skill. Let’s not talk in general terms for long and move on to a detailed description of the program...
Program overview
As soon as the smart TV program is launched for the first time, you will see a small window with a drop-down menu in which you can select one of the IP-TV providers. There is also the ability to manually enter the playlist address in M3U format.
After we select a channel, the main window will open with a list of available programs.
As you can see, the main window of the program consists of a viewing area, a list of available channels and a lower control panel. If you right-click on the viewing area, a context menu will appear in which you can: expand the picture to full screen, display it on a second monitor, start surfing channels and turn off the playlist. There are also some settings, for example, “Video window size”, “Management”, “TV program”, “Scheduler” and “Settings”.
The bottom panel contains standard keys: play, stop, record, open a file and adjust the sound. On the right side there are screenshot buttons, a settings key, TV guide, channel list and a navigation button to switch to the previous and next channels.
When we click the “Record/Stop Recording” button, the process will begin. At the same time, we see the recording time and the size of the output file.
After clicking on the red circle again, the recording will stop and the file will be available for viewing.
In order to open what was recorded on your hard drive or SSD drive, click on the button with the image of a folder next to the write button. You will see the directory and its path.
Creating screenshots works in the same way, just click on the camera icon and see an image thumbnail in the upper left corner, it confirms the creation of a screenshot.
In order not to miss your favorite show, IP-TV Player has a program. You can call it with a button with a picture of a clock, and turn it off with it.
If desired, the channel list can be disabled so that it does not take up useful space in the program. This is done with the button indicated in the screenshot.
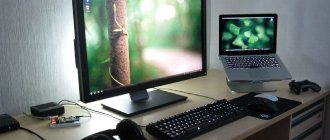
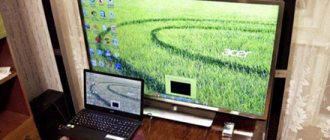
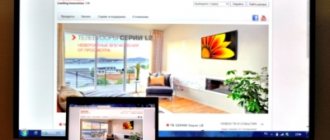
Media center with IPTV from laptop and monitor
The idea of making a home multimedia system has been around for quite some time. The prerequisite for its creation was getting rid of a large system unit and installing a laptop with a connected monitor at the workplace. The first implementation option that did not start was a media server from an unused Android smartphone. This idea ran into hardware limitations (weak Wi-Fi module, small amount of built-in memory, slow reading/writing of files via OTG) and software (lack of stable “server” software for the Android system). Afterwards, the workplace was reorganized and there was nowhere to put the monitor. Then it was possible to stop, recycle, take the monitor to the dacha, connect the TV hanging above the computer to the VGA port, and move the window with the movie running on the computer for everyone to see, but a 20″ monitor, 16:9 format, with a resolution of 1600×900 is preferable than a 15″ TV, 4:3 format, with a resolution of 1024×768. Having replaced the TV with a monitor, one could have stopped, but the TV was controlled by a remote control and it was used by household members who, with a computer, were like, “Oh, what is this?”
If you are interested in the idea, welcome to cat. Note:
Initially, the project involved using an old netbook from which the display could be removed. Fortunately, it turned out to have insufficient memory for a multimedia device, only 160 GB, and the laptop has a 500 GB hard drive. It was possible to swap the hard drives, but this did not seem like the best idea.
For convenience, in addition, it was necessary to purchase an IR receiver with a remote control for the PC. Based on numerous reviews and feedback, I decided on Microsoft MCE Remote. Buying one in Russia, even in Moscow, turned out to be not such an easy task. There were none left for sale anywhere, and where they once were there was a price tag close to 3,000 rubles. The necessary models were found on eBay, starting from 700 rubles for an IR receiver and remote control, but it would have taken about a month to wait. In the very first Internet flea market from TV advertising in Moscow, the only option was found, from Lenovo, suspiciously reminiscent of the Philips SRM5100/10 model, due to the lack of a choice of operating modes. Interestingly, the same remote control (without selecting operating modes) is included with ASUS EeeBox PC, but ASUS uses three AAA batteries instead of two. The price turned out to be quite affordable, 300 rubles. I managed to pick it up on time, snatching it in front of the person who asked to send it from Moscow to St. Petersburg by mail (if you are reading this, a person from St. Petersburg, then please excuse me). My location turned out to be more advantageous; the journey from the house to the seller took 20 minutes. As a surprise, I saw two remote controls, one of which turned out to be unused.
When finishing the hardware, you can add a cool USB hub, because the laptop has only 3 USB ports, one of which is USB 3.0, used to connect flash drives, and you need to connect a printer, scanner, IR receiver and mouse.
Full list of hardware used:
- Laptop ASUS K46CM;
- Monitor ASUS VE208N;
- IR receiver Lenovo eHome OVU430006/01;
- Lenovo MCE Remote RC1974511/00;
- USB hub CBR CH 165;
- Logitech M185 mouse;
- Router D-Link DIR-615.
Software implementation
The operating system installed on the laptop is Windows 8.1 with WMC, which makes you think of using Windows Media Center as a shell, but WMC is not omnivorous;
The interface also seemed overloaded. Without thinking for a long time, I chose XBMC, since the name was well-known and I had tried to install it before, but then I couldn’t figure out how to use the media center. XBMC is free, open source, and cross-platform. We install XBMC. After installation, the remote control is immediately supported, but the launch is performed on the main screen of the laptop. The standard interface language is English. We do the initial setup.
To change the language go to:
System > Appearance > International > Language
To output to a second monitor:
System > System > Video Output > Display Mode > select Full Screen #2
The disadvantages of standard remote control control immediately become visible:
- If the XBMC window is not in focus, then XBMC cannot be controlled;
- If the XBMC window is not in focus, control is transferred to Windows;
- You cannot launch XBMC from the remote;
- Insufficient control settings, for example, you cannot call the context menu;
- It is not possible to independently configure the remote control buttons to trigger an event in the player.
Also, we need a solution on how to control turning on/off the monitor from the remote control, while simultaneously turning on XBMC.
The starting point for the search was the article “How to turn a home computer into a two-in-one - home theater + personal computer,” which uses MediaPortal, which contains the standard Require focus setting. To solve the problem of transferring control to Windows, the author manually edited the registry.
In the process, it was found how to assign the launch of an application to the green button of the remote control with the Windows icon without third-party programs. The bottom line is that we set up a quick launch of the program for some key combination, and add the code for this key combination to the green button. You can read more in the topic “Reassigning MSRemote buttons and starting XBMC with the “GREEN” button” on XBMC Russia.
Another search led to two articles on how to completely (without a blinking diode) turn off the monitor using software methods. Articles on Habré, for different OS:
- For Linux;
- For Windows;
This method is not compatible with all monitors.
In my case it didn't work either. As a result, it was possible to turn the monitor on/off using standard Windows tools. It is enough to switch the operating modes of the two displays “Extended” and “Computer screen only”. To switch via the command line, use the DisplaySwitch.exe utility, with the /extend or /internal launch keys, for the “Extended” and “Computer screen only” modes, respectively.
%windir%\System32\DisplaySwitch.exe /extend %windir%\System32\DisplaySwitch.exe /internal At this stage it is still not clear how you can:
- Control XBMC when the window is not in focus;
- Configure the remote control buttons yourself;
- How to switch display modes from the remote control.
On the Internet, IR Server Suite and EventGhost programs were most often offered for setting up computer control from the remote control.
After installing IR Server Suite, it turned out to be too cluttered, so I chose EventGhost because of its simplicity. EventGhost lost support on Windows Vista, but it worked fine on Windows 8.1. The main thing is to run this program only as an administrator, since the application was last updated back in 2009, it does not provide for automatic launch as an administrator. Let's go through the setup for managing XBMC. EventGhost main window:
To create a new method of operation, you need to create a new configuration:
File > New
Let's add a plugin to support MCE Remote:
Configuration > Add Plugin… > from the Remote Receiver folder select Microsoft MCE Remote
There is also a Vista/Win7 version that runs this plugin as a Windows service, but I had no luck with it. In the plugin settings, check the box Disable HID service for this remote (recommended)
, which
removes
the CodeSetNum
X HKEY_LOCAL_MACHINE\SYSTEM\CurrentControlSet\Services\HidIr\Remotes\745a17a0-74d3-11d0-b6fe-00a0c90f57da , where
X
is an integer.
The configuration must be saved:
File > Save
The created configuration will be used until you specify another one.
To apply changes in the registry, restart the computer. The Windows remote control no longer works. One interesting thing that remains is that the computer can be woken up from sleep mode using the On/Off button on the remote control. In theory, it is possible to turn on the computer from the remote control. Google: Turn on the computer using the remote control.
Run EventGhost as administrator. Let's add a plugin for managing XBMC.
Configuration > Add Plugin… > from the Program Control folder select XBMC2
From the plugin settings, it is clear that, by intercepting the signal from the remote control buttons, EventGhost sends a command to XBMC. Therefore, let's go to the XBMC settings.
System > Settings > Services > Remote management > check the Allow programs on this system to manage XBMC
Next, we finish setting up the XBCM2 plugin and in the EventGhost window, we create a folder with the same name as the plugin. The folder and subfolders list control commands that can be passed to XBMC. I configured the /XBMC2/Buttons/Remote/
. It contains macros for buttons that may be on the remote control. To assign a remote control button to execute a macro, you need to drag an event onto the macro. An event is dragged from the program log, and it appears in the log after pressing a button on the remote control, or even when something happens in the system. Thus, we click the buttons and assign them to the desired event.
All that remains is to find the following:
- Launch XBMC from the remote control;
- Switching display modes from the remote control.
Switching display modes, which will ultimately look like turning the monitor on/off, is most logical by setting the On/Off button on the remote control.
This can also be linked to the startup/shutdown of XBMC, since XBMC will not need to be output to the laptop's main display. To automate switching screen modes, let’s create two *.bat files in advance:
Computer.bat:
taskkill /im XBMC.exe %windir%\System32\DisplaySwitch.exe /internal To switch to the computer where we first terminate the XBMC.exe process so that XBMC does not jump to the internal display.
Media.bat:
%windir%\System32\DisplaySwitch.exe /extend To switch to extended mode.
Let's create our own macro:
Configuration > Add Macro... > Window > Find a window > select XBMC
This event will check whether XBMC is open on our system. To enable a macro in the Find a windows setting, there should be a checkbox at the top called Stop macro if target is found (if we have an XBMC window running, it does not need to be turned on again).
The regular tool from EventGhost, called Start Application, does not have the ability to run *.bat files, so you need to add Python script execution to the created macro. Let's select the macro we created and proceed further:
Configuration > Add Action… > EventGhost > Python Script
The contents of the script to turn on the monitor and start XBMC are as follows: import os import time os.system('C:\Media.bat') time.sleep(2) os.startfile(r'C:\Program Files (x86)\XBMC\ XBMC.exe') I.e.
we launch the *.bat file, wait 2 seconds until the display mode switches so that XBMC starts on the second screen and launch XBMC.exe In the image and likeness of the previous macro, create a new one to turn off the external monitor and XBMC In Find a window you need to put check the Stop macro if target is not found checkbox, and Python Script to turn it off:
import os os.system("C:\Computer.bat") In both created macros you need to move the event that occurs when you press the On/Off button on the remote control.
Using command line scripts has a small drawback: when the script is executed, the cmd window blinks. You can avoid this by writing a program that executes the script code on your behalf.
As a result, we should get something like this view of the EventGhost window:
When using the functionality created by EventGhost, a problem arose that XBMC starts out of focus and the taskbar is always lit on top of the media center.
In this regard, I made the window move ahead of all the others, using the familiar Find a window function, with the Stop macro if target is not found checkbox. I hung a green “Start” button on this on the remote control, together with going to the main menu, when controlling XBMC. I won’t go into detail about creating the macro; I’m attaching a screenshot:
On the colored buttons of the remote control, in the bottom row, I hung the following events:
The result is the final EventGhost configuration:
Let's save:
File > Save
To configure the system, all that remains is to automate the launch of EventGhost at system startup.
The only solution that worked was to enable the built-in Administrator account and run the cmd script from startup. Win+R:
lusrmgr.msc
Users > right click on Administrator > uncheck Disable account
Login to the Administrator account and set a strong password.
. We log out of the account.
Using any text editor that can save in DOS-866 encoding, create a *.bat file with the following content:
runas /savecred /user:Administrator “C:\Program Files (x86)\EventGhost\EventGhost.exe -h” That is, run, saving the password, as administrator, the EventGhost program, with the -h switch (run in trey). Be sure to save in DOS-866 if you did not change the encoding on the command line.
Turn off EventGhost, run the resulting script, enter the password. Place the script in startup:
Win+R:
shell:Startup The path
C:\Users\%user%\AppData\Roaming\Microsoft\Windows\Start Menu\Programs\Startup will
, to which we will move the resulting script. When %user% logs in, EventGhost is automatically launched with full rights. When using other startup methods, full access was not transferred, including through the Task Scheduler.
Now turning on the computer will greet us with a blinking command line window, which will notify us that EventGhost has started.
In terms of startup, IR Server Suite would be better, since it runs as a Windows service, but I didn’t really want to deal with its settings when EventGhost started working for me.
For more complete remote control from the remote control, you need to make some Windows settings in the power options:
- %power plan% > Require password on wakeup > No;
- USB Settings > Temporarily disable USB port option > Disabled;
- Power buttons and lid > Close lid action > No action required;
- Power Buttons and Cover > Power Button Action > Sleep.
We reboot the computer (using the remote control button, of course), check the operation of everything that we have configured and configure XBMC to our liking. For example, I enabled full UPnP support so that I could access my home media library from my smartphone or, conversely, run a media file from my smartphone in XBMC.
System > Services > UPnP > put a dot next to each menu item
Let's add the promised IPTV. First, let's download the PVR IPTV Simple plugin for XBMC. GitHub page, .
Install the add-on in XBMC:
System > Add-ons > Install from ZIP file > select the path to the downloaded *.zip file
Let's turn on the TV:
System > TV > General > set the dot to On.
Let's follow the installation instructions:
System > TV > General > Clear PVR database
Let's set up IPTV channels:
System > Add-ons > Included add-ons > PVR IPTV Simple Client > Configure
Specify the path to the *.m3u file.
If you have a reliable online TV provider, then you can also specify the path to *.epg, which is the TV program, then you will add additional convenient functionality. The required *.m3u format is as follows: #EXTM3U tvg-shift=3 #EXTINF:-1 tvg-id=»id1″ tvg-name=»Channel_1″ tvg-logo=»logo1″ group-title=»Group 1″,Channel 1 https://STREAMURL #EXTINF:-1 tvg-id=»id2″ tvg-name=»Channel_2″ tvg-logo=»logo2″ group-title=»Group 2″,Channel 2 udp://STREAMURL … Although I ate the plugin and this one: #EXTM3U #EXTINF:0,Europa Plus TV rtmp://europaplus.cdnvideo.ru/europaplus-live/mp4:eptv_main.sdp ... The main thing is to save the *.m3u file in UTF-8 encoding so that correctly display Russian names of TV channels. We assign any convenient button on the remote control to open TV channels in EventGhost (XBMC2 > Buttons > Remote > Live TV) and by clicking on it a list of available TV channels will open.
Unfortunately, it was not possible to configure stream recording, which apparently is not supported by the plugin, since the record button is not active, unlike the other buttons.
Full list of software used:
- Operating system Windows 8.1;
- Event handler EventGhost;
- XBMC Media Center;
- Plugin for XBMC IPTV Simple;
- Text editor for editing *.m3u files.
In this article, I tried to describe in detail how, without special knowledge, using the enikey method, you can create a fairly powerful media system with IPTV from a desktop PC, with simple remote control, without losing the functionality of the computer.
IP-TV Player Settings
A small gear on the right side of the bottom panel of the program brings up settings divided into 4 categories, let's talk about how to configure IP-TV Player.
You can open a wider list of settings. By default they are hidden, to do this you need to check the box in the item: “All settings”.
Are common
Here we can overwrite the server settings and add channels that appeared when the program was first launched. To do this, click on the inscription: “Load preset from the list of providers.”
All providers you select will appear in a special list. It will be available by clicking the line “Switching between channel lists”.
The directory in which the screenshots will be saved is immediately installed. To do this, click on the icon with the image of three dots.
A number of other parameters can be configured here, including:
- audio track language;
- audio card;
- Network interface;
- cache (milliseconds).
Additionally
The additional settings menu consists of a number of parameters, let's look at them in more detail...
Boot with Windows, monitor the scheduler
This item allows you to add a program to your OS startup or scheduler.
Use GPU acceleration (if available)
If you have support for this technology, for example, NVidia CUDA, you can get a significant increase in performance. The graphics adapter will be loaded, and the processor will be freed up. The PC graphics adapter is better at processing the video stream than the CPU, which mostly deals with arithmetic operations.
Fit video to width
Using this item, you can scale the video, the video will be full screen, while some parts of it will be cut off due to the mismatch of the sides.
Show hours
If you check the checkbox next to this item, a neat clock will appear on the IP-TV Player screen.
List on the left side
If there is a checkmark, the list of channels will safely move to the left side of the screen.
List scroll bar
A convenient option that creates a scroll bar with which you can quickly scroll through a large list of channels.
Simple channel list view
The active state of this parameter makes the channel list more readable. Useless icons disappear, font and line spacing are reduced, resulting in more information fitting on one screen.
Show button in taskbar
Using this option, you can display an icon in the taskbar, by which you can always quickly call up the player.
Separate control panel
When this function is activated, the program will take the following form.
Custom interface colors
Here you can configure the main color of the IP-TV Player interface. This will not change it much, but it will still be possible to diversify the boring black style.
Demonstration mode
In this mode, as indicated in the explanation, the channels will change independently.
Allow smartphone control
This option allows you to control the player via the WEB interface.
Use OpenGL instead of DirectX/Direct3D
For those PCs that for some reason do not support the Microsoft library, or slow down when using it, there is an option to work via OpenGL.
Channel
In this section you can adjust parameters such as contrast, brightness, hue, saturation and gamma. There are also preset profiles, Deinterlace (elimination of interlacing), aspect ratio, frame cropping, monophony mode and audio track selection.
About the program
Here you are presented with information about the current version of IP-TV Player, there is a link to its official website and a reference book written in Russian.
Contacts
Official website - https://www.zelenaya.net/
The telephone number of the Green Point hotline depends on the city of connection (there is no single all-Russian one).
| City | Phone number | Office adress |
| Moscow | 7(495) 369-00-31 | No |
| Vladivostok | 7(423) 2-514-513 | st. Zhigura, 11a |
| Ufa | 7(347) 226-55-55 | October Avenue 44 |
| Belgorod | 7(4722) 777-567 | st. Shalandina, 1a. Shopping center "Leader" |
| Stavropol | 7(8652) 333-333 | st. Khetagurova, 9 |
| Neftekamsk | 7(800) 700-60-59 | Ufa, October Avenue 44 |
| Mud | 7 (47461) 41-100 | Lipetsk, st. Dovatora 2a/1 |
| Efremov | 7 | Yelets, st. Yubileinaya, 11A |
| Beloretsk | 7(800) 700-60-59 | st. Pushkina 59 |
| Kochubeevskoe | 7(86554) 2-88-88 | Nevinnomyssk, st. Lenina, 61 |
| Tomsk | 7(3822) 31-11-11 | st. Altayskaya 8/3, office 1 |
| Lipetsk | 7(4742) 243-243 | st. Dovatora 2a/1 |
| Mikhailovsk | 7(8652) 333-333 | st. Pochtovaya, 77 |
| Elista | 7(84722) 9-88-88 | 6 microdistrict, 25 |
| Tambov | 7(4752) 49-49-49 | st. International, 16, office 1 |
| Nalchik | 7(8662) 760-400 | Shogentsukov Avenue, 16. |
| Dace | 7 (4747) 900-900 | Yelets, st. Yubileinaya, 11A |
| Nevinnomyssk | 7(86554) 2-88-88 | st. Lenina, 61 |
You can contact company representatives in other ways:
- on the official forum (https://forum.zelenaya.net/).
- Order a call back on the website or from the application (available for Google Play and App Store).
- By writing to email ( [email protected] ).
- Or on social networks (Odnoklassniki, VKontakte, Facebook)
How to install IPTV Player on your computer
The IP-TV Player application is completely free, so you don’t have to look for a crack, license key or activation code. Just download the application from the link below and start installing.
- We launch the file downloaded to your computer from our website; to do this, simply find it on your PC (by default this is the “Downloads” folder) and double-click the left mouse button.
- At the beginning of the installation, you need to specify the installation path. You don't have to do this, but often you have to change the target directory. For example, if there is not enough free space. To make folder configuration options available, check the box next to “Select settings and installation folder.” Next, click on the “Browse” button and select the directory we need. Finally, click “Next”.
- At the next stage, we will be asked to install additional software. This is the Yandex panel and the start page, disable this function by placing the switch in the “Settings parameters” position and uncheck all three checkboxes from their positions. At the end, click on the virtual key with the text: “Next”.
- But that’s not all, they will try to slip us Yandex Browser again, if you don’t need it, just remove the checkbox from the “Download and install Yandex Browser” position. Finally, click on “Install”.
- The installation of the program has begun, it will take no more than one minute, we are waiting for the process to complete.
- We complete the installation by clicking on the button with the text: “Ready”.
At this point, the installation of the program is complete, and you can proceed to watching your favorite channels.
Advantages and disadvantages
The advantages of the program include:
- minimalistic interface;
- Availability of Russian language;
- completely free;
- wide functionality;
- broadcast recording;
- ability to pair with Smart TV, for example, Samsung;
- ability to control the program from a smartphone.
Unfortunately, there are also disadvantages here. Of the existing 30 channels on one provider, only 10 worked for us; for the purity of the experiment, we tried others, the situation did not change. In particular, Rostelecom, Luganet and Novotelecom failed to launch. Green Point Stavropol also did not want to work. No matter how hard we tried, there was no image. Other programs launch instantly.
[ads-pc-1]
The fact that the channel does not work depends on the program; the reason for the inoperability of TV programs lies on the side of the providers. Other TV shows launch correctly, which means the application itself has no problems
Story
She opened her first office in Tambov in 2007. Here, as in many other regional centers, there was a problem with the existing high-speed Internet access networks. Therefore, the provider built its infrastructure.
The very next year (2008) the company began expanding into the regions. The infrastructure was implemented in the cities of Yelets and Stavropol.
And in 2009, Green Dot decided to raise the bar and entered the Moscow operator market.
From 2009 to 2014, the provider began operating in cities such as Nalchik, Efremov, Nevinnomyssk, Mikhailov and Elista.
In 2015 there was a significant leap in development. The operator's networks began operating in seven major cities at once. This became possible thanks to the purchase in 2014 of part of the assets of VimpelCom (a company known to everyone under the Beeline brand, which at that time was also actively introducing wired Internet using FTTB technology in Moscow and the regions). This step allowed us to ensure a large-scale presence and save on building our own networks.
In the same 2015, the headquarters in Moscow opened its doors.
In 2021, the company increased sales volume by 35%, revenue by 25%, and active subscriber base by 18%.
In 2021, a new interactive TV platform launched.