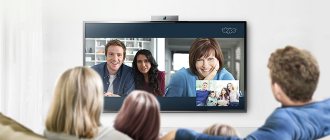
What is Kodi?
Kodi is a program for streaming media content. It is open source, meaning it is free and anyone can contribute to the project. It started life as Xbox Media Center (XBMC) before becoming Kodi in 2014.
The original developers still maintain Kodi, and there is a large community of developers involved in the project.
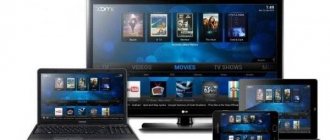
Kodi is currently available for Windows, Mac, Linux, Android, iOS and Raspberry Pi. The source code is open to everyone, so there are also ways to install Kodi on other devices, such as the Amazon Fire TV Stick or Smart TV.
Launch Kodi
Now that Kodi is installed on your Ubuntu system, you can launch it either from the command line by typing kodi or by clicking the Kodi icon (Activities -> Kodi):
When you launch Kodi for the first time, the following window will appear:
From here, you can start customizing your Kodi instance by installing new add-ons and adding media libraries.
To exit Kodi, click the "turn off" button in the top left or press CTRL+END .
How does Kodi work?
Kodi can play almost any type of media and has an interface very similar to a Smart TV. The Service does not provide any proprietary media. Instead, it relies on locally stored files or sources from the Internet.
If you already have a media collection stored locally on your hard drive, you can use Kodi to organize it. In addition, you can watch content from various online services.
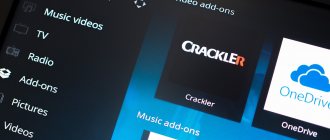
Kodi uses add-ons that bundle the software with various services. The official Kodi repository contains add-ons for services such as BBC iPlayer, Crackle, SoundCloud, Bravo and The Disney Channel. Along with the official repo, you can install other repositories collected by Kodi users containing custom additions and alternative content.
Kodi Setup: Initial Media Center Configuration
Previously, I have already devoted a lot of material to the Kodi media center, now it’s time to talk in more detail about the initial setup of this media shell, since I receive a lot of emails with questions about it. As you already know, there are versions of Kodi for various platforms, but I will tell you how to set up a media center on Windows OS.
1Shell system settings
Initial Kodi setup
1 of 2
First, activate the Russian language in the “System | Settings | Appearance | International | Language", select Russian from the list, then in the "Language and Region" section, set the required region and keyboard layout. Next, in the system menu section “Settings | System”, change the settings in the “Video Output” and “Sound Output” tabs according to your computer configuration. For example, choose a 5.1 sound scheme and a display resolution of 1920x1080p.
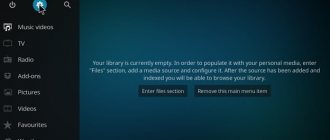
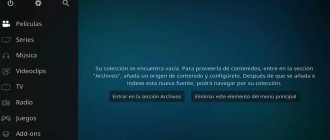
2Adding files to the library
To add your movie collection to your Kodi library, go to the “Video | Files | Add video" and click on the "Browse" button to select the folder directory with video files on your computer or home server (NAS). To connect two or more file sources, click the “Add” button and select a local folder or network device. The last step is to set a name for the file directory and click OK to move to the next step.
3Create a catalog classified by data type
Now we have to get data about our files uploaded to the media library, be it music or video. Kodi has several services (including Kinopoisk) for downloading our media library metadata. You can set the source content type in the menu: movies, TV series, etc., so that the plugin used in Kodi can get all the data about the files in the directory from the Internet. If your files are located in folders whose names correspond to the names of films, select the appropriate item additionally. It is worth noting that when using the Kinopoisk plugin to download metadata, you must specify the file name in any language with the year in brackets (for example, Molodost (2015) ). Also, do not forget to change the file metadata language to “ru” in the settings.
4Managing your media library
You can access the catalog of your video files in the “Video | Files | [File name in the library]”, or go to the required category on the home screen (Movies, TV series). By default, you get information about a movie by right-clicking on an entry and selecting this item. An additional way to navigate is by using the drop-down menu on the left side of the screen, where you can configure the “View” so that Kodi shows the information directly, without a context menu.
5How to set up IPTV in Kodi
Go to the “SYSTEM-Settings” menu and select the section - TV. Then in the “General” menu, activate the TV function - select “On”, make it active and when a warning appears that there are no active PVR managers, click OK. After we clicked "OK", you will be redirected to the page with add-ons - PVR clients. Select the PVR IPTV Simple Client add-on: then click enable and configure.
In the settings menu of the PVR IPTV Simple Client add-on, you need to configure the first and second fields. In the “Location” field, indicate the location where the iptv playlist is stored - a remote path (stored on the Internet, suitable for self-updating playlists) or select a local path (the playlist can also be located on the local network), you can select the playlist that you saved on your computer or tablet, phone when using Kodi on Android devices.
The second field is the path to the .m3u file or playlist. After all fields are filled in, click OK. Exit to the main menu and restart Kodi for the changes to take effect. After the restart, the TV item appears in the main menu of the player; when you go into it, you will see a list of iptv channels from the downloaded m3u playlist. Select the required channel to check playback. Ready!
6Play torrents in Kodi without waiting for download
To play videos from Bittorent peer-to-peer networks in Kodi without waiting for the full download and to manage torrent client downloads, I recommend the Torrenter v2 plugin. The plugin supports search across all popular trackers: RuTracker, NNM-club, RuTor, etc.
The Torrenter plugin supports Windows 7, 8.1 and 10, and can work on Raspberry Pi and Raspberry Pi 2 mini-computers. Plus, the plugin supports mobile devices running Android OS. The plugin has been tested on Kodi version: 14/15.
Screenshots of the plugin interface
1 of 3
To install the plugin, use the following repositories: MyShows.me Kodi Repo or XBMC.ru search db. You can install the XBMC.ru search db repository and in the future the repositories of many plugin developers will be available in the Kodi media center. After installing the repository, in the Kodi menu, do the following: “System | Settings | Add-ons | Download add-ons | XBMC.ru search db | Add-ons repository." Select MyShows.me Kodi Repo and click “Install” in the window that opens. Set search engines for the trackers you use in the “Video | Video extras | Torrent | Search Control Window | Install trackers." In the window that opens, click on the required trackers and then “Install”. This completes the installation of the repository, now you can open Torrenter and start searching for files.
List of plugin functions for playing torrents:
- integration with the uTorrent torrent client;
- ability to select trackers;
- preliminary download and automatic playback of the next episode;
- lists of films and TV series with metadata from TheMovieDB.org, TheTVDB.com and Kinopoisk.ru;
- search history.
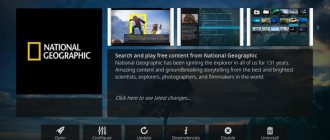
The functionality of the Kodi media center is easily expanded with numerous add-ons (YouTube, media libraries, Internet radio, etc.). I recommend paying attention to the Watchdog plugin, which automatically scans your media collection for changes every time you launch it. You will find this add-on under “System | Add-ons | Install from repository | Services".
7Kodi and setting up a DLNA network
Kodi supports DLNA networking (supports external UPnP/DLNA devices):
- act as a DLNA client - receive and play content from other devices (UPnP/DLNA), add devices to Kodi UPnP/DLNA for playing videos from the library;
- act as a DLNA server - provide the ability to play content from Kodi to other devices on the DLNA network;
- the ability to share your media library with other UPnP and DLNA devices;
- ability to manage UPnP/DLNA devices.
By setting up UPnP/DLNA in Kodi, you can share your media library with any DLNA device on your home network.
How to add UPnP/DLNA devices to Kodi
Open Kodi's media center and go to the Videos section, click Files, and then Add Video.
How to share your Kodi media library with devices on a DLNA network
Go to the “System” section, click “Services” to share your media library.
Is Kodi legal?
Kodi is just a media player and as such it is completely legal. The platform has a bad reputation for piracy, but this has nothing to do with Kodi itself.
Some repositories and add-ons provide access to sources of information that may have been downloaded illegally. Others may break region locks or provide live TV services that require a subscription fee to legally view.
Using the official set of addons provided in the Kodi repository should protect you from accidental piracy. You're unlikely to break the law without trying, but it's important to know what you can and can't observe in your area.
Alternatively, many users choose to use a VPN to mask their location to specifically bypass regional content blocks. Just like the Kodi service, VPNs are not illegal to use unless you intentionally use them to break the law.
In short, Kodi is as legal as you come. You decide what it plays and are responsible for its legality. You have been warned.
There are so many Kodi video settings!
Yes this is correct; however, with so many Kodi video settings, it's easy to customize and tailor your Kodi experience in a way that you'll love and enjoy. This is very important, especially with so many content options like the 10 best IPTV add-ons for Kodi, and it certainly helps to have a smooth browsing experience. By knowing these and other settings, relevant content, and suitable ways to control your HTPC, such as a wireless HTPC keyboard or applications such as Kore, the official XBMC/Kodi remote, you are sure to have a great time in your home. living room.
Recording source: https://www.smarthomebeginner.com
How to get Kodi
Since Kodi is open source, you can download and use it for free. In most cases, installation is a simple process. Kodi will work on many platforms, but is happiest on Windows, Mac, Linux, and Android.
Since the software will work on so many platforms, it's worth spending some time thinking about what you want to use Kodi for. At home, dedicating an old computer or Raspberry Pi to Kodi can be a permanent addition to your current TV setup. Plus, if you're always on the go, Kodi is best suited for your smartphone or tablet.
Russification of Kodi
Next, you can Russify Kodi for a better understanding of its functions. To do this, go to settings, then to “Interface”:
Next, in the “Regional” item, and then in the “Language” field, select Russian from the drop-down list:
After which you can proceed to the remaining settings, which we will configure more comfortably in your native language.
Using Kodi on your computer
Installing Kodi on Windows is a simple process. The download page gives you the option to use the Windows Store or download the offline installer. One of the benefits of Windows Store products is that they update automatically.
For Mac users, Kodi provides an installer. Installation is a bit more complicated than Windows and it's worth following the guide showing how to install Kodi on macOS
Kodi for Mac: How to install Kodi on macOS
Kodi for Mac: How to Install Kodi on macOS If you have an old Mac that you no longer use, Kodi is a great way to breathe new life into old hardware. Here's how to install Kodi on Mac. Read more,
Linux users can download Kodi from the official website or install via terminal. There is also a dedicated Linux distribution called Kodibuntu. This can take any spare computer and turn it into a dedicated Kodi-based HTPC for media streaming.
Download : Kodi for Windows | Mac | Linux (free)
Create multiple users on Kodi
If there are several of you who are going to use Kodi at home, each of you may want to organize your content differently. To do this, just create several user profiles on Kodi:
- Enter MENU settings (gear) .
- Click the "Profiles" section and enter "Profiles" again.
- To create a new user, you just need to click on “Add Profile” and customize it with the permissions, name or image you prefer.
To avoid confusion, you can force Kodi to show you the profile selection screen every time it launches. This can be done in the “General” menu in the “Profiles” section.
Using Kodi on Android and iOS
Kodi is also available on Android and iOS, but the installation process varies greatly depending on the platform.
For Android users it's easy. Kodi is available on the Google Play Store. For most users, installing it, like any other application, is the most convenient way. If your device doesn't have access to the Play Store, the APK can also be downloaded from the Kodi download page.
If you're using iOS, things aren't that simple. Kodi is available, but you will need to install it yourself. This is easier to do if you have a jailbroken device, but there are ways to install Kodi without jailbreaking your iPad or iPhone.
Download : Kodi for Android | iOS (free)
In the new version:
- Fixes a serious security issue in gnutls (Linux)
- Other important library/compatibility updates
- Gets a client/server on MariaDB 10.5.4 running on Android
- Fixed video database access for Ubuntu 20.04 (search and other filtering failed)
- Fixes processing of subtitles from archives
- Fixes CDDB access
- Makes minor improvements to logging and memory display/mapping
- Fixed EDL where skip points are at the very beginning of the file
- Contains code improvements to fix certain events, such as race conditions in EPGs or "pause" at the end of streams on Android
- Enables alpha blending for video player (Windows)
- Handles certain exceptions better (mostly Android)
You can see more about the changes on the official page .
To install of Kodi on Ubuntu / Linux Mint , you need to open a terminal (Ctrl+Alt+T), and type or copy the commands:
sudo add-apt-repository ppa:team-xbmc/ppa sudo apt-get update sudo apt-get install kodi
That's all, we find the media player in the application menu and we can view movies, photos and listen to music on our computer.
After installation, launch Kodi, and first change the interface language to Russian.
To do this, click on the gear and see this menu.
Go to “Interface” -> “Regional” -> “Language” and change the language to Russian.
Using Kodi on Raspberry Pi
Raspberry Pi is the ideal device to run Kodi. Small, cheap and low power, it can be attached to any screen. Although it has a reputation as a hobby computer for home electronics, using the Pi for Kodi is quite simple.
There are three standalone operating systems configured to use Kodi on the Pi, or you can install Kodi on the Pi along with other software. All of these options are covered in our guide to turning your Raspberry Pi into a home media center.
Install Kodi to turn your Raspberry Pi into a home media center
Install Kodi to turn your Raspberry Pi into a home media center If you have a Raspberry Pi, you can turn it into a cheap but effective home media center simply by installing Kodi. Read more,
Using Kodi on Amazon Fire TV Stick
The Amazon Fire TV Stick already provides access to a variety of streaming services. Despite this, it is not nearly as versatile as Kodi. Luckily, installing Kodi on Amazon Fire TV Stick is not only possible, but also quite simple.
As with any other method, you'll need to make sure what you're watching is legal, and even then it's worth using a VPN. This and three installation methods are covered in our guide, which details how to install Kodi on Amazon Fire TV Stick.
How to Install Kodi on Amazon Fire Stick
How to Install Kodi on Amazon Fire Stick In this article, we will tell you how to install Kodi on Fire TV Stick. It's surprisingly easy, with several methods. Read more,
All in one with Kodi
As we have already mentioned in other articles, this application for our smart TV is truly universal, since in it we can not only create a multimedia center for watching TV series and movies, but also install applications through add-ons (extensions) to do many cool things .
Therefore we can add applications such as YouTube, Twitch or Google Drive, for example, to Kodi. You might be looking for the point of doing this since you can do it from your own Smart TV. The advantage of this is that what Kodi has is the ability to install applications from the Android operating system and run them without leaving it. Even if it is not compatible with this "internal" playback, Kodi itself will force the specified application to open on the Smart TV.
Remember that to install these add-ons you must follow these steps:
- In Kodi's side menu, scroll down to the Add-ons section. In this new menu we will have access to all the information about these extensions.
- In the new sidebar, you will need to navigate to the open window icon. Then click on it.
- In the new menu that we have opened, we will have to select the "Search" option to, as the name suggests, open the add-on search engine.
- Type the name YouTube and click OK to have Kodi show you all the add-ons related to your search.
- Select one, click on it to access it, and then click Install to make it part of your installed add-ons.
This is the procedure you must follow to install extensions whose names you know. However, if you want to do some research into all the possible options that Kodi offers , you will have to:
- Inside the Add-ons menu, instead of going up to the box icon, you should go down to the Download section and click on it.
- Once here, all possible categories of these extensions will be shown. For example, click "Video Add-ons" to learn about alternatives on that topic.
In this list we find add-ons that allow us to enjoy video content in different ways : series, movies, TV shows, etc. You are solely responsible for each person's use . In this article, we do not encourage the use of those Kodi extensions that may violate image rights or piracy.