Every set-top box owner asks the question “How to set up a Kodi player on Android TV Box?” It’s worth starting with the fact that Kodi is a home theater for playing various films, TV series, clips and other content. It is used by many Android Box users. The application has a simple interface. Combines a media center, utilities for listening to music, viewing images and much more. A distinctive feature of the application is its compatibility with most TVs. We offer detailed instructions for connecting and configuring the software. Follow the tips to get results.
What is Kodi for Android consoles?
The Kodi program provides the client with the opportunity to organize viewing of media content on Android TV. To do this you will need to connect to the Internet. Use mobile internet or home Wi-Fi. At this point, the player has improved significantly. It is now available on Windows, Android and IOS. The advantage of the software is extensions. In professional language - addons. It is possible to download from directly in the program. A common addition is Phoenix. With it, you can watch various television films, series, shows and sitcoms.
Installing Kodi on Android TV
Setting up Kodi media player on Android TV Box is not easy. Now it is possible to download the program from the official Google Play store. This requires:
- Launch the app store.
- To find software, use the search bar. Using the text layout, enter the word “Kody”. Next, click on the “Find” button.
- Wait for the complete installation. The download will take a few minutes. The download speed depends on your home Internet connection. Use WI-FI to quickly download.
How to connect a universal remote control to a Samsung TV: codes, instructions
Can't find Kodi on Google Play?
Also use the manual method. This requires more time. This is due to the fact that Android does not have the Chrome browser. Steps to follow:
- download the Puffin TV and File Commander program from the Google Play electronic store;
- install Puffin TV and click on the corresponding line in the popular applications category;
- Click on the “Kodi Download” button.
- next to the Android icon, click on the ARMV8A button (64);
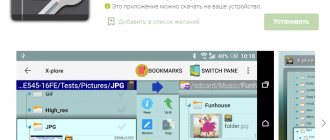
- open the “Downloads” folder on your personal computer;
- turn on the File Commander program;
- find the “Downloads” line and click on it, then select the downloaded file;
- after opening, confirm the conditions;
- activate the setting and move the slider to the other side.
Lyrical digression
I've been using KODI as a media center for over a year now.
It all started with some basic things, but even with such functionality I was completely delighted. Watching TV, movies and series now doesn’t look like some kind of quest, and all my family also fell in love with KODI, and I can’t even imagine how they could cope without it before. But I became more and more immersed in its capabilities and gradually increased its functionality. I implemented seemingly simple things, but if you put all the small details together, you understand how comfortable, logical and thoughtful everything is, and most importantly, functional. This is exactly the assessment I give to the entire final result. For some, this will not be the case at all, of course, because everyone has “their own markers.” But after the first publications, I received a lot of positive feedback from the audience and guests of the hub, and I realized that my experience was useful to someone. It's nice. Therefore, I want to continue.
If you missed previous publications, be sure to take a look at them, perhaps there will be something interesting for you. In a nutshell, we installed and configured the OS and KODI from scratch, set up viewing torrent content, YouTube, IPTV. We talked about control from other devices, backup, traffic analysis, and even taught KODI how to run retro games.
KODI: putting together a convenient and functional media center for the home
Unfortunately, the volume of one publication on Habré is limited, so everything that I would like to share cannot be fit into one post. Divided into several parts... In previous and subsequent publications, many other “goodies” were discussed. If you missed it, be sure to check it out... Part 1 . Hardware, OS preparation, basic server setup and Kodi Part 2 . YouTube, qBittorrent, Yatse and Kore management, VnStat traffic accounting Part 3 . Retro games Part 4 . IPTV Archive Part 5 . Yandex.Music Part 6. MariaDB and media library synchronization Part 7. Managing an iOS device Part 8. Telegram bot for qBittorrent Part 9. Spotify Part 10. IVI and Netflix
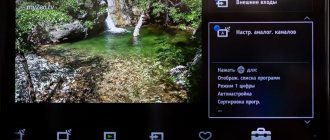
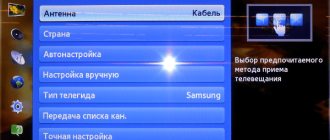
Setting up Russian language
The original program is in English. To change the layout you will need:
- launch the “Settings” folder and click on the “Screw” icon;
- go to the Interface - Regional section, next to Language select English;
- select the Russian layout and confirm the action.
Now the application works in Russian. Reboot your device and reactivate. Enter your parameters to get started.
If you have any questions or complaints, please let us know
Ask a Question
Installing repositories and add-ons
Many users prefer addons. To add content, add tabs to external media. Use a flash drive or micro-SD:
- connect the device with the parameters to Android TV;
- launch the USB flash drive, the “Files” line and the “Films” tab;
- open the “Add-ons” folder, click on the box icon located in the upper corner of the screen;
- activate the option “Install from spare parts document”;
- select a specific addon from the list.
Another method is to enter the address of the online page where the files are located. With this option, loading and transferring are not performed. The final stage is to install the software from the downloaded repository.
Preparing the server part. MariaDB
After reading the Wiki on the official KODI website, I decided that everything was quite simple and clear - just take it and do it. But in practice, everything turned out differently - the database is not filled with my media library, errors in the logs are incomprehensible or there are no records at all, which makes it quite difficult to understand what was done wrong. There is no point in connecting a second device to the database - there is nothing to synchronize.
In the comments to the previous publication, this issue was raised and @vyacheslavteplyakov made it clear that the Wiki is not updated and the information is probably out of date. But he also pointed out the main pitfalls and how to get around them.
Peculiarities:
- Use MariaDB;
- The media library must be located in a network directory;
- All paths to the media library on all devices must be absolute;
- Network directories - NFS or SMB, if you are forced to use NTFS, then only with authorization using an account with a password;
- The KODI versions on all devices must be the same.
We’ve sorted out the task and pitfalls – let’s get to work. Let me remind you that our server will be KODI on a nettop with Kubuntu 20.04.
Installing the MariaDB server
sudo apt update sudo apt install mariadb-server
The next step is to run the built-in security script. This script changes a number of the least secure default options for features such as remote root login and test users.
Running the security script
sudo mysql_secure_installation
A series of dialogs will open where you can make some changes to the security settings of your MariaDB installation. Set the parameters based on your own safety. Considering that my database will only be filled with a media library and it is located on an isolated home network, I did this:
[email protected] :/# sudo mysql_secure_installation NOTE: RUNNING ALL PARTS OF THIS SCRIPT IS RECOMMENDED FOR ALL MariaDB SERVERS IN PRODUCTION USE! PLEASE READ EACH STEP CAREFULLY! In order to log into MariaDB to secure it, we'll need the current password for the root user. If you've just installed MariaDB, and you haven't set the root password yet, the password will be blank, so you should just press enter here. Enter current password for root (enter for none):
We leave the root user without a password. Do not enter anything, press ENTER.
Setting the root password ensures that nobody can log into the MariaDB root user without the proper authorization. Set root password? [Y/n]
Reject ( N ).
By default, a MariaDB installation has an anonymous user, allowing anyone to log into MariaDB without having to have a user account created for them. This is intended only for testing, and to make the installation go a bit smoother. You should remove them before moving into a production environment. Remove anonymous users? [Y/n]
Remove anonymous users ( Y ).
Normally, root should only be allowed to connect from 'localhost'. This ensures that someone cannot guess at the root password from the network. Disallow root login remotely? [Y/n]
Let's leave the possibility of remote connection for the root user. Reject ( N ).
By default, MariaDB comes with a database named 'test' that anyone can access. This is also intended only for testing, and should be removed before moving into a production environment. Remove test database and access to it? [Y/n]
We delete the test database, it is of no use to us ( Y ).
Reloading the privilege tables will ensure that all changes made so far will take effect immediately. Reload privilege tables now? [Y/n]
We update the privilege table. We agree ( Y ).
Now let’s create a user from which our media centers will work with the database. To create a kodi with a kodi , launch the MariaDB shell and run the command
sudo mariadb GRANT ALL ON *.* TO 'kodi'@'localhost' IDENTIFIED BY 'kodi' WITH GRANT OPTION;
We allow access from any host to all databases on the server for the kodi
GRANT ALL PRIVILEGES ON *.* TO [email protected] '%' IDENTIFIED BY 'kodi';
Clearing privileges so they are saved and available in the current session
FLUSH PRIVILEGES;
The MariaDB shell can be closed by running the command
exit
To organize access outside the local host, you must specify port 3306 and bind-address 0.0.0.0 . Open the MariaDB configuration file
sudo mcedit /etc/mysql/mariadb.conf.d/50-server.cnf
Uncomment a parameter
port = 3306
Set bind-address parameter 0.0.0.0 (instead of 127.0.0.1)
bind-address = 0.0.0.0
To apply the changes, restart the MySQL server
sudo service mysql restart
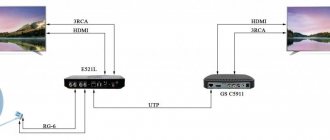
At this stage, we can check whether we did everything correctly. To do this, it is best to connect to our server from a third-party machine. This guarantees that access to the database outside the local host will work.
Alternatively, you can use MySQL Workbench.
Create a new connection:
Connection Method - Standard (TCP/IP) Hostname - 192.168.0.50 (replace with your server address) Port - 3306 Username - kodi (username if you created your own)
Click “Test Connection”, enter the password and if everything is correct, we receive the corresponding message:
The connection to the server should also be successful. You should see "nothing". This is also a good sign. The MariaDB server setup is complete, now we will start populating the database with our media library.
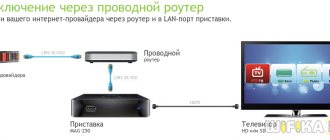
How to set up IPTV?
To set up IPTV use the steps:
- in the TV line, open the browser and go to the “Clients” folder;
How to install Yandex browser on Android TV: methods, instructions
- look for a plugin called PVR IPTV Simple Client;
- then launch the short menu, set the parameters according to the image;
- select the option to mp3 files, but download them first.
Simple tips will help resolve this issue. Follow the steps according to the images in the instructions.
Application features
After downloading media content to the device, the program will provide additional data about the film or series. At the same time, they import it from the official website. The user will be able to view the trailer for the film, a detailed description of the film, information about the director and cast. Just click on the line with the actor and his filmography will appear on the screen. Next, you can study the following picture. Now you don’t need to go to the browser on your computer or smartphone and select a movie there. Choosing the right movie won't be difficult. Open the catalog and select a picture from the playlist. The platform is easy to use. Control from PC or Android Box. It is also possible to select channels with a remote control. Below you will find recommendations on how to install Kodi on smart TV and how to add an iptv playlist to Kodi.
Why OKKO does not work on TV: reasons, what to do?