Good afternoon. How to connect a VCR to a computer. More recently, a VCR was the only means for viewing various videos, home and wedding recordings at home. Video taken while traveling. Or, if you just needed to play a cartoon for your children.
Such gadgets of the past were very convenient, since they had the opportunity not only to watch a video like on a TV, but also to review the moments you liked by using rewind.
But on video cassettes, which contain the video we need, there is a viewing limit. It's somewhere (may vary). Then, the clarity of the video recording begins to decrease and the quality drops. Also, the cassette itself may become damaged. For example, in the best case, it just breaks (then it can be sealed). Or, the tape recorder may jam it, which is much worse. Also, the cassette may become demagnetized.
From here, it becomes clear that to preserve your recording, it is better to copy it onto a DVD disc or a regular flash card. Of course, this can only be done through a computer.
Possible difficulties and errors
The most common mistakes people make when trying to connect a DVD player to a computer:
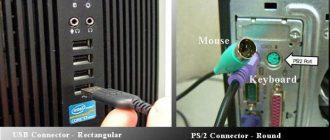
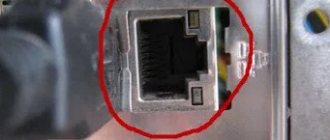
- Using a regular USB cable. As soon as an inexperienced user sees that the player has the specified connector, he immediately tries to connect through it. It is worth understanding that although these connectors look the same, they exist for completely different functions (the player only installs firmware through this connector, but on a computer this input has wider functionality and is used mainly for reading files from portable media).
The saddest possible consequence is device malfunction. The bottom line is that the computer and the player, being “masters,” will not be able to determine which of them should be the “slave” (device conflict).
- Use other connections without purchasing a tuner or video capture card. At best, the connection simply will not be established. In the worst case (especially if the hard drive settings have not been made), the devices may malfunction.
- The operating system may require initialization of the disk (player) upon connection. If you have not yet made the settings, then confirming this action on the computer is strictly prohibited. The Internet contains many examples of how, after actions of this nature, the DVD player ceases to recognize almost any data, which is why it becomes useless.
If you want to connect a DVD player to your computer and expect to connect it multiple times (as an experiment), then feel free to buy additional equipment and follow the instructions. The main thing is to follow all the rules and procedures for doing the work, without innovative ideas.
Cautions
When connecting, users can often encounter the following errors:
- Before you connect the DVD to your computer, you need to familiarize yourself with the available connectors. Users quite often try to use the familiar USB port. However, it is worth keeping in mind that on DVD players it is intended only for installing firmware. As a result, connections via USB devices will not work, since each of them will not be able to decide which one will be the main one.
- Users are trying to use an additional connection method without purchasing additional equipment (this will be discussed later). As a result, there can be two outcomes. Or the connection will not happen. Or the devices will turn out to be faulty.
- If the user has not completed all the necessary settings before connecting the DVD player to the computer, some conflict situations may arise. In particular, player initialization cannot be confirmed. If you do this, the player will stop recognizing the data and will be useless.
Now it’s worth moving on to considering the permissible and necessary equipment. First, let's take a look at the cable connection options.
CONNECTING VIA DVI
If you decide to use a connection via a DVI cable, remember that it only transmits images to the screen. The sound is provided by another cord and connector. In addition, if one of your devices does not have such an input, you will need a special VGA-DVI adapter. In general, the connection procedure is the same as that of the previous representative.
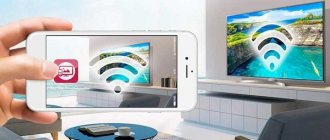
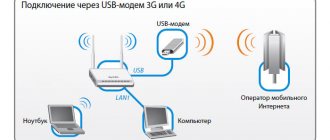
ROUTER
There is another way to connect to the router. You don't need a special cable. Need to:
- In the settings, select “Network”;
- Next we look for wireless ones;
- We find the desired access point and enter the password for it.
It is worth noting that the procedure for setting up Wi-Fi is the same. Connecting to the network will not be difficult for you.
Required settings
Before connecting the DVD to your computer, you need to perform a number of additional steps to ensure a successful connection:
- Format the hard drive with the FAT-32 file system. The files needed for viewing must be written to it. This is done so that the device is not perceived as an information storage device (flash drive).
- Using the appropriate wires and connectors, connect the tuner and video capture card to each other.
- Next, you need to connect the player's speaker system and the computer's audio card. To do this, a mini-jack is connected to the first connector, and a tulip to the second. Make sure the connection between the player and computer is established.
Now you need to make sound settings. To do this, open the “Control Panel” in the “Start” menu, find the section called “Hardware and Sound” and select “Sound”.
In the parameters, specify the number of columns. Most often their number is at least five. This is done to correct the reproduction of sounds.
At the last stage, the player is turned on. In its settings, you should specify the channel required for audio output.
After this, you can start checking the result. If something does not work, you need to check each device separately. This way you can find out if they are working properly or if something is damaged.
DIRECTLY
It is worth noting that direct connection is carried out using the same method as before. In “Network” you only need to select the wired option.
Next, follow the prompts and connect. If you do not have information about the network, then the router cord will come to the rescue; by connecting it, you will have access to all the data.
NO SOUND ON TV VIA HDMI
A common problem is lack of sound. This happens with different brands and models of TVs. Don't panic right away. Now I will tell you what needs to be done to make it appear.
- On your computer, right-click on the sound icon. It is depicted as a column;
- A tab will appear in front of you where you need to enter “Playback Devices”;
- We leave the sound only for your TV, and everything else must be turned off;
- Set the TV mode to “Default”.
Sometimes it happens that the TV is invisible in the tab. In this case, you should right-click on the empty area. The “Show disabled devices” mode will appear. We check the box next to it.
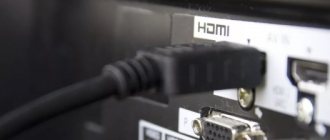
CONNECT VIA HDMI
If you have an HDMI cable, the connection will be made as follows. We also connect the cable on both sides to the devices. After this, you need to switch the mode to AVI on the TV. It is this that ensures that the display mode is changed not from the antenna, but from an external source.
Now all you have to do is select the port into which the cord is connected.
Component
Also known as color difference. Contains three separate coaxial cables that allow all elements of the video signal to be transmitted. At its ends there is an RCA. On the player itself, this cord is connected to the blue, green and red connectors. Everything matches the colors of the cables themselves.
Provides a clearer, more stable and more color-accurate picture.
Another adapter option for connecting a DVD player to a computer. There are options with three or four coaxial cables, five (three for primary colors, the fourth for vertical synchronization, the fifth for horizontal). The most common type is the VGA adapter. This is the best way to connect a DVD player to a computer among those presented.
Provides video signal transmission in digital format. Capable of working with any monitor formats that are within the maximum interface bandwidth. Allows you to make additional settings to ensure the highest possible picture and sound quality. Among them:
- aspect ratio;
- encoding methods;
- color space and many others.
It is worth noting that this option is the best among all presented.
Now it’s worth moving on to considering how to connect a DVD to a computer.
Step-by-step connection instructions
If a person wants to connect a DVD player to a computer, they should understand that they will have to tinker. You can find more than one connection method on the Internet, but depending on the device, many of them may not work, and below are examples of why such connections should not be used.
Before connecting, you should make sure that, in addition to your computer and player, you have:
- PATA-USB adapter.
- TV tuner or video capture card (you need to understand that this equipment costs a lot, and its purchase should not be in vain).
- If you want to connect a DVD player that is part of your home theater, you should check whether your computer's motherboard has a five-channel input.
If there is no such connection path, it is better to stop trying to connect the player and the PC, because replacing the motherboard with the required parameters may require replacing other components of the computer.
For the device connection process to be successful, the user must make the following settings:
- Format the hard drive with the FAT-32 file system. Audio and video recordings that you want to view on a DVD player should be recorded on the same disc (this is done so that the hard drive can be like an ordinary flash drive that stores information).
- After the connection between the PC and the DVD player is correctly established, go to “Control Panel” – “Hardware and Sound” – “Sound”, where in the parameters you need to specify the number of speakers (usually at least 5). Settings are carried out to adjust sound reproduction to suit the new environment.
Step-by-step instruction:
- Format your hard drive.
- Connect the tuner or video capture card through the appropriate connectors.
- To connect a DVD player's speaker system to your computer's audio card, take a cable and connect the inputs and outputs (mini-jack to the first and tulip to the second).
- Make audio playback settings.
- Connect the DVD player to the network and specify the desired audio output channel in its settings. While watching video/listening to audio recordings, you can use the equalizer value editor using the settings of your computer's audio card or use the player menu for this.
You can also connect via an HDMI cable or a 5-channel connection (if available on your computer), using an identical sequence of actions, but with a different cable.
Above were instructions for connecting a DVD player to a computer with the Windows XP, 7, 8, 10 operating system. And connecting a DVD player to an operating system such as Windows Vista has its own characteristics. The main difference is that the computer on which this operating system is installed can act as a flash drive (data storage). In this case, there is absolutely no need to format the disk, although there are few examples of such a connection due to the low prevalence of the operating system.
The following video clearly shows how to properly connect a DVD player to a computer.
TV ON LOCAL NETWORK
There is an option to connect via a local network. You will need a crimped cord. So, to carry out the procedure, you need to connect the PC and TV to the lan. Let's look at it step by step:
- You need to download and download an application called Home Media Server;
- Copy the required videos to the application folder and launch;
- Now you can watch what you want.
However, this method will help you enjoy only what you download from your PC.