Modern technologies allow you to access high-speed Internet from almost anywhere in the world. But questions regarding PC setup and Wi-Fi adapters are still relevant. For example, users often ask specialists about how to connect a Wi-Fi adapter to a computer or how to set up a Wi-Fi adapter on a PC if there is no disk drive or it is impossible to download the necessary drivers to the device.
Laptop adapter
Definition and Explanation
A network adapter is a device that allows you to take byte packets of information and convert them into a human-readable form for the operating system installed on the computer.
Not very clear? – let’s take a closer look now. Look, all computer technology can communicate only through the language of zeros and ones, or in another way, using “Binary Code”. With the advent of networks in our world, computers learned to talk and communicate with each other. For this, two types of connection are used:
- By cable;
- Via Wi-Fi;
But you can’t just connect your computer to the network. It must have a certain device that is capable of not only receiving and sending signals in the required encoding, but also checking them for errors.
This is why the network adapter or “Network Adapter” was invented. It, in fact, translates electrical impulses from the same adapter into a code that the computer can understand. Moreover, between two end devices, there can be a huge number of switches, routers and other network devices.
How does he work
Let me tell you with a simple example. Here you have two reception devices at home: a laptop and a personal desktop computer. The provider has installed a wire into your apartment through which the Internet flows. Usually, in order for several devices to use the Internet at once, they buy a router or router (these are the same thing).
It receives a signal from the Internet and must send it to connected devices. They are connected by addressing and a routing table. After all, the router must know where exactly to send this or that data. Therefore, each device has its own address. At the moment, the most popular addressing standard is IP version 4. You've probably already seen these numbers - 192.168.1.45.
The network adapter receives the signal and sets its address. The address is most often issued by the router itself if it has a DHCP server configured. This feature allows the router to issue addresses itself. Otherwise, you need to drive them in manually.
The computer is connected to the network card. It is usually built into the motherboard. A special internet cable is used for connection. When connected, if there is a signal from another device, which may be a home router, the connector begins to blink or light up. What signals the transfer of information on the network.
If the network card burns out or does not meet certain user requirements, he can buy an additional built-in card. Now let's move on to the laptop. As you probably know, it also has a similar wire connection, with a similar connector.
But more often laptops, tablets, phones and even TVs are connected via Wi-Fi. Therefore, the laptop also has a WiFi adapter. It receives a signal from the router in the form of radio waves according to the IEEE 802.11 standard. Then he converts the signal into something understandable for a laptop.
That is, the adapter helps a computer or laptop connect to any network – both local and global. The Wi-Fi module, if you remove the cover from the laptop, looks like the picture above. But a computer can also be connected wirelessly.
Since most often the computer motherboard does not have an additional built-in Wi-Fi module, it must be purchased separately. They come in two types:
- Internal – connects to the PCI Express bus;
- External – connection goes to any free USB port.
As you may have noticed, to improve the signal, each such module has an antenna. It can be removable or built-in. Similar antennas can usually be seen on a home router. They allow improved communication between two devices.
Functions
We looked at what a network adapter is and how it is configured, and now let's talk about the tasks that are solved when sending or receiving messages. There are nine in total:
- Galvanic isolation is carried out with twisted pair or coaxial cable. Pulse transformers are mainly used for this purpose, although optocouplers can also be used.
- Transmission (reception) of data. They come from RAM to the adapter or from it to the computer's memory thanks to input/output and direct access channels.
- Buffering. Used to match the speed at which data is transferred from or to the adapter with how it is transmitted over the network. Also, while information is being processed, it is stored in a buffer. It allows the adapter to work with the entire package of information. Also, thanks to the adapter, the data processing speeds of various LAN components are coordinated with each other.
- Package formation. The network adapter must divide the data into separate blocks in transmission mode (or they are collected during reception) in order to then format them as a frame of a certain format. It will be composed of several service fields, which indicate the address of the recipient’s computer, as well as the frame checksum, which is used by the device to conclude whether the delivered information is correct.
- Access to the communication channel. Also within its “jurisdiction” is a set of rules with the help of which you can get the opportunity to work with the transmission medium. In addition, the adapter detects conflict situations and monitors the state of the network.
- Identification of your address in the package that is accepted. It can be determined by the setting of switches, flashed into the PROM, or stored in a special register.
- Converts parallel code into serial code when transmitting data, and it converts it back when receiving it. There is a small exception to this. When the data transmission mode is active, information is transmitted over the communication channel in serial code.
- Data encoding/decoding. At this stage, electrical signals are generated and used to represent information. In most cases, Manchester encoding is used. This method does not require a clock signal to be transmitted to recognize 1s and 0s. In this case, polarity reversal is used.
- Reception or transmission of data pulses.
Also, network adapters, when working with the necessary software, can recognize and process an error that occurs due to poor hardware performance, collisions, or electrical interference.
What are there
Let's look at the interfaces with which the Wi-Fi adapter connects to a PC. The most popular: USB, M.2, PCI Express. Let's take a closer look at them.
USB interface
The Wi-Fi USB adapter is available with or without an antenna. looks like a flash drive. Can be connected via an extension cord. Installed in the USB connector of the device. To achieve a long range of the adapter when receiving a signal, connect the device via an extension cord. Then the device can be raised higher. The signal reception range will increase. For PC, choose a model with an antenna. For laptops, use the model as the first one in the screenshot above.
PCI Express
The Wi-Fi adapter is connected to a port located on the computer's MP.
Built-in antennas help improve signal reception.
M.2 interface
Modern MPs are equipped with such a connector. To connect you need an M.2 Key A, Key E or WiFi connector. The data is indicated in the description of the MP.
Convenient for installation in laptops where wires are routed out and antennas are connected. On PCs, Wi-Fi adapters may not find networks if there are no antennas. Then they are purchased separately.
Types of Wi-Fi adapters
There are several types of connectors to which you can connect a Wi-Fi module:
PCI – slot on the motherboard. There are two types:
- PCI;
- PCI-e.
USB port.
Depending on the type of connector, the required wireless module is selected. It is worth noting that laptops use a Wi-Fi adapter connector called MiniPCI-E.
As a rule, desktop PCs do not have such a connector, but you can buy an adapter from MiniPCI-E to PCI-E or PCI. Regardless of which type of connection you choose, in any case you will be able to connect to the network without a cable.
Setting up an additional router as a repeater
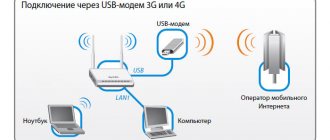
If the problem is that the distance to the signal source is quite large and there is no way to organize a cable connection between the router and the PC, then the answer to the question of how to make Wi-Fi on a Windows PC is that you can purchase another router and configure it in repeater mode.
In this case, the additional router will receive the signal from the main one and distribute it further both via Wi-Fi and cable. Therefore, you can connect it to a PC using a regular cable - RJ45.
You can configure the router as follows:
- Login to the router interface.
- Go to “Wireless Mode” – “Wireless Mode Settings”.
- Check the “Enable WDS” box.
- Several fields will appear below. Click on the "Search" button.
- Wait a little - the system will display a list from which you need to select the required connection and click on the “Connect” button.
- Enter the password for the selected connection and click “Save.”
After this, the router will start working in repeater mode. Now you can connect to your router using a cable.
This is one way to organize a wireless connection to a remote access point.
How to connect a Wi-Fi adapter to a laptop
Let's say you're tired of getting tangled wires. This problem can be easily solved by purchasing an external wireless network adapter. This is the simplest and most affordable option.
For the best signal, you should give preference to devices with an antenna. There are adapters with two ranges. They are only relevant if home computers support the 802.11ac standard. Of course, you also need to purchase a router operating at 2.4 and 5 GHz frequencies.
You must plug the wireless network adapter into the USB port on your PC. It is better to use the 3.0 connector for the highest speed. 2.0 will do as well.
As for drivers, they are usually already in the laptop. Manual installation will be required on Windows XP. However, there are not many users of this operating system left at the moment. If you need to install drivers, a disk will be included with the adapter.
The device is configured as follows: go to the device settings (Wi-Fi adapter properties). A software update is available here. Then connect to Wi-Fi. At the bottom of the screen on the right, click the network connections icon, select the one you need from the list and click “Connect”. If necessary, enter a password. Check the presence of an Internet connection.
Connection via external network card
External network cards mean USB modules. In our case we are talking about a USB Wi-Fi adapter.
To connect the adapter, insert it into an available USB port. The system will automatically detect the device and install universal software.
As in the previous case, it is better to go to the manufacturer’s website and download the appropriate software. After this, the corresponding icon will appear in the notification area and you can find an available wireless network on your computer and connect to it.
The advantages of this type of adapter include:
- easy installation;
- mobility - at any time you can remove the device and connect it to another computer.
Disadvantages of this module:
- weak built-in antenna that cannot be replaced;
- occupies a USB port - if there is an insufficient number of ports, this problem may require connecting an additional USB hub;
- low data transfer speed (compared to faster internal adapters).
Now you know two ways to install a Wi-Fi adapter for your computer. However, there are other ways to connect your PC to Wi-Fi:
- use your smartphone as a USB modem - in fact, the phone will act as a USB module;
- configure an additional router in bridge mode and connect it to the PC with a network cable.
If we figured out the first method, then with the second it’s not so simple.
How to connect a USB WiFi adapter to a computer?
Let's figure out how to connect a WiFi adapter to a computer. I recommend using the USB version as it is more versatile. If the PCI adapter can only be inserted into the motherboard of a desktop PC, then USB can also be used with a laptop.
The procedure is as follows:
- Connect the adapter to the USB port
- Start using WiFi Internet
Yes, it's so simple, what did you think? If you have Windows 7, 8, 10 installed on your computer or laptop, then nothing else is required.
An important nuance - if your WiFi adapter supports operation via a USB 3.0 port, then it is better to connect it to it.
No, it will work on 2.0, but for your own convenience, maximum speed can only be achieved on the latest standard.
Why then was there an installation CD in the box with the adapter? As for the disk with drivers and software, which is most often included, it only makes sense to get it if you have outdated Windows XP. Most often, it is for this that you need to install drivers separately.
The installation program essentially replaces the standard one built into Windows, so whether to install it or not is also up to the owner. You can install it out of curiosity. Sometimes, by the way, it happens that through it you can switch the USB adapter to WiFi access point mode and distribute the Internet from your computer to other gadgets.
Using an external module
This type of adapter resembles a USB flash drive in shape and size. It is economical, reliable and easy to use. The external module is mobile, its small size allows you to take it with you on a trip, the device easily fits into the pocket of a small bag.
To connect to the system unit of a stationary PC, tablet or laptop, use a USB port or Internet cable. Adapter:
- inserted into a free port of a laptop or system unit;
- connected to a wireless connection.
External adapters are used if the PC does not have a built-in module that can distribute Wi-Fi. They do not have a high speed of information transfer, but have almost no other disadvantages and are easy to use. The price of such an adapter is relatively low, which also adds to its advantages and makes this particular type of module extremely popular among users.
USB connection
Correct operation of the module is ensured by a special utility installed on the PC. Additionally, you don’t have to download anything; usually the program is already on the computer or is installed automatically during the first attempt to connect the adapter to it.
If the automatic download does not start, you need to click on the wireless connection icon and fix the error. You may have to install the drivers manually; to do this, carefully study the module’s operating manual, find its name and number, and using this data, select the appropriate program.
Connecting the indoor module
An internal or built-in adapter is connected to the motherboard, so it will not be possible to install it without experience in disassembling equipment. If the user has never looked under the bottom cover of a laptop or opened the system unit, and knows what a motherboard is and why it is needed only by hearsay, it is better to entrust the installation of the module to professionals.
Internal adapters:
- features increased bandwidth and speed, the user will be able to quickly access the necessary sites and applications, games and movies online;
- are more reliable, module malfunctions occur less frequently, errors that occur are corrected faster without the need to invite an outside specialist or to debug the settings yourself.
The price of an internal adapter is higher than an external one, but a lot depends on the model. After purchasing the device, connect it to the motherboard, wait until the drivers are installed and connected through the utility. Typically, setting up the equipment takes no more than a few minutes.
Important! A user who has no idea how a computer works and functions is better off abandoning the idea of installing an internal adapter on their own.
The setup is entrusted to a professional, otherwise you can seriously damage the device, put it out of working order for a while, or even completely destroy it.
Mini-adapter for Internet distribution
How to set up a WiFi adapter on a computer via a USB port?
Well, let's get down to practice. Connect the WiFi adapter to the computer into the USB port
and wait until the new USB device is recognized and installed successfully
If this miracle does not happen, then we take the CD in the old-fashioned way
and install the drivers from the disk.
After this, the WiFi icon will appear in the list in the lower right corner of the panel - clicking on it will open a list of wireless networks available for connection
Select the one we need - that is, from your router, to which you have access - and click on the “Connect” button
enter the password
and enjoy the Internet via wifi.
If there is a WPS button on the adapter body, then you are extremely lucky, since connecting to the router and setting up to work with its wifi network can be done automatically.
To do this, activate WPS mode on your router
and briefly press a similar WPS button on its body.
Then we also press this button on the adapter once. In a few moments, the computer or laptop will be online.
Possible problems and their solutions
There are a number of problems due to which you will not be able to connect to the Internet, in particular, on various versions of Windows: Windows 7 and higher. If your computer does not connect to Wi-Fi, make sure the board is securely connected. Try inserting other equipment into the USB or PCI ports. If it works properly, this means that the problem is in the modem itself. The board may be physically damaged.
In some situations, you will need to enable the adapter hardware on your computer. This can be done in a few simple steps:
- Right-click on the My (This) Computer shortcut and then click Properties.
- Go to the "Device Manager" section.
- Find your adapter. Go to its properties.
- Click the "Enable" button.
If you find an exclamation mark in a yellow triangle next to the device, the problem is with the drivers. Try reinstalling them or look for a different version. Make sure the driver is suitable for your operating system version.
Your computer may also receive error 651 miniport wan. Its reasons may be:
- the connection is blocked by an antivirus or firewall;
- you enter the password or login for your connection incorrectly;
- the conflict is caused by the network card;
- The problem is on the provider's side.
Try restarting your computer and then reconnecting the adapter. In the Device Manager window, disable the network card and check the operation of the computer's routers. Try running diagnostics in the adapter properties. In some cases, the troubleshooter corrects errors by setting the correct gateway.
How to install software for a Wi-Fi adapter
A driver is a program through which the OS receives data about the type of connected equipment and its purpose. It ensures the proper functioning of a laptop, computer and other devices with an operating system.
Quite often, failures in the wireless network appear after the system is cleaned of viruses, after reinstalling the equipment or the operating system itself. At this time, settings may be deleted. If a problem is detected, the presence of a driver on the laptop is determined.
To do this proceed as follows:
- Enter “Start” and then “Computer”;
- Go to the appropriate section of “System Properties”;
- Open the “Device Manager” tab. This section contains the inscription in English “Wireless Network Adapter”. Click on it and go to “Driver”. When there is no content, install the driver on the laptop.
Automatic installation of the Wi-Fi adapter driver
Perhaps, let's start with the most basic way to install drivers for any device on the system. So, you don’t have to bother installing the Wi-Fi adapter driver at all - and leave this problem on the shoulders of your Windows operating system. Your OS will try to find the driver needed for your Wi-Fi adapter on the Internet and install it. The disadvantage of this installation method is that the system quite often simply cannot find the necessary driver, as a result of which you have to resort to the manual installation method.
However, sometimes the system still manages to find the driver and install it correctly. As a rule, when accessing the Internet, the operating system will attempt to install the driver on its own, however, often this may not happen. To start automatic driver installation for the Wi-Fi adapter, you need to do the following:
- press Windows + R combination;
- enter the command devmgmt.msc into the line;
- press Enter;
- Find the “Other devices” section in the list;
Note: your Wi-Fi adapter may be in this section for a very obvious reason - the system did not install drivers for this device or was unable to do so the first time.
- find the Wi-Fi adapter in the list of other devices;
- right-click on the device;
- select “Properties” from the context menu;
- go to the “Driver” tab;
- click on the “Update driver...” button;
- select “Automatically search for updated drivers...”;
After selecting the above item, your operating system will automatically search and install the found drivers for the device, which in our case is a Wi-Fi adapter. The OS may or may not install the driver. That's how it will work out. However, don't worry if the OS fails to install automatically, as you can do it yourself...
Manual installation of the Wi-Fi adapter driver
Let's now see how to install the driver for the Wi-Fi adapter manually. So, there is nothing easier than installing a driver for any device: go to the manufacturer’s official website, go to the downloads section, download the required driver on your PC and install it on the system using the most convenient installation package.
If you own a laptop, then you need to go to the official website of the laptop manufacturer for the driver, for example, ASUS, Acer or Lenovo. If you encounter any problems installing the driver through the downloaded installer, then you can use, so to speak, a semi-automatic installation method - through the Device Manager, indicating the driver directory on the PC.
To accomplish this, you will need to do the following:
- go to the download section of the official manufacturer of your Wi-Fi adapter (or laptop);
- download a package of drivers to your computer;
- press Windows + R combination;
- enter the command devmgmt.msc into the line;
- press Enter;
- Find the “Other devices” section in the list;
- find the Wi-Fi adapter in the list of other devices;
- right-click on the device;
- select “Properties” from the context menu;
- go to the “Driver” tab;
- click on the “Update driver...” button;
- click on the item “Search for drivers on this computer”;
- click on the “Browse” button and specify the directory in which the downloaded drivers are located, for example, “Desktop”;
- Click on the “Next” button and wait for the driver installation to complete.
Connecting to a network in Windows
After installing the Wi-Fi device, you will need to configure it. We'll tell you how to connect wireless Internet for various operating systems from the Windows family.
Windows 7
To set up a wireless connection in this operating system, you need to go to the “Control Panel” and click on the “Network and Internet” icon.
After this, go to the “Network and Sharing Center” tab. In the left side menu, select the line “Change adapter settings”.
You will see a window with all network connections. In it you need to select a wireless network connection and right-click on it. In the menu that opens, select the “Properties” line. Uncheck the “Internet Protocol Version 6 (TCP/IPv6)” box if it is there, and oh if it is not checked. Now go to Internet properties version 4.
In the properties about and “Obtain DNS server address automatically” if they are not checked.
After this, you need to return to the “Change adapter settings” window and set the required wireless connection to the “connected” state. The wireless connection icon should appear at the bottom right of the taskbar. By clicking on it, you need to select your connection and enter the password.
Windows 8
In Windows 8, go to the Start menu and click on the All Apps icon.
After that, find the line “Control Panel” and click on it.
You need to enter the “Network and Internet” menu. Further steps for setting up a wireless connection are performed in the same way as for Windows 7. Connecting to the selected Wi-Fi connection is also performed in the same way.
Windows 10
In Windows 10, to get to the Network and Sharing Center, you need to perform the following sequence of actions:
- Right-click on the network icon located on the taskbar on the right, near the clock and select the line “open network and Internet settings.”
- In the “Status” window at the bottom there is an item “Network and Sharing Center” that you need to click on.
After this, you will be taken to the “Network and Sharing Center” and then you can proceed in the same way as in the case of Windows 7.
Connection
The instructions are suitable for all versions of Windows, starting from Windows 7. Algorithm:
In the tray, click on the wifi or globe icon with the left mouse button, then select the network and enter the password for it. To connect automatically, check the box of the same name. The inscription “Connected, protected” tells us that the connection was successful and you can use the Internet.
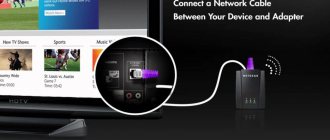
How to connect a Wi-Fi adapter to a TV set-top box
In certain circumstances, users need to synchronize an external Wi-Fi adapter with a Smart TV set-top box. The process of completing the task has several distinctive features, which will be discussed below.
Are all Wi-Fi adapters suitable for Digital TV set-top boxes?
How to connect Wi-Fi to a Samsung TV: step-by-step instructions
Some Wi-Fi modules are incompatible with this model of digital TV set-top boxes. Typically, the names of such adapters are indicated by the manufacturer of the set-top box in the instructions that come with the kit.
When choosing a Wi-Fi module, you should pay special attention to this point. For example, when connecting a TP-Link TL-WN727N Wi-Fi adapter to a Digital set-top box, synchronization will not be achieved.
Important! If the devices are incompatible, you can try to reflash the adapter to fix the problem. However, the process of completing the task requires certain knowledge and skills. After flashing the module, the warranty on the module will no longer apply.
Sources
- https://WiFiGid.ru/raznye-setevye-ustrojstva/setevoj-adapter
- https://FB.ru/article/242611/chto-takoe-adapter-setevoy-chto-takoe-adapter-lokalnoy-seti
- https://androidguid.ru/apps/wi-fi/kak-podklyuchit-set-vaj-faj.html
- https://lanportal.ru/wifi/wifi-adapter-dlya-kompyutera.html
- https://tehnofaq.ru/ustanavlivaem-besprovodnuyu-svyaz-na-noutbuke/
- https://wifika.ru/kak-podklyuchit-wifi-adapter-k-kompyuteru-cherez-usb-nastroyka-za-2-shaga.html
- https://itumnik.ru/wifi/kak-podklyuchit-vaj-faj-adapter-k-kompyuteru-nyuansy-nastrojki-routera
- https://ZnaiWifi.com/instrukciya/rukovodstvo-po-ustanovke-drayvera-wi-fi-adaptera-na-windows-7-8-10.html
- https://mirinfo.ru/wi-fi/kak-podklyuchit-adapter-k-kompyuteru.html
[collapse]
Setting up ZyXEL routers
First of all, the methodology for configuring ZyXEL routers will be considered. Compared to other manufacturers, this device has a large number of settings with different operating modes. For example, any ZyXEL device can be used as a repeater. It is easiest to configure this mode in NDMS V2 firmware.
There are also Lite 3 Keenetic routers, in which you can switch modes using physical keys on the device body. If the device does not have an analog version installed, you will need to use the web interface.
How to connect the router to the repeater:
- Open a browser and use the standard address of ZyXEL routers (my.keenetic.net).
- Find the “System” tab.
- Select operating mode.
- Next, a window will open containing a special switch. Change it in favor of an adapter.
- Press the confirm button.
- Restart the system.
- Next you need to connect the repeater to the router.
- Press the WPS key on two devices.
After this, you will not be able to use the repeater interface until its next restart.
It is recommended to update the firmware if there is no mode section in the administrative panel.
Converting Asus routers
When using these devices, remember that they can also act as repeaters. However, unlike ZyXEL devices, these routers will transmit the signal to devices via cable.
You can reconfigure your Asus router into an adapter as follows:
- Open a web browser on your computer and enter the standard address of the device (192.168.1.1).
- Log in to the administrative panel by specifying your login and password, which by default have the values “admin” and “admin”.
- Find the “Administration” section.
- Open the work mode tab.
- Enable the option to operate in repeater mode by checking the appropriate box.
- Select the required network for expansion from the list.
- Connect to it by entering the security code.
- Apply settings and save changes.
- Connect and explore the network.
Possible problems during setup
The main problem with having a router as a receiver (router as a receiver) is the method for configuring the router for a specific model. First, you need to decide on the available modes and find out whether a certain device can even act as an adapter. This will give you an understanding of how to use the device. For example, one model can work as a repeater, while another will distribute the Internet in client mode. Next, you need to decide on transmission options - via cable or wireless channel.
Also, often after turning on a certain mode, the Internet is not distributed due to lack of connection or environmental factors that affect the reception. To fix the error, you need to visit the access point settings, open the wireless mode and familiarize yourself with the available information.
The most common methods for solving problems are the following:
- restarting the dispensing equipment and re-entering the settings;
- connecting the cable to the computer directly;
- simultaneous use of wire and wireless channel for a computer.
If none of the above methods helps, then the problem lies in technical faults.