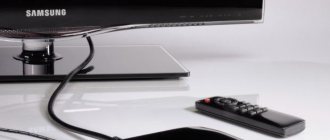
When the TV remote control buttons do not work or are difficult to press, at the very least, it is annoying. At most, it makes it impossible to switch channels or adjust the volume. Modern TVs, LG or Sony, may not have control buttons on the body at all. If the remote control is not working properly, you can fix it at home. It only requires precision and some simple supplies.
Types of breakdowns
You can control your TV in two ways:
- Through the buttons located on the front panel of the device;
- Via remote control.
And here there is an excellent opportunity to determine the source of the problem: if there is no response from the TV when you press the remote control buttons, but the TV executes commands when the control is from the front TV panel, then you will have to diagnose the remote control. But if the TV does not respond to either its buttons or the remote control, then, most likely, you are dealing with more serious problems in the equipment itself.
To understand how to repair the TV remote control, you need to figure out where the problem might be:
- The remote control may either not work at all - that is, when you press any button, there is no response from the TV;
- The remote control device does not work well - commands are executed, but not from all buttons or with a noticeable delay.
In the first case, the problem may be the lack of a power source or broken contacts on the chip. Incorrect operation of the remote control is most often due to discharged batteries or a case filled with liquid.
Causes of failure of the TV remote control
If the remote control does not function, then you need to find the reasons for its failure. Each person will be able to understand the problems associated with the operation of the TV program switch. You can even repair the remote control yourself. Repairing a remote switch will cost less than buying a new one.
The main reasons for the remote control failure:
- the batteries are dead;
- LED burned out;
- the graphite coating under the buttons of the rubber button pad has worn off;
- the printed circuit board is cracked and the tracks are disconnected;
- the ceramic resonator or capacitor has failed;
- solders near the resonator, capacitor, and LED have oxidized;
- the circuit board and rubber base are covered with sticky dirt;
- oxide deposits appeared on the battery contacts.
The batteries are low
80% of all calls to service workshops regarding a broken TV remote control are caused by batteries. The first thing to do when diagnosing failures of the remote control is to replace the batteries with new ones.
Even if you only installed new batteries a few days ago, you should try updating them. Batteries may be defective or expired; often, even in original packaging, these elements may be “dead.”
If you have a voltmeter in your house, you can check their voltage with this device. The minimum charge value should be 1.3 V. If the battery potential is lower, it must be replaced.
Check the operation of the remote control with new batteries; further repairs may not be required. If they are not the reason, move on to the next stage.
What to do if it is impossible to repair the remote control yourself?
In some cases, it is impossible to repair the remote control yourself. In these situations there are 2 options:
- Take the device to a service center.
- Buy a new remote control on the radio market or order delivery of the original device.
Batteries need to be changed without spilling acid.
Purchasing an analogue will cost less. In this case, you can buy a multifunctional device that can control several devices.
Minor repair work related to the remote control can be performed by almost all users: replacing batteries or gluing new contact surfaces can be done without any specific knowledge. In case of complex breakdowns, it is recommended to contact a service center or buy an analogue.
Some buttons don't work
It happens that some buttons on the TV remote control do not work well: you have to press them with great force each time. This is also a very common problem, which can be solved by simply cleaning the device.
The remote control may be clogged with dust or small particles of household dirt. These devices are also often filled with water, coffee or juice. The sticky mucus that collects under the button prevents the contacts from touching, which is why there is a delay or complete absence of the signal.
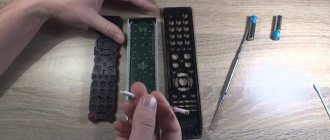
But how can you repair buttons with such dirt on your own? It’s very simple: the device should be disassembled and cleaned.
- Remove the batteries.
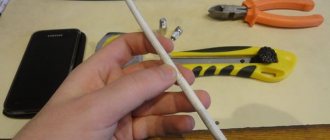
- Unscrew the connecting screws on the remote control.
- Carefully separate the two parts of the housing from each other. If something is in the way, do not force it, but inspect the device again; perhaps you missed some kind of fastening connection (often a bolt can be hidden under the batteries, for example). If the case has special latches, then you need to open them using a flat screwdriver inserted into the strip connecting the two parts of the remote control.
- You should have 2 housing parts, an internal contact rubber band and a microcircuit in your hands.
Carefully and slowly inspect each element. Despite the simplicity of the device, there are many small workers in it, so it is better to carry out an inspection using a magnifying glass.
To carefully detach the two parts of the plastic housing of the remote control, you can use not only a screwdriver, which can leave small chips and scratches. For this procedure, some masters use a regular plastic card, which is issued by all chain stores.
Remote control device
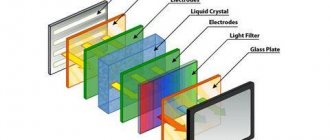
All remote controls have a similar design. Main components:
- Frame. Consists of two halves, glued or twisted.
- Printed circuit board. The board contains a small microcircuit, a few more radio elements, an infrared LED, battery compartment contacts and a contact pad in the form of conductive tracks.
— Rubberized pad with buttons.
- Batteries.
Cleaning from moisture and dirt
Anything that has oily dirt can be wiped with a damp cloth or cotton wool soaked in alcohol. However, if the remote control is old, the dirt may be unexpectedly heavy. It would seem where this dirt would come from, but, as practice shows, all remote controls collect dirt.
Take a small basin and pour warm, clean water into it. Add a few drops of dish detergent and lather the solution. Place all the elements of the remote control in it, including the circuit board. Don't worry, without power there will be no short circuit. After some time, all the dirt will become wet and it will be easy to remove, for example, with a regular toothbrush.
Clean the board with radio components especially carefully: they must not be damaged. The contacts on the microcircuit and the buttons themselves on the reverse side of the rubber element must be black! After all dirt has been removed, rinse the parts with running water, pat them dry with a dry towel and place them in a warm, dry place for 30-40 minutes to dry completely.
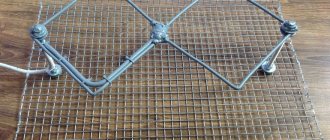
If the button contact has a graphite coating, then the reason for poor operation may be that it is worn out and erased. Regular chocolate or cigarette packaging will help solve the problem. You just need to cut paper-based foil into squares or circles of the appropriate size and glue the pieces with the paper side to the contacts.
It is best to glue the foil to the contacts using “Moment” or silicone-based glue. There is also a special product for this type of need, but buying it specifically for 1-2 buttons is impractical. Also on the market are special repair kits for remote controls, which contain buttons with conductive coating and a small tube of adhesive.
How to wash the remote control
Having disassembled the remote control, we separate all the plastic and rubber parts and go to the bathroom, where we thoroughly rub the remote control body with a soapy brush, after which we thoroughly rinse off any remaining soap.
Rubber bands should be treated more gently. The part of which they close the contacts of the board is a conductive material applied to a rubber base. Do not scrub them with a brush. It is better to gently rub with soapy hands or simply rinse under warm water.
We send the washed parts of the remote control to dry on your favorite towel. It is advisable that the towel be clean. You can wipe it off, but again, do not rub the conductive areas on the elastic bands.
Cracks after a fall
Remote controls can be located in a variety of places, as they should always be at hand: after waking up, you look for the remote control on the bedside table, when you have breakfast, the device lies with you on the table, and during an evening movie show, the remote control moves to the sofa next to you.
They are compact and comfortable, but they fall quite often, and this does not always happen on soft carpet. If the remote control is dropped on ceramic tiles, it can suffer serious damage not only to the outer case, but also to the internal microcircuits.
If after a fall the remote control ceases to function, then its restoration also begins with disassembly. There are three common damage caused by impact:
- Broken LED;
- The battery terminal is broken;
- The quartz resonator is damaged.
The first two faults can be determined by visual inspection. The operation of the LED can be checked without even disassembling the housing:
- Turn on the camera on your smartphone.
- Point the remote control at the camera so that the LED is in focus.
- Look at the mobile phone screen and press any button on the remote control. The signal, if any, will be clearly visible through the camera.
You can also check the operation of the LED using a multimeter, but to do this, the outer parts of the housing will have to be removed:
- Connect the tester probes to both ends of the LED.
- Set the device switch to 3V.
- Press any button on the remote control.
- If the tester shows voltage, then the LED is working.
After an unsuccessful fall of the remote control, the contact terminal of the batteries may be damaged. The spring contacts of this connection are soldered to the chip, so make sure that the soldering is not broken and is firmly in place. Also check the springs themselves for corrosion or bending. If the contacts are oxidized, you can clean them with sandpaper.
If you find ring cracks or oxidation in the soldering of the contact terminals and decide to solder them again, then the correct thing to do is to disconnect all the elements from the board, clean and tin them, and only then solder them again.
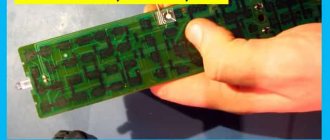
But checking the performance of a quartz resonator is not so easy. To do this, you need to disassemble the remote control and find on its microcircuit a small box with soldered contacts. If you gently shake it and hear the sound of crumbs rolling inside, then the resonator is broken and will need to be replaced. Only a master can revive such a bullet.
If the TV remote control was dropped on the floor and immediately after that you noticed that the device stopped working, then when disassembling the remote control you should pay attention to the ceramic resonator.
TV does not respond to remote control commands
If neither cleaning nor replacing batteries helps, the remote control is visually intact, but the TV does not respond to its commands, you should check the condition of the electronic part. To do this, the remote control is disassembled. When troubleshooting, you need to act carefully and carefully.
Lost contacts
When remotes are dropped or simply over time, a variety of devastating consequences can occur. After disassembling the remote control, inspect:
- area of the LED, the state of its legs;
- wires from the battery compartment, their condition, strength of soldering to the main board;
- condition of other parts with legs.
If breaks or broken conductors are found, repairs with a soldering iron or complete replacement of parts with damaged contacts are necessary.
Advice! It would not be superfluous to inspect the back surface of the electronic board. In places where the ends of the component legs have sunk deep, it is worth adding tin and working with a soldering iron.
Troubleshooting
During the initial visual inspection, most simple problems are detected and eliminated. If this does not help restore the operation of the remote control, it is worth checking the condition of some electronic components of the board. They start with an LED. Batteries are inserted into the power compartment. You will need a smartphone to check. The camera starts on it. The remote is pointed at her lens. If the LED is working properly, when you press the buttons, the smartphone, whose camera also captures waves invisible to the eye, will clearly display flashes. If the element is broken, the user will not see anything.
The second difficult problem is the failure of the quartz resonator necessary to generate a signal for the TV. Some manufacturers place this element in different parts of the electronic board. Therefore, you will have to determine the breakdown by ear. The board is gently shaken near the ear: if a rustling sound is heard, as if from rolling grains of sand, it means that the resonator is damaged and requires replacement . You can do this yourself or take the remote control to a workshop.