Short abbreviations
When presenting information, it is customary to use abbreviations and acronyms on the forum, for example:
| Reduction | Short description |
| LED | Light Emitting Diode - LED (Light Emitting Diode) |
| MOSFET | Metal Oxide Semiconductor Field Effect Transistor - Field effect transistor with MOS gate structure |
| EEPROM | Electrically Erasable Programmable Read-Only Memory |
| eMMC | embedded Multimedia Memory Card - Built-in multimedia memory card |
| LCD | Liquid Crystal Display - Liquid crystal display (screen) |
| SCL | Serial Clock - I2C interface bus for transmitting a clock signal |
| S.D.A. | Serial Data - I2C interface bus for data exchange |
| ICSP | In-Circuit Serial Programming – Protocol for in-circuit serial programming |
| IIC, I2C | Inter-Integrated Circuit - Two-wire data exchange interface between chips |
| PCB | Printed Circuit Board |
| PWM | Pulse Width Modulation - Pulse Width Modulation |
| SPI | Serial Peripheral Interface Protocol - Serial peripheral interface protocol |
| USB | Universal Serial Bus - Universal serial bus |
| DMA | Direct Memory Access - Module for reading and writing RAM without using the processor |
| A.C. | Alternating Current |
| DC | Direct Current - Direct current |
| FM | Frequency Modulation - Frequency modulation (FM) |
| A.F.C. | Automatic Frequency Control - Automatic frequency control |
FAQ
After registering an account on the site, you can publish your question or answer in existing topics. Participation is absolutely free.
Who answers questions on the forum?
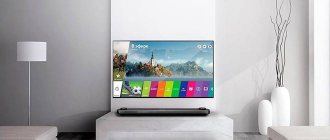
Reply to the topic Remove the cover of the LG 49LH590 TV
Like all other tips, they are published by the entire community. Most of the participants are professional repairmen and electronics specialists.
How to find the necessary information on the forum?
The ability to search the entire site and file archive will appear after registration. A site search form will be displayed in the upper right corner.
What other brands can I ask?
For any reason. The most frequent answers for popular brands are LG, Samsung, Philips, Toshiba, Sony, Panasonic, Xiaomi, Sharp, JVC, DEXP, TCL, Hisense, and many others, including Chinese models.
What other files can I download here?
If you actively participate in the forum, you will have access to additional files and sections that are not displayed to guests - diagrams, firmware, reference books, repair methods and secrets, typical faults, service information.
useful links
Here are just useful links for craftsmen. Links are periodically updated, depending on the demand for topics.
Protection
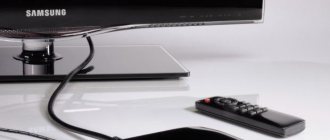
As soon as you put the cover aside, you will only see some parts of the TV, namely the power supply and the microcircuit, everything else is hidden under a metal protection, the removal of which will be the next step in disassembly.
First of all, we repeat the steps with the lid, that is, remove all the screws. Now, everything will depend on the design features, in some cases the speakers will interfere with you, they also need to be removed and put aside. Now the most important thing is that on almost all TVs such protection is additionally fixed in special grooves and recesses, this will be the most difficult part of disassembly.
Using a thin metal object, pry up each lock and release the protection; be as careful as possible so as not to damage the plastic parts and especially the device circuitry.
Tools and equipment
Before starting the work process, it is recommended to select the appropriate tools and materials that will help cope with the task. These include:
- Screwdrivers;
- Set of hex keys;
- Pliers;
- Soldering iron;
- Screen diagram. This element can be found on the Internet;
- Multimeter.
Matrix
Now you need to remove the protection. Considering that the power supply and circuit are attached to it, they are naturally connected to the TV matrix using a special cable. By slightly lifting the protection from one edge, the cable must be separated; this will require a little force. If all this seems too complicated to you, contact the LG service center, experts on how to disassemble any LG TV, and will cope with the task in the shortest possible time.
All circuits and other parts are attached to ordinary screws, so removing them will not be difficult; it’s a completely different matter if you need to get to the backlight. In this case, you will have to remove the most fragile part of the equipment, the matrix, experience and skill are important here, the risk of damaging the screen is very high, and this is a very expensive replacement.
You can contact the masters from our service center by calling or writing your question on the feedback form.
Your message has been sent.
Thank you for your request.
Author:
You might also be interested in
Removing the matrix with rear disassembly
This repair has a similar procedure, except that there is no front facing television frame, but this is partly the case, since there are quite a few models, so there are certain technological subtleties. In the future, the analysis of the control board, as well as the base of the matrix rigidity, is identical. Installation of the matrix is performed in the reverse order
When performing these operations, you can give a hint. If this is the first time you have decided to replace the matrix with your own hands, then it is recommended to record the actions using a camera. That's basically all. Remember and follow safety precautions, and carefully follow each step when repairing or replacing the matrix of a plasma or LCD TV.
There are a number of malfunctions of LG TVs that the owner can deal with on his own, for example, changing the fuse. Such work does not require special technical knowledge and experience, but there are other difficulties. In most cases, difficulties are associated with disassembling the TV, so we decided to devote this article to this issue and break down this process step by step.
LG TV repair in 1 day
Order repairs from our service center and receive a working device on the same day, with a warranty of up to 1 year
Find out the exact time and cost of repairs Thank you, no need
Comments (0)
Add a comment
Leave your question using the feedback form and the specialist will call you back and answer without imposing any services.
Hello, many TV fans!
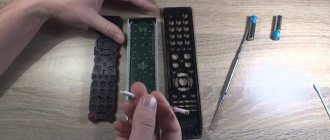
I have a TV LG 49SJ810V, SmartTV on WebOS. The TV is not bad, it shows well and has served us well for 4 years now. It comes with a Magic Remote - a very convenient and very strong thing, which is mercilessly used by my youngest son. Since the TV set and the son are the same age, the remote control survived flying up to the ceiling and falling to the floor, hard hits against the walls and copious injections of drool. They scratched themselves with it, bitten it, fell asleep on it. It was described a couple of times. But it still works, just change the batteries.
Mostly they watch TV, children watch Youtube, cartoons, Yeralash, children's films, sitcoms and, God have mercy, bloggers showing what amazing adventures happen to them every day in a two-room apartment.
Today Youtube suddenly stopped working. The TV showed the error “No network connection”. I went into the settings and found that the remote control also did not work correctly: the air mouse cursor appeared and disappeared, the response to the buttons was delayed, or even did not occur at all. Therefore, there was no way to even delve into the settings.
After browsing several specialized forums, I found out that the TV has a communication board that is responsible for both WiFi and Bluetooth communication with the remote control.
I have absolutely no experience in repairing TVs, so I decided to disassemble the TV. It was quite simple. First, the device must be de-energized. The back cover is secured with several screws. Having unscrewed them and removed the back cover, I saw this:
Since I studied in a Soviet school, attended labor classes, and even once saw a drilling machine turned off, I immediately guessed that on the left was the power board, on the right was the motherboard, the cables from which lead to the matrix and the black box at the bottom in the middle, where the button is located TV control. I unscrewed the box by itself.
Inside I found a board with a cable coming from the motherboard into the black connector, which I carefully disconnected, swearing to myself that for some reason I cut my nails that morning:
On the reverse side, tracks in the form of antennas and the antennas themselves are clearly visible:
I decided that this was the communication board. I took it in my hand and called the whole family. Raising the index finger of my other hand, I showed the board to everyone present and said importantly: “Communication board!” Everyone sighed, turned around and without a word went off to go about their business.
The experiment was continued. I took a paint brush, dipped it in technical alcohol and began to carefully move it inside the connector, imagining that I was engineer Garin from a book about the hyperboloid.
After waiting for the alcohol to dry, I returned the board to its place, attached the cable, assembled the TV and placed it back on the chest of drawers.
The moment of truth has come. I plugged in the TV and it worked just like before! The remote control and the Internet worked without problems. I was happy, proud and technically savvy. And the youngest turned on a cartoon about three cats and said: “Dad! Go, don’t bother me!” I left, leaving a subtle aroma of ethyl alcohol in the room.
Thus, life has once again confirmed that alcohol is a universal means for establishing and restoring communications.
All the best, health and good equipment!
Basic problems
Let us immediately note that in this material we will not talk about defects of LED backlighting, such as its flickering, unevenness, as well as partial or complete absence. When considering damage and malfunctions, we will only talk about the glass of the matrix itself, where the picture is formed. For convenience, we have divided all defects into several types, for which repair tips will be written, if possible.
Physical damage
In most cases, the LCD panel fails after impacts on the screen, falling of the device and other similar factors. Unlike old TVs, modern matrices cannot withstand some mechanical loads so well. Even a child throwing a soft toy with a glass eye at the TV screen can end badly for the latter.
If the matrix in your TV breaks due to excessive physical impact, then it cannot be restored and the LCD panel must be replaced.
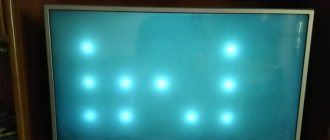
Image distortion
Factory defects are also not uncommon. It can appear either immediately after purchasing the TV or after some time of using the device. This breakdown can be so diverse that it can easily be divided into several categories:
- vertical stripes on the screen;
- absence of a picture or part of it;
- pillars in the image;
- “fading” or “braking” of the frame;
- illuminated areas on the matrix changing their position;
- color distortion and so on.
There can be many reasons for this malfunction. Usually the problem lies in flexible cables integrated into the glass of the matrix and control chips.
In most cases, this problem can be resolved by contacting your manufacturer's service center. You should not try to fix a problem with a new TV on your own, because you will be denied warranty service. Moreover, even if the defect is caused by a manufacturing defect, which involves replacing the device with a new one, you will also not be able to receive compensation after independent intervention.
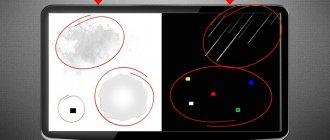
The appearance of spots in the picture
Another common matrix failure is various spots of oval, round or any arbitrary shape. They appear due to defects in the matrix glass or due to a damaged polarization layer.
Wear of these elements can be caused not only by manufacturing defects, but also by violation of transportation rules, storage standards and even operating requirements. If such spots appear on the display of your TV, then in this case the only possible solution is to replace the matrix.
Unskilled intervention
Although this is not a common cause of display failure, it is also worth mentioning. Problems with the matrix may also appear after self-repair of the LED backlight, screen or other components of the TV. In this case, torn cables, cracks in the corners of the screen, chips and other damage may appear. Of course, you can repair the LCD matrix of a TV yourself, but for this it is important not only to study the issue, but also to be careful. Remember that repairing any equipment also includes proper disassembly and assembly.
Tags: TV repair, lg smarttv
Comments 41
Industrial alcohol - methanol, poison. And ethyl is a drinking drink, which for some reason is considered not a poison, but a potent drug. But at the same time it is sold everywhere freely
In this case, it was technical ethanol - ordinary ethyl alcohol, unsuitable for drinking due to the high content of impurities. Although, someone drinks it...
There is a game of concepts here. If you spit in water, it will also become undrinkable. By definition, ethanol is drinking alcohol. And technically, methanol is poison. In negligible doses. And it’s funny that ethanol is called drinking alcohol, while at the same time being classified as a potent drug. Which, logically, should be banned altogether and cannot be in civilian use. “Ethanol is a narcotic substance. Here are its comparative characteristics in comparison with other drugs. Ethyl alcohol is a CNS depressant (relaxant) and is classified as a depressant (babiturates, benzodiazepines, butyrate). Rating of the degree of drug addiction caused: 1. Heroin 2. Cocaine 3. Tobacco 4. Methadone 5. Babiturates (sleeping pills) 6. Alcohol 7. Benzodiazepine 8. Amphetamines 9. Buprenorphine 10. Ketamine Alcohol is not officially classified as a narcotic drug according to the list of the Unified Convention on Narcotic Drugs of 1961, nor the more extended list currently in force. However, according to its pharmacological properties, ethyl alcohol belongs to the fatty drug series. Ethyl alcohol has a pronounced psychotoxic effect, which requires increasing doses to achieve (increased tolerance); with prolonged use, mental dependence develops and withdrawal syndrome is formed. Significant differences from recognized narcotic drugs are the free sale of alcohol (legal legitimacy), a long pre-morbid stage, that is, the formation of a painful desire is significantly delayed in time. The pre-morbid stage for alcoholism is determined by years, with drug addiction - weeks, with substance abuse - days. Withdrawal from stage 3 alcoholism is similar to withdrawal from heroin addiction”... In principle, the topic is not interesting for discussion. Of good!
Manual setting
In most cases, auto-tuning allows you to find two multiplexes of 10 channels each. But, if the automatic mode does not give results, you can try the manual setting mode.
The manual method requires the presence of frequencies on which broadcasting occurs. For satellite and cable, the numbers will be provided by the TV provider. For free-to-air broadcasting, the data can be easily viewed on a digital terrestrial television (DTTV) card.
- Go to the service via the link https://map.rtrs.rf/. The location should be determined automatically. In another situation, enter your region, city and home in the search bar.
- Pinpoint your house on the map and left-click on it.
- A table will appear with the characteristics of the two closest repeaters.
- First of all, the TVC number and frequency values for each multiplex are of interest.
- Additionally, look at the distance to the tower. The closer the repeater is located, the stronger and better the signal will be. The diamond-shaped arrow indicates the direction to the tower. By taking the compass in your hands and pointing the antenna exactly at the TV tower, you can catch the signal without any errors.
When the frequencies are known, in the already familiar “Channels” menu, open “Manual search/tuning”.
Select the broadcast type (in our case, digital).
Then, in the “Frequency” item, enter the found values for the selected TV tower.
In the table on the CETV card, the value is written in MHz, but in the settings you need to indicate it in kHz, that is, add three zeros to the original number.
The frequency itself may not be specified. Just enter the channel number of your repeater. The frequency will be automatically set to the one that corresponds to the TV channel number.
Then click on “Add/Create” on the right edge and the TV will begin manually scanning the first multiplex.
The same must be done for the second multiplex in order to find a total of two dozen channels.
It would be useful to look at the signal level scale. Based on the TV readings, you can adjust the antenna for the best reception. Try changing the location of the antenna, directing the axis of the structure at a different angle to catch a stronger signal. If the level is weak, channels may also be found. But in the future, the picture will freeze regularly and squares will appear.
There is no picture on TV 42LB673V, what should I do?
Due to numerous requests from readers, we decided to write a detailed article on how to disassemble and repair the LG 42LB673V TV (this instruction can also be applied to its neighboring brothers LG 42LB675V, 42LB677V, 42LB671V, 42LB679V) The 42LB673V TV belongs to the frameless series, be very careful when disassembling, one is wrong movement and the matrix will chip, which will make repairs impractical.
This TV was brought in for repair with the problem of dark spots on the screen, but this defect can also manifest itself as a complete lack of backlighting (no image, but there is sound).
Attention
Perform all actions at your own peril and risk. Do-it-yourself disassembly and repair is not recommended.
Composition of the LG 42LB673V TV:
Main (motherboard): EAX65384003
Power Supply: EAX65424001 (2.3) LGP42-14LPB
Panel (panel/matrix): LC420DUH (PG)(F1)
LED backlight/illumination (led string): 42″ V14 Slim DRT REV0.6 6916L-1684A,6916L-1685B, 6916L-1683B, 6916L-1682A
LG 42LB673V TV disassembly
1. Place the TV face down on a flat, hard surface.
2. Unscrew the bolts from the back cover and remove it
3. Unscrew the bottom end bolts of the speaker panel and carefully remove it by pressing the two latches along the edges and disconnecting the Wi-fi module with the power-on-control button.
4. Unscrew and remove the lower protective strips
5. Unscrew two screws in the right and upper corners that secure the “U-shaped” frame and remove it.
6. Unscrew and remove the strips holding the glass matrix around the perimeter.
7. Lift the “metal trough” by the protruding parts of the bracket fastening.
8. Remove the filters and diffusing plastic.
9. On the back side of the “trough”, remove the fasteners holding the reflector
10. Remove the reflector
TV backlight repair 42LB67*
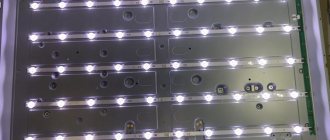
The TV has an intelligent backlight consisting of 5 lines of 9 diodes each, each in turn consisting of two separate parts of 5 and 4 diodes. Uses standard 3V diodes LG 3530 130 -150 mA
We check each line with a tester or LBP, monitoring the current consumption.
In this panel, very often the root of all problems is not the LEDs themselves, but the junction of two parts of the LED lines, we throw jumpers.
You can buy a new backlight for LG TVs 42LB675V, 42LB677V, 42LB671V, 42LB679V, 42LB673V 6916L-1684A, 6916L-1685B, 6916L-1683B, 6916L-1682A with free shipping, from a trusted seller on the global Aliexpress platform - link
If the link is not working, write in the comments, we will fix it.
Modification of the EAX65424001 power supply
To improve the power supply, it is necessary to increase the resistance of all current sensors from 1.5 Ohms to 2.4 Ohms (more is possible, even with an increase in resistance to 4.7 Ohms, the backlight will work at a fairly comfortable level). The photo shows the resistances that need to be replaced.
If you do not change the resistance, then be sure to turn down the backlight programmatically:
Menu - advanced settings - screen - image settings - backlight (set to no more than 80)
Hi all. An LG 39LB561V TV was brought in for repairs with a “no backlight” fault.
About a year ago, this TV was already repaired at a local workshop, but a year later the defect returned.
- Diagnosis of LED backlight malfunction
- Complete disassembly of the TV. Step-by-step instruction
- Identifying faulty LEDs
- Instructions for removing lenses and replacing LEDs.
- LED current limit
- Parts used in the repair
Defect manifestation
In this TV, on top of the matrix there are 8 cables with drivers soldered on them. But first things first.
We place our panel face down on a soft substrate and unscrew the self -tapping screws on the back panel.
But the TV set was assembled in Slovakia , it turns out, and consumes as much electricity as two 100 Watts.
Diagnosis of LED backlight malfunction
We will start repairing the LED backlight of the LG TV matrix by preparing the workplace, since when disassembling the TV we will need a separate table on which we will arrange such fragile parts as the matrix and light filters. I always repair such TVs with trepidation, since one wrong move can send the matrix to scrap.
Having laid the TV down, I unscrewed all the bolts around the perimeter of the cover.
TV after disassembly
Having removed the cover, I decided to measure the voltage on the LED driver at the moment it was turned on.
Connector for LEDs
At the moment of switching on, the voltage rose to 130 volts, after which it slowly dropped to zero. This behavior of the driver is normal, since if there is no load, it goes into protection and turns off the power.
Backlight circuit
The main elements of the TV backlight unit are:
- LEDs
- transistor
- resistor
- connection connector
To generate the supply voltage for LEDs, the following is used:
- driver
- inductor
- Schottky diode
- smoothing capacitor
Output circuit diagram of the backlight unit
Complete disassembly of the TV. Step-by-step instruction
Having confirmed that it was the backlight that was faulty, I proceeded to completely disassemble the TV.
First, I disconnected the cables going to the T-CON board and the MAIN board, then unscrewed and removed these boards.
Disabling the loop to the T-CON board
Power supply and MAIN boards removed
Removing the protection of the T-CON board
There were no problems with the T-CON board either. Carefully snapped the cables that went to the matrix decoders and removed the T-CON board.
Disabling T-CON board loops
The cables are disconnected and the board is removed
Next, I unscrewed the bolts that held the protection of the matrix decoder, after which I removed it and put it aside.
Removing the decoder protection bar
NEXT WE DO EVERYTHING VERY, VERY CAREFULLY.
- We turn the case over with the matrix facing up, and then carefully snap off the front metal frame.
Unsnap these latches around the perimeter
If something cannot be removed immediately, we do not use force under any circumstances. We take a good look at all the fasteners, look for the interfering latch, and only then remove the frame. After removing the frame, it is necessary to release the decoders from the rubber holders.
The decoders have not yet been removed from the latches
We also do this very carefully, first we release the lower part of the decoder, after which it should hang on the cable without effort.
Decoders removed from latches
- I removed the matrix along with the plastic frame. Since the frame sits tightly on the latches, I cut squares from the remains of thin plastic and inserted them under the latch, between the plastic part and the metal part, thereby freeing all the latches around the perimeter.
After this, the frame along with the matrix was completely removed. It is necessary to place the removed matrix in a previously prepared place, while paying special attention to the cables so that they are not damaged in any way. - After removing the frame, remove the films. We do this simply, move it to the bottommost layer (there is a layer like an org. stele), and remove it from the TV.
We got to the LEDs
This completes the disassembly.
TV stand
Before proceeding with disassembly, it is necessary to provide a smooth, flat surface under the TV so as not to damage the screen in any way. Place the equipment face down on a table, for example, and unscrew all the bolts holding the stand; depending on the model, their location and number may differ. This process will not cause any difficulties; as soon as the fastening elements are removed, the stand will be free.
Identifying faulty LEDs
After disassembling, I saw that the previous craftsmen had cut out the faulty LEDs from the strip, after which LEDs from other strips were installed in their place. They did it well, there are no complaints about the quality of the work done.
LEDs that were replaced in a previous repair
To find faulty LEDs, I used a laboratory power supply. I installed two thin sewing needles on the tips of the crocodiles.
Preparing for the test
To determine the rating of the LEDs, I first set the voltage to about 3 volts and checked whether the LED was lit. Next, I raised the voltage to 5 volts and a penny, and repeated the test. The LED lit up, which meant that 6 volt LEDs were being used.
Thus, I checked all the LEDs and found only one faulty one. At this stage, it is necessary to agree with the owner on the type of repair.
When repairing backlights, it is better to change all the LEDs, since in any case the old LEDs can fail at any time, which will lead to repeated repairs. If you do not want to change the LEDs, you can order complete strips.
The owner expressed a desire to install new trims. Since they are not available, I ordered them from China in his name. While waiting, it was decided to restore the TV by replacing just one LED. After a repeated breakdown, the owner will arrive with replacement slats, and this will reduce the repair time to a minimum. True, it is unknown when this breakdown will occur, perhaps the TV will work for a very long time