If you are using a traditional PC consisting of hardware with a monitor and peripherals, and the monitor has an HDMI connection, it is very easy to connect the PS4, Xbox on one or the other console and use the PC monitor for playback (in fact, if the monitor has multiple video inputs, you don't even have to plug and unplug one and the other to switch between PC and console). However, with laptops and AIOs things change, even though they also have an HDMI port.
We connect the PS4 game console to the monitor via converters
The easiest way is to use a special HDMI adapter and additionally connect sound through the existing acoustics. If the monitor does not have the connector in question, then it probably has DVI, DisplayPort or VGA. Most older displays have VGA built-in, so we will start from this. You will find detailed information about such a connection in our other material at the following link. Don't look at what it says about the video card, in your case you are using a PS4 instead.
More details: Connecting a new video card to an old monitor
Other adapters work on the same principle; you just need to find an HDMI to DVI or DisplayPort cable in the store.
The most popular Sega Mega Drive 2 emulators for Windows:
1) I’ll start with the emulator, which has long been considered indispensable, but it is still the same for many gamers. And the Sega Gens Emulator... meet the emulator for Sega GENS. This emulator dates back to 1999. Among the features: it has very high compatibility, i.e. Almost 99.99% of all games run on it without problems; graphics and sound, and controls too, are emulated very accurately, almost the same as on the original Sega console; + In addition, 32X and Sega CD are supported.
(Works on Win 2000, Win XP, Win 7. By the way, it launched just fine on a Win7 64 bit system. I also ran it on laptops - it just flies everywhere. Compatibility is excellent)
Several features of this Sega emulator:
— Allows you to save the game at any time;
— Supports network play;
— Fully functional joystick support;
— Ability to record sound;
— Good graphic filters that will allow you to get an almost perfect picture on your computer monitor;
In general, it’s definitely a must-DOWNLOAD for ALL Sega fans.
2) Recently, another emulator for Sega has gained high popularity. Impressions about it are very positive, compatibility with games is also high. In general, meet Fusion.
(I tested it personally on Win 2000, Win XP, Win 7. By the way, it launched just fine on a Win7 64 bit system. It also launched on a laptop without any problems.)
Peculiarities:
— Support for playing online;
— Many different graphic filters;
— Excellent compatibility with games;
— Support for Sega Genesis, Sega CD, Sega Master System, Sega Game Gear, Sega Game;
— Pleasant sound, without distortion or noise (this also occurs in some emulators).
In general, if you rate it on a 10-point scale, I would give it 10. It seems difficult to imagine all the functions of the presented emulator in such a small review.
3) The third and final review of the Sega emulator for Windows in this article. This will probably be the youngest emulator presented. And so... Meet Regen.
(Works without problems on Win XP, Win 7, Win Vista, Win 2000. Launched perfectly on a laptop with Win 7 64 bit)
What are the features? Let's start with the fact that Regen is a fairly powerful emulator, with support for Sega Genesis/MegaDrive, Sega Master System, GameGear, SG-1000 and SC-3000, and above all, with high accuracy emulation of the original game console.
Some sources say that Regen's emulation accuracy is even higher than that of Kega Fusin (see point 2).
Everything has its time
Remember that Dandy is over 20 years old, so your favorite game may look very unattractive on a high-resolution screen. Therefore, it is better to buy and connect a PS3 to your TV, and run Dendy games on your computer by downloading an emulator.
Of course, you won’t be able to achieve a complete feeling of immersion in the past, but if, for example, you connect a gamepad to your computer, you can spend an unforgettable evening in the company of your favorite childhood games.
Interface (audio-video) RCA cable
The Chinese used a rather interesting solution: RCA (Tulips) in 2.5mm Jack (In the photo it may seem like 3.5mm, but it’s not).
1 channel audio (mono) + 1 video with common ground.
Wire length:
1.38m
Gamepads (Joysticks)
Wire length:
1.84m
Disassembling the joystick
Unscrew 4 screws and open:
The buttons are stamped together, as far as I remember, before the buttons were stamped in pairs
The microcircuit is a “blob”, nothing has changed here since those times.
Features of connecting a dandy to modern TV
Compared to the old model of the device, the modern game console is a high-performance computer. The latest game consoles are offered on the modern market:
- with the most realistic graphics;
- with believable characters;
- with incredible musical accompaniment.
Modern gamers have a huge selection of games to choose from. “Dandy” can be classified as an outdated model, which is still in demand today. The console and joysticks were not of particular interest without the presence of cartridges that served as storage media. The most popular options were those that included 3-10 different games. Teenagers and boys often exchanged, bought, and sold cartridges among themselves. The devices could be easily connected to old TVs. In past years, all TV models did not have the necessary connectors to connect the device.
Sega Mega Drive 2 emulator for DOS:
(It’s unlikely that anyone will need it, but I’ll post it just in case)
There are emulators for Sega and Dos. I don’t know if anyone has such a rarity at home now, but, for example, at work it may well be. Why not use it then, at least for your own “selfish” purposes?!
This Sega emulator is one of the best for DOS. It is written almost entirely in assembler. (If anyone doesn’t know, programs written in it work faster than others. For example, almost all drivers are written in assembly language). It is worth noting that this emulator has fairly high compatibility with most games. Definitely download if you are a happy owner of DOS.
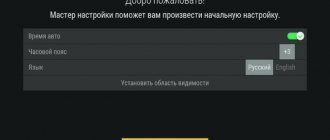
Basic Operations
The main operations in the system represent many categories. So, the user will be able to configure the following items:
- Program Manager.
- A picture.
- Search for broadcasts.
- Set the current time.
- Configure system parameters.
- Update the list of TV channels.
Program Manager
The program manager, in turn, is divided into several categories. Let's consider each point separately.
The channel editor includes a set of parameters that allow you to:
- Add a specific broadcast to your favorites list. To do this, mark the channel with a red mark by selecting the channel and clicking “OK”.
- To remove from this category, click “FAV”.
- If you want to remove a channel from the list so that it is not broadcast at all, select it and press the blue button on the remote control.
- To skip the broadcast, use the green key.
- If you want to move the channel to another position, then click on the red key, and when you select a place, click “OK”.
- You can block a channel by pressing the yellow button.
Please note that this section may require you to enter a password when editing the list of broadcasts. Usually a standard simple code is set - 0000. This way you can assign a specific number to the broadcast, delete a specific channel, add it to your favorites or remove it from there.
The next function in the program manager is TV Guide. This option allows you to view upcoming TV broadcast schedules. You should also read the description of a specific channel. In other words, this is the TV program guide.
The third category is sorting. Allows you to sort broadcasts by name or identification number. This way you can arrange them alphabetically, use your own numbering, or set them to automatic.
How to connect an iPhone to a Samsung Smart TV: via Wi-Fi, USB, HDMI, programs
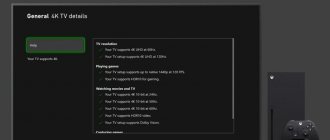
Image Settings
When considering how to set up the Selenga set-top box, it is worth noting one of the important parameters - the image. Open the menu and go to the second section. The user will then be able to:
- Change image format. Set the ratio to 4:3, full screen, 16:9, wide or panoramic. It is advisable to leave the choice to the system and set it to “Auto”.
- Adjust the volume level for a specific broadcast or for all at once.
- Set the required resolution. For example, for NTSC you should set 480i/480p, for PAL - 576i/576p. The maximum resolution is also available – 720p/1080i/1080p.
- Set menu transparency.
- Change the brightness, activate the visible broadcast number, set the time on the screen.
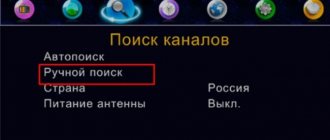
Search channels
The next item is searching for channels. This option is carried out at the very beginning after connecting the tuner. But, the user can also perform a repeated search. Available on the menu:
- Automatic search.
- Manual search. Used when the auto search did not give the desired results (usually due to a bad signal or error).
- Change country.
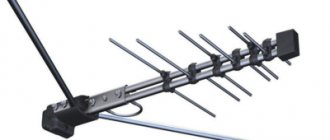
- Activate antenna power. Enable this option when using an antenna with an amplifier.
Setting the time
It makes no sense to explain what setting the time is. This paragraph contains standard parameters, including:
- Setting the time.
- Change region.
- Setting the time zone.
- Turn on the timer to turn off the TV.
Setting options
The parameters do not require additional manipulations. The only thing available to the user is to change the menu language.
System Settings
In the system parameters section, the following options are available to the user:
- Parental control function. Allows you to restrict access to viewing certain TV channels. When using this option, the system will prompt you to enter a password. Enter 000000. You can also set a code to use specific applications on the TV, for example, YouTube.
- Reset settings. This function is used only in extreme cases. Let's say a system failure occurs and many options on the TV no longer work, and steps to solve the problem did not bring results, then reset the settings to factory settings.
- Software update. Remember that every software needs regular updates. If you do not do this, various errors may appear over time. Usually, the update occurs automatically by the system itself, but sometimes an unexpected failure occurs, which is why you have to install the update manually.
Problem with the network “Error code 400” on Youtube: reasons, what to do?
Precautionary measures
At first glance, it may seem that there is nothing complicated or unusual about connecting Sega to a modern plasma panel. In fact, the procedure has its own characteristics. To ensure everything goes well, it is recommended to take precautions.
They read:
- Before work, clean the ports and plugs.
If dusty parts come into contact, they can cause a short circuit. - Do not change cables/replace cartridges without disconnecting the power from the console.
It is better to disconnect any operations with the game console (except for the game itself). - After the game is completed, do not leave the game cartridge in the console.
If you lose sight of this point, it may cause breakdown of structural parts in the device. - When connecting and playing games, handle the wires carefully.
This is Sega's weakest point. If something fails, finding the components will be very difficult. Such game consoles are not currently produced. - Protect Sega from various types of impacts (mechanical and thermal).
It is best to install the console away from heating devices and not place it in places exposed to sunlight. Sega also reacts negatively to moisture.
How to connect dandy to a computer?
Unfortunately, they are very expensive, but why not make one yourself? In general, the GamePad is a device very similar to an analog joystick. The difference between a typical joystick and a GamePad is the axis characteristics. Joysticks usually have two axes - X and Y. Continuous movements of the lever along these axes using two potentiometers are converted into analog electrical signals, which are then converted into digital signals using an ADC, on the basis of which the X and Y variables are calculated. The GamePad has non-proportional the amount of deviation from the center of the X and Y values for nine positions including the center, it is much simpler in design, and therefore more reliable.
power unit
Modern technologies are used: instead of the previous round DC power connector, MicroUsb is used.
Stated characteristics:
5v 500mA (I wouldn't be surprised if they made MicroUsb at 9v)
Wire length:
1.4m
Included is an adapter for “our” European sockets.
Sega console operating instructions
If you have lost the instructions for your Sega console, this is not a problem. We are publishing for you a printout of the user manual that comes with each Sega console. The instructions describe in detail how to connect the set-top box to the TV, how to turn it on and play it, as well as solving possible problems.
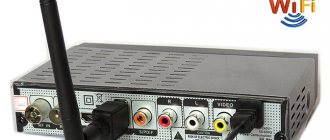
Components of the Sega console design
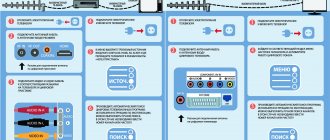
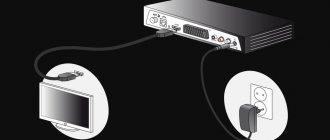
Installation and connection
The power supply comes from an alternating current network 220V 50Hz with the connection of a standard network adapter. The adapter is connected to the power input located on the rear panel of the set-top box. The power switch (“POWER” button) is located on the top panel of the set-top box.
Connecting Sega to the power supply
Connecting to a TV via AV input (in this case, color rendition and graphic image will be the best)
- Insert the AV cable's combi-plug into the AV output of the set-top box located on the rear panel.
- Insert the yellow plug of the AV cable into the video input, and the white plug into the audio input of the TV.
- Switch your TV to AV mode.
Connecting Sega to TV via AV cable
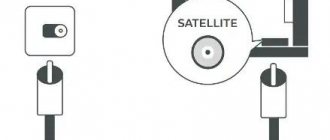
Connecting to a TV via antenna input
- Insert the combi plug of the modulator into the AV output of the set-top box.
- Connect the modulator and the antenna input of the TV with an antenna cable.
- Set up your TV.
Connecting Sega to TV via antenna cable
* Store note: it is possible to connect to the TV via the SCART connector using a special adapter.
Operating procedure
- Make sure the set-top box is turned off.
- Make sure all connections to the TV are correct.
- Connect the joystick to the left (main) connector on the front panel, for two-player play, the second joystick is connected to the right (additional) connector.
- Insert the cartridge with the picture facing you into the connector on the top panel to ensure complete mating of the docking contacts; the cartridge is inserted with slight pressure.
- Turn on the power of the set-top box. When connected correctly, the “SEGA” logo will appear on the screen, followed by the game name and game clip.
- Press the “START” button on the joystick. The game has begun. To start the game again or move on to the next game, press the “RESET” button on the top panel of the console.
Joystick functions
- START button starts the game and also turns on/off pause during the game.
- arrow buttons on the left control movement in the game
- Buttons A, B, C control the main actions of the game: shooting, jumping, etc.
- Buttons X, Y, Z serve, as a rule, for additional actions of the hero in complex games.
The specific purpose of the A, B, C, X, Y, Z buttons depends on the game.
Precautionary measures
To power the set-top box, use the installed network adapter. Do not use homemade or uninstalled adapters. When making connections to the processor unit, carefully check all connections to avoid breaks or internal damage.
There are openings on the unit body that provide cooling of system components during operation; factors that interfere with ventilation and the entry of dust and foreign objects into the system should be avoided. The normal operating temperature for the set-top box is room temperature, so it should not be located near heat sources or in direct sunlight.
When changing the game cartridge or switching cords, be sure to turn off the console. You should take a certain break between turning it on and off, and at the end of the work, the set-top box must be disconnected from the network.
Possible malfunctions and methods for correcting them
If a malfunction occurs in the operation of the set-top box, it is usually caused by a minor reason. Before claiming under warranty, perform the following checks:
| Problem | Check |
| No image on screen |
|
| The image is flickering or not in color |
|
| No sound |
|
| Streaks appear on the screen while playing | Fine-tune your TV |