And the fact is that when connecting a monitor or TV to a Windows 10 computer, HDMI is the most popular option due to the high quality of audio and video output. We will then look at the possible reasons that may be causing the problem, as well as the steps we should take to resolve the issue.
Contents [show]
- Reasons why Windows 10 does not detect the monitor via HDMI
- How to Fix HDMI Monitor Connection Problem Set HDMI as Default Device
- Manual screen detection
- Make sure display output is working correctly
- Update your display drivers
- Problems with viruses or malware
- Go back to the previous version of Windows 10
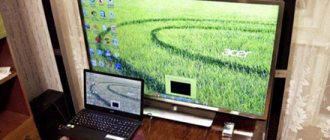
How to connect TV to PC via HDMI
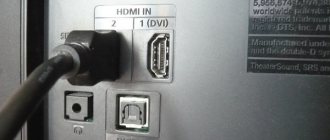
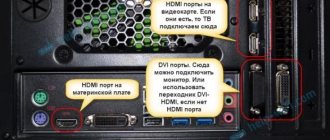
Their locations on different types of devices:
- desktop computer - rear panel of the system unit;
- laptop - on the side or back of the case;
- TV - on the back of the case, next to the cable antenna connection.
TVs that support HD picture quality are equipped with HDMI ports. It is simply useless to look for this type of connection on TV models without a designated format.
Before you start connecting your personal computer system to your laptop, you should check the HDMI cable for damage. First of all, you need to look at the integrity of the connectors that connect to electronic devices. Then carefully inspect the wire itself for damage.
If no problems are found in the cable, then you can proceed directly to the connection. To do this you need:
- Find HDMI ports on devices.
- Connect the cable to the desired PC input. If there are several of them, we find the port related to the computer’s video card.
- We connect the other end of the cable to the TV.
- Using the “Source” (or “Source”) button on the remote control, we switch to the desired broadcast channel: HDMI-1 or HDMI-2, depending on where the cable was connected.
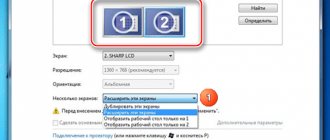
- On the desktop monitor, right-click on an empty space.
- Select the “Screen Extension” menu.
- In the “Multiple Screens” tab, select the “Display desktop only on the second screen” option.
If the connection instructions were followed correctly, the desktop of your personal computer will appear on the TV monitor.
TV firmware update
You can update your TV via the Internet if it is a SmartTV (most modern models are produced in this format). It is difficult to describe detailed instructions that are universal for all TVs, but in general the procedure will be as follows:
- go to the “Settings” of SmartTV, having previously connected it to the Internet via a LAN cable or Wi-Fi and a router;
- Find the “Support” item in the list (usually at the very end), click on it;
- Click on the “Software Update” tab and see if there are any updates for your TV; if there are any, click “Update now” and wait for the procedure to complete.
Most modern TVs are updated regularly: numerous software bugs are fixed and functionality is improved. Therefore, we recommend that you activate the “Automatic update” item in the TV system settings.
There can be many problems - software, mechanical, hardware. Periodically, plugs burn out, wires become damaged, and contacts oxidize. If you suddenly have difficulties connecting the HDMI cable to your TV, follow our instructions in the order we described.
If you have a weak laptop, when you connect a TV via HDMI, it may simply not have enough power or power. We recommend disconnecting unnecessary devices, such as flash drives, card readers, and mice, and try projecting the screen in this mode.
The image is not output to the TV via HDMI - reasons and solution
If nothing happened after connecting the personal computer to the TV via HDMI, then you need to once again check that all steps of the previously discussed instructions were followed correctly.
In the case when the user is sure that he did everything correctly, but the signal from the PC is not transmitted to the TV, then it is worth checking the devices and connections for faults.
There are three types of problems:
- Incorrect connection setup.
- Damage or problems with the HDMI cable.
- Problems hidden in devices: computer or TV.
Each type of problem contains specific cases that require a specific solution. Therefore, they should be disassembled separately.
Cable is faulty
First of all, you need to inspect the HDMI cable for physical damage. It is necessary to check the outer sheath throughout the entire wire plot, but some areas should be given special attention.
The first step is to check the cable bends. There is the greatest chance of getting a break. Then you need to inspect the areas that come into contact with the corners of bedside tables, stands and other furniture. The risk of finding a cliff in these places is also high.
Very often, HDMI cables are chewed by pets, mainly cats. It is extremely difficult to see damage from such sabotage. All that remains on the cable are small fang marks. However, such bites can be felt.
If no physical damage is observed along the entire length, then attention should be paid to the cable ports. This is where the wire connects to the computer or TV. Be sure to check that the ports are not bent.
A cable failure can be proven by replacing it. If, when changing the HDMI cable to another one, the image output problem was solved, then most likely the problem was a cable failure.
There is no point in trying to solder the broken wire yourself, since the HDMI cable is “picky” about such interventions.
TV is not configured
When connecting an HDMI cable to the TV, many users are faced with a screen that says “Signal not detected” or “No signal”. Most TV owners believe that they connected the cable incorrectly, but the main problem with such inscriptions on the display is the lack of the simplest device settings.
You will also need TV settings if, when you turn on the HDMI cable, the display still shows an image from another signal: cable TV or VGA cable.
To set the TV to view images received via HDMI, you must:
- Click on the “SOURCES” button. Usually this key is located in the upper right corner of the remote control and is a square with an arrow in it.
- A list of all possible signal reception sources will open on the TV display.
- You need to select exactly the HDMI source through which the signal is sent. Usually they are signed with the same numbers as on the external connector on the TV body.
- We select the desired source using the arrows on the remote control, and also confirm the selection with the “OK” button.
If everything is done correctly, the TV will switch to the HDMI signal.
On some TV models, the “SOURCES” button has a different name. Most often these are “Sources” or “INPUT”.
Laptop or PC is not configured correctly
Your desktop computer or laptop must also be configured correctly to send an HDMI signal to your TV. First of all, you need to make sure that the computer can transmit a signal from its desktop to the projector, and accordingly to additional monitors, which include the TV.
To do this you need:
- Right-click on any free space on the desktop of your personal computer.
- Open the “Screen Resolution” subsection.
- In the window that opens, select the “Connect to a projector” tab.
- Any mode other than “Computer only” must be activated in the settings.
Having completed all the steps of the instructions correctly, the user will receive a personal computer connected to the TV via HDMI.
If the Connect to Projector function cannot change the operating mode, it indicates that the connection between the devices has not been established. The user should check the integrity of the cable, as well as the PC and TV ports.
In addition to the long step-by-step instructions, you can use the Windows shortcut key combination (a button with a flag drawn on it) + P. This combination will change the mode in the “Connect to a projector” function.
Video card problem
In the case of desktop computers, the image signal to the TV does not come from the entire PC system, as is the case with laptops, but exclusively from the video card or video adapter of the device. And this part of the computer system has a habit of often breaking down due to the large overload that occurs during operation.
The problem with the operation of the video card occurs due to outdated drivers that serve this part of the PC system. You can update the video adapter software yourself by downloading the installer from the manufacturer’s official website, or automatically by running a system update.
Nvidia video cards have a specialized program that scans the computer system, checking for the latest update and running it on the device. You can download this software from the developer’s website.
To run automatic system update you need:
- Launch the Windows command line by pressing the hot keys “Win” + “R”.
- In the window that opens, enter the value “devmgmt.msc”.
- The device manager will appear in front of the user. In it you need to open the “Video Adapters” tab, in which you need to find the video card of interest.
- Right-click on the device of interest.
- Select the “Update drivers...” tab.
- Follow the instructions from the Windows assistant.
After updating your video card drivers, you must restart your computer's operating system.
Connection port not working
If all of the above examples are not related to the problem that occurred, and the signal from the PC still does not reach the TV, then most likely the problem is hidden in a non-working connection port of one of the devices.
When connecting the cable to a desktop computer, you need to use a connector that relates specifically to the video card, and not to the PC motherboard. Otherwise, signal transmission may not work correctly.
Fortunately, most devices have several ports for connecting an HDMI cable, so the user can simply replace the input from a non-working one to another.
Viruses on your computer
Viruses and malware can also block signal transmission from a personal computer to a TV via an HDMI cable. Basically, this is done to receive money from the victim, since the attackers ask for money to be transferred to their account in exchange for unlocking the system.
The solution to the problem under consideration should be prevention. Any desktop computer or laptop must have an anti-virus program installed, and you must scan files for viruses at least once a week.
If the user nevertheless “caught” a blocking virus somewhere, then the only solution to the problem will be a complete reinstallation of the Windows operating system.
Updating video card drivers
Outdated drivers for the video card on the computer are one of the reasons why HDMI does not work on the laptop. We recommend updating them. This can be done in a few clicks:
- go to “My Computer” and right-click in any free area;
- select the “Properties” tab, in the context menu click “Device Manager”;
- Find and expand the “Video adapters” item;
- in the list, click on the name of your video card (if there is no name, most likely, the standard version of the driver is installed, which urgently needs to be updated) and right-click;
- in the menu that appears, click “Update”, then select “Automatic” from the list.
Windows 10 has an automatic system for updating and installing drivers from a specialized download center, but problems often arise when installing the operating system. We recommend going to the video card developer’s website and downloading the driver for your model yourself. You can use the DriverBooster program to quickly update the necessary modules, but with this software it is better to always create backups so that in case of unexpected situations you can quickly restore a working copy of the drivers.
Why is there no sound playing?
An HDMI cable transmits not only the image from one device to another, but also the sound. However, it is with this that users often have problems.
If, after connecting a desktop computer or laptop to the TV, there is no sound, or the audio track does not come through the TV speakers, but through the PC speakers, then most likely the problem lies with the output device.
To fix this problem, you need to change the speakers through which the sound is played. This is done through a personal computer or laptop system.
Step-by-step instructions for replacing the audio output device:
- You need to right-click on the “Speakers” icon, which is located in the lower right corner of the taskbar of the Windows operating system.
- Then, in the selection panel that opens, left-click on the “Playback devices” item.
- After this, a panel will open with all possible speakers.
- In the listed devices, you need to find the TV and right-click on it.
- Then select “Set as default”.
After completing the setup, each time you connect to this TV via an HDMI cable, the computer system will transfer audio playback to the TV speakers.
Video instructions for replacing the audio output device from a PC to a TV
Checking the HDMI cable version
Sometimes problems connecting your laptop to a TV or other devices arise because you are trying to use a different version of HDMI cable that is not supported by your devices. The first version of HDMI 1.0 was released in 2002, now 2.1 is current.
Mostly in 2021, versions from 1.4 to 2.1 are used. For example, with an HDMI 2.1 cable you can connect devices to watch 8K video with a bandwidth of up to 102.2 Gb/s. If we are talking about version 2.0, then its maximum is 5K format with a maximum data transfer rate of up to 45.66 Gb/s. Read more about the types of cables and their versions in Wikipedia.
The image did not appear immediately, what should I do?
In this case, you just need to configure the laptop in the following sequence:
- Go to "Display Settings".
But such adjustments do not guarantee picture and audio adjustments, because the problem may lie elsewhere.
Driver installation and verification
And so, let me remind you that the HDMI output comes directly from the video card. It doesn't matter whether it's built-in or separate. Our task is to install newer drivers.
- Press two “Win+R” keys at the same time. Next, we write the command as above in the picture.
- Go to the "Video adapters" section. Right-click on our card and then “Update drivers...”.
- We immediately select the first item and wait until the system finds a new driver on Microsoft servers. If the driver is found, install it. But it is not always possible to update the software this way. Sometimes the system finds nothing and you see a message that the driver does not need to be updated. In fact, he just didn't find it.
- To install the exact driver, you need to know the name of your video card. As you may have noticed, the name is displayed there in the “Device Manager”. Next, simply enter it into the search engine and download the driver from the official website.
- Don't forget to specify the operating system. We download only the latest version of the driver and the full package. After downloading, install and reboot the device.
If this does not help and there is still no image on the TV, then try a different port on the TV and on the laptop (if there is one). Otherwise, you need to take some other wire, perhaps the one you are using is broken or not compatible according to the standards. You can check the cable by connecting another laptop or computer to it.
Connecting a laptop to a projector via HDMI
A laptop is connected via HDMI not only to a TV, but also to a projector - in schools, universities, and at public events where materials need to be shown to the general public. The connection process is practically no different from connecting to a TV:
- turn on the laptop and connect it to the projector using an HDMI cable;
- turn on the projector when the cord is already connected to it, and as soon as the lamp warms up, an image will appear on the screen;
- if the system does not automatically detect the projector, on a laptop in Windows 10, click the “Notification Center” tab in the lower corner, and then select “Cast to Screen”; on the projector, click Source (on the device itself or on the control panel), select a laptop via HDMI as the projection source.
Related questions
I want to connect my laptop to my home theater but the screen remains blank; What can I do? Make sure your laptop (or desktop) has HDMI as its default output connection. If this doesn't solve the problem, you can try to fix it as follows:
- Boot your computer by connecting the HDMI cable and your TV, which is already turned on.
- Turn on the TV after the connected computer boots up.
- Boot your computer and TV separately, then connect them using an HDMI cable. However, it should be noted that in some cases you will need to use a VGA cable.
What can I do about wireless HDMI problems? Wireless HDMI, also known as WHDI and/or WiHD (depending on the format), is fairly new. They help further reduce the number of cables needed for a home theater and are great for those with devices located far apart from each other.
However, they have their own set of problems. If you are having problems with your HDMI wireless interface, try relocating it to prevent interference, which often occurs due to line of sight and distance. If moving devices doesn't help, you may need to call technical support for your specific device.
How to update software on a video card
If connection difficulties continue after the recommendations above, updating the PC software associated with image output may help. The driver may be out of date, damaged, or simply missing. In such a situation, you should open the device manager and look at the “video adapters” tab. To do this, you need to select “manage” from the “my computer” icon in the menu, which opens by right-clicking on the mouse.
If a red or yellow icon is lit next to the adapter, then there is a problem with the operation of this node. To update, you can immediately open its properties and select automatic driver update, but it is more efficient to download it from the manufacturer’s website.
Advice! The update can be found using the DriverPack Solution utility. Its convenience is that it scans the system itself and looks for all the necessary drivers.
Solving problems when connecting a laptop to a projector
When connecting a projector via HDMI to a laptop, problems may also arise. As a rule, difficulties are resolved in a few clicks.
No signal or no clear image on the projector
If, when connecting a projector via HDMI, the system says “No signal” or the image is not entirely clear, we recommend moving the device closer. The further the projector is from you, the less clear the picture will be, but the final quality depends on the resolution of the computer.
Also in the Windows operating system settings in the “Resolution” tab, you can select “maximum” or “optimal”, based on your tasks.
Changing the display mode
As with a TV, when connecting a projector via HDMI on a laptop, you need to select a display mode. There are 3 options available:
- “computer screen only”;
- "duplicate";
- "expand"
Usually this window appears automatically (in Windows 10), but you can press the hot keys (Win + P) and select the “Duplicate” option.
Some projectors can be connected via Wi-Fi. If it is possible to connect the projector and laptop via Wi-Fi, then it is much faster, and there is no need to buy an additional HDMI cable. It should also be taken into account that to project an image on such devices, a 3-5 meter cable is often required, which is more expensive than similar options with a length of 1-3 meters.
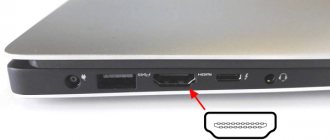
How to check the functionality of hdmi on a laptop?
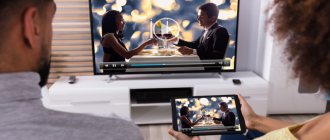
Many people like to watch movies, videos and photos on the big screen. But what if your laptop monitor is small? There is a way out - use an HDMI cable to connect to the TV. With it, you can watch videos in any position: sitting in a chair, lying on a bed, and even on the floor. And also communicate on social networks.
If all else fails
You should try not only the HDMI port on the laptop, but also on the TV; if possible, connect another device. It doesn’t work either - the TV socket needs to be repaired.
You can reset and reinstall drivers and video card settings:
- Removing old ones - launching new drivers
- Through parameters - additionally go to monitors
- Connect the TV, click on its icon in the monitors
- A notification should appear indicating that the external display is being used.
Important! Service center specialists know how often HDMI ports break down if they are connected incorrectly. It's not just about unstable network voltage or worn-out home wiring. Our electrical systems have poor grounding; often there is no grounding in sockets. When pairing complex, energy-intensive devices such as televisions and laptops, the contact points (port) are affected by the discharge. To connect them you need:
- Turn off both devices from the network completely
- Unplug any antenna or cable TV plugs
On budget and very cheap models, it sometimes happens that the connector seems to be present, but is not active. The user manual then states (in small print) that this is an additional option, its presence is not required. Depends on the country and type of laptop. Then using an HDMI cable is useless, read the instructions for your laptop - there may be a solution there!
It is better to resolve issues with connectors in a workshop. Changing them yourself is impossible. Connection and video card failures will be expertly repaired here. They will help expand the power resource of your PC - upgrading the video chip, installing a missing port.
Proper repair and tuning is the key to the longevity of laptops.
What makes HDMI so special?
High Definition Multimedia Interface, also known as HDMI, has made connectivity easier, which is often overlooked. Introduced to electronics consumers in 2004, HDMI continues to evolve to meet the needs of an ever-changing industry.
HDMI 2.0, the latest version available to consumers, supports 4K technology using 12-bit color and resolutions up to 60 frames per second. However, HDMI 2.1 doesn't stop there. Announced in 2021 but still some time away from full production, HDMI 2.1 will help support the emergence of 10K technology and will continue to expand 4K and 8K capabilities.
But what does all this mean for you? HDMI cables transmit audio and video signals between connected devices. This means you no longer need to have separate cables for audio and video.
HDMI also carries information known as a "handshake". In other words, HDMI cables transmit copy protection information, component types, capabilities, and restrictions between connected devices.
In particular, HDMI and HDMI ARC (Audio Return Channel) also support Consumer Electronics Control (CEC) technology. This allows you to use one remote control to control the basic functions of up to 15 connected devices.
HDMI technology minimizes the footprint of your home theater, optimizes your experience, and supports virtually all platforms and devices. This is considered an asset to your entertainment system, if not your entire home theater. (If you want to learn more about why HDMI is the best option for your home theater, check out my article on HDMI and HMDI ARC technologies.)
Troubleshooting
You can solder a broken cable yourself if it is not torn to shreds. As a rule, it is enough to restore the integrity of broken wiring in the inner layer of wiring. It is difficult to confuse them: as a rule, they are all marked with different colors.
If there is a problem with the port itself, you need to unsolder it and install a new one. For such repairs, it is better to contact a specialized service center.
Antivirus software is required to catch viruses. If you haven't used an antivirus before, now is the time to start doing so. By the way, according to reviews from many users, the standard Windows Defender is not the best antivirus. It is better to disable it through the Control Panel and install software from a third-party developer.
A good option is the free Avast antivirus. Unlike many similar ones, this application can scan the computer before loading the operating system, thus identifying viruses that hide their presence during normal operation. A full scan takes a couple of hours, but in this way you can detect all malicious and simply suspicious software.
Another good option is the Dr.Web CureIT utility! It is usually used when conventional antiviruses can no longer cope with the infection. The program is not installed on the computer and is not updated, but can also be launched from a flash drive. Before each scan, it is recommended to download the latest version with the latest anti-virus databases from the developer’s website.