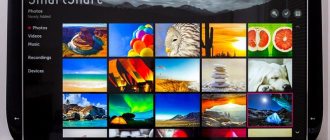
Streaming with the built-in media player is a convenient solution that allows you to watch content such as videos, photos and music stored on your computer through your TV.
A connector for connecting a base station, as well as the ability to call video, images and music over the network, are some of the most important properties of Smart TV receivers.
This way, you save on the resource-intensive transfer of this multimedia content to your TV using an external hard drive or flash drive.
Many of the currently available Smart TV models are equipped with an internal media , so they can receive media files from the local network without the need for additional devices.
TVs that lack network connectivity and the ability to play multimedia can be retrofitted relatively cheaply by purchasing a suitable player.
The small EM7285 player can even handle Full HD material. Using a Gigabit Ethernet cable network or a wireless WLAN network, calls up multimedia files and then plays them using your TV and/or Hi-Fi group.
Playing media content via TV
A media player (also known as a media ) receives multimedia files from a server on a local network and then plays them using consumer electronics.
To do this, you must connect such a player to your TV and/or Hi-Fi equipment. You can connect to a local network using a data cable or via a wireless network (WLAN).
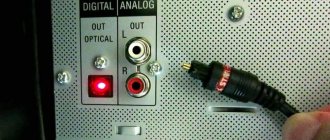
Players for playing movies, photos and music are equipped with an HDMI connector, which communicates with the TV. In addition to standard definition video, PAL accepts high definition content, including Full HD material (1080p and 1080i).
Better-equipped models have a built-in hard drive and a USB port to which you can connect external USB drives to write to and read multimedia content from them. External hard drives can also act as a client for streaming content . It is worth noting that even devices such as the Sony PlayStation 3 and Microsoft Xbox 360 game consoles can be used as a network receiver for materials transmitted to the TV.
Most media players offer the ability to connect to Hi-Fi equipment to play music (or get better sound during movie sessions). However, most of them do not have a display to help you select audio tracks. Therefore, you have to turn on the TV even when you just want to listen to music.
How is transmission from computer to TV carried out?
For users who want to regularly play content collected on a computer using a TV, a network player that supports the DLNA ( Digital Living Network Alliance ) standard offered by many manufacturers is a convenient solution.
DLNA defines the standards for communication between Smart TV receivers, media players, receivers, audio-video, computers, tablets and smartphones. Thus, for example, you can call, using all devices that support DLNA , a multimedia file from a network drive with the DLNA or from a computer that has software compatible with this specification. DLNA is currently available in version 1.5.
Wireless Connectivity Options
Despite the fact that in most cases the computer is connected to the TV using wires, there is also a wireless connection method.
Bluetooth
Using Bluetooth to pair a laptop and TV equipment is an option that is convenient for owners of outdated models of digital equipment. Some computers require you to purchase a Bluetooth router separately.
The connection diagram is as follows:
- both types of equipment are included;
- in the “Bluetooth” settings of the PC and TV, select the “discoverable” mode;
- find Bluetooth via PC and select the brand of your TV;
- If necessary, TV equipment is allowed to be paired with a computer.
WiFi
Since connecting a laptop to a TV is a network connection, one of the pieces of equipment must be a so-called access point. The second one will be used for control. If the user needs access to both devices, then he needs to connect a Wi-Fi router.
Before trying to connect via Wi-Fi, be sure to check whether your TV has a Wi-Fi module. Some models simply do not have it and connection will be impossible.
Online media sharing technology
The condition for providing multimedia content on the network is the connection of devices to the same local network. The type of connection (wi-fi (WLAN) or cable Ethernet) does not matter. Control is taken over by the UPnP AV ( Universal Plug-and-Play Audio Video ) protocol, which must be supported by all devices.
This technology allows you to discover all devices on the network and interact with each other. UPnP AV protocol looks for a server on the local network that provides the appropriate multimedia content exchange service. Then displays a list of found devices.
UPnP AV protocol is the fact that it does not require login to the server and does not allow you to manage access rights. Each device can therefore access shared resources without problems.
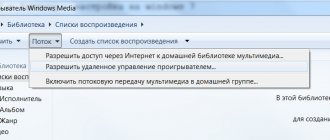
To play media content using the DLNA , you need to enable it on all devices participating in the transmission. Then a list of available content will appear on the screen and you can start playing.
Network performance
When streaming high-definition video, a lot depends on the data transfer speed on the local network. Otherwise, when watching movies or music through TV, they may stutter.
However, even on a cable network with Fast Ethernet ports, which can achieve performance of up to 100 Mbps, you can smoothly play high-definition videos in 1080p mode.
WLAN and PowerLine networks
In wireless networks and PowerLine, it is necessary to ensure good conditions for data transmission, because both of these types of local networks are more susceptible to interference than network cables.
However, under optimal conditions, the 802.11n option in the case of WLAN, and the HomePlug AV option in the case of the PowerLine network, is sufficient for high-quality playback of HD movies.
You can view playable content found on DLNA-enabled devices connected to your local network in the player GUI.
Multimedia server for home network
It is recommended to use a multimedia server as a source with files. This is the name given to an identifying device on a network that stores photos, music files, and movies for transfer to a playback device.
The role of such a server can be successfully performed by a regular desktop computer or laptop. However, this first one is a little less suitable for this job because it consumes a lot of power and the server must be constantly ready to perform its duties.
A more economical solution is, for example, a router with a USB or NAC interface.
Share photos and videos via DLNA
If you want to provide movies, photos and music on your local Windows network, you cannot do without server software, for example, share-ware Tversity (www.tversity.com) or free VLC Media Player (www.videolan.org), Serviio (www. servio.org).
Tversity not only gives you access to information via UPnP and DLNA , but also allows you to project multimedia files using a web browser. The benefits of this tool, as well as the PS3 Media Server program, are its ability to convert files saved in exotic formats to commonly used ones (an action we call transcoding) so that they can be transferred to devices that do not support little-known video codecs. Alternatively, you can use server software offered by some TV manufacturers, such as Samsung's PC Share utility.
With this program, you can easily organize and quickly search even a large collection of music and movies. Can independently sort files, dividing them into photo, video and music categories according to their extension.
In addition, it reads metadata (additional information contained in files), for example, musical artists, which allows you to sort your collections also in accordance with these criteria. The corresponding data will be displayed on the Smart TV screen or in the player interface.
Router as a server
The media server software that most routers and NAS devices use supports UPnP and DLNA (check your user manual).
By connecting an external USB drive to your router, you can transfer the movies, music and photos stored on it to streaming devices via your TV .
Server activation
The media server function should be enabled automatically after installing the disk into the network memory. Check this in the router configuration interface. The method for performing this operation depends on the router model (check the instructions).
Bring up the configuration page, then go to the correct menu and, if necessary, check the media server control box.
Play video and music
Other programs that comply with the UPnP AV can be similarly used as servers. First you need to connect them to your home network (preferably using a cable). Then turn it on and search for a media server on your local network.
When a media server is detected, you can play the media files it provides, provided that both the media server and the playback device support the file format.
NAC as a media server
Modern NAC devices offer at least one UPnP AV . UPnP AV server can be taken over by a router if you connect it to a USB port with a hard drive containing multimedia files. If necessary, you must activate the media server (the corresponding option is presumably located in the column with NAC parameters).
Regular NAC servers provide the UPnP AV Server in the advanced settings or in the Advanced section. However, the ability to select the folders in which multimedia resources should be available on the server leaves much to be desired. Most models allow you to specify only one folder, forcing users to organize the folder structure collected in the NAC server in a specific way.
Why connect your PC to your TV?
The expediency of pairing a computer and TV is different for each user. By displaying images on a large screen, you can significantly expand the functionality of the equipment:
- make presentations;
- view all kinds of content;
- play video games;
- communicate via video conference.
Owners of home computers pair it with TVs for the following reasons:
- if the monitor malfunctions, the screen is cracked;
- for comfortable viewing of films, cartoons, photos and videos;
- for broadcasting;
- inspection of the PC contents.
If your computer monitor breaks down, while it is being repaired or when you buy a new one, you can use a TV to replace it.
Converting files to work with streams
If you can't play a video file on your TV or media player , you need to convert it to a format supported by your device. This is done very conveniently using the Tversity program (see above).
This tool can transcode files presented on the media player into the desired format in real time. However, this is only possible when Tversity independently detects the playback device. The list of models that are automatically recognized is posted on the manufacturer's website.
Alternatively, you can convert videos using one of the many free utilities designed for this type of task. Worthy programs, in particular: Format Factory and simplified Universal Player Encoder. They are equipped with codecs (GNU and GPL versions) necessary to convert audio and video tracks to other formats.
Connect via Wi-Fi
Instructions for Windows 10
Select the desired file, right-click. In the window that appears, select “Transfer to device.” Then select the name of the TV.
Instructions for Windows 7
Right-click on the file and select "Play to". Click on the TV. After this, a player will appear where you can manage the selected files and change the order in which they are displayed. To expand the list, transfer files through the player. This way you can remotely control the display, updating it with new files. You can also combine photos, music and other movies.
It happens that before the image is transferred, the “Media Streaming Options” window appears. Click "Enable Media Streaming."
What you need to know about DLNA
DLNA ( Digital Living Network Alliance standard distinguishes several categories of media content - images, audio and video, as well as device types that are used to identify individual products, for example, as a media content server or media player. Thus, other devices connected to the local network can submit a request to them for this service.
A certificate issued by DLNA (www.dlna.org) after passing the appropriate tests certifies that the device has been classified as part of a specific equipment category. The certificate also contains details of the file types supported by the device. DLNA organization , but also accept many more formats.
Problems with DLNA working correctly
In practice, DLNA does not always work flawlessly. Although manufacturers advertise their Smart TVs , smartphones and tablets as capable of seamless data exchange between all devices, but the user must in many cases fiddle with unusable software, and messages appear on the TV screen informing that the file format cannot be serviced.
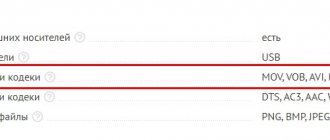
One of the reasons is the fact that DLNA imposes only three formats on manufacturers - JPEG (photo), MP3 (music) and MPEG-2 (video). Even if your TV supports formats such as DivX, MKV or H.264, this does not mean that you will be able to play content stored in these formats through the DLNA .
As a result, you can connect the desired file from a flash drive, and not via DLNA , which remains incomprehensible to many users. And even if the content is playing, the TV interface may respond very sluggishly to user input.
On the other hand, some functions do not work, such as scrolling forward and backward. In this situation, it is recommended to try several different DLNA / UpnP . Maybe one of them will work optimally with your TV, device or smartphone.
Adjusting the image on TV from a PC in Windows 10
For your computer, the connected TV is simply a second monitor, and accordingly, all settings are made in the monitor settings. In Windows 10, you can make the necessary settings as follows:
- Go to Settings (Start - gear icon or Win+I key).
- Select the settings item “System” - “Display”. Here you will see two connected monitors. To find out the number of each of the connected screens (they may not correspond to how you arranged them and in what order you connected them), click the “Detect” button (as a result, the corresponding numbers will appear on the monitor and TV).
- If the layout doesn't match the actual layout, you can drag one of the monitors to the right or left in the options (i.e. change their order to match the actual layout). This is only relevant if you use the “Expand Screens” mode, which is discussed below.
- An important parameter item is located just below and is entitled “Multiple displays”. Here you can set exactly how two screens work in pairs: Duplicate these screens (the same images with an important limitation: both can only be set to the same resolution), Extend the desktop (the two screens will have a different image, one will be a continuation of the other, pointer the mouse will move from the edge of one screen to the second, if positioned correctly), Display only on one screen.
In general, the setup can be considered complete at this point, except that you should make sure that the correct resolution is set for the TV (i.e. the physical resolution of the TV screen), the resolution is adjusted after selecting a specific screen in the Windows 10 display options. two displays, the instruction may help: What to do if Windows 10 does not see the second monitor.
Android manages devices
Android works not only as an operating system for tablets and smartphones. This platform is increasingly being used in modern media players as well. Below are some of the many examples.
Media player with DVB-T2 support
The iconBIT company offers the XDS1003D T2 model. Equipped with good software. In addition to popular video files, including ISOs containing disc images, Blu-ray even supports 3D movie formats. Playback is carried out using an additional hard drive, which can be installed inside the case (must be in 3.5-inch format) or from shared folders on the local network.
The player not only has a Gigabit Ethernet connector, but also a USB 3.0 port for connecting external hard drives. In addition, there are two USB 2.0 connectors and a card reader that supports SD, SDHC and MC formats. HDMI 1.4 (maximum image resolution is 1080p) and S/PDIF interfaces are provided for transmitting image and sound signals. The player supports, in particular, Dolby Digital and DTS Surround standards.
An Internet connection allows the use (via the TV) of online services such as YouTube, Flickr and Picasa. An addition is a built-in DVB-T tuner with recording and delayed viewing (timeshift) functions. The device has successfully proven itself as a multimedia TV control panel.
Media player
Eminent follows a similar trajectory, but abandons the DVB-T tuner. The EM 7385 is equipped with an easily accessible external hard drive bay that can accommodate a 3.5-inch SATA hard drive. In addition, it has a powerful USB 3.0 port and a built-in WLAN module, which allows you to connect wirelessly to other devices within your home network.
The slightly more modest EM 7380 only plays multimedia files from network shares, external hard drives, USB keys and SD memory cards.
You can download applications for the Eminenta interface from the manufacturer's website. Two player models can be controlled remotely through special applications on an Android smartphone.
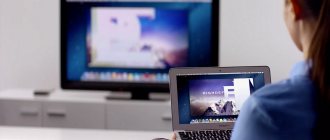
Ways to watch videos from a laptop on TV
To stream content from a laptop to a TV, it is recommended to use a WiFi or HDMI interface. The advantage of the first is that the user does not need any wires to pair devices, and the second is the ability to transfer not only images and videos, but also application screens to a large monitor.
How to watch videos over Wi-Fi
To connect a laptop to a smart TV via WiFi you will need:
- Connect both devices to the same router. To connect Smart TV to the router, you will need to go to the system settings using the corresponding key on the remote control, open the “Network” tab (the globe icon) and activate the WiFi module built into the device. Next, select “Search for wireless access points” and find the name of your home network in the list that appears. After entering the password, the TV device will connect to the router.
- Set up DLNA from your computer. A user of any laptop model running Windows 7 (and higher) will have to open the “Connection Control Center”, go to the “Active Networks” tab and change the characteristics of the access point from “public” to “home”. These steps are necessary so that the TV can access video files stored in the laptop’s memory.
- Open access to the content folder. The user can “share” either a specific folder or the entire computer hard drive (the second option is preferable). To open access, you will need to right-click on the desired directory, select “Access” from the context menu, go to “Advanced settings” and check the box next to “Open shared access” in the window that appears. Then all that remains is to save the changes by clicking on “Apply”. You can also use a method that involves launching a special access control assistant: you will need to open Explorer, “Network”, “Discovery”, and then follow further instructions from the system.
- Synchronize TV with computer. The user should launch the SmartHub of the device, go to the “Share” section (the name of the function depends on the manufacturer) and click on the icon of the paired laptop. You can then navigate through your computer’s file system and start playing any supported media file. If any difficulties arise, it is recommended that you familiarize yourself with the contents of the instructions supplied with the television device.
A WiFi connection allows you to play only files downloaded offline on your Smart TV—to watch movies online on a big screen, you will need to use an HDMI interface.
It is also worth noting that most modern TVs support the AVI format, but not MKV. If the TV does not have its own Wi-Fi module, to synchronize the device with the laptop, you can use a special adapter that connects to the TV device via an HDMI connector and acts as an external antenna.
The most popular is Google ChromeCast, the latest generation of which costs 5 thousand rubles. After connecting such a gadget to the TV, you will need to perform all the steps of the above algorithm.
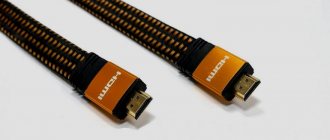
Via HDMI
The algorithm for connecting a TV to a laptop using an HDMI cable is as follows:
- Checking the ability to connect the TV to the computer. Such actions are necessary, since some TVs have an HDMI output, not an input. You can check the purpose of the connector by reading the instructions supplied with the device. If the television set is not equipped with the required HDMI connector, you will have to use an adapter to the existing input port.
- Connecting a laptop to a TV with an HDMI cable. After connecting the devices to each other, you will need to start the computer, and when the loading of the laptop’s operating system is completed, turn on the TV device. The TV should recognize the new external signal source automatically.
- Setting up a laptop. The user will need to click on the “Start” menu icon, open “Control Panel”, go to “Hardware and Sound” and select “Display”. In the tab that appears, you should select the most convenient method for displaying content (it is recommended to use the “Duplicate” mode).
- Additional configuration of video card parameters. You will need to click on the icon of the desired driver in the “Hardware” section and manually set the optimal system parameters. This step is optional.
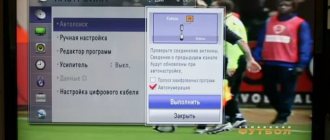
- Selecting an external signal source on the TV. To switch the TV device to display content via HDMI, click on the “Channels” button located in the upper right corner of the remote control and click on the line of the connector involved in the connection.
Next, the TV device will begin to duplicate the laptop screen, and the user will be able to start watching movies on a large monitor. It should be added that setting up the computer is only necessary the first time it is synchronized with the TV.
You can purchase an HDMI cable at any retail electronics store: when choosing an accessory, you should keep in mind that cheap models may not support 4K resolution and may become unusable after a month of use.
Conclusion
Other methods of connecting a TV to a laptop are inferior to the described interfaces in all respects. You can find out about the video formats supported by the TV device on the manufacturer’s official website.