Setting up a modern TV is a fairly simple procedure. After turning on, the device will automatically offer to perform the necessary manipulations for complete setup. If even with the advice you cannot understand how to set up an LG TV, then you need to carefully study the instructions from the manufacturer or any other step-by-step guide.
- Automatic channel tuning on LG TV
- Manual channel tuning
- Setting up IPTV on Smart LG TV
- How to connect a third-party device
- Possible problems when setting up your TV
During setup, you will need to find channels, set the date and time. If the TV is classified as smart, you will additionally need to connect to Wi-Fi or connect an Ethernet cable.
Setting language options
When you turn on LG TV for the first time, the system will prompt you to select the desired language. As a rule, the default language is set to the region in which the TV was sold. If changing the language was not offered, you will need to go to the menu. The language settings change as follows:
- You need to take the remote control and press the Settings button (usually looks like a gear).
- Go to settings.
- Find the “System language” or “Language” subsection.
- Select the required language.
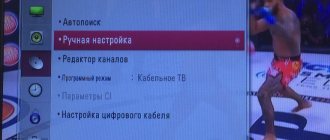
Through the parameters you can configure both new and old TV. If you need to find channels or restore television after installing a new antenna or cable signal, you can re-tune it through a separate menu.
Selecting a location
The location region should be selected in order to fine-tune the date and time and receive additional content or functionality that is only available for a specific location. To select a location on your TV, follow these steps:
- Settings opens.
- Select the “Settings” section.
- You need to find the “Country” item and select your region of residence.
Manually setting up the TV allows you to change a large number of parameters, as well as perform a factory reset. A separate menu allows you to configure image, sound, connections, etc.
Setting the date and time
There are several ways in which the date and time can be changed. If the device can connect to the Internet, the time will be set automatically. You just need to specify the correct time zone. On simpler models without smart TV or in the absence of an Internet connection, the following manipulations are required:
- Open the settings menu.
- Go to the “Date and Time” section.
- We set the time and date manually. You will need to specify not only hours and minutes, but also your time zone.
In the section you can change the on and off time, as well as activate a one-time timer. It is worth noting that due to an incorrectly set date, satellite television does not start working correctly. This setting has a strong impact on a number of TV functionality.
Controlling the TV using the keyboard, 45 connecting a keyboard, Connecting a keyboard
Any TV, including those that are not Smart TV devices, have a service menu that controls vital settings.
In particular, the horizontal and vertical image size, brightness correction, as well as other parameters that can seriously affect the operation of the device. Therefore, if you don’t understand how and what to do, it’s better to leave this service altogether. It is not surprising that the service menu on Samsung TV is usually called extended, because it is used if you need to make major changes in the operation of the TV itself.
And to use it, you need to have a special remote control. Moreover, it is important that it be “native” to the TV, that is, it comes with it. Otherwise, even if you get to the menu, it will be difficult to stay there, since the controls are not reliable.
Instructions for setting up LG brand equipment
Setting up is carried out in approximately 5-10 minutes.
- Press the Menu button;
- Select from the Options menu;
- Select Auto-adjustment;
- The chosen country is Sweden or Finland;
- Select the signal Cable;
- Choose Digital;
- Pressing Poshuk.
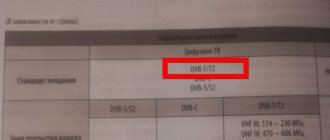
Setting up digital channels on TVs of the LG brand
In order to tune in to high-definition digital TV channels on a large number of LG models, press the Menu button on the remote control, you will see the TV menu, in which you will need to select the Options section.
Select the country Sweden or Finland.
Now go to the Settings menu, Auto-shook item, indicate the method of connecting to the TV – Cable.
Now, in the new window, go to Settings and enter the current parameters: search type – fast, frequency – 298000, Swiss. characters – 6952, modulation – 256QAM, edge ID – auto.
If you have completed everything correctly and saved all changes to parameters, then you will find channels and radio stations within an hour.
An important feature of LG TVs is the Automatic Channel Update function. You must be sure to turn it off, otherwise the TV will periodically delete the list of channels you have installed.
Go to Setting up digital cable – Auto-update channel: vimc.
Changing the region on LG TV 2021 (Russian/Ukrainian SMART/SMART) without a service remote control
Sorting of channels.
Adjusted. Auto search. Cable. Uncheck (√) from Autonumeration. Viconati. After setting up all channels, the required buttons will appear in the Program Editor. The previously selected countries are Sweden or Finland.
Sources:
https://freesoft.ru/blog/kak-na-smart-tv-LG-smotret-IPTV-besplatno https://amaths.ru/kak-podklyuchit-t2-k-televizoru-LG/ https://www .LG.com/ru/LG-magazine/what-is/kak-pomenyat-yazyk-v-televizore-LG https://gadgets-reviews.com/ru/stati/4597-kak-nastroit-kanaly-na- televizore-LG.html https://www.lanet.ua/sdonetsk/instructions/instruktsiya_LG/
How to get to the service menu of Samsung TV 6
In order to go to the service menu you need to perform a few simple manipulations. But they are only available if you have a remote control. For some models, a standard remote control is suitable, like for Samsung 5, or you will have to use a special remote control, which is not included in the kit, and will need to be purchased separately. But this is not a problem, because there are many service stores.
- Take the remote control and press the following sequence: - - mute - power;
- Having found out how to enter the service, you need to wait a couple of seconds, since the TV, after pressing the specified combination, will reboot to display the necessary information;
- After this, the person entering must learn to move in such a way as not to accidentally change the settings. If you need to change something, you need to press “Enter” and only then make amendments;
- Go to “Control”, “Cloning” and so on;
It is important, before finishing work in the “Hotel Option” section, to set o to protect some functions from failures. And also, since the user has entered the menu and knows how to enter here at any time, he also needs to understand how to exit without damaging the settings. This is done this way:
- You can exit by simply turning off the TV;
- Then we go back to -SYSTEM and see what has changed;
- If everything is fine, we entered without problems and the settings are fine, which means that we can continue to use the TV with the updated menu.
Any TV, including those that are not Smart TV devices, have a service menu that controls vital settings. In particular, the horizontal and vertical image size, brightness correction, as well as other parameters that can seriously affect the operation of the device. Therefore, if you don’t understand how and what to do, it’s better to leave this service altogether.
It is not surprising that the service menu on Samsung TV is usually called extended, because it is used if you need to make major changes in the operation of the TV itself. And to use it, you need to have a special remote control. Moreover, it is important that it be “native” to the TV, that is, it comes with it. Otherwise, even if you get to the menu, it will be difficult to stay there, since the controls are not reliable.
Auto search for TV channels
Most LG TV settings can be done automatically. Thus, all models provide an auto-search function for available TV channels. Launches in just a couple of clicks. Finds digital and analogue channels if the available signal allows. Searching for TV channels on LG TVs is as simple as possible; the user only needs to specify the related parameters and confirm the launch of the automated process. We do the following:
The auto search will begin, and the found programs will be displayed on the screen during the process. By default, paid and encrypted ones are skipped; if you wish, you can activate them later (you will need to pay for access). The system will automatically number the found TV channels. Upon completion, the user can adjust this list or add captions to each program.
- How to set up a Samsung Smart TV - step by step instructions
Disable automatic updates
In Smart TV, by default, the function of automatically updating the current software and the OS itself is activated. On the one hand, this is convenient, since the user always has the latest software at his disposal. On the other hand, this leads to some problems - after updating some important software, all settings fail, including found TV channels. Therefore, many users disable auto-update. This is done as follows:
- In the general settings section, go to the “Digital cable” section (in some versions it may be designated as “Digital”).
- A new window will appear in which we click on the “turn off auto-update” button.
I accidentally changed the language to Spanish and now I have everything in Spanish and only 4 channels (there were 70) how can I change the language?
As with any TV, settings - language - change. If everything is in Spanish (and it probably is), then you need to reset all settings to factory settings. In this case, the entire menu will be in English, but it’s easier to figure it out. How to do this I won’t say - different models have their own access to this function. You can look in the instructions for the TV.
Here, I would probably like to immediately clarify about the country where the Samsung TV was purchased.
It will probably be interesting that, for example, in the Samsung Smart TV series, which were purchased in one of the European countries, the Russian language cannot be found in the menu at all, so you can offer this “Russification” option:
If a TV from Samsung was purchased in Russia, then there is definitely a Russian version of the menu and to activate it, you just need to select the required function:
As you can see from this video, there is nothing complicated. Millet initially needs to select the “menu”. And then “language” and scrolling through all the possible options, stop at Russian.
Obviously, we need to find Russian in the menu. Spanish is, of course, fun, but the chain of actions does not change when you change the language. So, we need to find Settings, in them - Languages, then - Change, in the end, find what we are looking for in the list. To make it easier to understand whether you are at the right stage or not, I offer a translation into Spanish: Settings are “a configuración de”, Languages are “idiomas”, Change is one of these: “cambiar”, “modificar”, “ alterar", "variar".
Any TV has an option for setting up channels; you need to go to the menu and watch, and then press the necessary buttons.
There you need to find the option to set up channels, then click OK cable TV or other, after that comes the country, indicate Russia, and then search.
And you will have all the channels, it all depends on the TV operator and the correct language will be available.
You can set up analog TV separately, and then digital, everything will return to normal and all channels will be found immediately.
If you cannot find the options in the menu due to the wrong language, then open the instructions and using the example pictures there you will see everything and it will become clear. You can select the language directly in the system option.
I suspect that you changed not the language, but the region, since you only have 4 channels left.
And yet, first you need to try to find Russian in the settings.
Go to the menu. In the window that opens, select System, in Spanish it can be sistema. You can navigate by the icon - it’s a gear.
Next Idioma, translated into English Language, what the language means and choose Russian.
If you haven’t found one, it means the region is wrong.
Then try to do it from the remote control, as in this video
In general, setting the language is not such a difficult manipulation. But if you don’t understand, it’s better to contact a more knowledgeable person or a specialist from the service.
Samsung TVs have a fairly user-friendly interface. Samsung TVs are multilingual. In order to change the language, you need to press the MENU button, after which you should go to the System section, in this section you can select the interface language.
You can also change the broadcast country. In order to do this, you need to go to the broadcast section, in the country section you can select the country, separately for analogue broadcasting and separately for digital broadcasting.
You can also change the language of the audio track during TV broadcasting. To do this, press the Tools button on the TV remote control, then select the audio language from the menu.
Great weekend to everyone! It’s been a while since we wrote anything on the topic of smart TVs. Therefore, let's correct this jamb, especially since new information has appeared on the Internet.
So we will talk about how to add the Russian language to Samsung Smart TV J and K series (2015-2016). After all, it is about the latest generations of TVs from this manufacturer that the most questions arise.
The content of the article:
So, my dears, if you are regular readers of the blog, you probably know that more than one publication has already been written on this issue. For example, you can refresh your memory if necessary:
But there we carried out all the manipulations using a special service remote control or a device replacing it:
And now we will try to add the Russian language to the J and K series with only the standard remote control from the TV set. But here it is necessary to note an important nuance: the blocking of the Smart Hub cannot be bypassed in this way.
Well, let's get straight to the point. And for a better understanding of the issue, immediately watch a video from a YouTube user with the nickname 5960niktv. So, let's take a closer look:
Now let's summarize and note the key points. The first thing you should pay attention to is the key combination on the standard remote control to enter the service menu. On 2015 J-series Smart TVs this is:
And on the latest K-series of 2021 the following scheme works:
After logging in, follow the “Control-Hotel Option” path and activate the “Hospitality Mode” option, changing its value to “On”:
Then we take one step back through the menu and enter the “Cloning” section:
And in it we select the “Clone TV to USB” function:
At this stage, the TV will display a message that it could not find the connected flash drive. That’s correct, we didn’t insert it:
Therefore, click “OK” and return to the very beginning of the engineering menu. Then we follow the path “Option-MRT Option”:
And in the “Language Set” item we indicate the value “CIS”:
Then you should return to the very beginning and disable the initial “Hospitality Mode” parameter:
At this step everything is done. We turn off the TV using the button on the remote control, and after it starts, the Russian language will become available in the settings menu:
That's all, friends, now you know how you can add the Russian language to Samsung Smart TV J and K series (2015-2016) using a regular remote control out of the box. That's all for now, if you have any questions, ask them in the comments.
But in conclusion, I would like to clarify once again. Look, now we just added the Russian language and nothing more. If you brought a TV from abroad and your Smart Hub is blocked, then you need to use the service remote control or a device that replaces it and do the following manipulations:
How to install Russian language on Samsung smart TV.
How to change the language on a Samsung TV? Many people ask this question when they buy a TV or bring it from another country.
I want to warn you right away that the author is not responsible if you do something wrong, changing the parameters on the TV may cause a brick. In other words, fuck your TV!
Let's watch the video carefully as shown in the video review on how to install the Russian language on a Samsung TV.
How to flash Samsung smart TV. First, we need a Samsung TV remote control. Or a service remote control to get into the TV service menu.
Not all remote controls are suitable for this, see the screenshot below for one of the remote controls that may suit you!
Fits ! Doesn't fit.
Your Samsung TV is turned off, then press 1 2 3 mute 4 power. The TV should turn on and you will be taken to the service menu where you can flash your Samsung smart TV.
There are different remote controls, I tried different dances with a tambourine, but nothing worked with the original TV remote control. Everything here is as simple as borrowing from a neighbor for a couple of minutes. Business is for 5 minutes, the main thing is not to rush and not ruin the TV!
And so you got to the service menu of the Samsung TV.
The most important thing is not to use the left to right buttons, only use enter to select a category and top to bottom!
Well, here we are in the service menu of a 2021 Samsung TV that was purchased in Europe.
How to change the language on a Samsung TV with a red square marked ,,Option,, a menu that you need to go to by pressing the enter button!
Next we get to the Samsung service menu, see the screenshot below.
Unlock Smart Hub
Turn off the device, press the keys on the remote control in order: “Info - Menu - Mute - Power”.
The TV will turn on, and you will automatically be taken to the service menu. Now, using the up and down keys, go to the “Options” item. On the remote control press the “OK” key.
Go to the “Local Set” item, where we change “EU” to “CIS_RUSSIA”. On the remote control, press the “Return” key to return to the options. Reset system settings using the Factory Reset button. Confirm the actions with the “OK” button.
To exit the engineering menu, press the TV power off button on the remote control.
Turn on the receiver again, use the remote control to go to the menu, go to system settings and change the language.
We need "Russian".
We perform the steps to turn off the device and re-enter the service menu. We get to the items “Control” – “Sub option”, where we enter the following parameters in the second and third lines (see screenshot).
These steps will enable the service port and error timer, which will trigger a system reboot if serious problems occur.
How to get to the service menu of Samsung TV 6
In order to go to the service menu you need to perform a few simple manipulations. But they are only available if you have a remote control. For some models, a standard remote control is suitable, like for Samsung 5, or you will have to use a special remote control, which is not included in the kit, and will need to be purchased separately. But this is not a problem, because there are many service stores.
- Take the remote control and press the following sequence: - - mute - power;
- Having found out how to enter the service, you need to wait a couple of seconds, since the TV, after pressing the specified combination, will reboot to display the necessary information;
- After this, the person entering must learn to move in such a way as not to accidentally change the settings. If you need to change something, you need to press “Enter” and only then make amendments;
- Go to “Control”, “Cloning” and so on;
Reset to factory settings for Smart TVs of different series
The procedure for resetting Samsung TVs to factory settings is approximately the same for all models, however, depending on the series, different nuances may appear.
Series D
Samsung D series TVs are reliable. However, even they are not immune from various problems. And to get rid of them, you need to reset the parameters.
This is done using the remote control. Before starting the reset, you must go to the main TV section. Now you need to find the “Exit” button on the remote control and hold it for about 10 seconds. A special window will appear in which the system will once again ask you to confirm the reset. Here you need to agree by clicking the “OK” button. Immediately after this, the device will begin to reboot, simultaneously deleting user settings and restoring factory settings.
Series K
In such TVs, the reset is done through the settings menu. Procedure:
- use the remote control to open the main menu;
- go to the “Settings” section by pressing the corresponding key;
- in the “Support” tab you need to find the “Self-diagnosis” item;
- a list of available operations aimed at restoring the device’s functionality will appear;
- “Reset” is selected from the list.
After this, the rollback of user settings will begin. It is worth noting that you must enter a PIN code to initiate the reset. If the user has not changed it, then you need to enter the combination “0000”.
Series J
TVs in this series support a reset from the settings menu. To find the desired command, the user will need to go to the “/123” section. There, in the “Support” tab, click the “Self-diagnosis” section. In the proposed list, you will need to click on the “Reset” button.
Here you will also need an access code, which was selected in advance by the owner of the TV. After entering the code and clicking the “Yes” button, a full reset will begin. Usually the operation takes a few seconds, the device will reboot and be ready for use.
Series H
H series models allow you to reset your Samsung TV to the factory settings of your Smart TV in much the same way as previous models. By going to the appropriate tab, the user will have to enter a PIN code and confirm their actions.
Series F
How to reset settings on F series TVs:
- on the main screen, select the “More” button, which opens access to the main menu of the device;
- you need to go to the directory “” - “Support” - “Self-diagnosis”;
- In the list of actions that appears, select “Reset”.
Here you will also need to enter the access code and confirm your actions. The access code will not allow a stranger to interfere with the TV’s settings and will preserve its functionality. After agreeing, the system will restart the TV.
Series E
The E series will not boast any unusual approach to resetting settings. The main settings menu and available self-diagnosis interfaces are still used here. The order of moving through the menu items remains the same. The names of items and the configuration of keys on the remote control may change slightly.
After detecting the “Reset” section, the device will ask you to enter an individual access code, without which it will not be possible to perform a reset.
M, Q and LS Series
Smart TV series M, Q and LS are very similar to each other. So their reset methods follow the same principle. To perform a system rollback, do the following:
- press the “Home” button on the remote control;
- in the “” section find the “Settings” item;
- then in the “Support” tab click on the “Self-diagnosis” button;
- Now you can implement a rollback using the “Reset” key.
To return to the original settings, you will definitely need a PIN code.
Setting up channels
To enjoy high-quality images on your new Samsung TV, you need to properly configure the reception of available TV channels. Typically, the Russian interface in the menu should be installed automatically, and therefore you will not have to waste time changing the language.
Procedure:
- Go to the main menu from the remote control.
- Select the settings section.
- Click on the “set up and search for channels” tab.
- Select manual or automatic search type.
- Wait until the TV equipment scans the available frequencies and displays a list of channels available for viewing.
It is advisable to use an automatic search for available TV programs, since the operation can be completed in just a few minutes. The device will automatically start searching, and then assign numerical values to the found channels, which you can then change yourself if desired.
As soon as the channel search on the Samsung TV is completed, the device will automatically turn on the first channel in the created list.
It is advisable to learn more about the features of automatic and manual settings so as not to make mistakes.
- How to set up DVB T2 on your TV
Manual setting
This type of search is usually used on older TV models, since there is no “automatic” there. When choosing the manual search mode for TV channels on a Samsung TV, you must take into account that you will have to change the factory settings.
This is what often scares users away, although there is nothing complicated about it. Do not be afraid of mistakes, because by choosing the wrong frequency, the user will not be able to break the TV - after that you can set other, correct values.
You can carry out the operation yourself using the following algorithm:
- Go to the main menu and select the “Antenna” section.
- Next, click on manual settings and select “Search for digital channels.”
- An item with additional settings should appear in the new tab: frequency, module, transmission. There we set the following parameters: 170000 kHz, 128 QAM, 6900 KS/s.
- Next, you need to wait until the settings are automatically loaded into the system and the search is carried out.
- After entering the required settings, programs on the Samsung TV will begin to appear on the screen.
- Once the settings are completed, you need to save the result and adjust the frequency, module and transmission indicators. In this case, only the frequency needs to be changed to 178000 kHz. After that, run the search again.
Using the same principle, you can find all available channels by adding 8000 kHz to the frequency. Using manual settings, you can independently select the ideal sound and image quality on your TV so that the picture is as clear as possible. To do this, you need to select the “ Image ” section and adjust the contrast, clarity and brightness as you wish.
The user also gets the opportunity to manually set the order of the channels depending on their own preferences.
To do this, you need to go to the menu and select the “ Broadcast ” section. Opposite the desired program you need to check the appropriate box.
Auto mode
Every modern Samsung TV has a function for automatically tuning TV channels. To search, you must select the signal source: satellite, cable or antenna .
To search, you need to go to the menu, select the “ Channel search ” tab and start automatic mode. The programs will be arranged in a certain order.
- How to manually tune channels on TV?
To change the location of the TV guide yourself, you must select the move function:
- Go to the main menu.
- Go to the “Broadcast” tab (dish icon).
- Move the slider down and find the “Change channel number” command. Click on it to activate.
- Return to the “Home” tab and open the “Broadcast” section again, select “Change”.
- Select the program that you want to move to another place in the channel list. Check the box and choose to change the number.
-== Television ==-
Everything about Russian and foreign television, important when purchasing satellite systems, consultations and questions
All about Dreambox
Everything about the Dreambox digital receiver: Russification, problems and their solutions, tips….
Dreambox - EPG and Picons
- Dreambox DM 500/800/8000 HD PVR
- DM 520/820/7080 HD/900 UHD
- Topics 239 Messages 85k
85k
Satellite
Everything related to satellite reception, satellite receivers. Repair, installation, configuration.
Repair and restoration of HDTV receivers
- Compressed information
- Receivers without EMU FTA
- Receivers
- Satellite transponder news.
- Settings and discussion of satellites
- Various equipment
- Antenna tuning and problem solving
- Channels and issues related to them
- Closed filtered topics
- HDTV receivers
- HDTV receivers Linux
- Section not for guests
- HDTV receivers without FTA EMU
- miscellaneous about satellite
Topics 1.4k Messages 196k196k
IPTV SamsungTV and other models.
Other TV and IPTV models
- Blu-ray/DVD players SAMSUNG IPTV
- Other devices and IPTV
- Repair and restoration of SAMSUNG Blu-ray/DVD players
- Archive
Topics 143 Messages 35k35k
Miscellaneous about television...
here is everything that does not fit in content into any of the above sections about TELEVISION..
Topics 502 Messages 11k
11k
Multimedia consoles
Various multimedia consoles and everything about them.
Topics 186 Messages 10k
10k
IPTV providers
Topics 10 Messages 833
833
Cable
Problems and their solutions, reception features, exchange of experience
Topics 161 Messages 4.6k
All about Dbox
Section about Dbox...information, configuration, software replacement, problem solving.
Topics 220 Messages 5.3k
Everything about Video Disk Recorder, hardware, software, setup, experience sharing
VDR: Hardware (computers, fans, cards, circuits)
- VDR: Linux for VDR users
- VDR: Your own foreman
- VDR: Plugins & Addons
- VDR as a network multimedia center
- VDR: ArVDR
- VDR: LinVDR, c't-VDR & Co
- VDR Blogs
- VDR: International
- HDTV under Linux
Source
WebOS
The current version is 4.x. New 4K and OLED TVs run on version 4.5 (updated 05/15/2019)
WebOS runs a new application from Rostelecom - Wink, where you can watch more than a hundred channels for free throughout the year. All recommendations, settings and descriptions of solutions in this article apply to versions of WebOS 3.0 and higher.
Disabling advertising in LG Content Store
What if I don't have playlists and can't find them?
Usually playlists can be found on specialized forums of IP-TV providers. If you can’t get freely available playlists, you’ll need to spend a little money. We go to the website at edem.tv and register there. This is a direct television provider. We pay a couple of bucks and generate a link to the playlist for ourselves (there in just a couple of clicks).