Step-by-step setup of analog channels on your TV
The easiest way to set up a TV is in automatic mode, when the TV itself searches for all channels, arranges them sequentially and remembers them. When setting up your TV, automatic search may skip channels with too weak a signal.
Undesirable results may occur when automatically tuning your TV:
- the TV can remember one channel of normal quality and another of the same quality, but with a lot of noise;
- The TV itself may not determine the sound standard on some channels (there will be sound, but there will be no sound)
To eliminate unwanted auto search results, you can switch to manual TV setup mode and manually delete them. For example, “Menu” / “MENU” -> Channel settings / Channel -> “Manual tuning” (see the instructions for the TV). In the “Manual tuning” channel mode, you can manually change the audio broadcasting standard on those channels where there is only a picture.
How to connect
To get access to Disney, just sign up for one of the digital TV tariffs from MGTS:
- “Basic” – for 160 rubles/month. the client receives 156 channels of different topics (rental of a set-top box - 99 rubles/month);
- “Optimal” – 120 rubles/month, 92 TV channels and free equipment rental;
- combined tariff “Summer Promotion” – 499 rubles/month, combines interactive TV and Internet services: 92 channels, 300 Mbit/s;
- “It won’t be boring” – 649 rubles/month, 156 channels, 200 Mbit/s, free Wi-Fi router and TV set-top box;
- “Internet + TV” – 749 rubles/month, 156 TV channels, 300 Mbit/s.
The last 3 packages are provided as part of the summer promotion. The indicated price is valid for 3 months from the date of registration; after this period, other prices are provided.
Detailed instructions for setting up your TV in pictures
To find the section for TV settings in the menu, refer to the TV's instructions. You need to find a menu with a line to start automatic channel search and start the search. Usually it is called up like this: “Menu” / “MENU” -> Channel settings / Channel -> “Auto tuning”. The TV itself will clear the memory and record the channels present on the cable network.
If you were unable to set up your TV yourself, you can order a specialist to set it up for a fee at your home by phone.
How to set up your TV in automatic mode
Comment. The images below are photographs of the TV screen. The quality of the image taken by the camera is much worse than the real image on the TV screen due to the characteristics of the camera.
The setup is shown on the example of a Samsung Plano TV. If you have a TV of a different brand, the names of menu items and buttons may differ (see the instructions for your TV).
1. To enter the TV settings, press the MENU button on the remote control. Text with the names of sections of the TV menu will appear on the TV screen. To move up and down and left and right in the TV menu, use the arc-shaped buttons with the image of triangles, placed side by side in a circle (in the photo around the Enter button). To increase or decrease any parameter, use the volume + and - buttons. To exit a menu or return to the previous menu, use the button labeled TV or EXIT.
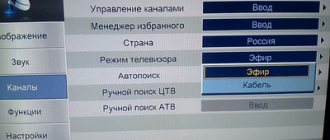
2. Once you enter the menu, you will be taken to the image settings section. To go to the TV channel settings, use the down-up buttons and scroll down until the phrase Channel appears at the top, and the icon with the image of a satellite dish is highlighted on the left.
3. Now go to the right side of the menu using the right arrow button. After this, the phrase Autotune should be highlighted.
4. To start auto-tuning, press the right arrow button again. Put the remote control aside and wait until the progress bar reaches 100%. This will take about 5 minutes. While scanning channels, the found channels will briefly appear and disappear on the screen and the channel number counter in the corner of the screen will change. Don't interrupt the setup process!
5. Exit the TV menu by pressing the EXIT or TV button. You can watch TV! If necessary, you can manually arrange channels in the order in which you are accustomed to it, and also remove channels with strong interference or duplicate channels. Congratulations, you can now use cable television in Ivanteevka.
Digital terrestrial television channels of the DVB-T2 standard
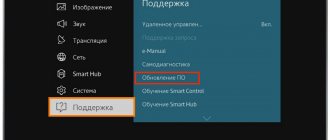
If you bought a TV, antenna and set-top box just now, then when you open the welcome window, you need to click on the “Menu” button on the control panel. Next: “DVB-T setup” -> “Channel search” -> “Search mode”. Here you can both find the channels themselves and set the frequency.
To simplify the search process, you can first go to a special website with information to find out what frequencies the channels are broadcast on in your city.
If the antenna is directed correctly, then after a few seconds the “Signal Strength” and “Signal Quality” scales will be filled. If the level is good, then you need to click on “Search”, and the device will perform the adjustment itself.
If you do not know the correct direction of the antenna, you can rotate it very slowly and smoothly. In this case, you need to carefully look at the scales of intensity and quality. Once these scales are full, secure the antenna in this position and perform a search.
This is one of the easiest ways to set up a digital TV yourself. If automatic tuning turned out to be ineffective - the set-top box found few channels (or even did not find them at all), then you need to use manual tuning.
To do this, you need to delete all those channels that were found earlier. After that, select the manual search mode in the same way. A window will appear on the screen. In it you need to set the frequency on which all channels in your city are broadcast. You can find out the frequency on the Internet or from your service provider.
After the channels of the first multiplex have been found, you will need to find out the frequency for the second multiplex and start the manual search again. You can find many channels this way.
Checking the signal quality
To make sure that everything is done correctly, you need to find the “INFO” button on the receiver. (In some models, this button has a different name. To determine which button is intended for checking the signal quality, you need to look at the instructions.) This button must be pressed 3 times, as a result of which a window should appear on the screen with information about the signal quality, number channel, frequency and encoding. If the first two parameters are greater than 60%, this means that the signal level is acceptable.
If the signal is of poor quality (constantly changes its level) and shows 30% of the full signal, then the image quality will be very poor. In such cases, it is necessary to either raise the antenna higher, or install it in another place, or simply strengthen the signal.
If the TV can receive several multiplexes, you need to check the signal quality on each of them, because they work with different transmitters. It may well be that the signal will be good in one multiplex, but not in another.
Interesting facts about the channel
Disney Channel was created in the late 70s. In the first years, he broadcast cartoons and programs from the television studio of the same name. Today, the broadcast network includes game and animated series created specifically for the channel. The content is suitable not only for children, but also for family viewing. Some films will be of interest to teenagers and even adults.
Officially, Disney Channel broadcasting in Russia began in the spring of 2010. Although, since 1991, separate blocks have been broadcast on central television channels. For example, “The Magical World of Disney”, “Walt Disney Presents” and others.
Today the broadcast network includes original animated series, full-length cartoons and films, and domestically produced programs.
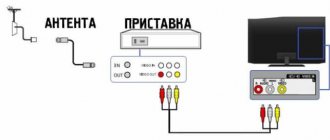
Standard set-top box for setting up a TV
- The decoder itself (receiver, digital receiver, tuner, decoder). This is a small device with connectors and possibly buttons. The number of connectors, buttons and display depends on the price of the decoder. In addition, the decoder can perform other functions, such as recording images on a pendant disk or connecting to the Internet. In the latter case, the receiver turns a regular TV into a kind of Smart TV.
- Remote control for controlling the set-top box (turning on, off, setting, changing channels). The signal from the remote control is transmitted to the decoder via an infrared beam. The transmitter is located on the front of the remote control, just like any other remote control.
- Power supply. Converts 220V household voltage to the lower voltage required for device operation. The device can be located inside or outside the STB. In the first case, a standard network cable comes out of the STB, and the receiver is connected to an outlet. In the second case, the device is at the other end of the cable and connected to the outlet.
Newer receiver models always work with popular digital television standards: DVB-C, DVB-T and DVB-T2. With older decoders the situation is different. It is likely that your receiver only works with DVB-T signal processing. If your device was purchased a long time ago, there is a risk. Modern set-top boxes are capable of receiving digital television.
What do you need besides the console?
- Antenna. Analog signals are transmitted at measurement wavelengths. Therefore, the antenna must also be designed to receive meter waves (SN). Digital programs transmit decimeter waves, that is, the same antenna (DMV) is required. With other types of antennas, you will not be able to configure the decoder and successfully broadcast digital channels. The exception is an omnidirectional antenna, which can simultaneously receive both meter and decimeter waves. An all-wave device is useful if you still need to watch analog channels in addition to digital channels. For example, you can broadcast local analog television in addition to national channels.
- Cable. A regular two-wire cable is not suitable for transmitting the signal from the antenna to the receiving device. You need a conductor with minimal signal loss. To connect the decoder to the antenna, a coaxial antenna cable is required. It is sold on the meter; upon purchase, the cable is cut to the required length. This means that you need at least one plug that can be installed on the free end of the cable. The plug is then inserted into the socket on the set-top box.
- multimedia cable 3RCA - 3RCA (ringtones). Required for audio and video transmission. There are three plugs on each end. Each of them is marked with a specific color. Yellow indicates video transmission, red indicates audio transmission for the right audio channel, and yellow for the left audio channel. Often the decoder is equipped with an RCA cable. However, sometimes it may happen that there is no cable in the box. The “plug” is then purchased separately at computer or home appliance stores. It is used to connect both old and new TVs.
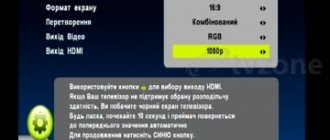
- HDMI cable. A more modern version of the cable for connecting the set-top box. Not all devices have HDMI connectors, so a cable is not included. If you need to improve the picture quality on your TV, an HDMI cable can be purchased separately.