Modern television devices are not just “boxes” with which a person switches channels. This is a smart technique that can be customized to suit specific needs.
For these purposes, manufacturers constantly release software add-ons that are installed after purchase. This requires firmware. How to flash a TV correctly is further in the article.
Internet connection
Before connecting, make sure that your DEXP Smart TV has the ability to connect to the Internet; this information can be found in the TV’s passport.
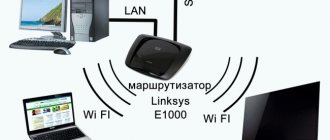
To connect the Internet to your Desktop TV, choose the convenient option of connecting Wired and Wireless using Wi-Fi technology. You must have high-speed Internet, otherwise the video you are watching will constantly freeze.
When connecting via an Internet cable, you must connect the cable from the router to the LAN connector on the back of the TV.
Press the Menu button and select the desired Settings section.
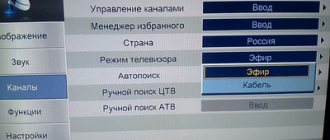
Select the Network item.
Next, go to the network configuration and do several actions.
Selecting the connection type ethernet or wireless, select the option we need. If you chose wired, the TV will automatically connect to your network.
When choosing Wireless, you will need to find your network from the list of found Wi-Fi and enter the password for your router to connect.
If you did everything correctly, you can immediately access the Internet from your Smart.
Automatic search for digital channels
First of all, you need to try turning on automatic channel search, and if there are no connection problems and the signal level is high, the TV will detect about 20 main digital channels. Using the remote control, go to the “” item of the DEXP TV, select AUTO SEARCH, press the “enter” button and select “DTV”.
The search procedure usually lasts about 20 minutes, showing the number of channels found. After the search ends, a window with the result of the work will be displayed, if everything went well and the channels were found, close the window and enjoy watching, but if the channels were not found or some kind of failure occurred, you should use a manual search.
How to set up a DEXP TV for digital channels without a set-top box
How to connect a DEXP TV to digital television without an additional tuner. The equipment is divided into several types: those that support digital but without Internet access, those that support Smart, and those that do not support the format. To configure without using a set-top box, you will need to go to the main “Smart Menu” and perform all actions from there. What to do:
- through “Settings”, select the mode and change the “Antenna” value;
- opening “Search” - “Auto Configuration”, wait for the parameters to load;
Upon completion, all found TV signals will open; with a new request, you do not need to enter parameters.
Manual search for digital channels
Digital channels
To set up a manual search for channels on a DEXP TV, go to the item (as in the automatic search), click on “Manual search channels”.
- First, we set the frequency of information transmission (it can be found on this website individually for each region), then in a separate window for entering channels, we enter the same value as in CETV and then click “Start searching for channels.”
- Subsequently, the lower lines indicating the signal level and image quality, in percentage, should be maximum; if they are less than fifty percent, then change the frequency, thereby selecting the highest percentage.
- Well, then a search for digital channels is carried out, it takes about ten minutes, after which a window is displayed indicating the result.
Cable TV channels
After you have connected the cable to the DEXP TV, you need to configure the channels, in rare cases it is done automatically, but if this does not happen, then the service is provided by a paid connected provider, but you can perform this procedure yourself, saving some money, so we immediately proceed her:
- Go to the item on the TV remote control;
- Go to the “Channels” section;
- Next, go to “Manual setup”;
- A settings window will appear where you need to select your country of residence;
- Below is the “Antenna Selection” window, go to “Cable” or “DVBC”, different names on different TV models;
- In the next window you need to enter the search frequency, regular channels are caught at frequencies 10, 362, 370, 378, 386, 394, 402, 410, 418, 434, 442, 450, 458, 786, 794, 810, 818 MHz, well and if you need channels in HD resolution, then you need to enter frequencies from 902 MHz, it should be said that it is with these high frequencies that you should try to start the search, because the quality of television is much better, and if the search is unsuccessful, then go to low frequencies, they are more efficient;
- QAM is set to 64 or 256, it is worth noting that this value also affects the result of displaying the picture on the screen;
- Set the symbol rate to 7000 thousand;
- Next, in the new window, move to the DTV and press the enter button on it;
- And at the end of the setup process, we launch the search itself and wait for the final window with the result of the work done.
Satellite TV channels
Setting up the search for satellite channels on DEXP TVs is a very important matter, because it is precisely because of it that a decent result follows. We will tell you in detail how to find the largest number of TV channels in manual search mode:
- On the control panel we find the item tab and go to it;
- Next, go to the “Installation” tab;
- We leave the satellite as default, it must be entered;
- The frequency must be looked for in specially designated tables for each individual region; you can request it from providers, find it on the Internet, or ask your friends or setup specialists;
- Go to the flow rate tab and if you have DVB-S, then leave it, and if another one is turned on, switch to this one. It is worth paying attention, when changing the frequency and flow, follow the lower information, the intensity and quality of the signal, they should be maximum. You can change them by entering a different frequency value and by changing the flows.
- The polarity cannot be changed, it should be set automatically;
- Next, just click on search for channels;
- When the search ends, a window will appear notifying the search result; if it is successful, close it, sort the TV channels as necessary and enjoy watching.
Terrestrial TV channels
Most people are inclined to use this broadcasting format, because it is the one that has the most advantages in use, such as: accessibility, ease of connection, high quality broadcasting, ease of installation and configuration. So let’s proceed to describe the complete installation of digital terrestrial TV on a DEXP TV:
- Initially, install the antenna cable into your TV or digital set-top box;
- We enter the point;
- Next, click on the “settings” section;
- And in searching for channels, we are offered two methods: “Automatic search” and “Manual search”, first we select the first method, if any problems occur and subsequently the channels are not found, we switch to manual installation;
- After you have started the manual search, you need to enter the channel numbers from which digital television is broadcast, individually for each region. You can find it out from your provider, find it on the Internet, or ask your familiar installation specialists;
- Below is a point where broadcast frequencies are entered, they are also individual, but it’s worth trying to enter the general value of 546 MHz, which may or may not work;
- It is not recommended to touch other values, so we leave them as they were and click on the “Start” button;
- That's it, the setup is complete.
Checking for digital TV support on DEXP
Before proceeding directly to the setup, let’s make sure that your equipment supports digital terrestrial TV reception. This function is only available on models that support the DVB-T2 broadcast standard.
To check for DTV support, enter your TV model number in the Search box in the table below. If it is found, feel free to start setting it up - your receiver can pick up “digital” without additional attachments.
| Model | Diagonal | DVB-T2 support |
| 22A7100 | 22 | + |
| 22A7200 | 22 | + |
| 24A7100 | 24 | + |
| 28A3000 | 28 | + |
| 32A3000 | 32 | + |
| 32A3100 | 32 | + |
| 32A3200 | 32 | + |
| 32A7000 | 32 | + |
| 40A7000 | 40 | + |
| 40A7100 | 40 | + |
| 42A7000 | 42 | + |
| 42A8000 | 42 | + |
| 42A8100 | 42 | + |
| 42A8200 | 42 | + |
| 42A9000 | 42 | + |
| 46A7000 | 46 | + |
| 49A8200 | 49 | + |
| 50A7000 | 50 | + |
| 50A7100 | 50 | + |
| 50A8000 | 50 | + |
| 55A8000 | 55 | + |
| F22B7000C | 22 | + |
| F22B7000E/B | 22 | + |
| F22B7000E/W | 22 | + |
| F22B7100EE | 22 | + |
| F22B7200C | 22 | + |
| F22D7100E | 21.5 | + |
| F24B7000C | 24 | + |
| F24B7000E | 24 | + |
| F24B7100EE | 24 | + |
| F24B7100K | 24 | + |
| F24B7200C | 24 | + |
| F24B7200VE | 24 | + |
| F24D7100E | 23.6 | + |
| F24D7200C | 23.6 | + |
| F32C7000B | 32 | + |
| F32C7100B | 32 | + |
| F32C7100B/W | 32 | + |
| F32D7000B | 32 | + |
| F32D7000C | 32 | + |
| F32D7000C/W | 32 | + |
| F39B7000VD | 39 | + |
| F39B7100E | 39 | + |
| F40B7000C | 40 | + |
| F40B7000E | 40 | + |
| F40B7000H | 40 | + |
| F40B7000K | 40 | + |
| F40B7100K | 40 | + |
| F40B7200C | 40 | + |
| F40B8300K | 40 | + |
| F40C7100C | 40 | + |
| F40C7100K | 40 | + |
| F40C8000H | 40 | + |
| F40D7100C | 39.6 | + |
| F40D7200C | 40 | + |
| F40D7200C/W | 40 | + |
| F42B7000ED | 42 | + |
| F42B7000M | 42 | + |
| F42B7000T | 42 | + |
| F42B8000H | 42 | + |
| F42B8100K | 42 | + |
| F42C7000E | 42 | + |
| F43B7200С | 43 | + |
| F43B7200S | 43 | + |
| F43B8000H | 43 | + |
| F43B8000K | 43 | + |
| F43C7000C | 43 | + |
| F43C7100K | 43 | + |
| F43C8000H | 43 | + |
| F43D7000K | 43 | + |
| F43D8000K | 42.5 | + |
| F43D8100H | 43 | + |
| F46B7000MD | 46 | + |
| F48B7000M | 48 | + |
| F48B7000V | 48 | + |
| F48C7200K | 48 | + |
| F48D7000K | 48 | + |
| F48D8000K | 47.6 | + |
| F49B7000T | 49 | + |
| F49B7200C | 49 | + |
| F49B8000K | 49 | + |
| F49B8100K | 49 | + |
| F49B8200K | 49 | + |
| F49C7000C | 49 | + |
| F49C8000H | 49 | + |
| F49D8100H | 48.5 | + |
| F50B8000H | 50 | + |
| F55B7000T | 55 | + |
| F55B7200C | 55 | + |
| F55B8000H | 55 | + |
| F55B8000K | 55 | + |
| F55B8100K | 55 | + |
| F55B8200K | 55 | + |
| F55C7000C | 55 | + |
| F55C8000H | 55 | + |
| F55D7000E | 54.6 | + |
| F55D7000K | 54.6 | + |
| F55D8000K | 54.6 | + |
| H19B7000С | 19 | + |
| H19B7000E | 19 | + |
| H19D7100E | 19 | + |
| H20B7200C | 20 | + |
| H20C7200C | 20 | + |
| H20C7200C/W | 20 | + |
| H20D7000E | 19.5 | + |
| H24B3000EE | 24 | + |
| H24B7000E | 24 | + |
| H24B7100 | 24 | + |
| H24C3000E | 24 | + |
| H24C7200C | 24 | + |
| H24D7000E | 23.6 | + |
| H28B7100C | 28 | + |
| H28B7100E | 28 | + |
| H28C7100C | 28 | + |
| H28D7200K | 28 | + |
| H28D7300K | 28 | + |
| H32С8000H | 32 | + |
| H32B3200CD | 32 | + |
| H32B3400ED/A | 32 | + |
| H32B7000C | 32 | + |
| H32B7100K | 32 | + |
| H32B7200C | 32 | + |
| H32B7200T | 32 | + |
| H32B7300C | 32 | + |
| H32B7400C | 32 | + |
| H32B8200K | 32 | + |
| H32C7100C | 32 | + |
| H32C7200K | 32 | + |
| H32C7300K | 32 | + |
| H32D7000E | 32 | + |
| H32D7000M | 31.5 | + |
| H32D7000Q | 31.5 | + |
| H32D7100C | 32 | + |
| H32D7100K/W | 32 | + |
| H32D8000Q | 31.5 | + |
| H32D8100H | 32 | + |
| H39D7000E | 39 | + |
| H39D7000Q | 38.5 | + |
| H39D7100E | 39 | + |
| H39D8000Q | 39 | + |
| U40B9000H | 40 | + |
| U42B9000K | 42 | + |
| U43D9100H | 42.5 | + |
| U43D9100K | 42.5 | + |
| U49B9000K | 49 | + |
| U49D9000K | 48.5 | + |
| U50B9000H | 50 | + |
| U55B9000H | 55 | + |
| U55B9000K | 55 | + |
| U55B9100K | 55 | + |
| U55D7100E | 54.6 | + |
| U55D9000K | 54.6 | + |
| U58B9900H | 58 | + |
| U65D9000K | 64.5 | + |
Technical setup of equipment
The technology for setting up digital TV is not the most complicated; if all conditions are met, you will definitely be able to achieve the result:
- Take the remote control and find the “Menu” button, move on.
- In the window that opens, find the “Settings” section and select it.
- Check the set region, the default is usually Russia. Otherwise, change the region to your own.
- Select the signal standard. It happens that there is an analog signal DTV-T, it is better to change it to digital DVT-T2. If necessary, you can select both options, after which the search for new channels will begin.
- After these steps, you will be asked to choose between automatic and manual channel selection. If you can enter the search parameters yourself, then choose manual, but the easiest way is to use auto-search for channels - the set-top box will do it itself. If you choose the first option, select “auto search”. You just have to wait a little until all the channels are detected, the process may take a while. The main thing is to click the “save” button when the search is complete. There should be 20 broadcast channels.
- When performing a manual search, it is necessary to find out the frequency of each TV channel on which it is broadcast. If such information is available, then enter the modulation parameters, frequency and transmission speed.
It is important to know that with an automatic search, fewer items may be found, or even none at all. In this case, try performing the operation manually, knowingly removing all access to the content. Also, a manual search will help to return a previously deleted channel.
And one more thing - pay attention to the signal level, it is desirable that its quality is at least 30%. If it is less, then most likely few or no channels will be found.
Source
Manual setting
In some cases, automatic tuning of DEXP TVs does not give the desired result. The device may not find a single channel or connect only a small part of them. In such a situation, perform a manual search. The procedure depends on the type of television being received; we will consider all cases separately.
On-air channels
To catch them manually:
- On the TV remote control, press the “Menu” button.
- Enter the section called “Channels”, select “Manual search” in it.
- Set the parameters - frequency and TVC number for multiplexes 1 and 2. This data is unique for each region and can be found on the CETV interactive map. To set the specified parameters, use the “Right” and “Left” buttons.
- Press the “Start” button on the remote control. All available channels will be found within 3-5 minutes.
Cable channels
Manual search for cable programs occurs according to the following algorithm:
- Connect your provider cable to your TV.
- Using the “Menu” button on the remote control, open the settings window. In it, go to the “Channels” tab.
- After selecting “Manual search”, pay attention to the “Antenna” item. In it you need to select the “Cable” value.
- Start setting your search parameters. They can be obtained directly from the provider (look in the contract or call the hotline). Once the data has been entered, click on the “Start” button.
Checking DVB-T2 on the device
Before you try to set up digital broadcasting, you need to make sure that this model can connect to this standard.
- The first way to check is to go to the manufacturer’s website and enter the model of your TV.
- Also, the TV model can be found not only on the manufacturer’s website, but also in Yandex Market. To do this you need:
- Go to the store's main page.
- Enter your TV model in the search.
- On the product page, go to the “Signal Reception” section.
- If opposite the DVB-T2 standard. If it says “Yes”, you can safely start setting up the number. If not, you will have to purchase an adapter.
- If you have an instruction manual on hand, then just open it and carefully look to see if the technical specifications include the DVB-T2 standard.
If your TV does not support digital TV
If your model is not found in the table, then the TV does not have a built-in DVB-T2 tuner. There are two ways out of this situation:
- Buying a new TV. In this case, it is necessary that the device works with the DVB-T2 standard. Prices for new models start from 8,000 rubles.
- Buying a digital set-top box. It allows any device to broadcast free over-the-air television. At the same time, the price of the issue is from 650 rubles. Check out our rating of digital set-top boxes. After purchase, the receiver needs to be connected and configured.
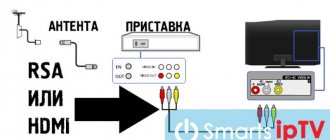
Instructions on how to connect old models to DTV
First of all, you need to connect the antenna to the set-top box, and the set-top box itself to the TV. To connect the set-top box to the TV, the AV interface is used. Also, digital set-top boxes can be connected to older TV models using “tulips”. Now you can start setting up channels. In total, today there are 2 multiplexes, which in total amounts to 20 federal channels that a TV must find when connecting to digital broadcasting.
The setup is done as follows:
- You need to use the remote control to find the signal source selection button.
- Press the button with Auto search and wait until the TV finds all the necessary channels.
Select AV/TV.
This information is then saved and you can enjoy watching it.
Digital television
Having purchased a DEXP brand TV, first read the operating instructions for the equipment.
IMPORTANT! Before setting up digital broadcasting on your Smart TV, make sure that it supports this technology. This means that the device itself already has a built-in broadcast tuner.
As a rule, all modern TVs support this broadcast standard and there is no need to buy anything additional. If your device supports this format.
Let's move on to setting up digital terrestrial channels:
- On your remote control, go to the Smart menu.
- Select "Settings". Click “OK” to confirm your login.
- Click on the "Channel" section.
- In the antenna type selection section, select DVB-C.
- There we select “Auto-tuning”, which will automatically fill in the search data (frequency, modulation, baud rate).
- In the scan types section, select the “Full” view.
- Specify the network identification parameter as “Automatic”.
- To search for channels, click “Search”.
- After a period of time, the auto search will end and 20 on-air digital channels will be available for viewing.
How to switch to digital reception on models with Smart TV?
Modern DEXP models are all equipped with the Smart TV function. It's much easier to set up digital channels here. This can be done not only using auto-tuning, but also manually. The algorithm is simple:
- You need to connect a cable from a decimeter antenna to the TV.
- Then use the remote control to open the “Menu” and go to Settings.
- Find the channel section, click “OK”.
- Select Tuner mode, in this case cable TV. If the user is connected to a satellite dish, then in tuner mode it is necessary to select a satellite. For 20 free terrestrial TV channels.
- Then, after selecting Terrestrial TV, click “Auto Search”.
- Choose DTV if you only need digital channels.
- Then you just need to confirm the start of the search and wait until the TV finds all the necessary channels.
Manual setup instructions:
- It is necessary to clarify the frequency of multiplexes in the user's region. This can be done on the website smotritsitru.ru.
- Then go to the TV DEXP menu and select “manual search”.
- A window with manual search options will appear.
- In it you need to indicate the channel number and start searching.
This procedure must be carried out for two multiplexes. when the user selects certain signal frequencies in the window, the zero values of the signal reception level there should change to digital values, preferably about 70%.
Errors when setting up television
During setup, various errors may occur - the device does not pick up TV channels, finds only part of them, does not see the remote control, etc.
TV does not find 20 free TV channels
There could be several reasons:
- First of all, you need to check whether the TV supports the DVB-T2 standard. If not, purchase a console.
- If the TV supports channels, but does not find them, you need to go to the menu and set the channel frequency manually. Sometimes channels that were not found during auto-search appear without problems during manual tuning.
- It is also necessary to check the operation of the antenna, its direction towards the tower and weather conditions.
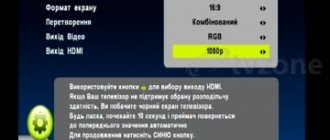
Can't select display mode
DEXP TVs offer several display modes. Which one to choose depends on the TV broadcasting standard that the user needs:
Poor image quality
In this case, the action algorithm is as follows: check the operation of the antenna, as well as the integrity and operation of the cables that connect the antenna to the TV. In this case, the signal will not be able to arrive normally, and there will be constant interference.
ohdpluginlibrary application error
This message appears in modern DEXP models when the software fails. Algorithm for solving the issue:
- Reset everything to factory settings.
- Install a new version of the software.
Why do we need updates?
There are several main reasons why users decide to flash the system:
- Increasing the stability of the new TV device. Some TVs have so-called raw firmware, if the sample is completely new and was turned on for the first time. LG and WebOS users face this problem. All errors can be corrected using the downloaded program for the system. Having done the firmware correctly, a person will get rid of many problems.
- Increased work speed. System firmware is often used to increase the speed of the TV. Sometimes the device responds slowly to the remote control. This applies to Smart applications, changing channels, and simply turning the device on and off.
- TV firmware is an ideal way to expand functionality. Manufacturers release updates that increase the capabilities of an existing device. This is how additional programs and useful applications appear in the menu.
- Solving problems with Smart TV. If you have any problems with the Smart TV function, then perhaps the preferred solution to the problem is a full software firmware. If you study user reviews on the Internet, you can understand that the firmware helped solve many problems on the TV.
To understand the purposes for which a specific update is intended, you can go to the official website of the TV manufacturer and in the appropriate section find a full description of the new firmware version. There it will be written in detail about the advantages of the program, new functions, as well as problems that can be solved.