Before we begin the story about setting up the Home Media Server program , I would like to explain that this program will help solve the question “How to watch movies, listen to music from a PC on a TV with DLNA technology . These include Samsung's AllShare technology. download the Home Media Server from this link.
Supported HMS operating systems:
- Windows 95, 98, ME, 2000, XP, 2003, Vista, 7;
- UNIX-like systems using Wine;
- MAC OS using WineBottler, CrossOver Mac.
Adding directories of media resources to the Home Media Server program
- "Settings" button - "Media Resources" section - "Directory List" page - "Add"
- from Windows Explorer, drag (and release) the required directories with the mouse into the main form of the program (can be used with standard file search in Windows).
To access the server through a browser, you need to enable Web , set a permanent server port in the Settings - Server - “Port” field (value from 1024 to 65535). Accessing the server from a browser:
https://server IP address: specified server port.
The server IP address can be found in the Settings - Server - List of allowed network connections - Search section.
Advantages and disadvantages
The main advantage of Smart Share is that this program significantly expands the capabilities of a SMART TV from LG, allowing you to directly access multimedia content from third-party devices. So, to watch a movie or TV series located on a PC, you just need to open the corresponding folder on the television panel and start the video of interest. But first the content must be placed in the required directory.
The next advantage of the program is the ability to view files from devices connected to the USB connector. For example, you can display photos from your phone or camera. A convenient Russified and intuitive interface is another advantage of the application, thanks to which even an inexperienced user can work with it.
However, the Smart Share program also has disadvantages. You need to know that there are many DLNA standards, and they differ in different configurations. Therefore, you should install only recommended applications for TVs from different manufacturers. It follows that the Smart Share , designed for LG , is not suitable for equipment from other manufacturers, for example, Samsung or Sony . For them, you need to look for and use analogues (for Samsung this is Samsung Smart View, and for Intel - Intel Wireless Display or Intel Wi-Di). In addition, the Smart Share application may have difficulty playing movies in complex formats or in HD resolution, since not all devices are capable of playing them.
Advice! It is recommended to transfer large files and high quality files via an Ethernet cable, since a wireless connection is not capable of providing stable and uninterrupted data transfer.
Launching the Home Media Server program
Pay close attention to all messages that may appear from firewall programs when you first start the server.
Click the “Launch” button in the button bar of the main program window. If the server starts successfully, the “Start” button will become unavailable, but the “Stop” and “Restart” buttons will become available, and the message log will contain the lines “Starting server [IP address]”.
What to do in case of errors when starting a home server
- check the list of available network connections in the program settings (section Server - List of allowed network connections - Search). If the list of allowed network connections is not empty, compare it with the list of available network connections using the “Search” button.
- check the settings of the firewall program you are using, the “Home Media Server (UPnP)” program must allow network activity, for more stringent rules, UDP port 1900 must be open for incoming and outgoing packets, the server port specified in the program settings must be accessible to incoming connections.
You can generate a list of allowed network connections from the list of available network connections by marking the network connection to be included in the list in the first column. If a constant port number is specified for the media server in the program settings (section “Server” - field “Port”), then the availability of the media server can be checked from the browser at https://server IP address: specified server port. If yes, the media server welcome page will open. If the Web mode is enabled in the Program Settings - Device section , the top level of the media resource database will open.
Options for connecting media devices to the server
You can find options for crimping network cables here. To avoid misunderstandings, a media device also includes a television.
- Computer - Media device. A crossover cable must be used for the connection.
- Computer - Switch - Media device. Straight cables must be used to connect devices.
- Computer - Router (router) - Media device. Straight cables must be used to connect devices.
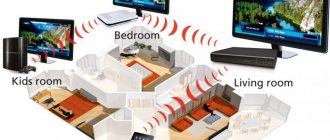
- Computer - Wi-Fi router - Media device. You can find out more about the wireless connection method in the article “Setting up Allshare” and “Smart TV”.
The operation and settings of the media server do not depend on the connection option. When using a router, enable the mode for automatically assigning IP addresses to devices; for details about setting up the router (router), read the article “Setting up a Wi-Fi router” .
When using connection options 1 and 2, IP addresses are assigned manually, the addresses must be different in the last part of the IP address, the subnet mask is 255.255.255.0, the default gateway is the IP address of the computer, if necessary, you can specify the addresses of the DNS servers. Example: computer address is 192.168.1.4, media device address is 192.168.1.5.
TV as a wireless monitor (Miracast, W >
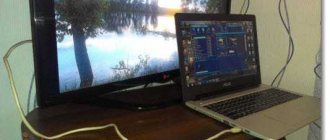
If the previous section was about how to play any files from a computer on a TV and have access to them, now we will talk about how to broadcast any image from a computer monitor or laptop to a TV via Wi-Fi, that is, use its like a wireless monitor. Separately on this topic Windows 10 - How to enable Miracast in Windows 10 for wireless broadcasting to a TV.
The two main technologies for this are Miracast and Intel WiDi, with the latter reportedly becoming fully compatible with the former. I note that this connection does not require a router, since it is installed directly (using Wi-Fi Direct technology).
- If you have a laptop or PC with a 3rd generation Intel processor, an Intel wireless adapter, and an integrated Intel HD Graphics chip, then it must support Intel W >And finally, the TV must support this technology. Until recently, it was necessary to purchase a Miracast adapter, but now more and more TV models have built-in support for Miracast or receive it during the firmware update process.
The connection itself looks like this:
- The TV must have support for Miracast or W connection enabled >Note that I was unable to connect my TV via WiDi from a laptop that definitely supports the technology. There were no problems with Miracast.
Finding a server in a media device
The search for a server with shared folders is performed according to the user manual of the media device. If you have any questions, please refer back to the above-mentioned articles on Allshare and Smart TV. If the server is not found, but all connections are made correctly, then in the program settings (Server section) check that the list of allowed client devices is empty or the device’s IP address is in the list of allowed ones. When using the network protection program, check the rules for network access of the hms.exe module (if the server runs as a Windows service, then for the hmssvc.exe module), if possible, switch the network protection program to learning mode, restart the Home Media Server program ( UPnP)". If other media servers are used, it is better to turn them off at the setup stage.
Navigating through files on a media device (TV, media player)
If the device supports the Russian language, then in the program settings (Device section) you can enable the “Russian names of the main folders” mode, this affects the names of the main folders of the media resource database. If the Russian language is not supported by the media device, select the Translit mode for encoding Russian names; the “Russian names of the main folders” mode is turned on/off at the user’s discretion (if disabled, the names of the main folders of media resources will be in English). Folder names can be changed in the main form of the program by right-clicking the mouse - selecting the "Change name" item. Unnecessary folders of media resources can be deleted in the main form of the program by right-clicking the “Delete Folder” item, or the “Exclude empty folders when transferring information to UPnP devices” mode can be enabled in the Device section. Slow navigation through the media resource database may be due to the operating characteristics of the media device, the inclusion of the “Exclude empty folders when transferring information to UPnP devices” mode, the presence of slow removable media in the system, frequent changes in media resource directories and the enabled “Automatic” mode. scanning directories when they change while the server is running.” The “Exclude empty folders when transferring information to UPnP devices” mode can be turned off, the “Removable media” folder can be deleted in all sections of media resources (Movies, Music, Photos). Navigation through directories of media resources in the structure of their storage on disk can be done through the folder “Watch Folders” (Russian language is turned off), “Catalogues of media resources” (Russian language is turned on). If some media resources are not visible on the media device, but are present in the main form of the program, then this may be due to the mime type transmitted by the server for this media resource. The Mime type can be changed in the program settings - Settings button - "Media resources" section - "File types" - selecting a file extension - Change button.
Watching movies from the server
The server can transfer films to a media device in their original form or through transcoding (converting a film into a format supported by the media device). The movie is automatically transcoded if the file extension is not included in the list of supported ones or if a transcoding profile is selected for the movie. Configuring movie file extensions supported by the media device: “Settings” button - “Device” section - “Built-in file support” - “Movies”. The list of file extensions is generated according to the media device user manual or information on the media device manufacturer’s website. If the film is played in its original form, then selecting the audio track and subtitles included in the film file is possible only if the media device supports this choice. When you select a movie through the Transcoding folder, you can select an audio track, internal and external subtitles, audio delay, and a transcoding profile to convert the movie.
Transcoding profile is a script (macro) that generates parameters for calling a transcoding program or performs transcoding using DirectShow. Editing transcoding profiles: "Settings" button - "Transcoder" section - "Profiles" button.
The transcoding profile used can be selected:
- for all films: Settings button - section "Transcoder" - "Transcoded file parameters" - Movies - "Transcoding profile"
- for movie files of a certain type (extension) - Settings button - “Media resources” - “File types” button - selecting a file extension - Edit button - “Transcoding profile”
- for a specific film: in the list of films of the main form of the program, using the right mouse button - “Transcoding profile” or through the navigation of a media device, if the film is selected through the Transcoding folder in the Settings folder, generated by the server for each film.
When playing movies, media devices usually stretch the video to fill the entire screen, so to maintain the proportions of the movie frame, the server generates parameters for adding color to the original frame size to the frame size specified in the settings. Setting the transcoded frame size and the color of the addition is set in the program settings - Settings button - section "Transcoder" - page "Codecs, frame" - "Frame size". Color addition is not supported by all transcoding programs, so if you select a transcoding profile different from the main ones, it may not be available.
Reasons for errors when playing movies from a home media server:
- select the original movie file in which the format, video or audio encoding is not supported by the media device, a possible solution to the problem is to select the movie through the Transcoding folder
- a movie is selected through the Transcoding folder, in which video or audio encoding is not supported by the transcoder program; a possible solution to the problem is to select a different transcoding profile for the movie; Problems with the audio track can also be solved by setting the number of channels in the program settings (section Transcoder - “Codecs, Frame” page) to 2
- Media device or server is unavailable: Reboot the media device or server.
Reasons for stopping/slowing down content playback:
- stopping viewing may occur due to insufficient disk space used to store temporary files; exceeding the file size supported by the device; exceeding the maximum size of the transcoded file specified in the program settings (section Transcoder - “Transcoded file parameters” - Maximum size).
- The transcoding speed of the film is not sufficient for viewing, you can check this in the main form of the program: perform test transcoding using RMB in the list of films - The transcoding speed (fps parameter) must be greater than the frame rate of the film. If the “Show transcoding panel” mode is enabled in the program settings (Transcoder section), then the transcoding speed can be viewed in it after selecting a movie on the media device. You can also turn on the transcoding speed indicator (section Transcoder - “Subtitles, speed indicator”), if the transcoding speed is less than the value specified in the program settings, the current transcoding speed will be displayed on the film frame in the place specified by the user.
Solutions to the above problems:
- select a transcoding profile with a smaller frame size and video quality for viewing
- if the encoding of a video track is supported by a media device, but the movie file format is not supported, then you can select a transcoding profile that converts the movie file format and leaves the video track unchanged (transcoding profiles “Movies - TsMuxer” - m2ts file generation, “Movies - WMF" - generation of wmv files). For the “Movies - TsMuxer” transcoding profile, you must additionally download the TsMuxer transcoder program from the home page (in the Transcoding profile settings)
- stop watching a movie on a media device to create a transcoded movie file large enough for viewing
- specify a disk for storing temporary transcoding files that is different from the one used by the system to store the paging file
- optimize the system as a whole - check disk fragmentation, the list of startup programs, etc.
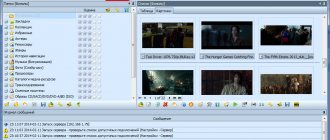
Install, launch the Home Media Server program on your PC, go to Settings by clicking on the corresponding button.
On the right is the “Add” button for disks/directories with media content. In this case, you can choose which of these files will be scanned when the program starts. Scanning is necessary if you have changed the contents of this directory and changes have occurred there. A green circle indicates that these file types are being scanned. Now you should pay attention to the File Types button on the right panel. Some TV models cannot play PAL video files; you must add NTSC for the content to be recognized. (for example, MPEG-PS_PAL_NTSC for *avi).
For the *mkv container, select Transcoding Profile - Core AVC. In DLNA, enter the line MPEG-PS_PAL or MPEG-PS_NTSC depending on your TV. Now let’s look at the left panel “Categories” - “Device”. Here you will need to select your TV type and resolution. DLNA1 and DLNA1.5 are the old and new versions, you will learn about the supported DLNA version of your TV from the manual or on the official website. You can also configure Web access to the server here. Let's move on to the next category of the left panel of the “Server” settings section.
Add your TV to the client devices (look in the menu, TV network settings for static IP). When you click on the lifebuoy icon, the program will automatically detect the name of your computer and add it to the Server - Name line. To identify devices on the network connected by DLNA technology, use the “Search” button. Make sure your TV is turned on and connected to a wired or wireless network. After scanning the network, the program will add the found network clients (PC and TV). Click on TV and go to client settings.
By clicking on the Settings button, you will be taken to the individual device settings. Set the settings we talked about above.
When you click the “File Types” button, you will be taken to the file registration settings, where you can make the necessary changes.
Return to the main settings window and go from the left panel to the “Transcoder” category.
Set the settings according to the image and go to the bottom tab “Codecs, Frame”.
I draw your attention to the parameter section “Sound - Original audio track if the compression is the same” . Unchecking this box will help avoid losing the Russian track when playing a video. Remember that before transcoding, each file can be viewed and changed if necessary. The next tab we'll look at is Subtitles.
In this window, you will configure the subtitle display style to your taste and other parameters necessary for their correct display. Let's look at the last category in the left panel, "Advanced".
“Install the Windows Home Media Server (UPnP)” checkbox .
Thus, the program will automatically load when you turn on the computer as a service, I wrote about this in the section Automatic server startup.
What you need to connect
Wi-Fi technology provides for wireless information exchange. To connect a PC and TV via radio, you must first be sure that the equipment is equipped with the appropriate hardware components or optionally supports such data exchange technology.
Connecting a laptop makes everything much easier. All laptop models are equipped with a hardware Wi-Fi module. To set up a wireless connection you need to buy a special device. Because desktop PCs do not support wireless synchronization.
What does this adapter look like? There are two options:
- a hardware component built into the system unit with an antenna that connects to the PCI slot;
- external adapter connected via USB interface. Externally, the device resembles an ordinary flash drive.
Modern LG and Samsung TVs support Smart TV. However, older models do not provide Internet connection settings. Therefore, users buy external Wi-Fi adapters that are inserted into the USB input of the TV. Sometimes compatibility issues arise. To avoid them, buy an adapter and TV from the same company.
You definitely need to find out what standard the adapters support for wireless network connections. The most optimal version in terms of speed is IEEE 802.11n. This standard for transmitting signal from PC to TV has a wide bandwidth. Therefore, there will absolutely be no delays or freezes in the image. Of course, you need to install the latest drivers for the network card, Wi-Fi module and other devices related to connecting to the Internet.