In this article, I want to once again talk about how to create a DLNA server on a computer (laptop, netbook). This will allow you to watch movies and photos on your TV, as well as listen to music that is on your computer.
You just need to connect the TV to your computer via a network cable, or simply to one network, start a DLNA server on your computer and start watching a movie or photo.
I have already written detailed instructions about this, but in it I showed the example of LG TVs, and the example of their proprietary Smart Share application (this is a proprietary provision from LG for transferring media content from a computer to a TV using DLNA technology). Here is this article: “Setting up DLNA (Smart Share) on an LG Smart TV. We watch films and photos that are on the computer.”
But, as it turned out, there are many problems with the Smart Share application. Either it does not start, then it produces various errors, or it closes on its own. You can read about this in the comments that visitors left on the article, the link to which is above.
There is a very good and absolutely free program “Home Media Server (UPnP, DLNA, HTTP)” , which is an excellent analogue of Smart Share from LG, or for example AllShare from Samsung.
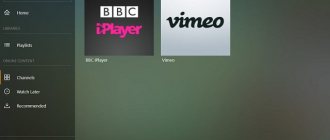
“Home media server (UPnP, DLNA, HTTP)” is a kind of universal program with which you can launch a DLNA server and connect to it from almost any TV that supports DLNA technology (and if your TV has Wi-Fi , or network connector, then it most likely supports this technology). In principle, a DLNA client can be not only a TV, but for example a game console.
This instruction is suitable for TVs from different manufacturers: LG, Samsung, Toshiba, Sony, etc. Compared to branded applications such as Smart Share, “Home Media Server (UPnP, DLNA, HTTP)” has a large number of settings.
We will not delve into all the nuances, but will only consider how to open shared access to the necessary folders or drives. How to create a server and how to start watching a movie using DLNA technology on your TV.
Connecting a TV to use DLNA technology
Before we start setting up the program, we need to connect the TV to a computer or laptop. If you already have everything connected, for example through a router, then you can move on to the next step.
This is interesting: The TV does not see movies that are on the computer (laptop) after starting the DLNA server
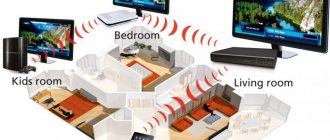
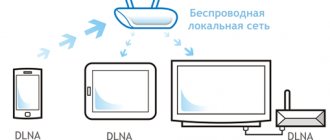
We need to connect the laptop and TV to the network. If you have a router installed at home, then just connect your computer to this router, via cable or via Wi-Fi, it doesn’t matter. And you need to connect the TV to the same router. You can also connect your TV via a network cable or via Wi-Fi (see connection instructions here).
Our task is to ensure that the TV and the computer (in my case, a laptop) are connected to the same router. I have an LG 32LN575U and an Asus K56CM . This instruction will be based on their example.
What to do if you don't have a router?
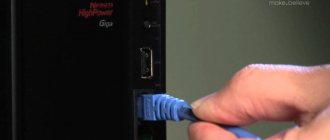
In this case, you can connect the computer to the TV via a network cable directly. We simply take a network cable of the required length (it can be crimped at almost any computer store) and connect the TV to the computer.
It looks something like this:
Connecting this way should work fine. But my TV refused to see the server created on the laptop. But, in the “Home Media Server (UPnP, DLNA, HTTP)” program, the TV was displayed and I could start viewing photos from the laptop itself, and the photo appeared on the TV.
She also has an idea on how to connect them without a cable and without a router. But I’m not sure what will work and this method is only suitable for TVs that have the ability to connect to Wi-Fi.
You can try to create a computer-to-computer connection on a laptop, which I wrote about in the article “Using a laptop as an Internet access point (Wi-Fi router). Setting up a computer-to-computer connection via Wi-Fi. Then, connect the TV to the created access point and try to access files on the computer.
I think we have sorted out the connection. Let's move on to setting up the server.
Operating system for home server
One last theoretical point: what operating system should the home server run on?
If a ready-made NAS is used as a server, then this issue is immediately removed - the manufacturer has already decided everything for the user.
But when using self-assembled configurations, you have to choose: Windows or one of the many Linux distributions?
My opinion is that only Linux should be installed on the server. There are both specialized distributions for self-assembled NAS (FreeNAS, OpenMediaVault), as well as universal Debian and Ubuntu, on the basis of which you can configure anything for yourself.
But I couldn’t force myself to make friends with Linux as the main OS on my desktop computer. Therefore, Linux for the server, Windows (or macOS if you are an Apple technology user) for everything else.
Setting up the “Home Media Server (UPnP, DLNA, HTTP)” program
First, we need to download and install the program itself. I recommend downloading from the official website: . There is always a new version and it is safer.
Follow the link and click on the “Download” .
Save the archive to your computer. To install, simply run the setup.exe file, which is located in the archive. I will not describe the entire installation process, it is simple. Follow the instructions.
After installation, launch the program with a shortcut on the desktop.
This is interesting: What is the network connector (LAN) for on the TV?
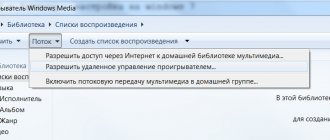
Let's go straight to the program settings. We won't do anything special there. We will simply indicate local drives, flash drives, external hard drives, or folders whose contents we want to see on the TV. For example, you can open only a few folders with movies, photos and music.
A settings window will open. In the first category, Media resources , we need to indicate which disks or folders we want to see on the TV. By default, standard folders with photos, videos and music are open there.
The program is trying to sort everything. And in order not to get confused in all these folders on the TV, I advise you to open shared access to local drives. By default, if I'm not mistaken, access to them is already open. Check to see if the checkbox next to Local drives .
If installed, this means that you can open any file on the TV that is stored on these local drives (drives C, D, E, etc.).
You can also specify individual folders, or, for example, an external hard drive. To do this, click on the Add , and select the desired folder, flash drive, or hard drive in Explorer.
We can see which folders and drives we have opened access to. We can delete selected folders. These are the basic settings, if you look, there are a lot of settings there, I won’t go through them all. To save, click on the Ok and agree to scan media resources.
We wait while the program scans the folders and disk. Next, you can start the DLNA server itself. To do this, simply click on the “ Launch ” button.
We see a message stating that the server is running.
Now, just turn on the TV. If everything is connected correctly, it should appear in the “Home Media Server (UPnP, DLNA, HTTP)” program. To do this, go to the Playback Devices (DMR) , and on the right, click the Update .
If our TV appears, then everything is fine. You can try to start viewing photos directly from the program.
If the TV does not appear in the program, and the server we created is also not visible on the TV, then first of all, check the connection. Is the TV connected to the network and is the laptop connected.
Then, completely disable antiviruses and firewalls. They can block access to the server.
To do this, in the main program window (at the top), select one of the tabs: movies, music, or photos.
This is interesting: How to make your Wi-Fi network open? Removing the password from the wireless network
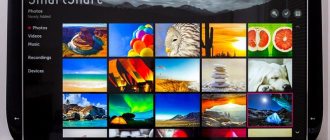
In the left window, media content will appear that is located in those folders and drives to which we have opened access. Right-click, for example, on a photo, and select “Play on ,” then select our TV.
The photo should immediately appear on the TV screen.
In the same way, you can start playing video and music. This means that we can start playback on the TV screen from the “Home Media Server (UPnP, DLNA, HTTP)” program.
But this is not always convenient. It is much better to go through the TV and open the necessary files. To do this, leave the server running. You can hide the “Home Media Server (UPnP, DLNA, HTTP)” program. Click on the red cross (close the program), and it will hide in the notification panel.
At the same time, the server will work and you will be able to access your computer from the TV.
We start viewing files via DLNA from the TV
This means the server is running on the computer, files are open for viewing.
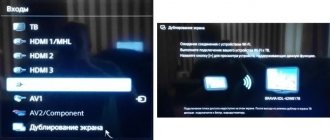
Now, on the TV, we need to go into the program that is responsible for working with DLNA technology. For example, in LG, this is Smart Share. On other TVs, this application may be called differently.
For example, to launch Smart Share in LG, go to Smart TV (blue button on the remote control) and select Smart Share. If your TV does not have Smart TV, but does have DLNA, the process may be different.
Next, go to the Connected devices and select the server we created.
Open the My Computer , and we see our local drives there, and other folders to which we have shared access.
Then we go to the folder we need and start viewing photos, videos, or playing music.
Afterword
“Home Media Server (UPnP, DLNA, HTTP)” is actually a very cool program, with a lot of settings. We only considered opening file sharing and starting the server. When I started watching a movie through the Smart Share program, the laptop went into sleep mode and playback was interrupted. “Home Media Server (UPnP, DLNA, HTTP)” has a lock that prevents the computer from going to sleep when it is being used as a server.
I hope everything worked out for you and you are now watching your favorite movies on the big screen TV using DLNA technology.
If something doesn’t work out, write in the comments, we’ll try to figure it out.
Installation
After successful loading of the distribution kit, it will proceed to installation: on the first installation screen you will be prompted for the directory into which the unpacking will be performed; you can leave it unchanged, or you can change it;
Next, the program installation directory will be indicated, which can be changed if desired, and you will also be prompted to “Create a shortcut to launch the program...” on the desktop → after selecting, click “Install”
installation is complete and the program will ask you to launch the program → click “Yes”.
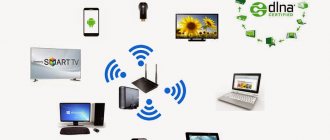
general information
What is DLNA? This is a set of standards, a technology thanks to which compatible devices transmit and receive images, video, and music over a local network. Also, with the help of DLNA, media content can be displayed online. At the same time, connecting compatible devices to your home network is possible both wired and wireless.
3 groups of devices that support the technology:
- Designed for use on a home network - network storage, network media players, TVs, printers, etc.
- Mobile devices – smartphones, audio and media players, digital cameras that support file transfer via Wi-Fi, etc.
- Mobile devices for connecting mobile networks to home networks - for example, a modem.
How do you know if your TV supports DLNA? Everything is simple - in the instructions or on the sticker on the receiver itself there will be the inscription: DLNA CERTIFIED. However, it must be taken into account that some large manufacturers have given a proprietary name to the technology. SAMSUNG SMART TV, which will be discussed below, has DLNA called AllShare.