In general, the Home Media Server program is conceived by the developers as a home media server. But most often HMS is used as a DLNA server. It is ideal for this purpose and has many useful settings, often functioning even better than official programs such as LG SmartShare PC SW and the standard method of setting up DLNA via Windows Media Player. The idea is to allow the TV to play movies, music, pictures and other content directly from your laptop or computer. At the same time, they must be connected to the same home network, for the organization of which a router or router is usually used. After that, all that remains is to configure the program, and it’s done. You can download it on the official website https://www.homemediaserver.ru by clicking on the “Download” button. Installing Media Server is as easy as shelling pears: unpack the archive and run “setup.exe”, where we agree to all the conditions and click the “Next” button everywhere. After successful installation and launch of HMS, the main program window will appear. When you launch it for the first time, select your TV from the list of devices (for example, LG TV). You can add media resources to which your TV will have access in the next window or in the settings later. In the program data backup and recovery window, click “Run” and “Close”.
HMS as DLNA server
We immediately go to the program settings. Here we have to configure our home media server like DLNA. To do this, in the “Media Resources” category in the very first tab “Directory List”, using the “Add” button, indicate the paths to the folders on our computer where the media files that you would like to see on an LG TV or other are located. After adding all the folders, click “Scan”. Although we will set up auto-scanning of new media resources, new elements still sometimes do not appear automatically, and you need to scan using this button manually.
On the “Scanning” tab, it is important to enable automatic scanning of directories when they change and start the program, so that new media files are immediately displayed on the TV.
In order for Home Media Server to start when the computer boots, in the “Advanced” category you need to check the boxes “Start the program when you start a Windows session” and “Install the Windows Home Media Server service...”. Setting up HMS for the DLNA server is complete, click OK.
In the program window you should see a list of your media: movies, pictures and music from the folders to which the paths have been added. Click the “Start” button and go to our LG TV or another one with DLNA support.
Setting up a media server on an ASUS Wi-Fi router
First of all, connect the drive you want to access from the TV to the router’s USB port.
Then, go to the settings of our ASUS router by simply opening the address 192.168.1.1 in the browser. Enter your username and password (by default, these are: admin and admin). If anything, there are detailed instructions, you can see them here.
In the control panel, go to the “USB Application” section and select “File/Media Server”.
On the “Media Server” tab, opposite the “Enable DLNA Media Server” item, set the switch to ON . This enables the DLNA server. You can, if you wish, change the name of the server and choose whether to share the entire disk, or only certain folders (all by default). But these functions are unlikely to be useful. Click on the “Apply” button.
There is also the option to run iTunes Server. I understand this is for Apple TV.
The entire server is running, and the TV should already see it. But, we still need access to the drive from a computer, or even from a smartphone (Android). Therefore, in the same window, go to the “Network Neighborhood (Samba) / Cloud Disk” tab, and opposite “Allow resource sharing”, set the switch to ON. Save your settings.
Now, on the computer, in Explorer, on the “Network” tab, there will be a drive that is connected to the ASUS router. I will write more about this below. You can already turn on the TV, launch DLNA, Smart Share, Media, etc. there, and watch movies, photos, or listen to music that is on the drive.
If any questions remain unclear, you can also look at a separate article on setting up file sharing on ASUS routers.
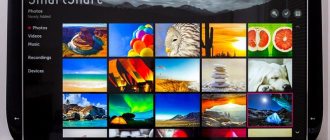
LG SmartShare
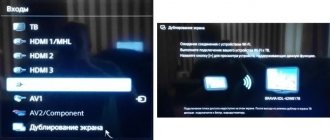
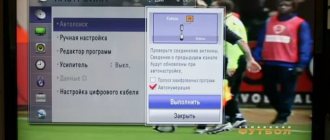
Working with a DLNA server will be shown using the example of an LG LN655V TV. Go to the main menu of Smart TV and select LG SmartShare.
First connection
When connecting the device to the TV for the first time, you must select “Connection Guide” in the lower right corner.
Next, select the “PC Connection” tab and click the “Next” button 3 times. Please note that in step 3 your home network is selected (wired or wireless, depending on how you connect the TV), otherwise select it.
In step 4 you should see your PC. If it's not there, restart the server, this usually helps. Next, select the device and go to the “Connected devices” item.
View Media
After the first connection, our device will be displayed in the last item of LG SmartShare – “Connected devices”. If it is not there, restart the server on your PC. For example, to watch movies you need to select the “Movies” folder, then “Media resource directories”.
Here you will see a list of folders added in HMS settings. Go to any folder and launch the movie. Sometimes the TV may write that “The file type is not supported.” Don’t despair, this is a glitch, try to run it again and everything will work out 2-3 times.
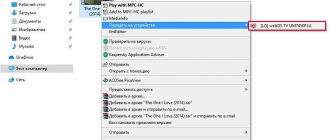
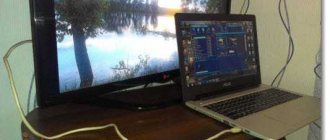
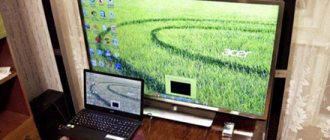
Displaying video from Windows 10 to TV: a quick and easy way
A video, film, almost any video can be displayed from a computer to a TV in a few clicks of the mouse. Turn on the TV. Make sure it is connected to the Internet (to your router).
On the computer, open the folder with the video, and right-click on the file that we want to play on the TV (Smart TV). Next, move the cursor to the “Transfer to device” item. Our TV should appear there. If it says “Searching for devices...”, then you need to wait a little. Leave the menu open, or try again in a couple of seconds. As you can see in the screenshot below, Windows 10 found two TVs on me: LG and Philips.
Choose a TV. The player control window will immediately appear. In it, you can control video playback on the TV, add other files to the playlist, see information on the TV, etc.
The TV will immediately start playing the currently running movie.
We have just started watching video from a computer to a TV using DLNA technology. As you can see, everything works. And all this wirelessly, over the air. It's over if you have both devices connected via Wi-Fi.
Features of HMS
The advantages of a home media server from Serviio are as follows:
- on the TV you can see a clear PC folder structure;
- the ability to start playing media files on TV from the program itself on a PC. To do this, you need to select a file from the list and click on the green Play button, which is present if the TV is turned on;
- relative stability of operation (after PC SW DLNA from LG it’s just a fairy tale);
- a large number of settings.
Flaws:
- some confusion for beginners;
- Sometimes automatic scanning of new files does not work;
- Periodically you have to restart the server for the device to appear on TV.
Despite these shortcomings, HMS is ideal as a home media server, including DLNA. Details on setting up the Home DLNA server are in the following video.
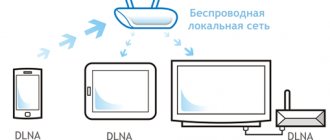
DLNA Technology Conventions
When using DLNA connections, you can create a connection between any devices that work with this standard, and each of them can act in different roles. To refer to them precisely, a number of terms are used, which are described below.
The first group of device connections, which are used mainly in the home, is called HND (Home Network Devices)
| DMS (Digital Media Server) - media server. These are devices that are the source, that is, which contain the files that we want to watch on another device. This could be a computer with the special software listed above installed, or a NAS device that has DLNA support. |
| DMP (Digital Media Player) - media player, or DLNA client. These are the devices that receive content from the media server and can either play it or transmit it to another device, acting as a media renderer. These are TVs, game consoles, independent monitors, home theaters, etc. |
| DMR (Digital Media Renderer) - media renderer. A device capable of playing content received through a media controller, which in turn transmits it from a media server. Usually the same ones that can do this are those listed above in media players. |
| DMC (Digital Media Controller) - media controller. Allows you to find files on the media server and transfer it for playback on the media renderer. These are tablets, smartphones, digital cameras with support for WiFi connections |
| DMPr (Digital Media Printer) - devices that provide printing services for others are network MFPs and printers. Media players (DMP) and media controllers (DMC) are capable of transferring printed information to them. |
Another group of devices - MHD (Mobile Handheld Devices) - are portable devices capable of transmitting and receiving content - mobile phones, tablets, smartphones, video cameras, cameras.
| M-DMS (Mobile Digital Media Server) - mobile media servers. Gadgets that are capable of distributing content stored on them to mobile players (M-DMP), media renderers (DMR) and printers (DMPr). these could be mobile phones or portable media players. |
| M-DMP (Mobile Digital Media Player) is a mobile media player capable of playing video from servers - stationary and mobile (DMS and M-DMS). This role is played by phones, PDAs, tablets |
| M-DMU (Mobile Digital Media Uploader) are portable gadgets that can upload files to servers. For example, digital cameras, camcorders or phones. |
| M-DMD (Mobile Digital Media Downloader) - portable devices that can find and download media content from DMS and M-DMS servers (mobile phones and media players) |
| M-DMC (Mobile Digital Media Controller) are portable media controllers that have the ability to find content on media servers and broadcast it to DMR media renderers - phones and PDAs. |
Other options
The capabilities of the Home Media server reviewed do not end with DLNA. HMS can provide access to computer media resources using UPnP (Universal Plug and Play) technology and the HTTP protocol. This is more relevant for smartphones and tablets.
But this server can do a lot more for DLNA. For example, you can give access not only to computer resources, but also to streams of Internet radio and IPTV television. It is also possible to broadcast so-called podcasts from various online cinemas, such as hdserials.ru, hdkinoklub.ru and hundreds of others. There are also possibilities for transcoding media files of a format that is not supported on TV. How do you like this? All this will be discussed in the following articles, subscribe to our newsletter, as well as VKontakte and Twitter.
Briefly about DLNA
For reference, DLNA is a standard for transmitting media content on a home network, including streaming. Those. a media server is actually created, and all devices connected to it at home (other computers, TVs, game consoles, phones) will be able to freely access your movies, music and photos.
In this article, a computer or laptop with Windows 7 will be used as a DLNA server. And all other devices connected to your home router via wire or Wi-Fi will be able to freely use its content. This is especially useful with movies that you need to access on your TV.
But enough ranting, let's go and try setting it up.
Adding other DLNA-compatible devices to your home network
By setting up a DLNA server on your PC, you can connect other devices to your wi-fi router. Connecting to your home network, possibly via a wireless connection or via cable.
Laptop or other PC
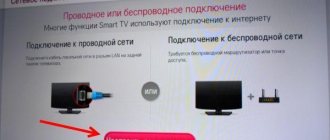
To add a laptop to your home network, you need to configure its connection to the router. In the case of a wired connection, it is enough to connect the LAN connectors of it and the router. When connecting wirelessly, you need to pay attention to the bottom right corner of the monitor. There you will find an icon in the form of gray sticks of different heights.
The icon on the panel indicates that the laptop is currently disconnected from the Wi-Fi network
By clicking on it, you will go to the network connection settings menu; all networks with connection capabilities are displayed here. Select the desired network, click the mouse.
On the “Sharing Center” tab, connect the desired wi-fi network
If the network does not have a password, the connection will occur automatically. Otherwise, a window will pop up in which you must enter a password.
X
Enter your home network password and click “Done.”
Video: how to connect a laptop to a wi-fi network
Before you can transfer media content to other devices, you need to configure the media server.
To add a laptop to your home network you need:
- Go to the “Start” menu, then “Control Panel” and go to the “HomeGroup” tab.
- If a home group has already been created on one of the devices, the system will prompt you to join it, click “Join”.
To connect the device you need to click the join button
- In the next window, enter the password generated by the system when creating the homegroup.
To connect to a homegroup you need to enter a password
Media player
To integrate a media player into your home network, simply connect it to your router. The player automatically connects found DLNA resources. It is enough to open shared access to folders for homegroup devices on the device acting as a media server.