Antenna installation and configuration
Determining the installation location of the NTV-Plus antenna
To ensure reliable reception of a satellite television signal, you need to choose an open area. There should be no tall trees, branches, buildings, bridges, flagpoles, etc. Most often, the antenna is installed on the roof; you can also simply mount it on the wall, on a loggia or balcony. It is very important to protect the structure from bad weather.
Each user can install and configure the HTB-Plus antenna independently. But still, some parameters are best left to professionals.
Antenna installation and configuration steps
Before you begin installing a satellite dish, you need to make sure that the equipment kit includes everything you need. Sometimes it happens that for some reason the equipment is incomplete, or a person does not understand why this or that part is needed.
To install the antenna you need:
- satellite receiver or built-in set-top box;
- coaxial cables with connectors;
- a plate with a diameter of at least 60 cm;
- converter and access card;
- user manual and contract.
The very first thing to do before installing the NTV-Plus antenna is registration on the company’s official website. The user must go through the hardware registration procedure, otherwise it will not work.
Assembling a plate for NTV-Plus with a diameter of 60 cm
When a place has been chosen, among the equipment you need to find a bracket on which the plate itself is attached. A cable is attached to it, which is pulled to the TV. Different brands of TVs have different locations (sockets) where cables need to be attached. If the receiver is not built-in, then the wire will have to be connected to it.
Self-tuning "NTV-Plus"
When the antenna is configured and the cables are connected, the most important stage begins - the actual setup. To do this, you need to know the settings. In particular, it is necessary to know the frequency of the signal. If after entering the data the channel does not show, it means something was done incorrectly. If the equipment is configured incorrectly, contact your operator.
There are 2 ways to tune channels - manual and automatic. The second one requires virtually no effort on the part of the user, because To start the automatic setup mode, you only need to press a few keys on the remote control. This is done in several steps: “Menu => channel search => ok.” If the parameters on the receiver (including the frequency) were set correctly, then the setup will be successful.
Manually setting up a satellite dish
The manual search option is much more complex, so experience is required to carry out this procedure effectively. But if you decide to do it yourself, you can follow the following instructions.
- Reset all existing settings if they were previously set. This is done in steps: “Menu => setup => default installation => channels => antenna => satellite setup.”
- After this, use the receiver to set up the satellite dish, and when you are prompted to enter a password, you must enter four zeros.
- After this, a tab will open where there will be many satellites. Opposite some you can see check marks. These are the satellites that are allowed by default. You need to remove the marks opposite the satellite, otherwise their broadcast frequency will also be taken into account. In this case, you must leave a checkmark next to the “Eutelsat W4-36E” satellite. In some cases, such manipulations may be impossible for the user. To open access, you will need an access card.
- Check transponder parameters. The following indicators are usually used: 12130 R and Lnb levels (lower - 0, upper - 10750).
- After setting up the transponder, you need to move on to the final stage, namely, entering all the parameters in a special line. The broadcast frequency must be entered in the “Manual setup” section. To start searching the network, you need to select the previously specified transponder. Be prepared that the search will take a very long time. But a tuned antenna will show any channel.
Transponders for HD
For lovers of satellite TV in HD quality. A number of special devices with HD frequencies are available:
- 12399 R: KHL TV HD, Discovery Channel Russia HD, Film Premiere HD;
- 12207 R: TLC Russia HD, Eurosport 1 HD, History Russia HD, Amedia Premium HD;
- 11930 R: Viasat Nature/History HD, Viasat Sports HD, FOX Russia HD, Viasat Sport East HD, TV 1000 Comedy HD;
- 11823 R: Match! Football 1/2/3 HD, Nickelodeon HD, MTV Live HD, Our Football
It must be said that the transponders listed above have frequencies in the range of 11800-12400 MHz. The reason is that they make it possible to maintain a high-quality HD signal without degrading the coverage area or interruptions.
Right polarization allows you to produce a clear, complete and stable signal, which, importantly, does not at all affect the channels from multiplexes No. 1 and No. 2.
Set-top boxes and TV
Setting up the NTV-Plus Vostok antenna on different TVs
For different brands of TVs, the setup principles may be different. It's not difficult to understand them.
Instructions for setting up Samsung and LG TVs
- To set up NTV-Plus channels on Samsung TVs, first make sure that the device has a CAM module.
- Select “Broadcast” from the menu.
- Go to the selected antennas, check the box next to “Eutelsat W4-36E”.
- Save the specified settings.
- Go to the “LNB Settings” tab, select a transponder (any).
- At the same time, make sure that the “DiSEqC” mode is turned off. Set the lower and upper LNB settings to 9750 and 10750 respectively. Be sure to enable TOH 22 KHz.
- On the remote control, press the “Return” button 2 times, then go to manual channel search.
- Select the Eutelsat W4-36E satellite and transponder number 11900 (V/R) 27500. Start the search process.
If the setup was carried out by an experienced technician, then the channels can be sorted into categories to make them easier to use.
Setting up NTV-Plus on LG TVs is carried out according to the same scheme, only other parameters are taken into account, which can be found in the instructions.
Source
How to set up a satellite dish?
Setting up equipment is a very important process that directly affects the level and quality of the signal. If you decide to save money and not call a technician to install and configure everything, you must follow some rules when setting up.
NTV Plus satellites are located above the equator; in order to find a signal, you need to point the dish to the south. There are two options on how to do this:
- Look where your neighbors' plates are pointed and do about the same.
- The second and more reliable option is to use a compass; if you don’t have one, download an application on your phone or use an online compass. The dish angle depends on your location and the antenna manufacturer. The approximate range of the angle at which the antenna should be located is 17-38 degrees.
Before installing the antenna, you must make sure that there are no obstacles in the signal path. There should be no trees, buildings, or large branches. You can check this by looking in the direction of the signal; if there is nothing in the way, you can install a dish; if interference is visible, it is better to hang it in another place.
Be sure to secure the antenna as securely and firmly as possible. With a slight shift, for example, from a strong wind, the signal may be lost and all channels may be lost, then you will have to set everything up again, over time this will get boring. To do this, it is recommended to use a highly reliable bracket.
If you don't know the exact settings, you can still adjust the antenna yourself. To do this, slowly move the antenna horizontally, stopping at each point for 5-7 seconds. Continue to do this until an image appears on the TV. When the picture appears, pay attention to the signal level, it should be at least 50%.
I DETECT YOUR AD BLOCKER!
I understand that you cannot turn off your ad blocker.
Simply because I don’t want to change the order of things. But like any sane person, I want to offer a compromise. I GIVE YOU GIFTS! PAY ATTENTION TO ADVERTISING! NO OFFENSE! BE MORE HUMAN TO THE AUTHORS OF ARTICLES! ISN'T IT NICE TO DO SOMEONE GOOD?
INCREASE YOUR PERCENTAGE OF POSITIVE KARMA. WE WILL ALL BE GRATEFUL!
We have a minimum of advertisements on our page. At the beginning of the article and at the end! So it won’t hurt to read and learn something useful!
Whitelist this website or disable your ad blocking software!
THERE WILL BE SPECIAL GIFTS FOR SUBSCRIBERS!
THIS IS EASY AND FREE TO DO. ALSO, GIFTS WILL BE TO ALL FRIENDS WHO DO NOT TURN ON AD BLOCKING! And they pay attention to advertisements. You will find the GIFT above the bottom block (footer), or to make it completely clear, immediately after the comments. Of course, when you disable the blocker. The gift will be updated and have different themes.
A tiny team of authors already thanks YOU for your kindness and understanding of the situation. The advertisements contain useful information.
GOOD LUCK FRIENDS!
Equipment registration
In order to register a new contract, you don’t have to go anywhere; you can do it online. But for this you need to know the following information:
- Subscription contract number.
- NTV card number plus.
- FULL NAME. subscriber
- The date when the contract was concluded.
- Equipment installation address.
- Your phone number or email.
- The name of the digital set-top box that receives the signal and the model of the television module.
- Serial number of the set-top box.
- The date when your channel package starts working.
There are three ways to register a contract without leaving home:
- Through the official website of NTV Plus, using a special form.
- If you don’t want to do this yourself, you can call the support service at 8-800-555-67-89, and they will do everything for you.
- You need to fill out and scan the contract, then send it to the email address
This is a slow process and may take more than 7 business days from the date the contract is sent.
Step-by-step instructions on how to draw up an agreement online:
- We go to the official website of NTV Plus.
- If you do not have a personal account, you need to create one. Click on the form in the upper left corner and register it.
The fields with the contract and card number are left blank.
- After registration, you will receive a confirmation email with further instructions.
- You need to go to the website and go to your personal account, select the item: “Register an agreement.”
- A window with conditions will appear in front of you, put two checkboxes.
- We fill out the field with the contract number, it consists of 10 digits, then enter the smart card number without spaces.
The item with the card number where the family package is indicated does not need to be filled out. - In the date line we put today's date.
- Next, fill out the section with personal information (full name, address where the equipment is located).
- We issue personal account statements upon request, the service is paid.
- We choose a subscription, the contract will be issued within 24 hours if there are funds in the account.
- We link the agreement to your personal account.
- You need to fill out a paper agreement, send a photocopy of the agreement and passport to the company’s email address.
- When all documents and contracts are concluded, an image will appear on the screen. On average, this procedure takes one hour. If the channels do not work, contact support to clarify the reason.
Search channels
There are two ways to search for new TV channels, automatic and manual:
- Automatic search does not require additional knowledge. Just run it and wait for the process to complete.
Manual search is more professional and requires additional settings, but thanks to it, you can find all available TV channels.
Automatically
The automatic setup looks like this:
- Enter the menu using the remote control.
- Find the “Channel Search” subsection.
- Select this section and wait until the search ends. Upon completion, all found channels will begin broadcasting the image.
Resetting and setting parameters manually
The manual version is much more complicated, so for the best result you will need some knowledge. If you decide to do this yourself, use the following instructions:
- Before you start searching, you need to reset your previous settings. To do this, go to the “menu”, then the “setup” tab, select “default installation”, “channels”, click on the item “antenna”, “satellite setup”.
- After resetting the settings using the receiver, you need to configure the satellite dish, the system will ask you to enter a code, it is simple and most often - 0000.
- A tab with a huge list of satellites will appear in front of you, and you need to know exactly which one to choose. Remove all marks that are opposite the satellites, otherwise their purity will be taken into account when searching. You must leave one check mark next to the Eutelsat W4-36E satellite.
In some cases, these actions will not be available; you will need an access card to open them.
NTV-PLUS in 2021.
NTV-PLUS sensed the competition and decided to launch seven new TV shows.
To achieve balance, some things are reduced, the list is at the end of the article.
Specifically, from January 1, 2021, NTV-PLUS begins broadcasting 7 new TV channels at once.
List, Mosfilm. Golden Collection", "Dance!", "Motorsport TV", "Hunting and Fishing", NickToons, HGTV and HSR24.
What will we find in these TV channels?
"Mosfilm. Golden Collection"
This channel provides exclusive and premiere access to the golden fund of Russian cinema. A unique combination of classics of Soviet and Russian cinema, as well as modern Russian films.
The “Basic Online” package, as well as in the archived packages “Basic”, “Basic West”, “Basic Plus”, “All Inclusive 549” and “All Inclusive 999”.
"Dance!"
The entertainment channel will introduce viewers to exciting dance shows from around the world. Broadcasts of the best events from the world of dance sports, large-scale reality shows.
Also documentary projects about the best dancers and famous athletes. Watch all this and much more on the “Dance!” TV channel.
You will find it in the “Entertainment” package, as well as in the “Basic”, “Basic Plus” and “All Inclusive 999” archive packages.
"Motorsport TV"
The most exciting auto and motorsports broadcasts from around the world, as well as documentaries. Educational programs and special projects of our own production. The channel airs premium racing series.
Such as Moto GP, WEC, Isle of Man TT, Xtrial and much more.
Found in “Basic Online”, as well as in the archive packages “Basic”, “Basic West”, “Basic Plus”, “All Inclusive 549” and “All Inclusive 999”.
"Hunting and fishing"
An entertaining TV channel for those whose hobbies are hunting and fishing. Programs filmed in different regions of the country and abroad.
It will be of interest to experienced fishermen, hunters, and those taking their first steps. Experts give advice on using fishing gear, talk about fish species and fishing methods.
They share information about hunting weapons, features of winter hunting, and expeditions to mountainous areas. They also reveal the secrets of preparing culinary masterpieces from game and fish. Filming the most beautiful places, natural exoticism.
Look in the Basic Online package, as well as the Basic, Basic West, Basic Plus, All Inclusive 549 and All Inclusive 999 archived packages.
NickToons
Popular animated series filled with adventure and humor, teen television series about school, true friendship and mysterious incidents.
A proven company has gathered on air that will not let you get bored. SpongeBob, Teenage Mutant Ninja Turtles, Penguins of Madagascar, Saja and Craig and Alvin with the Chipmunks.
New cartoon characters also joined them. Four-legged athletes from Athleticus and mysterious creatures from the animated series Darg van Dango.
In the “Children’s” package, as well as in the archive packages “Basic”, “Basic Plus”, “All Inclusive 549” and “All Inclusive 999”.
HGTV.
A TV channel about design, renovation, home and garden improvement, and the modern level of comfort. The main audience is women 25–49 years old and anyone who wants to bring more beauty, harmony, and convenience into their lives.
The basis of the broadcast network. The channel’s own programs, such as “Real Estate Hunters,” “Blind Game,” “Jack Pot. We are buying a house”, “Star renovation”, “Reliable walls”.
Look for the channel in the “Basic Online” package, as well as in the archive packages “Basic”, “Basic West”, “Basic Plus”, “Lite Plus”, “All Inclusive 549” and “All Inclusive 999”.
HSR24.
This is a teleshop of interesting, functional and useful things. Exclusive cosmetics, original clothes and shoes, unusual products for home and garden.
In the “Basic Online” package. Also in the archive packages “Basic”, “Basic West”, “Basic Plus”, “Lite Plus”, “All Inclusive 549” and “All Inclusive 999”. Of course, Aunt Shura offers all this and more.
What will be closed?
From January 1, 2021, due to the expiration of contracts with copyright holders. Broadcasting of MIR PREMIUM HD, Star Cinema, BOLT, Bryansk Gubernia channels will be stopped on the NTV-PLUS platform.
Also, RT (Arabic), RT (Spanish), RTD (Russian), Kuban 24 ORBITA. From December 31, 2021, broadcasting of the METEO TV channel will stop.
For TVs with a CAM module
Modern TVs can receive a signal without installing additional equipment (receiver). In order to watch premium channels, television equipment manufacturers have made an option with which you can connect an external CAM module. It converts the receiving signal and sets up the channels.
Instructions for installing the CAM module:
Via Common Interface slot:
- Insert the access card into the CAM module.
We connect the CAM module with the card into the slot located on the side of the TV (Common Interface).
- Remove the sticker on the back of the TV.
- Insert the adapter into the corresponding hole.
- Lightly press the adapter to connect to the connector.
- Make sure the connection is secure and the adapter does not wobble.
- Insert the access card into the CAM module.
- Attach the CAM module with card to the CI adapter.
For LG and Samsung models
LG and Samsung TV models have CAM modules, so their setup is identical - via CI, but different from the standard one.
Installing channels for Samsung and LG:
- Open the menu and select the “Broadcast” tab.
- Select the antennas tab and check the box next to “Eutelsat W4-36E”.
- Save your settings.
- Open the “LNB Settings” tab, select any transponder. DiSEqC mode must be turned off.
- Enter LNB settings. The upper level is 9750, the lower is 10750. Turn on the 22 kHz tone.
- On the remote control, double-click the “Return” key, then open the “manual channel search” tab.
- Select the Eutelsat W4-36E satellite and transponder number 11900 (V/R) 27500.
- Start your search.
Now you can independently install the NTV Plus satellite dish and find all the channels available to you. We wish you pleasant viewing!
Source
Left circular polarization
NTV Plus transponders with left polarization and circular frequency are divided into two main types:
- frequency 12341 L. Includes TNT channels, Home, NTV Mir, STS and Pervy. Flow rate with FEC value, 27500 SR - three quarters. Encoding - Viacces;
- frequency 12265 L: Russia 24, REN, Pyatnitsa, MIR, channel 5 and Russia 1. The main part of the channels is included in multiplex No. 1, with the QPSK standard and MPEG-2 DVB-S modulation format.
Meanings and their interpretation:
- Viaccess - access to pay TV channels. The most popular are the fifth and sixth versions. Others have been hacked or are on the verge of being hacked.
- Forward Error Connection (FEC) - corrects errors proactively. Using this method you can restore the parcel information.
- SR is the streaming speed, which shows how dense the information flow is in the signal from the satellite.
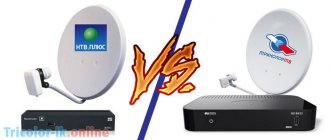
Setting up the NTV Plus antenna
The NTV Plus satellite television set is an excellent choice for sports and movie fans. But the operation of television without failures and interference can be ensured with proper assembly, installation and configuration of the dish. First, make sure that the requirements necessary for the correct operation of the system are met:
NTV Plus channels are broadcast from the Eutelsat W4/Express AMU 1 satellite, located at 36 degrees east longitude. The satellite covers the main part of the territory of the Russian Federation.
To receive channels you will need the following equipment:
- Antenna diameter 55-90cm.
- Circular polarization converter.
- Receiver for receiving NTV plus or CAM module.
- Coaxial cable.
- Connectors.
The minimum size of the plate for reception is 55-60cm. By increasing the size to 80-90 cm, we will get a stable and stable signal that will not be affected by weather conditions in the form of rain, snowfall, or cloudiness. The NTV+ system uses circular polarization converters. There should be a circular or “Circular” mark on the irradiator body. The number of outputs in the irradiator corresponds to the number of connected receivers.
Let's proceed to the procedure for installing and configuring NTV Plus channels, which consists of the following steps:
Stage 1: Checking the signal
You can set up an NTV Plus satellite dish only if there is a signal. You can navigate by the sun: around 13:00 its direction corresponds to the position of the satellite, by the dishes on neighboring houses. There are also maps on the Internet, like DISHPOINTER, which will help you check the possibility of satellite reception. Working with it is quite simple: enter the exact address of the house, select the name of the Eutelsat W4/Express AMU1 satellite. A colored beam will show the direction. If the beam is red, that is, reception from the window is not possible, then the system is installed on the roof. The connection will cost more, since cable costs will increase, but the result obtained is worth the effort.
How does a satellite TV set work? The antenna plays the role of a lens that receives the signal and transmits it to the converter. The converter amplifies reception and transmits the signal to the set-top box.
Only a specialist visit and measuring the signal using a spectrum analyzer will give an accurate guarantee of the availability of satellite reception! The cost of these works is 1000 ₽.
Stage 2. Installation of equipment
We assemble the satellite dish according to the instructions. A drill with a hammer drill for drilling brick and concrete surfaces will make the process easier. The bracket can be secured using anchors with a diameter of 8mm or 10mm or a 14mm dowel with a capercaillie. All connections are made using coaxial cable and F connectors. The cable is stripped (see photo) and the connector is put on it. Connectors come in screw-on and crimp-on types. The most common ones are for cheating. Crimp connectors are more reliable and have a longer service life, but their installation will require crimping pliers.
After assembling the dish, we set it according to the elevation and azimuth of your region. For Moscow, the elevation angle is 27 degrees, the azimuth is 181 degrees (see photos for other large cities).
Stage 3. Setting up a satellite dish
We carry out the work using a setting device or attachment. In the second case, it is recommended to configure the set-top box in advance, for example, when purchasing a set in a store, or from friends where NTV Plus already works.
You can configure programs in manual or automatic search. In the set-top box recommended by the operator, all the settings are already included in the menu, you only need to select the automatic mode, the receiver will do everything on its own.
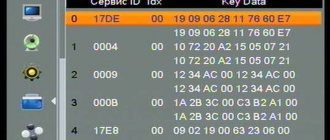
In manual search, enter the parameters:
- Eultesat W4/Express AMU1 satellite.
- Converter settings: upper/lower local oscillator frequency 10750 MHz.
- To search we use a transponder: 11785 R, flow rate 27500, error correction 3/4.
- 22KHz must be enabled to supply power to the converter.
- We activate the network search function to search the entire list of channels.
The channels are configured, go to the “Search for channels” menu. Two scales will appear on the screen: reception level and quality. For the satellite to operate, it will be necessary to fill two scales by at least 70%. We carry out the operation of setting up the antenna in clear, calm weather, if possible at noon, when the sun can be used as an additional reference point.
NTV plus frequencies
Today, the NTV Plus satellite network is one of the most extensive in the country, and can delight users with a wide selection of content for every taste.
The television company has a network of its own NTV satellites, broadcasting at appropriate frequencies from various points on the planet. NTV Plus frequencies are what we will talk about today.
The first and main question is what equipment will you need to fully enjoy the affordable quality of satellite television?
Needed:
- High-quality audio system capable of providing good stereo sound.
- LED, LSD or plasma panel that supports HD video reception.
- Convector, HD receiver and TV antenna.
For more complex systems, this list of equipment may not be enough, and additional purchases will be required, but in the vast majority of cases, customers choose the above set.
The stability of the received signal depends on many factors: nearby high-rise buildings, bad weather, trees and wires. By the way, the latter can not only greatly distort the signal, but also completely block it, which is why it is better to entrust all work on laying cables, installing network components and the satellite dish itself to specialists.
Otherwise, self-installation of equipment by a person who does not have special training and the necessary knowledge of configuration will not lead to the expected results.
The two main transponders of the television company are NTV plus HD and NTV plus. They are divided into devices with right and left polarization types. They strongly depend on two main flow parameters - speed and frequency. These two parameters also have a great influence on ensuring the required reception frequencies and stable operation of the transponders themselves.
Next, we will consider in detail the three main types of transponders.
Procedure for tuning NTV Plus to satellite
- We direct the dish to the satellite’s receiving sector (we focus on the sun and neighbors’ antennas).
- We expose the antenna vertically (for Moscow/Moscow region), up to the maximum.
- We begin to slowly rotate the antenna by 1-2mm, wait a couple of seconds, look at the signal scales on the screen; repeat the procedure until the scales begin to fill.
- When the scales begin to fill, we proceed to the fine-tuning procedure until we achieve 70% filling.
- Fix firmly and tighten the bolts.
- We carry out all the work slowly, since the receiver reacts late, and you may miss the moment.