Without a doubt, Telekarta is one of the best satellite communication companies. It is not surprising that a fairly decent portion of viewers prefer to order paid channels here. But over time, many channels may disappear, even though the user is sure that he paid the subscription fee, and the package should work perfectly. Most likely, the issue is that the update was not carried out on time.
If this is really the problem, then it can be easily solved by carrying out a set of certain procedures and performing the simplest manipulations. Then the channels will return in the same quantity and quality as before, and perhaps even more advanced, because the company is making updates for a reason - it does this to improve the quality of the signal and expand the list of new products offered.
How to update the channel list step by step on recommended equipment?
From time to time you have to reboot the Telecard yourself to improve the quality of broadcasting or add new TV channels. It will take no more than 10 minutes. The reboot procedure may vary slightly for each model.
The essence of the update is to reset the receiver's current settings to factory settings, after which a search for channels that were relevant at the time of scanning occurs.
The recommended equipment already has the necessary functions and parameters for Telecard satellite broadcasting, so there is no need to specify additional parameters. The main thing is that if you do it yourself, try to follow the instructions step by step.
To update the channel list, you will need a remote control and preferably instructions for the equipment.
Instructions for GLOBO receivers
This is the recommended equipment for viewing packages from Telecard. Globo supports all the functions necessary for the Telecard. What needs to be done?
- To start the update, enter the receiver menu.
- Using the arrows and the OK button on the remote control, open the “Settings” or “Custom Settings” item.
- Then you need to confirm the actions. In each model, confirmation occurs differently.
| GLOBO HD X8 | GLOBO X80/90 |
| A confirmation request will appear in a new window, where you need to select YES. Then a list of TV program packages will open, select the one you need and start downloading by clicking YES. | The receiver will ask for a password. The default is 4 zeros - 0000. Next, follow the menu instructions and select YES in each new window. |
- The set-top box will automatically begin the update process.
- Wait until the search is complete and exit the menu using “EXIT” on the remote control.
Instructions for Continent receivers
Continent receivers are used to view open programs from any satellite and closed programs from Intelsat 15 and Express AM3 satellites. The equipment menu is Russified, and its structure is intuitive. To reload the channel list:
- On the remote control, press the "Menu" button
- Go to the settings section using the arrows on the remote control. There are differences at this stage. Follow the algorithm in the table according to the model.
| CSD-01/IR | CHD-02/IR, 04/IR, 04/CX | CSD-03/IR |
| Custom Setting - Factory Settings - OK Button | Setup – Configuration – OK | Installation – Factory settings – YES – Channel Search item – OK button |
- Then confirm your actions with a password - it is 4 zeros. After the code, you additionally need to confirm with the YES or “Restore Default” button. In each subsequent window, click OK. The CSD-03/IR model does not require a password. Here you need to activate “Network Search” and click “Start Search”.
- The receiver will automatically update via satellite and download the new list.
- Once the update is complete, press the “OK” and “EXIT” buttons alternately.
Instructions for models from EVO
These receivers are designed for broadcasting directly the Telekarta TV program package and other unencoded programs. To update the set-top box, do the following:
- From the control panel, enter the Menu.
- Using the arrows and the OK button on the remote control, find the desired section. To do this, follow the algorithm in accordance with the model:
| EVO-01 | EVO-02 | EVO-05 | EVO-07 |
| Custom Setting - Factory Settings | Settings – Configuration – Factory settings | Settings – Configuration | Settings - Factory settings |
- Next, enter the password - standard 0000.
- After logging in with your password, you will need to confirm the request. The confirmation algorithm is different for each model.
| EVO-01 | EVO-02 | EVO-05 | EVO-07 |
| Press the red button on the remote control | In the new window, select YES | After the password, you need to select “Factory settings”, where you can select a package of TV channels. In all pop-up windows, click OK. | In the new window, click YES and select the desired channel package. |
- The list will then begin updating via satellite. After finishing, just click on
Flash GI 1025 / 1026
How to flash Gi S1025 / Gi S1026 tuner
Galaxy Innovations
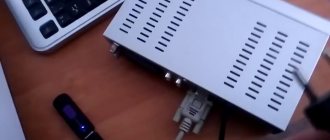
To flash the Gi S1025/1026 receiver firmware, we need a program, a null modem cable , and of course the Dump firmware file itself .
The null modem cable should only be connected when the receiver is turned off, so as not to burn the com port, and it should also be disconnected only when the receiver is turned off.
This is what a null modem cable looks like, you can buy it at a radio store, and its wiring, which you can solder yourself.
Also make sure that your computer has a com port; if it doesn’t, you will need a USB-RS 232 , which you will also have to buy at a radio store.
So: well, now let’s move on to the firmware of our receiver. In the program , download Upgrade-1.0.15 bootloader Gi S1025 1026 bootloader. There are two files in the folder LZMA.EXE which we run for a normal robot program. And we also launch the program itself.
Select in the drop-down menu (Serial Port) the Com port of the computer to which your zero tuner is connected with a modem cable. By default it is COM
-1 (when using a USB-RS232 adapter, the
COM port may be different.
Next: select the firmware mode in the field ( Upgrade Type
).
We are looking for the item ( allcode + bootloader
) (the lowest one in the list), which allows you to update the receiver’s bootloader, the firmware itself, as well as the list of channels.
Next: let's proceed to updating the receiver software itself. To do this, press the button ( Next
) and turn on the power of the receiver, plug it into the network, and if everything is correct, after a few seconds the firmware process will begin, and you will see the following window.
is written to flash . At this moment, you cannot turn off the tuner from the network, turn off the program, or turn off the computer, otherwise the tuner may glitch. We are waiting for the completion of the firmware process. Upon completion, the program will display a corresponding message ( Program
upgrade finished successfuly).
Watch the video on how to flash the Gi s1025 / s1026 tuner
And now the tuner is flashed. Click ( Finished
), close the program window, first disconnect the tuner from the network, and then from the computer, EVERYTHING IS READY!
Read another topic - How to flash Gi S1125 / S1126 tuner
Source
Telekarta Vostok launched new channels
Since January 21, 7 TV channels have become immediately available in the “Unlimited Vostok HD” package of satellite television “Telekarta”. Viewers will be able to enjoy sports broadcasts on the rating channels Eurosport 1 and Match TV HD , keep abreast of all business news from the RBC TV , and watch the best Russian and foreign films on the Illusion+ and Russian Illusion TV . Cartoon Network with original cartoons, beloved by children all over the world “Auto 24”.
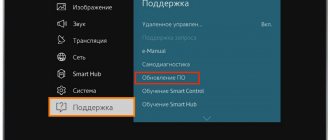
How to update the receiver:
For uninterrupted and high-quality broadcasting, as well as watching new TV channels, we ask you to reset the settings on your receiver to factory settings. Your receiver will automatically search and update the channel list. The whole process will only take a few minutes. The setup steps may vary depending on your receiver model.
Attention! Factory reset is only suitable for certain models of recommended receivers. On recommended Continent, Rikor receivers and receivers from other manufacturers, such actions will lead to resetting the satellite parameters. To avoid this, scan channels according to the instructions at the bottom of the page.
Attention! These instructions are only suitable for the recommended equipment. Detailed instructions on how to update it can be found by selecting the brand of your receiver.
Attention! Searching for channels on your own on non-recommended equipment may result in resetting all frequencies and receiver settings. To restore these settings, you will need the qualified assistance of your installer.
In order to configure your receiver yourself, we recommend using the “How to search for channels” section in the instructions for your equipment (when using a CAM module, the channel search is performed according to the instructions for the TV).
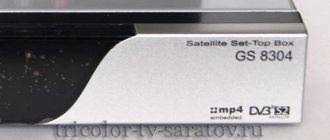
Review of the digital receiver GI (Galaxy innovations) 1025
Main parameters:
Receiver GI 1025 packaging and appearance
The receiver is packed in a tight and beautiful box. Inside there are detailed instructions in Russian and English.
The receiver itself is made in a small case with slightly rounded corners. Color matte black. The design is quite attractive. The front panel is devoid of any buttons or covers. This is understandable: all this allows you to reduce the cost of the receiver as much as possible. Moreover, this does not in any way affect the technical parameters.
The card reader is displayed on the side panel. Obviously, this is dictated by the same considerations to reduce the cost of the design: since there is no cover on the front panel and the small case does not allow the card to be completely recessed, it is better to place the slot on the side panel to avoid possible damage to the access card.
The rear panel has a minimum of outputs. But everything you need is present: input for connecting a converter, SPDIF, RS 323 port for programming (software change), AUDIO R/L stereo signal output (tulips), VIDEO RCA output (tulips), 0-12V 12 V voltage output for external switches , TV output SCART type for TV.
The entire layout is made on one board, which again helps reduce the cost of the receiver. This is unlikely to affect reliability, since Galaxy innovations products are known for their high quality.
The receiver remote control is standard, used on many budget models of GI receivers. Actually this is an advantage, since it can be replaced without problems. The remote control is reliable and easy to use.
The receiver is built on the popular, modern Ali 3329C processor, which implies good software support.
Basic settings of the GI 1025 receiver
MENU button , we go to the items for selecting the main settings of the receiver. There are 5 points here:
Let's take a closer look at some of the most interesting and useful menu functions:
The most commonly used and important INSTALLATION contains all the standard functions necessary for editing converter parameters and setting up ports and motor suspension.
It is worth noting the support for the DiSEqC 1.0 & 1.2 protocols (up to 16 ports) and the clear operation with the motor suspension revealed during the testing process.
When approaching a satellite, the receiver instantly locks the signal, which allows you to adjust the motorized gimbal even on weak satellites without much difficulty.
At the bottom there is a fairly informative (bright and wide) signal level scale, which certainly facilitates the process of tuning the antenna to a satellite using this receiver.
View channels - Select an option to view channels. You can choose to view all channels, only open channels, or only encrypted ones.