Hello, dear readers of the NskTarelka.ru blog, I present to your attention a detailed review of the Favorite package of the Continent TV project.
Let's look at the list of channels available for viewing when connecting to the package, and also find out how relevant the Favorite package is at the moment.
Attention - the article is no longer relevant. The “Classic”, “Favorite”, “Start” packages are being archived by the operator; the ability to switch and connect to these packages from other TV packages will not be provided from July 15, 2014.
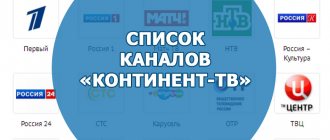
Continent Channels - Favorite package
| Freely available TV channels - FTA |
| Style and fashion. | Lifenews | TVNZ |
| World of Belogorye | TV Arm RU | Union |
| iONE | First Yaroslavsky | TTS |
| Styletv | Arrow | Channel Eight |
| Kurai | Time TV | First educational |
| Shop & Show | Teledom |
| Free TV channels |
| First channel HD | Russia HD | Carousel |
| First channel HD (+4) | TV Center | Success |
| First channel | NTV | Channel 5 |
| Channel One (+2) | NTV (+3) | Yurgan |
| Channel One (+4) | Russia 24 | OTR |
| Russia 1 | Russia 2 | RZD TV |
| Russia 1 (+2) | Russia Culture | TOP SHOP TV |
| Russia 1 (+4) | Star | Moose |
| Continent TV Info |
Below is a list of channels available for viewing with a positive account balance, with a paid subscription to the Favorite package.
Paid channels of the Favorite package
| Main unit |
| STS | Yu-TV | National Geographic |
| REN | Rain | TMB |
| Home | Moscow 24 | Discovery Channel |
| Region 26 | Theater | Animal Planet |
| Pepper | Euronews |
Next, choose one of the three proposed thematic blocks that is most interesting to you:
| Film |
| Kino Plus | The world of the series | Universal Channel |
| TV 3 | Amedia 1 | SONY SCI-FI |
| Favorite movie | DIVA Universal | SONY TV |
| Zee TV |
| Sports |
| Sports 1 | KHL TV | Sport Plus | Sport |
| Knowledge and entertainment |
| Male | Country life | STS (+4) |
| Ocean TV | Story | TLC |
| Travel+Adventure | Galaxy | Hunting and fishing |
And we make a choice between two thematic blocks:
| Music |
| MTV Hits | Moose | Chanson TV |
| Children's |
| Disney | Nickelodeon |
As a result, when choosing the Favorite package on the Continent, we have the opportunity to view from 61 to 67 channels.
Monthly payment for the Favorite package will cost 170 rubles. Payment for six months 780 rubles. (130 rubles/month) Payment for the year 1188 rubles. (99 RUR/month)
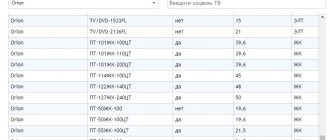
At the office website of the Orion Express project Continent TV the list of channels in the Favorite package is currently missing.
The only thing we were able to find on the site, more or less at least some information about the Favorite package, was the “News” section, page 29.
Publication date 09/13/2010
The motivation for the lack of a list of channels in the Favorite package, based on conversations with the company’s technical support, and communication with company representatives on the official forum, apparently is that the Favorite package has lost its relevance today.
More interesting offers from the operator have appeared on the market in terms of price and quality of package content:
-Unlimited package, Continent project - 2388 rub. per year (199 rub./month) more than 150 channels - Standard package, Telecard HD project - 880 rub. more than 70 channels per year (it is possible to switch to the Unlimited package)
And indeed, against their background, the Favorite package with the number of channels from 61 to 67 for 1188 rubles per year looks unattractive.
And if you connect one of the thematic packages, or even more so several, the price will become completely unattractive. Most of the channels available in thematic packages and additional blocks offered to choose from when forming the Favorite package are included in the subscription fee of the Unlimited package.
Configuration Manager
After initializing the NCC, you need to install the Configuration Manager (Continent network management program) and configure the administrator's workstation. From the Administrator VM, launch the Configuration Manager installation wizard and follow the installation instructions. After installation, reboot the computer and launch the Configuration Manager. When you first start the program, you will need to initialize the biological random number sensor. Following the instructions, we initialize the DSC.
Let's establish a connection with the central control center by specifying the following parameters:
- “Login type” – “Using a password”;
- “Server” – IP address of the NCC management interface – 192.168.1.1;
- “Account” – admin, “Password”
The connection to the NCC will be completed. This is what the Continent network management window looks like.
The navigation menu has the following tabs:
- Access control – setting up firewall.
- Virtual private networks - setting up a VPN.
- Intrusion detection system—configuring the functions of the intrusion detection component.
- Structure – contains a list of security nodes. Here the UB is configured and its components are activated.
- Administration – contains settings for complex administrators, issuing certificates, updating the complex, licenses and backups.
The following settings need to be made:
- Add a valid license to the security node;
- Perform network settings;
- Set up a monitoring system.
To add a license, go to “Administration” – “Licenses” . By default, a demo license with a limited set of components and a period of 14 days is attached to the gateway. Let's upload the current licenses to the repository.
Next, you need to link the current license to the UX and unlink the demo license.
Save the changes by clicking on the “Save” button in the upper left corner. Next, let's configure the network parameters. “Structure” – PKM according to UX – “Properties” . We already had the internal control interface set when initializing the NCC. Now you need to specify the external interface, the DMZ connection interface and set the default route according to the layout.
In the interfaces tab you can:
- Specify the type of interface purpose: external, internal, monitoring, switch port
- Set IP addresses
- Add VLAN and loopback interfaces
- Create a Bridge interface, aggregation
To configure routing, go to “Static routes”
It is worth noting that Continent supports dynamic routing protocols OSPF and BGP .
Let's indicate the time zone for the monitoring system. Let's save the settings and install the policy on the NCC.
Thematic packages
Cinema - 100 rubles per month
Our new movie Kinolux Comedy TV Kinosoyuz TV XXI Amedia 2
Male - 100 rubles per month
Extreme Sports Comedy TV Nautical Channel 2×2 Peretz Russian Extreme Fight Club RBC Auto Plus
Hobbies - 100 rubles per month
Travel Channel Moscow 24 RTG TV Kitchen TV 24Techno Science 2.0 My planet
Music - 75 rubles per month
Europe Plus TV Ninth Wave VH1 Classic
Children - 75 rubles per month
Children's world Gulli Tiji
HD — 100 rubles per month
Travel Channel HD Travel+Adventure HD KHL HD Rain HD Sony HD Sports 1 HD Mezzo Live HD MGM HD Outdoor Channel HD HD Life
In addition to the above channels of the Favorite package, it is possible to connect additional packages:
Our football - 149 rubles per month
Available channel of the same name Our Football
Ethnic - 30 rubles per month
Inter + TNV Shant Maidan
Horizon - 50 rubles per month
Mother and Child LIVE! Healthy TV
World cinema - 60 rubles per month
Russian bestseller Cinema TV Russian novel
Openings - 99 rubles per month
Discovery World Animal Planet HD RTG HD Investigation Discovery Discovery Science
Monitoring system
The final procedure for preparing the administrator’s workstation is setting up a connection to the monitoring subsystem via the https protocol. A secure connection when connecting to the monitoring system is implemented using two encryption algorithms:
- GOST R 34.11-2012 (Stribog) – requires additional CIPF software “Continent TLS VPN Client”
- RSA
As part of this cycle, we will connect using the RSA algorithm. To do this, you will need to issue an RSA root certificate and a monitoring system certificate. Go to “Administration” – “Certificates” – “Root Certification Authorities” . We specify RSA as the signature algorithm.
For a monitoring system certificate: “Certificates” – “Personal certificates”
- Name – used to connect via https
- Certificate type – web monitoring
- Root certificate – a previously created RSA root certificate
Let's bind the created certificates to the NCC. “Structure” – PCM according to UX – “Properties” – “Certificates”
Let's save the settings and install the policy on the security node.
To access the monitoring system, specify the URL of the personal monitoring certificate. In our case it is https://mon-aes. To access the monitoring system, you need to configure the DNS server accordingly or add the hosts file.
Initializing and Configuring a Security Slave Node
We initialize the slave node that protects the branch network. The initialization of the CU is identical to the initialization of the central control center. Except for a few details:
1.When installing the OS, select the installation language and click “Install Continent...” . Platform type – “Custom”
2.Initialize the device as a “security node”
3. At NCC we issued certificates in the local menu. To issue a subordinate node management certificate, you must create a certificate issue request. Select “Certificates” – “Requests for issuing certificates” – F4. The request is recorded on a USB drive and sent to the Configuration Manager.
4.In the Configuration Manager, we issue a certificate based on the request. “Certificates” – “Personal certificates” – Create – “Load data from request file”
5.Next you need to create a UX: “Structure” – “Security Node” . Specify the device ID and upload the created certificate. We save the changes and bind the license to the security node.
6.Export the node configuration to a USB drive. RMB for UX – “Export node configuration”. We connect the USB drive with the configuration to the VM with the slave node and click “Connect to NCC” .
7.Configure the management interface ge-0-0 (eth0). In our layout, we implement the following scenario: access from the branch to the Internet will be carried out through the central control center located in the central office. Therefore, the IP address of the NCC is specified as the default gateway.
8.Device initialization is complete. Next, you need to confirm the changes in the Configuration Manager, configure network interfaces and specify the time zone.
We save and install the policy on security nodes.
Note that in the Continent 4.1 complex it is possible to deploy a UB array. To do this, in the Configuration Manager, in the “Structure” section, you need to click “UX Creation Wizard” . Next, you need to select the number of CUs (maximum 50), specify the path to save extended containers (needed to initialize the CU) and configure each of them.
The created security nodes will appear in the "Structure" . Next, in the local menu, you need to initialize the UB with a connected USB drive on which the extended containers are located.