External causes of problems
Unremovable on your own, you'll have to wait.
Carrying out preventive maintenance by the operator.
Prevention is caused by the need to check equipment, software and eliminate detected problems. Operators carry out this regularly, turning off channels. Your favorite programs will return to the screen after the maintenance work is completed; no independent steps are required. You can find out about prevention by going to the operator’s website.
Click on your operator's logo and check
their maintenance
. If it's not about prevention, the following are important factors to consider:
Weather
. Heavy snowfalls, rains, and thunderstorms are accompanied by a dense accumulation of clouds that impede the passage of the signal. Hail, lightning strikes, and heavy snow introduce additional interference. The signal will return as the weather improves.
Solar interference
. The phenomenon lasts for a short time, channels will appear after it ends.
Obstacles appearing
on the signal path. Houses that have been built, trees that have grown, and tall special equipment that has arrived can block and greatly weaken electromagnetic waves - and it will be impossible to watch TV. The solution is to remove the obstacle (remove interfering branches, wait for the equipment to leave) or move the satellite dish. Obstacles are determined by looking at the sun at thirteen o'clock in the afternoon: the imaginary segment from the plate to the sun must be free:
Updating DVB T2 set-top box
The process of flashing such set-top boxes is similar to the devices from Rostelecom described above. After downloading all the necessary files and installation manual from the official website, you need to place a file with the extension .ssu .
Having gone to the set-top box menu, select the “ System ” tab and select the “ Update and save ” item. Then, you should reboot the device and disconnect the power from the network.
After turning on, the set-top box will have a new firmware version. All that remains is to configure dvb t2 to automatically or manually search for channels.
Firmware D-Color
D-Color has removed the Firmware section from its website, providing them only upon request. And this is what many of the companies producing various DVB-T2 receivers are doing now.
About firmware: Updating the software (firmware) of your equipment is carried out only in cases where any problems arise, or the update will add useful functions to the device.
Flashing devices unnecessarily is not recommended, because... During the firmware update process, there is a possibility of equipment failure
.
If you are not sure that you can handle updating the firmware yourself, we recommend that you contact the appropriate service center, qualified specialists or your dealer.
Many companies produce set-top boxes with the same model number, but completely different inside .
For example, the Tesler DSR-320 is available in 15 modifications
— 15 firmware options.
The worst case scenario is that when the firmware is for another processor , the set-top box will turn into the so-called. "brick".
Different generations are incompatible with each other:
- MStar MSD 7816 ≠ 7802 ≠ 7T01 ≠ 7T00
- ALi M 3812 ≠ 3821 ≠ 3821 P
- Novatek NT 78316 ≠ 78306 (78336)
- Sunplus SPHE 1502 ≠ 1505 ≠ 1509
If the firmware is for exactly the same processor, but a different tuner , then the Auto Search will end immediately, just as the Manual Search will not find anything and the Quality scale will not react in any way.
Internal reasons
Caused by hardware and settings problems. The message “no signal” is sent to the screen by the TV or receiver itself. TV/AV
problems are solved by checking settings, cables, and connected equipment.
The TV shows a “no signal” sign if it “does not see” the connected receiver. You should start by checking the selected signal source on the TV. There are several types of sources:
TV.
TV channels are broadcast using a digital or terrestrial antenna.
AB.
TV channels are broadcast on the AV channel. Connects using so-called 3RCA tulips:
HDMI.
TV channels are broadcast via HDMI cable:
Composite
Connects using 3RCA tulip:
You must press the “input” or “source” button on the control panel. A list of available modes will open; you should select each one in turn. This action will determine the port used to communicate with the receiver. Make sure the receiver is turned on. Getting into the correct mode will cause a picture to appear. If the remote control buttons are not labeled, you need to look at the instructions for controlling the TV.
If trying the modes does not bring results, the problem may lie in a broken connection with the receiver. This is determined by pressing the menu button on the receiver's remote control. A corresponding picture should appear on the screen; its absence indicates incorrectly connected cables or damage. The solution is to reconnect the cable to the correct port or replace the damaged wire.
Variants of errors when connecting MTS Digital Television via a TV module (CAM)
Error code E06 4
The reasons for this error may be the following:
- the smart card was inserted incorrectly;
- a smart card from a third party, not from MTS, is inserted;
- contamination of smart card contacts;
- Smart card malfunction.
To solve the problem, you can take the following actions: - reinstall the smart card, making sure that it is placed correctly; — perform delicate cleaning of smart card contacts, without using harsh cleaning materials and detergents.
Error code E16 4
This system message may indicate that there are not enough funds on the personal account balance. Another likely cause of the error is a lack of subscription to a specific channel. To solve the problem, it is recommended to check your personal account balance and top it up, if necessary. Check the operation of the channels that are included in the connected service package. If these steps do not bring results and the error is still active, you should call support.
Error codes E30 4, E120 4
A possible cause of the error is that the date and time are set incorrectly on the TV to which the TV module is connected. To solve the problem, you should set the exact time and date on the TV by reading the device instructions.
If this action does not resolve the errors, you should take the following steps:
If these steps do not bring results and the error is still active, you should call support.
Error code E19 4
The cause of the error may be a prolonged shutdown of the TV module when the device has not been used for MTS television broadcasts for a long time. To solve the problem, you need to check whether there is a smart card in the device, and also make sure that the signal source is connected to the equipment. Leave the TV module on for 30 minutes. If the error persists after this period of time, you should call support.
Antenna and connector problems
Pressing the menu button should display the main settings menu on the screen. If it appears, but the “no signal” sign stubbornly continues to light up, the problem is in the antenna or connector.
Antenna+converter
- the main external part of the equipment. Their failure leads to the inability to receive a signal. Plate problems:
- curved body;
- lost focus;
- wrong direction;
- loose fasteners.
- check the integrity of the antenna;
- straighten the body;
- point the plate in the right direction;
- secure loose fasteners.
The correct direction is determined using a compass. Operator installers help you set up satellite television and point the antenna correctly; you can independently adjust the “look” of the antenna based on the initial setup (detailed instructions).
The dish is intact, aimed correctly, but the signal from the satellite has disappeared? The problem may be with the converter. You should check the functionality of the device by connecting it to another dish and another receiver. TV channels show that the converter is intact, but there is no picture - it is faulty. The problem is solved by replacing the device.
The problem is in the module
If studying the above material and following the instructions did not bring the desired result, and the channels still do not show, the reason may be a technical failure of the module. It is strictly not recommended to disassemble the receiver yourself, as this will void the warranty agreement and will be forced to pay the full cost of repairs in the event of a breakdown. Contact the official service center of the telecommunications operator, where professional diagnostics and module replacement will be carried out.
The MTS remote control is a small mechanism with buttons that allows you to install and then manage MTS digital television channels. Control occurs by transmitting commands through infrared radiation. They are sent to the decoder, where this signal is converted to digital for transmission to the TV. It is battery operated.
Receiver problems
The inability to receive a signal can be caused by freezing or breakdown of the receiver. If there is no signal on the receiver or tuner, you can reboot the device by turning it off and on. If the console is frozen, this will help. The absence of a signal after a reboot indicates a malfunction of the receiver. If the console is broken, you can purchase a new one from. Specialists will be able to select the right equipment and connect satellite television with all the settings.
A little more, and MTS satellite TV will be broadcast from a new, more advanced satellite. This will happen on October 18th. In order to continue watching TV, owners of set-top boxes need to configure them or update their software. We will now tell who, what and how to do it.
On October 18, from 2:00 Moscow time to 10:00 Moscow time, technical work will be carried out related to the change of the satellite from which MTS television is broadcast. During these hours, watching TV channels will not be possible. Sweet Dreams!
First, you need to know your console. Even if you don't remember its model, scroll through our slideshow below and find the set-top box your TV is connected to. At the same time, see if you are one of the lucky ones: one model does not require any action. All other consoles are divided into two categories: interactive
(DUNE TV 251-S MTS and Huawei DS300a) and
linear
(Avit S2-3220, Avit S2-3900, SkyWorth HSD11, EKT DSD4404). We have prepared short instructions for both types of consoles.
It sounds incredible, but you really don’t have to pay for MTS satellite television. True, this is only available to MTS subscribers who have rented satellite television equipment. We've sorted out the details.
If you have purchased equipment, you can still save using Smart tariffs: 20% of the money you spend on TV will be credited to your mobile account. More details here: 20.mts.ru
Satellite TV users connected via an MTS TV module with a smart card should use the instructions for linear set-top boxes. A special note for owners of different EKT consoles: they look the same from the front, and the differences can only be determined by their back panel - again, see our slideshow.
So, owners of the EKT 4614i set-top box do not need to take any action: your TV will be reconfigured to receive a signal from the new satellite automatically.
Linear set-top boxes (Avit S2-3220, Avit S2-3900, SkyWorth HSD11, EKT DSD4404) and MTS TV module
1.
Go to the set-top box menu on your TV, find the settings item and enter the updated data:
- Frequency - 11920 MHz
- Symbol rate - 45000 Msymbol/sec
- Polarization - vertical
2.
Start searching for TV channels: the set-top box will re-search all the TV channels you receive from the satellite.
Interactive set-top boxes (DUNE TV 251-S MTS and Huawei DS300a)
Until two o'clock in the morning Moscow time on October 18, each owner of an interactive set-top box for MTS satellite TV had to reboot it. If this has not been done, you will need to manually update its software (or, as they say, firmware). This is a simple matter, we have described everything in detail.
First of all, you need to make sure that your set-top box really needs to be updated. If your TV works as usual and you can watch all TV channels, then you don’t have to read any further: watch your favorite shows as before and don’t worry about anything. If you don’t have only some channels, but you do have the rest, if you can watch everything, but it seems to you that the picture is not of very good quality, then it’s not a matter of updating either: the instructions below are not for you. Just call our support team so we can help you. But if you turned on the TV and set-top box and can’t watch anything at all, let’s figure it out further
.
We found out that your TV channels are not shown. First, you need to see if you really have an outdated version of the software on your set-top box. Let's check.
If you have a DUNE TV 251-S set-top box
Go to the settings of the set-top box using its remote control: Menu > Settings > About the set-top box > 1.8.78.75 / 1601.082114062424
Software version for DUNE TV 251-S
If you have a Huawei DS300a set-top box
We go to the settings of the set-top box using its remote control: Menu > Settings > About the set-top box > Technical data. Place the cursor on Technical Data, press the Right button, and then the Down button several times so that the Software Version item is visible. If the console is updated, it should indicate: 1.8.78.73 / 03030.201708151039
Software version for Huawei DS300a
If the software version on your set-top box matches the one we indicated just above, then the reason for the lack of TV channels lies in something else: you don’t need to update anything, call our support team and we will help you. If the software version is different, you will have to update it manually. Let's get started. Pay special attention to the sequence of actions.
To update the set-top box, you will need a personal computer with Internet access and the ability to connect a USB flash drive. In addition, you will need the USB flash drive itself, formatted under the FAT32 file system. The flash drive does not have to be empty.
- Connect the flash drive to a computer running Windows (the steps are similar for Apple computers).
- Double-click to open the My Computer shortcut.
- Find your flash drive in the list of disks (it will be designated as “Removable disk”)
- Right-click on the found disk and select “Properties”.
- In the “General” tab, find the line indicating the name of the file system.
If you need to format a flash drive in FAT32, first make sure that it does not contain the information you need: during the formatting process, all of it will be destroyed.
To format in the same way as described above, connect your flash drive to your PC and find it among the disks. Then right-click on the flash drive and select “Format...”.
In the pop-up window, select FAT32 as the file system and click “Start”. The operation of formatting a flash drive is not instantaneous, but usually lasts no longer than a minute. After its completion, the flash drive can be used immediately.
1.
Download and save the new software for the set-top box to your personal computer, preferably directly to your desktop. The archive file for DUNE TV 251-S MTS is located, for Huawei DS300a - .
2.
Unpack the contents of the downloaded archive using the “Extract to current folder” operation. For owners of DUNE TV 251-S MTS this will be a file named , and for owners of Huawei DS300a it will be an upgrade
.
3.
upgrade file or folder
(depending on the model of the set-top box) must be copied to a flash drive, directly to the root folder, and not inside some other folder.
If you have a Huawei set-top box, before copying, make sure that
there is not another folder with the same name
upgrade If there is, then
you should copy
upgrade upgrade
folder copied to the flash drive there should be a
DS300a_pub_version
and nothing besides it - be sure to check.
Accordingly, if you have a DUNE set-top box, the root folder of the flash drive should contain the file 251-S 1601.082114062424_rel.fw
Cable communications are not available to all residents of Russia, but many have a desire to watch the best television channels in good quality. A way out of this situation may be to connect satellite television, which is available even in the most remote corners of the planet. In Russia, satellite television services are provided by many providers, including MTS. appeared relatively recently, but many have already appreciated its advantages, while the number of new subscribers is increasing daily. If you just purchased the kit, then very soon you will have to figure out how to set up MTS satellite TV. Of course, unless you decide to hire a specialist to do this work.
Of course, if possible, it is better to seek help from an appropriate specialist who will install and configure the equipment
.
MTS does not provide such a person, so clients are forced to deal with this issue on their own. Of course, there is a fee for such services, and not a small one. If you do not want to pay or there is no suitable technician in your locality, you can set up satellite TV from MTS yourself. This is quite possible, and you do not need special equipment
.
No one guarantees that you will definitely cope with the task, but it’s worth a try.
How to flash a TV set-top box (Step-by-step instructions)
Let us analyze in detail the process of flashing the firmware of the Rostelecom set-top box model MAG-250.
- Create a folder on your computer and place the previously downloaded server and program in it: mcast.exe and dhcp. In addition, you need to place two files bootstrap and imageupdate.
- Call the command line by pressing the Win+R keys. You need to enter the ncpa.cpl command in it. A network connections window will open, select the one we will use and right-click on it. By clicking on “Properties”, select the component (TCP/IPv4). In the window that opens, you will need to manually enter the IP address 192.168.1.1 and the mask 255.255.255.0.
- Connect one end of the network cable to the computer and the other to the set-top box.
- Turn on the set-top box and quickly press the “Menu” button, after which the device’s BIOS should open.
- Enable the dhcp server installed in a folder on the computer. To do this, in the command line, specify the path to the folder with the file, for example: C: Rostelecomdualserver.exe, and press the Enter key
- Run the mcast.exe program and specify IP 192.168.1.1, then click on the “Select” button. In the menu that appears, you will need to specify the broadcast addresses Steam1: 224.50.0.70:9000 and Steam2: 224.50.0.51:9001. Then, next to each stream you will need to press the “Start” key.
In the BIOS you should follow this path: Upgrade Tools – MC Upgrade .
During the loading process the following messages will appear sequentially:
Bootstrap message: Reception of an image is started! Bootstrap message: Writing image to flash. Writing image to flash successfull!
Then the device will reboot and start with the new firmware version.
What is required to set up MTS satellite TV
Many are convinced that setting up satellite television is an incredibly complex procedure that requires special equipment, so you can’t do it without a specialist. In fact, everything is much simpler. Of course, no one will claim that everything is extremely simple, but nothing is impossible here. Many people are most concerned about the issue regarding the special equipment needed to search for a satellite. Don’t worry, you don’t need to buy any special devices, any smartphone is enough. Of course, before you set up MTS satellite TV, you need to find out what exactly you need and prepare everything in advance. Don't worry, the list won't be long.
To set up MTS satellite television you will need:
- The MTS satellite TV set itself;
- Working tool for mounting the antenna;
- An application installed on your smartphone to find a satellite (for example, SatFinder);
- TV or projector.
You don't need any additional devices. Basically, even if you don't have a smartphone, you can still locate the satellite. This can be done through the setup wizard on the MTS website or in the menu of the set-top box.
- Important
If you are not confident in your own abilities, do not risk the equipment and contact a specialist.
An alternative way to flash the MAG-250 console
The best option for an alternative device update is DNA firmware.
Thanks to it, functions such as:
- TV program from Yandex;
- recording broadcasts to disk;
- autostart of iptv broadcasts from Rostelecom;
- Recovery after the update occurs automatically.
It is important to install the original version before installing alternative firmware. Otherwise, problems often arise with updating the device.
The DNA firmware process itself occurs without the use of a network cable. To work, you will need a flash drive with a capacity of up to 8 GB, formatted in FAT32.
Then, on the USB drive you should create a folder with the name of the device and install the firmware files there: “ Bootstrap ” and “ imageupdate ”. In the future, there are two options for updating the device:
- from the internal portal;
- from BIOS.
In the first case, you need to go into the settings and go to the service menu by pressing the “ SETUP ” button. Selecting “ Update software ”, select the option “ via USB ” and click “ Start update ”. Before starting the process, you will need to click the “ Check ” button.
The program will check for the presence of the necessary files on the flash drive. If all requirements are met, the “ Start ” button will light up.
A common error: “Invalid file header.” In this case, it is recommended to reformat the USB drive to FAT32. In addition, you should check the name of the folder on the flash drive. It must be without spaces, for example, MAG250. If this does not help, then you should use the firmware option from the BIOS.
After connecting a USB drive with files, you need to reboot the device. In this case, you should hold down the “ Menu ” button. After the menu appears, select “ Upgrade Tools ”, then go to “ USB Bootstrap ”.
If everything is in order with the information on the flash drive, the process of updating the software version will begin. The successful completion of the installation will be indicated by the message: “ Writing image to flash successfull ”.
Then, the device will reboot and will start with the new firmware.
Setting up MTS satellite TV
Before you set up MTS satellite TV yourself, think about everything again. You must be aware that no one will compensate you for damaged equipment if you damage it during the self-installation process. If you are confident in your abilities and are aware of the possible risks, then you can begin installing the antenna and setting it up. Ideal if you have an assistant. It will be much more convenient if someone monitors the picture quality while adjusting the antenna. So, let's look at how the process of installing and configuring satellite television from MTS goes. By the way, if you prefer visual instructions, then at the end of the article there is a corresponding video.
- Important
The MTS satellite dish must be facing south, otherwise you will not be able to receive a signal.
To install the antenna, follow these steps:
- Choose a suitable place to install the plate. It must be in the line of sight of the satellite, that is, there should be no high-rise buildings or tall trees around that could interfere with signal reception;
- Assemble the satellite dish following the instructions that came with the kit;
- Install the bracket in a predetermined location and attach the plate to it (do not tighten all the bolts, otherwise you will not be able to fine-tune the equipment);
- Attach the converter, connect the cable to it and stretch it into the apartment, then connect it to the set-top box.
The installation of the satellite dish is complete. Be sure to check that everything is securely fastened. After fine tuning, you need to tighten the remaining bolts so that the antenna does not change position in bad weather. Subscribers often complain that the signal disappears during windy conditions. As a rule, the reason is poor fixation of the satellite dish. So, after installing the antenna, you can begin setting up the equipment. As was said, for an accurate determination you can use special applications for a smartphone or the setup wizard on the MTS website. Our example uses the SatFinder program.
To set up MTS satellite TV, follow these steps:
- Download and launch the SatFinder application (the program is free);
- Enable geodata transmission on your smartphone to connect to GPS;
- Select satellite ABS 2 - 75 E;
- The program will show the direction of the antenna, and also calculate the elevation angles and azimuth;
- Point the plate in the desired direction;
- Turn on the set-top box, then open the menu item Settings - Antenna settings;
- A scale will appear that displays the signal strength. If the scale is filled to the maximum, you do not need to do anything. Otherwise, rotate the antenna until the bar is full.
After completing the above steps and achieving maximum signal, you can secure the antenna thoroughly and begin authorizing the equipment. The most convenient way to authorize is by calling the help center. we have already told you. That's all, we hope you were able to install and configure MTS satellite TV without any problems.
Once upon a time, MTS provided exclusively cellular communication services. But today it is ready to offer its subscribers access to high-speed Internet and high-quality digital television. Moreover, cable television from MTS is distinguished by its interactivity
– users can use additional services, select broadcast languages, and even pause programs to continue watching later. Cable TV from MTS is controlled through the “Personal Account” or directly using the remote control.
Description of service
offers subscribers high-quality cable television, the channels of which are broadcast via the Internet. Broadcasting of individual channels is carried out in HD quality, which will be appreciated by lovers of beautiful, detailed images. Other advantages and benefits of the service:
- Several tariff plans - you can choose one or another package of channels at your discretion;
- Possibility of personal selection of channels - you can create the content of the package yourself, excluding channels that you simply do not need;
- Possibility of re-watching programs - watch any program that aired yesterday or today;
- Pausing the broadcast - you can be distracted by doing important things, and then return to watching TV from the point of interruption
; - Multilingual broadcasting – choose the broadcast language yourself;
- Possibility of ordering video films on demand - arrange a real cinema at home;
- Possibility of connecting information services - you can display exchange rates, weather reports, and a map of traffic jams on your TV screen.
If you want to join high-quality modern cable television with a whole bunch of additional services, feel free to choose television from the MTS operator.
MTS cable television tariffs
The MTS operator is ready to offer its subscribers two main tariff plans:
- “Basic” - includes 121 channels, 13 of which are broadcast in HD format. The cost of the tariff is 145 rubles/month. This should also include the monthly fee for the decoder - it is 99 rubles per month;
- “Nothing Extra” - carefully selected 65 channels for 300 rubles/month, 26 of which are broadcast in HD format. An excellent solution for those who love high-quality pictures and do not want to subscribe to unnecessary channels. TV decoder is provided free of charge.
Additional thematic packages can be connected to each set of channels
– “Kaleidoscope” for 100 rubles/month, “Adult” for 250 rubles/month, “Global” for 900 rubles/month, “PLUS CINEMA” for 380 rubles/month, “PLUS FOOTBALL” for 380 rubles. /month, “Discovery” for 20 rubles/month and many others. It is also possible to connect to 2 or 3 TVs - the cost of the service is 99 rubles/month.
In addition to home cable TV from MTS, subscribers can connect to high-speed mobile Internet using GPON technology (fiber optics will be laid into your apartment). Connection speed varies from 60 to 500 Mbit/s. By the way, to watch MTS cable television you will need a special set-top box and a router that supports the IPTV protocol. But if the router is provided for use free of charge, then for a TV decoder you will need to pay 99 rubles per month. If you use the “Nothing Extra” tariff, the decoder will be provided free of charge.
To manage your cable television service, use MTS’s “Personal Account”, located on the operator’s official website. But instead of the “Mobile Communications” section, use the “Home Internet and TV” section. For authorization in the service, the contract number and password are used.
Why MTS cable TV does not work
If your MTS television does not work, try rebooting all subscriber equipment
. Also, the performance of the service is affected by the timely payment of payments. If there is money in the account, the equipment has been rebooted, but the television still does not work, call +7-495-636-0-636.
Modern home digital TV in HD quality is a new milestone in cable television. If previously it was enough to run a cable into the house and connect it to the TV, now, with the increase in the size of TV screens, an image of this quality is not enough for a comfortable perception of the picture. To watch channels in digital quality, a special set-top box or TV module is used. Setting them up is not that difficult, especially since the equipment is usually set up by a cable TV specialist.
You can receive DVB T2 digital television channels for free using a regular terrestrial antenna. But, as a rule, there will not be many channels, and it is necessary to have direct visibility from the antenna to the TV tower. Therefore, it is better to connect digital cable TV, which will have many more channels and does not require any antenna, even if you pay a small subscription fee for it. Let's look at ways to connect home TV from MTS.
Channels don't work
If certain channels aren't working for you, make sure you have the appropriate subscription. This can be done in your personal account; we have already discussed this process in the sections above. Incorrect channel search can also make it impossible to broadcast a particular television channel. It is recommended to reset the settings and search for channels again in manual or automatic mode. The official website offers precise frequencies for manual installation for study, which guarantees the best signal quality.
How to connect
Connecting your home MTS TV is as easy as shelling pears: call the toll-free number 8-800-250-00-50, give your address and make sure that connection is possible in your home. Next, leave a request for connection, and within a few days a specialist will contact you to clarify the connection date. We advise you to use the information below to determine in advance the type of equipment you wish to use. You can rent equipment and pay a small monthly rent for it, or you can buy it back by paying a certain amount once.
Usually a specialist himself connects and configures the equipment, but if you have the fate of connecting yourself, then watch the following video. Various details and instructions are given below.
TV module
In order to use the CAM module, the TV must have a CI slot and a built-in DVB-C receiver.
These components are already available in all modern TVs.
The advantages of this method of connecting digital TV are as follows:
- no need to use an additional IPTV set-top box, which will take up extra space;
- all channels will be present on the TV itself, and an extra remote control will not interfere with you;
- the device itself is cheaper.
But there is also a drawback: you will not be able to use such useful IPTV functions as repeat, rewind and pause TV channels in real time, as well as picture-in-picture, video on demand, etc.
The procedure for connecting the CAM module of cable digital TV from MTS is as follows:
- Turn off the TV;
- Insert the CAM module into the CI connector.
- We insert the Smart card into the module so that the card chip is on the side of the sticker on the module.
- Turn on the TV
Setting up a CAM module consists of the following steps:
- We set the correct time and time zone in the TV settings, and also, if there is a “Countries” section, select Russia or one of the countries of Western Europe (England, France, Germany and others).
- In the mode of receiving a digital TV signal, we search for channels with the parameters indicated in the table below.
The MTS TV setup process is complete. When updating the channel package, you must search again.
New TV features
The remote control for the MTS set-top box allows you to select digital TV settings and use all its capabilities:
- retune selected programs to the desired channels;
- allows the “repeat” function to watch a missed program, and the “TV pause” function to pause the show for an hour.
- Using the remote control, you can activate a reminder about the desired program or enter additional alerts, such as:
- "MTS Weather";
- "MTS Route";
- "MTS Exchange Rates";
- "Yandex traffic jams";
- "Video on demand".
- With one touch of the remote control button, you can remotely request a new show or movie of interest, select any movie from the Omlet ru catalog.
Setting up the TV
Now let’s talk about how to set up the device for operation:
- Download instructions on where to choose the right manufacturer.
- Dial the three-digit code;
- Press 2 buttons simultaneously (TV and OK) and hold for 2 seconds. The “TV” key will light up;
- Dial the next three-digit code. The button light will go out;
- Try the volume. If there are changes, then save the code and continue checking;
- If there is no reaction, then repeat steps 3-6, trying the following codes.
How to replace the original
Sometimes the set includes a universal MTS remote control, which makes it possible to control several devices:
- receiver;
- TV;
Setting the remote control to the desired device is done using the TV and DVD keys. If you need to return to working with the set-top box, you should press the “STV” button on the remote control. The LED blinking will indicate the transition to control of the set-top box.
It is not possible to buy the MTS remote control separately, since it is included with the set-top box in one set. But there are already absolute analogues on sale, which are fully adapted for the MTS decoder.
If you have problems with the settings
When suddenly the television settings are accidentally lost, it is necessary to carry out a number of operations:
- Select the “Menu” key on the remote control;
- Use the down arrow to select the “Custom Settings” section;
- Use the right arrow to find the “Factory settings” section;
- press the “OK” key.;
- the interface will show the PIN code request command. Enter 0000 using the remote control buttons;
- you will be asked to confirm the operation - again you need the “OK” key.
The result of such actions will be the automatic installation of TV channels by the set-top box.
The set-top box does not respond to the remote control
If suddenly the mts remote control does not work, first you should check whether the remote control is configured for the decoder. If not, then the “STV” button will solve the problem. If there are still no signals, you need to restart the decoder and check the batteries. As a last resort, you can contact the service center.
HD set-top box
Connecting cable TV from MTS using a set-top box must be selected in 2 cases:
- If your TV does not have a CI slot or a DVB-C receiver.
- If you need IPTV functions pause, rewind, etc.
When choosing a set-top box, pay attention to the following: if your TV does not have an HDMI connector, then you need an SD set-top box connected to the TV using a tulip-type RCA cable. With such a decoder, you will only be able to use IPTV functions; watching programs and movies in HD quality will not be available. If your TV is equipped with such a port, then you will be able to enjoy watching HDTV high-definition programs.
It is also worth noting that when choosing this type, control will be carried out by the remote control from the set-top box. To connect the decoder, first insert the TV cable from MTS into it.
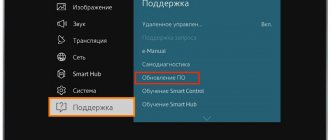
What is firmware?
Firmware is the software that makes the hardware do what the manufacturer intended it to do. This is what tells your Wi-Fi, Bluetooth, graphics card, and other pieces of hardware that cause your software to "flag" what to do.
All Android TV boxes use the Android operating system, which has many different versions that sometimes require updating.
Why do you need to update the firmware?
To work properly and perform all the latest functions that a TV box should be able to do, you will need the latest version of Android.
An update can allow your TV box to do new things designed by the manufacturer without actually upgrading the hardware.
Updates also usually improve your device's performance, so you get faster streaming and better picture quality.
It can also help alleviate problems that may have occurred on the system as a result of other OS or software updates.