Quite a lot of people spend a decent amount of time behind the wheel every day: they have to sit in traffic jams, travel along the highway at a monotonous speed - all this is very tiring. In order to entertain themselves at least a little during a long trip, drivers buy a car TV. Such a gadget is not an essential item in a car, but it will make your trip more comfortable and exciting.
The choice of such products is very wide, and products can differ significantly from each other in appearance, diagonal size and many other parameters. To make it easier for you to choose the best product, we decided to rank the best car TVs of the year. However, before analyzing the characteristics of specific models, it is necessary to understand what indicators should influence the choice of such a device. Let's start with this.
Types of players with TV
Today, leading companies producing radio electronics for vehicles offer consumers of their products two types of devices:
- 2-din radio with TV in the car. 2 din is the generally accepted installation size of this type of equipment, almost twice as large as standard formats (1 din).
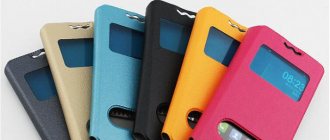
- Player with retractable screen.
Both models of car receivers (now also for television signals) are designed primarily to create the most comfortable travel conditions for the car owner and his passengers.
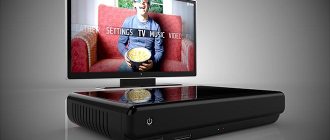
Turn your Android device into a mobile TV
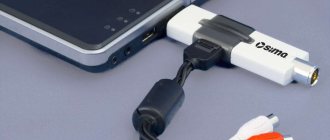
A tuner is a device that receives a digital television signal in a car. There are two groups - a multimedia station and a car set-top box for TV - “digits”. They are united by one integral and important part for receiving a TV signal in a car, called an antenna.
Pioneer radio with TV
A well-installed antenna in a car is a very good opportunity for uninterrupted reception of radio, TV and GPS signals. Currently, there are many varieties that are connected to a tuner to obtain a high-quality signal.
Components of the Pioneer car player with a TV and the structure of the control panel
The radio package from Pioneer includes:
- USB and AUX connectors, allowing you to connect all known types of modern storage media, including wireless Internet modems;
- 4-channel amplifier with a power of 50 W;
- Subwoofer;
- Remote control;
- Radio;
- Device for working with CD and DVD discs;
- Bluetooth function;
- Russian-language menu program;
- Removable, retractable or high-resolution screen integrated into the radio;
- Additional devices in the form of: navigation system, rear and side view cameras, and so on.
That is, this car player with a TV (widescreen) is a full-fledged multimedia system that allows you to listen and view music and other information, use mobile telephone services and the Internet without leaving the car.
The device control panel consists of the following elements:
- Liquid crystal display;
- Touch control;
- Signal indicators;
- Colored panel illumination;
- USB and AUX format outputs.
Benefits of an integrated tuner
The main advantage of the built-in TV tuner is that all functions are compatible with each other. This gives more quality when watching TV. Today there are already a large number of different screens that have an increased level of quality of the reproduced picture.
Pioneer PI-703 2din GPS color camera and TV antenna
It is possible to connect any portable monitor to the newest 2-DIN radio tape recorder “Pioneer”. But it’s best to buy one with a built-in TV and radio, that is, a single device. This will allow easy connection, and device matching problems will disappear.
Installation of MMS Pioneer (Prologi) with the ability to watch digital TV
Installation work for installing a car radio with an integrated (built-in) TV (LCD screen) in it is no different from installation work for replacing the head unit with other audio equipment. The installation process is described in detail in the technical instructions for the device supplied with the equipment. The easiest way to connect car equipment was and remains to contact a service center specializing in this type of work.
Car owners should know that in modern MMCs designed for receiving television signals, all the necessary additional devices are already included in its package:
- Digital antenna with amplifier. Using a Polish antenna for DVB-T2
- Car set-top box (digital tuner) for TV;
- Receiving antenna.
After installing MMC, receiving a digital TV signal of the DVB-T2 standard, MPEG4 compression occurs automatically. High-quality reception of analogue television is almost impossible for technical reasons.
If your car only has a TV, then this equipment should be purchased, connected and configured separately.
Useful tips to help you when buying a quality radio with TV
Before buying a radio, you first need to inspect the appearance of the device. There should not be any hint of mechanical damage on it. Next, we move on to checking the functionality; one of the important points should be high-quality sound without any problems appearing during its adjustment.
Components of the Pioneer car radio with TV
We check all the connectors on it and inspect the monitor. It must also be free of defects and a film must be glued to it, preferably dense and soft. Since the screen is not large in size, inspection must be done very carefully. If air space appears in the surface layer of the monitor, the screen should be replaced. Since in the future the space will only expand.
The manual for using and installing the radio is short, so you need to take a look at it. Installing a playing device yourself is not difficult; the main thing is to use photo and video materials that can help you understand what’s what. The price of a TV radio is determined by the quality of the monitor and controller, as well as the degree of functional equipment.
Features and uses
Many people want to watch digital TV in their car. Just a few years ago this was simply not possible, but now it has become a reality. You can easily watch many channels in your car with the help of modern technology. This will be very relevant if you often have to stand in traffic jams and have absolutely nothing to do with yourself at this time.
The dvb t2 standard is great not only for TVs, but also for cars, it was able to show its best side. With its help, you can ensure full reproduction of the digital broadcast system signal and broadcast it to the panel in the vehicle.
To use dvb t2 you will need a specialized tuner for your car. The broadcast is broadcast in an encrypted format, and the device acts as a decoder. It decrypts the transmitted signal using internal protocols, and then transmits it for direct playback on the monitor.
But modern car satellite television will cost a more significant amount. The antenna and tuner are slightly more expensive than for terrestrial digital television reception. The receiver operates in a completely different format; it looks like a standard car radio and is installed in its place. But such a system also has its advantages.
- It is impossible not to note the higher quality of the picture, because such a car radio itself adapts to changes in the reception level and adjusts the main parameters.
- Reception is provided almost throughout the entire country, and you will be able to fully travel out of town.
- Easy to set up equipment.
Connecting and setting up a DVB-T2 digital TV tuner in a car
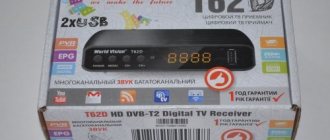
Dear friends, I wish you all good health. Today I’ll tell you about the purchase and little experience of using a DVB-T2 digital TV tuner from Aycetry! After the published review of the car radio, I showed the link to the seller. After some negotiations, this tuner was sent to me. I have long wanted to have a TV in the car, I won’t say that it is necessary, it’s just that sometimes you have to sit in the car with the children, waiting for mom from the store or for some other reason, and the children demand cartoons, and you can watch the news yourself in the parking lot. Someone will think that cartoons can be downloaded and watched from a flash drive, but each time you download a different cartoon, but here they are almost always different. The parcel arrived in a cardboard box, inside of which there was a factory-made, colorful, cardboard box. Box contents: TV set-top box, internal antenna (attached to the glass with double-sided tape), connection wires, IR receiver, remote control, instructions in English. Unboxing
Specifications (taken from the store website):
Frequency Input: VHF 177.5MHz-226.5MHz, UHF 474MHz-858MHz Modulation: QPSK/16-QAM/256-QAM Decoding Standard: MPEG4, MP@ML, MP@HL, H.264/AVC Audio Decoding standard: MPEG-1, MPEG-2, MPEG-4, HE-AAC 4 ways video output (one way from power socket if needed): Output impedance: 75 ohms Output voltage: 1.0'20mVp-p Power supply: DC 12V-24V 6W Terminal connection: Active amplifier antenna input jack (5V power supply), Quadrate car power input jack (battery+, battery-, ACC+), R/L audio 3X Video output External remote control IR jack cable, external power input connector, USB upgrade connector, HDMI high definition output. Applicable power source: car battery (12V~24V) Outer size: 125mm x 85mm x 26mm Application temperature: -5~40 degrees
Photos of disassembly
As I understand it, the set-top box is universal, it can be used in a car by connecting it with the supplied wires, or it can be used at home, for this you need a 12-volt power supply and an adapter for connecting an antenna, since the tuner has a Female SMA (female) antenna connector.
The set-top box has 1 HDMI output, 3 video outputs (tulip), stereo audio output (tulip), a connector for connecting a power supply (if necessary), a connector for an IR receiver, 1 antenna input, 1 usb port allowing you to view photos and video files from a flash drive, as well as You can also listen to music, you can record TV shows on a flash drive, an LED indicates that the device is turned on, and a connector for connecting to a car radio. The latter has audio and video outputs, wires for connecting power (the positive one is protected by a fuse). This connector on the set-top box side has an input that allows you to control the tuner from the car radio, but for some reason the wire itself is missing in the wiring harness for connection, so I brought it out by soldering it inside the tuner and connecting it to the wire from the TV-IR radio. I will try to describe my actions sequentially, since not everything was so simple with the connection or I wanted a lot. First, the radio was brought home, and after powering it and the tuner from a powerful 12-volt power supply, connections began. Everything turned out to be quite simple: the tulips from the wiring harness from the set-top box were connected to the free tulips of the radio, the power was supplied, the antenna was screwed in (I didn’t catch it in the house, and I didn’t count on it). When turned on, the tuner started working, tried to find channels, but to no avail, but read the flash drive with a bang. At first I was confused by the TV-IR wire on the radio, but since there was nowhere to connect it to the set-top box, the idea of switching channels without a remote control was forgotten. You just need to figure out where to glue the IR receiver so that it doesn’t spoil the view in the cabin. The radio was returned to the car, the tuner settled in the glove compartment, the antenna was glued to the windshield, the IR receiver simply lay under the radio, the remote control switches channels, and regulates the sound. In the regional center it receives channels; there are interruptions in the picture when moving, but rarely (although I temporarily glued the antenna to the roof on the street side for testing). The antenna has an active amplifier, without power supply to it, reception deteriorates greatly. All that remains is to find a permanent place for the console and almost everything is fine. But then I came across a description on the 4pda website for connecting similar tuners to radios. After reading a little, taking everything off the car again and bringing it home, I began to study. Some people came across connectors on their radios intended for connecting such set-top boxes, but by some coincidence, my car radio did not have such a connector. And we could have calmed down on this, but there was a hint on the website that you can connect the LED to the TV-IR wire and make sure that there is a signal there when the TV application is running on the radio. My LED blinked when I pressed the on-screen buttons, but the video and audio inputs did not work at that time. Then I found that I needed to solder the video input to leg 5 of the FMS6502 chip (video switch) and it should work. I can hold a soldering iron in my hands, but everything in this radio is so small that there were fears that this operation would fail. Everything went well, and the image appeared on the screen when the TV application was launched.
It remains to find the contacts responsible for the sound input. They turned out to be the legs of the audio analog switch 4052 (to which legs I soldered, it’s clear from the photo). I chose the tuner model in the factory settings (I got 12):
TV Tuner is controlled from the touch screen and steering wheel buttons from the standard TV application.
Channels accept all that are available in the city
After all the connections and settings, I abandoned the IR receiver and remote control in favor of settings and control via the car radio, which turned out to be much more convenient, in my opinion. Outside the city it works at a distance of 10 km without problems, beyond 12-15 km the picture and sound begin to fail. It is necessary to experiment with antennas, I hope someone will have constructive suggestions on this matter. I also forgot to mention that my console is connected to power after ignition. After turning it off and on, the settings are not lost. I will attach a short video of the TV set-top box working.
Photos and descriptions of disassembly and soldering are not instructions, this is just a topic for thought. Described in more detail on the forums. I'm just a user.
If you have any questions about the review, ask in the comments.
I wish everyone a good shopping experience.
Links to the forum
link link
The product was provided for writing a review by the store. The review was published in accordance with clause 18 of the Site Rules.
Specialized car radio and features of standards
Before choosing a suitable tuner, you should decide on its standard. Let's compare a digital TV tuner used for a car and a satellite analogue.
| Digital receiver | Satellite |
| Low cost, the car radio is offered at an attractive price. | You can use the receiver anywhere in Russia. |
| Can be used to view all major channels. | Exceptional quality. |
| Ease of setup and versatility. | More channels. |
| Excellent quality, work in several standards at once. | Reliability of operation. |
| Constantly updating the list of broadcast channels. |
It turns out that a car radio with a tuner according to the dvb t2 standard is best suited for use in the city. A car dvb t2 car radio will cost the buyer a small amount, and the set-top box can work with any signal formats.
A set-top box with dvb t2 technology for a car can be used with a signal up to high quality 1080p. In fact, the broadcast occurs in MPEG-2 and MPEG-4. But still, the receiver has a good foundation for the future.
You can purchase a dvb t2 receiver for your car in regular stores. Prices may vary depending on the model and its parameters.
Which antenna to choose?
Today there are two types of antennas:
- External – pin or telescopic (retractable). It is a passive mechanism that is influenced by the environment and is very sensitive to signal reception. When connecting such an antenna, you will need to additionally install an amplifier for the TV and FM signal, and when mounting it to the body, you need to take into account its structure so that the signal is as stable as possible.
- Internal. Also called GPS antenna. It is attached to the top of the windshield. The device is already available with a built-in amplifier and is compatible with various car radio tuners.
Installation
Installation of a TV tuner in a car is always accompanied by configuration, since installation involves the complete installation of the receiver in the car, verification and a trial test. Let's take a closer look at how this device is installed in your car in practice:
- The first thing you need is to choose a suitable place for the receiver, as well as the tuner, in the car.
- The next stage will be a test connection, as well as startup and diagnostics of all equipment for operability.
- After everything is connected and confirmation of functionality is received, you need to proceed to the installation.
- The system elements are located as far as possible from all electrical appliances of the vehicle.
- Leave enough space between equipment so that the wires do not have to be pulled.
- Next, all components are fixed using fasteners in places prepared in advance.
- Subsequently, the power and connection are pulled so that there is no easy access to it.
- After connecting the system to power, another test run and performance test are performed.
Important. When setting up the equipment, it is recommended to use the recommendations of the user manual. This will allow you to complete the installation step by step without missing important points.