A question has arisen: how to connect and configure the World Vision digital set-top box? Brief instructions will help you understand the issue and solve problems. The World Vision tuner is suitable for broadcasting terrestrial, satellite and cable TV. Many users choose it. Affordable price and many useful options play a role. The right option for family use. It provides the opportunity to get high-quality images and a lot of useful content. Choose packages depending on your needs and pricing policy. The number of channels is not limited. For quick connection you need to buy a separate antenna.
How to connect the World Vision set-top box to your TV and set up channels
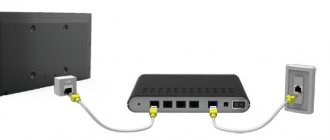
The set with the tuner includes the set-top box itself, a control panel and batteries, as well as various cables for connection. First, study the device and consider all the inputs and plugs. Older models use an RCA cable. It may not be included in the kit. In this case, you will have to purchase the wire separately. Modern models are connected using an HDMI or SCART cable. After purchasing, install the router next to the TV receiver. Connect the receiver to the antenna and TV. This model of set-top box connects to any TV. The main thing is to choose the right wire. Next, follow these steps:
- click on the “Main Menu” button;
- wait until the “Settings” window opens;
- select the desired country and connection type;
- enable automatic setup;
- TV channels will be installed by default.
Why YouTube doesn’t work on a Samsung TV: reasons, what to do?
Connecting the device
You need to connect the World Vision set-top box to your TV in the following way:
- First disconnect the TV from the power supply;
- now connect the cable through the antenna port and the digital set-top box;
- use the correct connector and wire, depending on the tuner and TV model;
- plug both devices into a power outlet;
- wait until the download is complete.
Initial settings
How to set up the World Vision set-top box? Using the remote control, open the “menu” folder.
After turning on the devices, start automatic channel search. Open the Settings folder and set the correct frequency. Use "search" to find a TV channel. The tuner allows you to create lists of your favorite TV channels. The remote control will help you open the desired folder and perform any action.
Basic Operations
Play the menu and open basic operations. Please review all folders carefully. The following sections are easy to find here:
- Images;
- auto search;
- applications;
- options;
- system settings;
- time and date.
To open each one, click on the “Ok” button. Use the remote control and press the Up, Down, Right, Left buttons. The meanings of all keys can be easily found in the instructions for use.
Program Manager
This option is needed to carry out operations with various programs. Users can enable an electronic guide or create a separate list of favorite TV programs. Use the "edit" option. Rename, block or completely delete an unnecessary TV channel. Use a timer to activate sleep mode. At the set time, the TV will turn off automatically.
Image Settings
The section is necessary to change parameters and screen resolution. Use automatic settings or set new ones. You can access the folder using the remote control.
- Programmable remote control for World Vision receivers. Special version.
Search channels
To find any program, use the automatic search. Can't find the channel you're looking for? Proceed to manual configuration. To do this, follow the clear steps:
- open the correct broadcast format;
- click on the “Manual search” item;
- set the necessary parameters for broadcasting.
Digital TV hotline - toll-free phone number
The folder also has sections with the following names: “antenna power”, “country”, “banner waiting time”.
Setting the time
Play the Time section. Carefully study the sub-items of the folder. Determine the correct country and time zone. The remaining settings are programmed automatically.
Setting options
This section consists of the following folders:
If you have any questions or complaints, please let us know
- menu language;
- subtitles;
- dubbing;
- digital video.
Set your preferred language and watch live channels. The most popular are English, French, and German. Turn on subtitles or voiceover.
System Settings
The tuner has a list of system settings. The most popular option is parental controls. It is necessary to monitor children's online activities. Create a custom profile and enable it. Monitor downloads and uploads on your browser.
What can he do?
- Reception of fixed T2 channels in good quality. This is why I bought it (for the dacha).
- Media player. Play music, videos, pictures from a flash drive.
- Weather forecast (from the Internet).
- Reading rss feeds. I added news channels to myself, and now I have the latest news right on my TV.
- Mail. Built-in gmail service. We watch mail on TV.
- Youtube. Built-in application of the most popular video hosting. It works great, it’s fast and doesn’t slow down, it cuts out ads, but... There’s one thing - there’s no way to log into your account to monitor your subscriptions. Search only.
- IPTV. For those who don’t know what it is, iptv makes it possible to load any channel in the world into your set-top box and watch it without problems. I used to use these playlists , it was all free, but it was a little buggy (just a little). I thought the problem was in the tuner itself, poor reception, etc. but then I connected to the service from edem.tv for 1$\month. and everything works great.
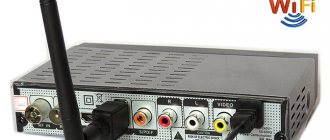
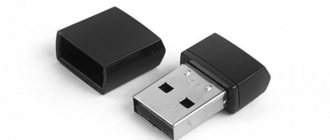
How to connect WI-FI to the World Vision Premium receiver
The premium brand receiver quickly connects to the router and home Internet. To do this, take a USB cable. You can buy it at any hardware store. Enter the modem password and go to the “network”. Use the Internet to search for movies, TV series and clips. Watch online or record to watch again.
Possible problems and their solutions
Possible problems are related to device failure or cable connectors. Try turning the tuner off and on after a few minutes. Check the antenna's functionality. Due to weather conditions the signal is poor. In addition, the receiver may break. Examine the condition of the receiver yourself. In the event of a serious breakdown, use the help of a service center.
World Vision set-top box does not find channels
Has the image disappeared from the screen? The reasons are as follows:
- system failure;
- technical malfunction of the device;
- internal breakdowns.
How to connect the Rostelecom remote control to an LG TV: codes, instructions
We recommend updating your system and downloading the new update. Also try turning on the receiver and antenna again.
Does not respond to the remote control or the button does not work
The remote control does not work if there is no charge. Press all the buttons and check that the device is working properly. No signal? Insert new batteries and try again.
No signal
The “No Signal” error is due to temporary interruptions. Wait a couple of minutes and turn on the TV again. Often, the problem goes away within a few minutes.
Poor image quality
Image quality varies depending on weather conditions. First check if the antenna is working properly. Turn it towards the tower to improve the signal. Also use an amplifier to improve picture quality.
World Vision has been operating in our market for more than 16 years. Currently, the manufacturer sells more than 40 types of DVB-T2 set-top boxes and this allows it to be among the 2-3 most popular digital equipment companies in our country. Just think about it, in just 13 years they were able to sell 10 million units of receivers. This, in turn, allowed them to release new models that meet all digital television standards and can receive all 20 free channels without any problems.
- Step-by-step instructions for connecting and setting up DVB-T2 digital set-top boxes World Vision
Today we will talk about this manufacturer in more detail. We will study the connection procedure, and also show a visual overview of searching for digital channels from World Vision devices. Additionally, we will try to answer the questions that have accumulated regarding these set-top boxes and provide the most possible causes of certain problems with the equipment.
Internet setup.
In order to set up the Internet in the T62A, T62D, etc. set-top boxes, you need a wi-fi adapter, since these models do not have the option of a wired connection. There is also no wi-fi module and therefore you need to buy additional wi -fi adapter equipment.
After the Wi-Fi adapter is connected, you need to go to the settings of the set-top box in the System item.
Wi Settings section , where you need to update the available networks and, having found yours, enter the password for it to connect.
Next, go to Media Center and select Internet from the list. Here is a list of downloaded applications YouTube, IP TV, mail, weather, etc. Click on the desired application to get started.
As you can see, World Vision set-top boxes have many features that are missing in other budget models. It is possible to watch digital television in different formats and access the Internet.
World Vision has been operating in our market for more than 16 years. Currently, the manufacturer sells more than 40 types of DVB-T2 set-top boxes and this allows it to be among the 2-3 most popular digital equipment companies in our country. Just think about it, in just 13 years they were able to sell 10 million units of receivers. This, in turn, allowed them to release new models that meet all digital television standards and can receive all 20 free channels without any problems.
Today we will talk about this manufacturer in more detail. We will study the connection procedure, and also show a visual overview of searching for digital channels from World Vision devices. Additionally, we will try to answer the questions that have accumulated regarding these set-top boxes and provide the most possible causes of certain problems with the equipment.
Characteristics of World Vision digital set-top box models
| Model | Price (rubles) | DVB-T2 | CPU | Tuner | Connectors | WiFi | External Power Supply | Remote control |
| 65 | + | Ali3821p | Rafael Micro R836 | HDMI, USB, RSA | — | + | + | |
| 65M | + | Ali3821p | Rafael Micro R836 | HDMI, USB, RSA | — | + | + | |
| T64LAN | 1300 | + | Availink 1506T | Rafael Micro R850 | HDMI, USB, RSA | + | + | + |
| T64D | 990 | + | Availink 1506T | Rafael Micro R850 | HDMI, USB, RSA | + | + | + |
| T64M | 890 | + | Availink 1506T | Rafael Micro R850 | HDMI, USB, RSA | + | + | + |
| T62N | + | HDMI, USB, RSA | + | + | + | |||
| T129 | + | Rafael Micro R846 | HDMI, USB, RSA | — | + | + | ||
| T62A | 1200 | + | HDMI, USB, RSA | + | Interior | Trainable | ||
| T63 | + | Rafael Micro R836 | HDMI, USB, RSA | + | + | + | ||
| T63M | + | Rafael Micro R836 | HDMI, USB, RSA | + | + | + | ||
| T61M | + | MaxLinear MXL608 | HDMI, USB, RSA | — | + | + | ||
| T70 | + | MaxLinear MXL608 | HDMI, USB, RSA | — | + | + | ||
| T62D | 800 | + | MaxLinear MXL608 | HDMI, USB, RSA | + | + | + | |
| T62M | 1300 | + | MaxLinear MXL608 | HDMI, USB, RSA | + | + | + | |
| T60M | 900 | + | MaxLinear MXL608 | HDMI, USB, RSA | — | + | + | |
| T59D | + | Montage M88CT6000 | Montage M88TC3800 | HDMI, USB, RSA | + | + | + | |
| T59 | 1000 | + | Montage M88CT6000 | Montage M88TC3800 | HDMI, USB, RSA | + | + | + |
| T59M | 900 | + | Montage M88CT6000 | Montage M88TC3800 | HDMI, USB, RSA | + | + | + |
| T54 | 1000 | + | Ali3821 | MaxLinear MXL608 | HDMI, USB, RSA | — | + | + |
| Premium | 1400 | + | Ali M3821 | Rafael Micro R836 | HDMI, USB, RSA | + | + | + |
| T55Gold | 1400 | + | Ali M3821 | HDMI, USB, RSA | — | + | + | |
| T126 | 1000 | + | HDMI, USB, RSA | — | + | + | ||
| T57M | + | HDMI, USB, RSA | — | + | + | |||
| T36 | 800 | + | HDMI, USB, RSA | — | + | + | ||
| T57D | + | HDMI, USB, RSA | — | + | + | |||
| T57 | + | HDMI, USB, RSA | — | + | + | |||
| T56 | 1300 | + | HDMI, USB, RSA | — | + | + | ||
| T58 | 1100 | + | HDMI, USB, RSA | — | + | + | ||
| T39 | + | HDMI, USB, RSA | — | + | + | |||
| T38 | + | HDMI, USB, RSA | — | + | + | |||
| T37 | 1000 | + | HDMI, USB, RSA | — | + | + | ||
| T34A | + | HDMI, USB, RSA | — | + | + | |||
| T55D | + | HDMI, USB, RSA | — | + | + | |||
| T55 | 1400 | + | HDMI, USB, RSA | — | + | + | ||
| T35 | 800 | + | HDMI, USB, RSA | — | + | + | ||
| T43 | + | HDMI, USB, RSA | — | + | + | |||
| T34i | + | HDMI, USB, RSA | — | + | + | |||
| T34 | + | HDMI, USB, RSA | — | + | + | |||
| T53 | + | HDMI, USB, RSA | — | + | + | |||
| T40 | + | HDMI, USB, RSA | — | + | + | |||
| T23CI | + | HDMI, USB, RSA | — | + | + | |||
| T411CI | + | ALI M3602 | HDMI, USB, RSA | — | + | + |
*The table contains blank data in the cells with price and DVB-T2 tuner model. In the case of price, the reason is that not all consoles are still on sale and are at the testing stage or have been completely discontinued. In the tuner model data, we were unable to find out the “filling” of some consoles from the manufacturer. Perhaps this is a trade secret or the data has not yet been added.
Instructions for connecting World Vision set-top boxes to TVs
According to our observations, the most popular World Vision set-top boxes at the moment remain the following models: Premium , T62A and T62D . That is why we will take screenshots of equipment for further instructions for these consoles.
However, we dare to assure you that the instructions are equally suitable for any of the device models of this company, the main thing is to do everything in the same way as the review. The general connection diagram is as follows
The antenna is connected directly to the digital set-top box through the corresponding input. In this case, the connection to the TV itself is made by ONE of 3 options:
- Via HDMI cable. Such a wire is usually not included in the kit. However, if your TV has such an input, then it must be used first. The thing is that HDMI provides the best image quality and is generally more durable. It is best to buy a cable from trusted companies: Twisted Veins, Mediabridge ULTRA, Monoprice. A meter of their cable will cost 2-3 times more than cheap analogues, but their quality will be 5 times higher.
- Via RSA (tulips). Particularly relevant for TVs older than 7-10 years of production. These models do not have HDMI, but there are multi-colored inputs for RSA. They are also called “tulips” for their corresponding color. 2-3 meters of this cable are often included with the set-top box. Its quality leaves much to be desired and when using it, be prepared to replace it after 2-3 months of active use. On some TVs you will find options in which you will need to connect not 3, but 2 or 1 RSA output. The principle does not change here, the main thing is not to make a mistake with the colors.
- Using converters and adapters. This is especially true in case of absence or failure of any output on the TV. Adapter from RSA to SCART. A special SCART output can be found on TVs that are more than 10 years old. According to our observations, many subscribers still have such “tenacious” TVs. In stores, the adapter can be seen for 200-300 rubles.
- RSA-HDMI signal converter. It may be useful if, for example, the output for “Tulips” on your TV is broken. Costs vary, from 500-1000 rubles on average.
Regarding adapters, we will say that they should be used only in case of urgent need. It just doesn’t make sense to resort to their help.
After the device is connected, to turn on the set-top box and check the connection, you must do the following:
- In the TV menu, go to the signal display mode you need. For HDMI, this is the corresponding mode. For RSA, AV (Audio-Video) is usually selected.
- After this, you can turn on the set-top box and press the power button on the remote control.
- If the welcome menu appears, then the connection was made correctly and you can begin directly setting up digital channels.
In December 2021, the long-awaited terrestrial cable receivers of the T64
, having additional Internet functions, and in March 2021 - IPTV set-top box
I64
, which has only Internet functions.
Let me make a reservation right away: who cares about LAN
— take T64
LAN
.
Well, after six months of promises, all T64 LAN
were simply abandoned.
Family 64
is a continuation of the ideas of the Premium receivers on the ALi M3821 and on the GX3235S, but for various technical reasons (in particular, the insufficient performance of the GX3235S on external IPTV streams with Full HD quality), a new processor from another manufacturer was chosen as the basis -
Sunplus Availink AVL1506T
.
This processor, like the GX3235S, also has 64 MB of built-in RAM.
Dolby Digital licensed
(AC-3).
- T64 M
- DVB-T2/DVB-C, power LED, panel buttons, 2 USB. - T64 D
- DVB-T2/DVB-C, digital indicator, buttons on the panel, 2 USB. - T64 LAN
- DVB-T2/DVB-C, digital indicator, buttons on the panel, 1 USB, 1 LAN. - I
64 - digital indicator, buttons on the panel, 1 USB, 1 LAN.
For external distinction, each model has a white box with a different color design on the counter. For example, D
- purple:
On the side is the direct OEM manufacturer of receivers of the World Vision and Galaxy Innovations brands - Primus Interpares Ltd
:
Included is a regular remote control from T62 (suitable for T61, T63, T70 and a World Vision learning remote control):
The code for these remote controls appeared in the Huayu DVB-T2
starting from
version 2018
. The remote control from Selenga HD980D is also suitable.
Power supply +5V 2A
, wire length - 110 cm:
Collapsible adapter - under the letter C
E is a self-tapping screw.
Like the T62, the kit includes an audio-video cord 90 cm long - with a 4-pin Jack 3.5:
Please note that Jack is long
, so it’s better not to lose the cable, it will be difficult to find later.
In addition, there is no pinout standard in the world. World Vision uses this option:
The kit also includes a Warranty Card and a booklet in the form of a folded A4 sheet - on one side in Russian, on the other in Ukrainian. Black and white screenshots, on which, of course, nothing is visible, but the text of this “User Guide” can be read with glasses. Or - in color.
The front panel is the same for all (except T64 M
— no digital indicator, just a green-red LED):
POWER
buttons
,
OK
and dual-purpose
VOL/CH−
and
VOL/CH+
- Volume/Channels. They will be able to temporarily help if the remote control is broken or lost.
Taking into account the extremely sad experience with, the case here is maximally perforated with holes:
and on the sides:
The bottom is also perforated:
And just for comparison - the rear of the T64 D
at the top, and at the bottom - T62D (rounded body):
As you can see, the new models have abandoned the transitive RF OUT output and the USB connectors are now only on the back.
At T64 LAN
instead of one of the USB connectors - a
LAN
:
And for the IPTV set-top box I
64 - of course, there is no antenna input at all, so the board itself is shorter:
If models T
64 signatures
are in relief
, while
I
64 are made simply with white paint and with the typo ETHE
NR
ET.
Some users of T62, T64 and set-top boxes from other manufacturers sometimes complain of hum and even noise in the image when connecting an audio-video plug. The reason is that the plug must be plugged in all the way
, until there is a slight click, without leaving such a gap:
In addition, some people turn the volume up high on the TV and low on the set-top box, and as a result they hear the background. It is necessary, on the contrary, to set the set-top box to almost maximum, and to reduce the volume on the TV to an acceptable level. And then control it from the console.
But with some TVs this doesn’t help much; a slight background is still felt. You must understand that any set-top boxes with such an AV socket have an initial design flaw: for all signals there is only one ground
, common - for all signals, and besides, the ground is located at the very neck of the plug.
And, for example, in set-top boxes with RCA or SCART outputs, each signal has its own separate ground.
Therefore, if, despite everything, you hear the background in any set-top boxes with a 4-pin Jack, you can connect the ground of the Jack with a separate wire to the ground of the TV (for example, at the RCA inputs, SCART or antenna input jack).
When you turn on the set-top box, the red Power icon first lights up on the digital display, then the green inscription LOAd
and after 17 s - the channel number, and then the ticking
Clock
(can be disabled in the menu):
Green level icon three antennas - LOCK
— the fact of capturing a DVB- digital stream.
The brightness of the indicator is adjustable only for operating mode. On duty - always average.
Red Power icon - always
, so it is extremely difficult to determine whether the set-top box is working or in standby mode?
The technical part will show how to fix this hardware defect.
Naturally, the T64 M
There is no such drawback, because there is no digital indicator, but only one two-color green-red LED:
When I turn it on, the screen is initially black
, and the branded splash screen appears after 11 s:
Factory font in set-top boxes on Sunplus
(
Availink
) - small, which is not always convenient.
And 64
, like
Premium
, it is possible to change
the font size
, so all subsequent screenshots will use the maximum
1.25
(and the factory 1.10):
Of course, at the maximum size, the endings of some words may be cut off, but everything is clearly visible. This is especially important for older people.
At 17 s the start menu appears, and if you have an Active antenna powered from the input of the set-top box
, then do not forget to Enable the appropriate item:
Naturally, if you are not interested in either the antenna or cable at all, then you can simply exit by pressing the EXIT button.
All 20 TV channels and 3 radios were found:
If necessary, use Manual Search
by selecting the multiplex frequency channel:
Slowly rotate the antenna on the window to achieve the maximum Quality
.
Also, if channels have already been found, but they show poorly, then press the INFO
and adjust the antenna to the maximum of the Quality -
Q
-
Quality
:
And as you can see at the very bottom, the regular information panel also has a Q
, so simply by switching channels, you can immediately see the current
quality
of the signal from the antenna or cable:
But who wants to find cable
channels, it is better not to use the start menu, but to go to the main menu, because here you can select to search
Only open ones
:
How to switch channels using the front panel buttons - press OK
,
the Channel List
:
VOL/CH−
and
VOL/CH+
buttons to select the desired one and press
OK
.
Weekly TV guide
EPG
button (red button switches to Daily):
Teletext
TXT
button :
and typing 888
- we will see
subtitles
:
Let me remind you that from January 1, 2021, any TV channels broadcast in Russia must have at least 5% of programs with subtitles or other options understandable to people with hearing impairments.
By the way, some cable operators transmit subtitles not via Teletext, but by another standard method - DVB Subtitling
, but like the T62, the T64 remote does not have a
SUBTITLE
.
Addition: in the firmware dated September 9, 2019, a button was defined for this 0
:
and select the appropriate language.
Pressing the TV/R
, switch to the radio, where after a few seconds the screen saver with the moving Clock/Date/Radio will turn on:
General view of the menu:
Sunplus
processors
Most settings are in a separate menu:
in Date and time
You can choose synchronization not only
Auto
- from the antenna, but also via
the Internet
:
Because, unlike broadcasting, not all cable
operators have set up a time service.
Aspect Ratio Options:
But let me remind you that 16:9 channels can show old programs and films made over the last 100 years in the usual 4:3 format
Therefore, there is no point in changing the aspect ratio every time, you just need to set it once - either for a widescreen TV or for a regular CRT.
Despite the presence of only the usual composite and HDMI outputs in the set-top box, the system offers options ranging from component YUV to such exotics as S-Video and VGA:
Supported video modes:
- 480p_60
- 480i_30
- 576p_50
- 576i_25
- 720p_60
- 720p_50
- 1080i_60
- 1080i_50
- 1080p_60
- 1080p_50
If you connect the set-top box to a monitor, it is better to start checking with modes _60
Hz, i.e. NTSC. For example, 480p_60 is the standard minimum VGA mode.
The 3.5 plug of active computer speakers can be connected directly to the AV socket.
When turned on, the set-top box can, by default, immediately launch with the application you need, for example, IPTV:
If you do not use an antenna or cable, your IPTV will immediately start showing.
Each of the 4 colored buttons can be assigned the following Applications and functions:
Also in the Other section there is an item Update channel list
: for cable television it is better
Enabled
: if your cable operator adds new channels or deletes some old ones, the set-top box itself will update the Channel List to the current one.
But if you are used to arranging everything yourself as it should, then you need to turn it off. (set by default):
Then, after changes with your operator, you will need to launch
Auto Search
or temporarily turn it on.
Updating the channel list
.
Last item Boot to standby mode
:
if Off — the set-top box turns on completely and immediately starts displaying. Those. like 99% of all consoles.
If you change to On.
, then the set-top box, after being plugged into the outlet, will first remain in Standby mode, and then you will need to turn it on with the remote control. Because like most audio-video equipment.
In addition, state memory
set-top boxes - at the moment of power failure:
- if you were watching and the light went out, after the energy appears it will turn on again and show.
- if the set-top box was in Standby mode, then when the light flickered, it would remain in Standby mode.
Standard media player for set-top boxes based on Sunplus
(Availink):
As noted at the beginning - Dolby Digital
(AC-3) is available for all models.
And in the same way you can read “Electronic books” - ordinary text files:
But in the case of 64, an extremely rare Cyrillic encoding is used.
By the way, this is the official encoding of DVB
, therefore, when you see, for example, the names of channels on the screens of digital TVs, satellite, cable, terrestrial set-top boxes - the letters are precisely encoded in ISO 8859-5.
In the Media Settings
can be changed to the more common
Windows-1251
:
And, for example, in the D-Color DC1002HD mini and DC1301HD set-top boxes on the Sunplus 1509A processor, the more familiar universal UTF-8 is used for the E-book.
Set-top boxes of the 64 family support Wi-Fi adapters based on the MediTek MT7601
and older
Ralink RT5370
:
FF-FF-FF-FF-FF-FF
as the MAC address
- this is bad. Try turning off the set-top box, unplugging the adapter, turning on the set-top box and plugging in the adapter again.
In set-top boxes with a LAN
— T64
LAN
and
I
64 you can select
Wired network
:
Note that inside the T64 LAN
and
I
64 is not a real Ethernet processor, like, for example, the Vmade K6, but simply a
USB < > LAN
.
And, of course, multicast UDP streams are not supported, so to view the internal open IPTV of your Internet provider (streams start at udp://
), a function on your router is required (to watch IPTV from the Internet, the UDP Proxy function is not needed).
Also Sunplus processors do not support rtmp://
, so if you downloaded a playlist somewhere on the Internet, and there are
rtmp://
, then they will not be shown on these set-top boxes.
USB < > LAN adapters can be connected to all models
on
Realtek RTL8152B
or
ASIX AX88772
.
Ordering a USB to LAN
on AliExpress, exclude any possibility of ordering
CoreChips SR9700
or similar
RD9700
.The seller should not mention numbers anywhere 9700
, and the best guarantee is reviews from people that everything is fine, the speed is maximum, the chip is really
Realtek RTL8152B
or
ASIX AX88772
.A conditional sign of the presence inside 9700
may also be a low price. Required - from 200 rubles. But it’s still better to first read the reviews of those who have already purchased.
Naturally, problems with 9700
This applies not only to these set-top boxes, but also if you simply connect such an adapter to a computer or tablet.
Attention!
Regardless of the chipset, under no circumstances should you take 2-in-1 devices -
USB Hub + Ethernet
:
Such devices initially contain a bootable Virtual CD with drivers, and Ethernet can appear only after installing the drivers, which is of course impossible on regular set-top boxes.
The same applies to Wi-Fi adapters, for example, Tenda U2
is a composite adapter: Virtual CD + Wi-Fi. Do not use any regular set-top boxes.
About the story with T64 LAN
1 version is described below.
If this question does not interest you, then move on to the next part. As already noted at the very beginning, the first . As a result, users complained that the LAN connection was only in 10 Mbit Half Duplex
- the speed
was no more than 5 Mbit/s
.
For SD channels, this is basically enough, but if you try various HD
streams, it starts to croak, stutter, and buffer.
But the set-top box has not only IPTV, but also other Applications capable of playing HD
-content, but due to this limitation, this is now an unsolvable problem via the built-in LAN.
Of course, it works fine via a WiFi adapter. But they bought it precisely for the guaranteed LAN.
First World Vision
on the person (developer of
Premium
and
64
's) simply banned for such questions, seeing in every ordinary buyer - hysterics and hysterics, as well as misdirected Cossacks - the machinations of some mythical competitors who hinder the sales of new products with negative reviews.
:
it turns out to be bullshit, one wrote, presumably sent, the rest raise and shake this topic, therefore I decree that if something like this appears on this forum, the writer will be banned without talking.....
complaints are not accepted, the forum is private, mine.....
From the side of new users of World Vision products, all this looks strange: after all, people bought equipment with their own money and want to know at least some reason for the incorrect operation. But those who have been on the forum for a very long time know that, unfortunately, such a reaction to questions has become the norm in recent years.
After some time, they somehow saw the problem, and regularly fed people tomorrow
kami, promising to solve it with SR9700 drivers for AVL1506T.
But, as it turned out, it was just a distracting maneuver so that sellers had time to sell the maximum number of 1 version.
And a long time ago, version 2 of the T64 LAN
with Realtek
RTL8152B
:
Serial numbers starting from WV201812.
And all owners of version 1 were simply told that no one promised you 100 Mbit anywhere:
:
Does the specifications on the packaging indicate that the port is 100 Mb/s?
However, they indicated 10/100:
Not to mention that even a year before the appearance of this model, only 10/100 was discussed with LAN. No prehistoric 10 Mbit Half Duplex
in 2021 there was no question.
Now Internet providers are bringing 1 Gbit fiber optics to apartments, and World Vision
has proposed 10 Mbit in 2021, modeled in 1990.
And until now, no one has even admitted the very fact of their miscalculation and mistake. And of course - no apologies to users. On the contrary, there is only increasing aggression towards people.
And then it becomes clear that I am not me, the cow is not mine. My house is on the edge, I don’t know anything:
:
I wonder why we are asked this question, what is written at the top of the forum?
World Vision Club! It’s correct that it says that this is a forum for fans of World Vision equipment, and not the official website of TM World Vision, I think you can see the difference between the two addresses.
But, despite, as it turned out, a forum of amateurs
, if someone starts to be indignant about this issue - a ban.
It is clear that admitting the fact of a miscalculation by declaring version 1 defective would lead to an immediate refusal of people to buy version 1, i.e. to overstocking sellers with old versions of consoles, and then they will not order version 2 without selling version 1.
Therefore, they delayed it as much as possible, fed it with promises, apparently in the hope that it would somehow resolve itself later.
Chassis date:
- 2018-07-18
- 2018-09-03
those. Two versions were initially developed. But first they put into production and sale 1 version with CoreChips SR9700
- as a cheaper option than - with
Realtek RTL8152B and a separate Pulse H1102NL transformer
.
Let me remind you that T64 LAN
- the most expensive of the 64 family, and the remains of version 1 are still on the shelves, so when purchasing,
carefully
at the serial number (should be WV
201812
xxxxxxx or more) and look inside through the cracks so that there is a matching network behind the LAN connector transformer
Pulse H1102NL
(or any other brand).
Well, the unfortunate owners of version 1 have only Wi-Fi or use an external USB-LAN adapter.
But even if you connect an external USB-LAN on the correct chipset, the set-top box will not work with it, because it already has a USB-LAN Corechips SR9700
on the board.
The easiest way to disable the Corechips SR9700 is by breaking its USB connection (pins 12 and 13):
Moreover, it is not necessary to disconnect both contacts; it is enough to lift one of them or unsolder one of the two 33 Ohm resistors going to contacts 12 and 13:
Then we plug into the only USB1 an external USB-LAN on the RTL8152B chip, we see 100 Mbit Full Duplex
, and as a result, HD channels began to show normally without constant buffering and stuttering.
But despite the above facts, set-top boxes 64 (except LAN version 1) can and should be taken because of their additional capabilities.
This review examines the current version dated June 14, 2021:
There are two options OFFICIAL and BETA, but BETA does not only mean that it is preliminary for the test, here BETA
First of all, the presence of unofficial
Lite IPTV
and
Radio
.
Official firmware is only on the website, Beta is only on the forum.
You can update via USB or via the Internet, selecting the desired option Official or Beta. But Beta is not always promptly uploaded to the update server:
Therefore, in such cases, just download from and update via USB.
Moreover, on the T
64 you can install the firmware from the Internet set-top box
I
64 -:
The application will appear:
The IPTV buffer has been slightly increased due to the absence of DVB functions in the memory (DVB-T2/DVB-C):
But you can always go back to firmware T
64.
Well, if during the software update
If some kind of failure occurs, then a mode is provided - simply rename the firmware file to
rom.bin
, write it to a blank flash drive formatted FAT32, insert it into the set-top box and plug it into a power outlet.
At the end of the process, turn off the console, remove the flash drive
and turn on the console again.
Lite IPTV
Same as Premium
, the best app is
Lite IPTV
- the same as the IPTV app, but Lite already contains a playlist. Therefore, having bought a set-top box and connected it to the Internet, you can immediately appreciate the advantages of IPTV, without even understanding any playlists, where to look for them and without delving into other issues.
Lite IPTV
- a ready-made solution for those who are far from the topic of IPTV, but simply want to watch more than 20 standard channels from an antenna.
Relevance of the Lite IPTV
supported by
World Vision
, but at the same time naturally not being responsible in any way for the channels offered, but simply providing an extremely simple way to view them.
If you have links to some interesting channels, you can suggest them on the forum to be added to the Lite IPTV playlist.
Radio
Similarly, for those who like to listen to Radio, the Radio
— more than 300 radio stations:
This list is also monitored by World Vision and you can also suggest your streams to be added to it.
Just like in TV radio, after a few seconds the screen saver turns on:
Let me remind you that this is a Radio
can be specified when turning on the set-top box, i.e. you can simply plug in active speakers and use the set-top box as an Internet “radio receiver”.
IPTV
Well, those who are not satisfied with the list of channels offered in Lite IPTV can use the IPTV
and upload your own playlist - for example, from your Internet provider (if it provides open IPTV) or downloaded from somewhere on the Internet.
As usual for set-top boxes on Sunplus processors when starting IPTV
There are no prompts or menus:
OK on the remote control
and
the green
Import
button to load the playlist from a flash drive:
and watch channels from your playlist:
If you know the address of any self-updating playlist on the Internet, you can also add it by entering its address through the red
Cloud
button and then
the green
Import
button , or by loading a pre-prepared list with addresses of self-updating playlists from a flash drive -
Let me remind you that Sunplus processors will not play streams starting with rtmp://
and
udp://
(for example, local IPTV from your ISP -
the UDP Proxy
on your router is required).
If one of the streams with addresses starting with http s
— the set-top box and the server cannot agree on encryption.
Sometimes just removing the letter s
those.
so that there is only http
(without s).
The latest firmware version V10.11.16 dated 12/17/2020 already has cipher suites (including 2 unknown ones), so first update the firmware to this latest one.
Online cinemas
In Premium
there was an attempt to use the illegal service
Kino-Live
, but due to regular blocking at the request of film rights holders, in
64
it was decided to use the official online cinemas
MEGOGO
and
IVI
:
Megogo
Search
possible in English, Russian, Ukrainian:
When starting, a short description is shown first:
INFO
button at any time
for technical information or go to a specific movie time:
OK
at any time
,
a time ruler
and the arrows will also jump to the desired moment:
In Megogo
Only free movies/cartoons/series are available. Paid - it will take a long time to load, but will not launch.
IVI
In IVI
also free:
But you can also watch paid ones if you already have your IVI details:
And when you try to view paid ones for free, an error will pop up:
If you first switch the console menu language to English, the answer will be more detailed - Playback fail, return to
, well, the most complete answer is
Playback fail, return to previous menu!
Those. as in other set-top boxes on Sunplus processors, if you want to find out more about the error in Internet applications, you need to temporarily switch to the English menu.
YouTube
Let me make a reservation right away that the ability to view YouTube
on any regular consoles (not Android) will always be in question. Therefore, on regular consoles you shouldn’t rely too much on its constant performance.
For example, it should not be surprising that in the Music
any videos launch with an error, but in other Categories everything is fine.
The owner of YouTube
is
Google
- whatever he decides, so it will be.
In addition to the usual functions, I would like to note here the ability to add to Favorites
(
FAVOR
) and
history
:
For example, in Favorites
You can add live broadcasts of some TV channels that do not have an IPTV stream, but are broadcast via YouTube:
About cable television and more
The transition of broadcasting from “analog” to “digital” has also pushed subscribers of cable operators to personally switch from analogue cable to digital DVB-C, although cable operators do not and do not intend to disable analogue in their cable.
Some users, when buying cable set-top boxes, discovered that on some channels (or rather cable multiplexes) the set-top boxes are shown with “squares” and stutter.
Unlike analogue, where interference is often barely noticeable to the human eye or it easily adapts to it (ripples, “snow”, fine mesh), in digital there is a minimum visible size of interference “square”, and it is already difficult not to notice, not to mention from that it is impossible to adapt.
Analog cable allows for twists, bad contacts, old cables - some image will still be visible, but any number is more demanding on cables and contacts.
If you have problems receiving channels on your cable receiver, you need to adhere to the following algorithm
:
- Call the cable guy. Probably someone sat directly on the central core. If there is a signal (and the cable guy claims that it’s normal), you should try connecting the receiver directly near the panel. If there is a signal, go to step 2.
- If there is a divider installed in the apartment, connect the receiver directly to it. If there is a direct signal, check it on another divider. It is advisable to take a satellite splitter, they save less on production (the upper frequency of the satellite is 2150-2400 MHz). Then perhaps the issue is in the socket. We check directly in front of the TV. Let’s say it doesn’t help directly without an outlet, there is no signal.
- We make a test circuit directly from the shield to the receiver with a new cable. If it works with the same divider and socket as it was, then the question is in the quality or condition of the cable that was originally there. If it doesn’t work from the shield, then you need to try connecting a 10-12 dB attenuator into the cable break, or connecting it through a divider for 8 outputs, or through a cable coil, etc. Perhaps the input signal is not too small, but too large.
- If the conclusion is that the divider, the socket, and the cable (a little bit of everything) contribute to the weakening of the signal, and the cable guy claims that the signal is normal, then you need to use a signal amplifier in front of the divider.
taken from the description for a simple cable receiver.
But not only this may be the reason, but also the influence of interference from HDMI on terrestrial DVB-T2 and cable DVB-C.
In addition, in receivers with a connected Wi-Fi adapter, it can also have a negative effect, and in such cases, try connecting it via a USB extension cable (and for normal Wi-Fi operation it is also better with it).
All of the above applies to any terrestrial cable set-top boxes.
However, there are some hardware nuances: concurrent owners of T62
and
T64
noted that with
a lot of noise in the cable
, T64 coped worse than T62.
Of course, at the same time, the Quality scale of the T62 sagged and the BER
(errors, but normally the BER should only be 0), however, the T62 with great difficulty, but still pulled it out, trying to correct the errors. But T64 could no longer do it.
There is also an interesting case with on-air reception: in the city of Donetsk there is an on-air multiplex (formerly Ukrainian MX5) on channel 29 (538 MHz), but it is jammed by the Ukrainian side. T64 could not cope with its reception (although Quality (Q) shows 100%), while T62 (Ber = 0) and other set-top boxes of its neighbors show it normally.
The signal is processed by a demodulator: the T64 uses the rather rare Availink AVL6762TA
(used in on-air cable
GI Uni 2
(analogue of Mecool M8S Plus DVB) and other TV boxes on Android, in USB tuners, on-air set-top boxes Cadena SHTA-1104T2 and -1104T2N).
Still, I note that such cases are quite rare and these are already extreme options, so first of all, you need to put your cable wiring in order and minimize the influence of interference, because Any on-air cable set-top boxes are created based on normal conditions and with an initially normal digital signal.
Well, finally, let's take a look inside, having lost the warranty. Having unscrewed two screws, we will see a board marked chassis S6TD-AVL1506T-CR-V1.3
,
D
- 64
D
:
The tuner block has a pre-UHF, because input filters are used:
T64 LAN version 1
The marking is distinguished by the letter L - S6TD
L
-AVL1506T-CR-V1.3:
And the younger one has T64 M
There is no D or L in the marking, just -
S6T-AVL1506T-CR-V1.3
:
And instead of a digital indicator there is a two-color red-green LED.
Technical details
: input UHF BFP196, tuner Rafael Micro R850, demodulator Availink AVL6762TA, their common quartz X3 24 MHz, processor Availink AVL1506T, quartz X1 27 MHz, MD flash memory MD25Q32CSIG (4MB), (LAN version has
1
CoreChips SR9700 chip, version
2
Realtek RTL8152B chip, transformer H1102NL, quartz X4 25 MHz), DC/DC converters S10 (+3.3V), S15 (+1.16V cores), S10 (+1.2V demodulator + tuner), linear stabilizer AF1117 1.8 (memory ), LED driver FD650B-S, digital indicator YL3212CH1-BDCB21, USB dongle AO3401 (A19T), IR sensor MYS-1838, power supply capacitor EC1 470×10, video output EC2 220×10.
Measured current consumption (2 multiplex, active antenna power on, without USB): T64D - 630 mA, T64LAN - 680 mA, i.e. 3.15-3.4 W.
In standby mode: T64D - 240 mA, T64LAN - 260 mA, i.e. 1.2-1.3 W, which clearly exceeds the standards, incl. and specified in paragraph Power supply of the operating manual:
- Standby load = 0.5 W
As you can see, the duty regime here is very conditional. In reality, only the power supply to the processor core is turned off (+1.16V), and the remaining voltages remain - the chips are simply in inactive mode.
Therefore, even in standby mode, the set-top box remains warm.
Temperature conditions in operation (and standby), °C:
- tuner +59 (+37)
- demodulator +51 (+45)
- processor +46 (+37)
I repeat, the body of the consoles is perfectly perforated, so there are no issues with cooling.
There is an EC2 capacitor between the USB, but this is not for stabilizing the USB power supply, but for the composite video output.
Some 64 D
and 64
M
(2 USB each) noted that it is better to connect more demanding loads to USB1, i.e. closer to the power connector of the console CON1.
For comparison: the T62 has a second USB connector located in the farthest corner, but at the same time there is a wide power path leading to it.
The board has a ready-made socket J1
for connecting to
UART
(16 - UA TX and 17 - UA RX).
But unlike other consoles on Sunplus, here the log is limited only to the very beginning of loading (the first 11 from the black screen), the World Vision branded splash screen appears only after the last cyg_start
. And all subsequent work of the console is not displayed in any way. Switching off to standby mode also occurs without messages.
Availink AVL1506T processor has 76 pins:
The case size is 9x9 mm, and the radiator size is 14x14x8 mm (like the middle white outline) more than covers the processor, so even if it is glued crookedly, cooling will not be affected.
The large white outline shows the maximum size of the radiator, but the existing standard one does an excellent job of cooling.
Of course, there is no documentation for the processor; I only traced some contacts:
• 51 VIDEO - to + EC2
• 53 USB1− • 54 USB1+
• 56 USB2+ - to SR9700/RTL8152B for LAN • 57 USB2− - to SR9700/RTL8152B for LAN
• 62 AUDIO Right • 63 AUDIO Left
• 72 IR U9
Improvement of the operating mode indicator
with loss of warranty
As already noted, in all models (except M
)
the red
operating mode indicator is always on:
So it’s difficult to immediately understand whether it’s on or in standby mode?
The reason is that this one is red
The icon in the digital indicator is constantly connected to the +3.3V power supply:
And as noted above, even in standby mode, all voltage sources work (except for the +1.16V core power supply).
One of the fixes is to power it from the USB connector:
removing the 1 kOhm SMD resistor from the board (for the 64D it is the outermost one from the LED driver chip):
and soldering a new one at 2.2 kOhm - to the 6th leg of the digital indicator and to +5V USB1:
And similarly for models with LAN:
As you can see, the model has 64 M
The +
of its two-color LED is located on pin 6
and, accordingly, the 64M display works fine (however, there is no digital indicator).
But now other models have the red icon turned off in standby mode:
The vast majority of World Vision consoles are regular standard models from Chinese OEMs. And only Premium
and
64
- our own original developments.
And if
there are still no issues
Premium 64
there are still some errors and miscalculations. Apparently, unlike the more expensive Premium, the 64 models were created under conditions of lack of time, and as you can see, not all hardware aspects were fully debugged, refined and tested.
Let me remind you once again: those who want to purchase the T64 LAN
must look carefully at the serial number on the back of the box or on the bottom of the set-top box - the date should be WV
201812
xxxxxxx and newer.
the T64D as the most optimal
c 2 USB, because this will allow you to have a flexible approach to connection: if necessary, you can always buy a USB-LAN converter and insert it into any USB. And when there is only one USB port, there is always some risk of it failing.
In addition, the LAN located on the board is not the real LAN of the processor itself - it is the same ordinary USB-LAN converter that uses a USB port.
Despite some of the miscalculations mentioned above, this series can be recommended as having a more powerful modern processor, ongoing software development, and most importantly, the availability of a ready-made Lite IPTV
, which allows you to watch more than 20 broadcast channels via the Internet without understanding all this.
Because for most ordinary people, IPTV is still a dark forest. A Lite IPTV
- this is a ready-made solution. First of all, for older people, because younger people will figure everything out themselves.
Let me remind you that any applications, including Lite IPTV
, you can set it to start automatically when turned on. And you can also bind any of these applications to the colored buttons.
Positive: a new modern processor, terrestrial cable, the ability to select the size of letters in the menu, several Internet applications, including a simple and immediately ready-to-view Lite IPTV, ready-made Internet radio stations, you can select a specific application to launch when you turn on the set-top box, assign it to color buttons for various applications and functions, Dolby Digital license, full Ethernet for T64LAN 2
versions and I64, digital indicator with a ticking clock, well-perforated case, interchangeability of T64M/D/LAN and I64 firmware, emergency recovery mode after unsuccessful firmware, active software support, low price.
Negative: the red indicator is constantly on (except for the T64M), in standby mode it consumes more than all conventional set-top boxes for the T64LAN 1
Ethernet versions are only 10 Mbit Half Duplex, extremely aggressive attitude of the developer (Super moderator on the World Vision forum) towards ordinary users, even if they point out objective hardware flaws, a very short user manual.
In general, as has been noted more than once, such a set-top box can and should be taken to expand the standard list of on-air channels, primarily for those people who do not yet understand IPTV at all and just want to watch many different channels at once.
Rate this publication
You can ask questions about digital television on the DVBpro forum
Author: Alexander Vorobyov, 07 Sep 2021 | Permanent link to the page:
Search and configure 20 digital channels on World Vision set-top boxes
When you connect any of the World Vision set-top boxes for the first time, a special welcome message should appear on the TV, in which you will be prompted to quickly set up the device. In any case, if the antenna selection was made correctly, the tuner will be able to independently configure all available channels. To do this you need:
- Go to the device menu by pressing the corresponding button on the remote control.
- Press the “Menu” button and go to the search section. Specify in the DVB-T2 range item. If the antenna has a signal amplifier, then also switch the power to “on”.
- Select “Auto search” and click “OK”.
- The set-top box will search across all available frequency ranges. The search will continue for 5-10 minutes. During this time, the device will save the entire available channel list and save the settings when finished.
The auto-search function is very convenient in cases where there is a stable signal and the antenna itself is well-tuned and is capable of receiving a digital signal without problems.
Manual search
If there are problems with the signal strength or the device cannot detect the required number of channels for no apparent reason, then you should repeat the search procedure in manual mode. The sequence of actions is as follows:
- Go to the console menu, to the search section.
- Select “Manual search” there and press “OK” on the remote control.
- After that, go to the Internet and open the interactive map of CETV. We indicate your area of residence on it and write down the parameters of the television tower closest to you. We will be interested in the channel number for RTRS 1 and RTRS 2.
- In the set-top box menu, first indicate the number of the first channel from the card. At the same time, we check that the power and quality of the signal changes from 0% to some value. In this case, it is not necessary to have 100%. In some areas of residence, 60%, 70%, etc. is enough for normal broadcasting...
- Click “OK”. The search will find available TV channels and radio.
Shows only 10 channels out of 20
This problem is quite common among those who switch from analogue television to digital. When searching for channels, it can find either the first 10 or the second 10 channels, but not all 20 together.
Check strength/quality parameters
Go to “Channel Search” - “Manual Search”. At the bottom of the screen you see two parameters - signal strength and signal quality. Ideally, they should both be at 100%, however, in our experience, values of 60-70% are quite enough for normal operation
If the frequency setting is incorrect, then the strength and quality will be equal
0. Better use automatic channel search. You will observe the same thing, if the frequency is correct, but the signal is really very degraded - you should check the antenna.
Antenna check
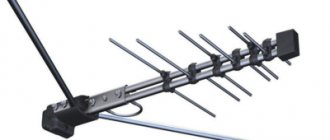
If the strength/quality parameters constantly jump from 0 to 100% within a second, then you need to check the antenna. Specifically: raise it higher and turn it towards the TV tower. You can see where the tower is located on the map that we showed above (CETV Interactive Map). The higher the antenna is, the better the quality of the channels and the greater their number.
In most cases, if you only see 10 channels instead of 20, then the problem is a weak signal. It may make sense to use antennas with a signal amplifier or special antennas designed to work with DTTV receivers
Receiver marriage
The option of a non-working console cannot be ruled out. The World Vision T65 comes with a one-year warranty. Therefore, if nothing works out at all, try exchanging the receiver at the store where you bought it
Setting up WiFi on World Vision set-top boxes
In most digital set-top boxes, the connection to the Internet occurs through special Wifi adapters. On World Vision devices this can also be done using an RG-45 connector. This is a standardized connector that is likely to be found in any PC.
Connection to WiFi is made by connecting the set-top box with a special adapter via the USB input. At the same time, you need to buy not the first one you come across in the store, but exactly the one recommended by the official manufacturer World Vision.
After connecting the set-top box to the wireless network, the owner will have access to the following functions:
- Updating and firmware of the console.
- Watching videos from the YouTube portal.
To connect to an existing wireless network, you must:
- Go to the device menu and in the “System” section select “WiFi Settings”.
- Then select the device in the menu - Wifi and click OK.
- The set-top box will search for available wireless networks. When finished, the full list will be shown. From it we need to select the one we need and enter the password for it.
After saving the settings, you will be able to freely watch YouTube directly from the console.
Review
Is it worth buying world vision t62d? Of course it's worth it! This little crap with its ridiculous price will turn your ancient TV into a modern entertainment center. I bought it as a T2 and I didn’t even know that there was something else in it, but here is such a pleasant surprise.
If you also have doubts about the price, you will be reassured by the 1-year warranty card. Even if it burns out on the first day after the warranty expires, I think for that kind of money with such capabilities it won’t be a shame)).
If you have any questions, please ask. I'll tell you, I'll show you...
Firmware for World Vision tuners
A software update is necessary in the following cases:
- When the set-top box starts to work inadequately: reboot, freeze, or refuse to connect to the TV.
- When will a new, stable version of the software be released?
To update you need:
- Download the latest version of the set-top box software from the official website. The firmware format will be .bin.
- Write the file to a flash drive with the Fat32 file system.
- Insert the USB drive into the console and go to the menu.
- In the “System” section, select “Software Update”.
- Then update via USB.
- Specify the path to the file and click update.
If the software file meets the hardware requirements, then the firmware will take 10-20 minutes. When finished, the device will reboot.
World Vision Errors
During the operation of the site, we have accumulated a lot of questions from subscribers regarding World Vision set-top boxes. For some topics we will try to answer and provide possible solutions to problems.
The set-top box does not search for channels / finds less than 20
- Try searching manually.
- Make sure you select the correct antenna. If the distance to the TV tower in your region is more than 10 km, then you will need an outdoor antenna with a signal amplifier.
- Check the antenna cable for integrity.
The device does not connect to the TV
- There may be problems due to old software. It needs to be updated.
- Check the cable connecting to the TV. In 30% of cases the culprit is just a wire.
The console reboots or freezes
- Update your software.
- Reset to factory settings.
How to set up a learning remote
In total, the universal remote control has 4 programmable buttons: TV Power, Vol+-, AV. To program them, you must press the OK and 0 buttons simultaneously, the red light should light up. After this, place another remote control opposite the student and press the button on the second one that you would like to program. After that, on the original remote control, press and hold the button that you would like to transfer. It is necessary to hold it until the remote control is not trained, the diode blinks 2 times. At this point the learning process can be considered complete.
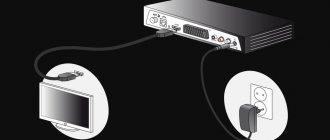
How to connect the set-top box
The World Vision kit includes the digital set-top box itself, a remote control, a PCA cable for connecting to TV, batteries, and instructions.
You can also use an HDMI cable to connect a digital set-top box to your TV. If there are corresponding connectors on the TV panel. If you have an old TV, use the PCA cable that comes with the kit, you need to connect it according to the lights, yellow video, red and white wires are audio.
- First of all, turn off the power supply to the TV and set-top box and only then start connecting.
- The next step is to connect the antenna cable to the antenna input of the digital set-top box using a plug.
- Connect the video cable to the appropriate jacks on your TV and set-top box.
- After this, we connect the power supply to the TV and set-top box.
- You need to turn on the video channel on your TV; in some models it is called AV.
How does it all work?
Digital television is called such because the transmission of television images and sound occurs using digital encoding of the video signal and audio track. Unlike analog TV, digital TV is not affected by interference. Therefore, a digital channel will either work perfectly or not at all - there are no such noises as in analog broadcasting, such as artifacts or ripples.
As mentioned above, to migrate from analog to digital, you only need an antenna and a set-top box with a DVB-T2 tuner (namely DVB-T2, the outdated DVB-T will not work), support for the MPEG4 video compression standard and the Multiple PLP mode. Actually, the set-top box itself is a signal decoder from your antenna. In World Vision T65M, digital signal reception is provided by a highly sensitive Rafael Micro R836 tuner.
This set-top box can use an HDMI or RCA cable (“tulips”) as an input interface.
Some models may have a SCART connector. If your TV has an HDMI connector, then HDMI will be the priority option - the “picture” quality is much higher than on RCA. But such a cable was not included in the kit - you will have to buy it separately. When connecting via RCA, we adhere to the standard connection scheme. The yellow plug is for the video signal. White - for the left audio channel (mono). Red - for the right audio channel (mono)
Setting up channels
Channels are configured on the set-top box itself and its remote control is used. The TV remote control is only needed to turn the TV on and off.
- Click on the Menu button and go to the Search or Channel section.
- Since World Vision set-top boxes are suitable for cable and over-the-air broadcasting, we select the desired search range.
- We choose DVB-C if you have cable TV.
- Choose DVB-T2 if you want to tune channels from the antenna.
- Search type All.
- Click on Autosearch and wait for the scan to finish.
Receiver setup
When you turn it on for the first time, the startup screen will be in Ukrainian.
Use arrows to select Country (Kraina/Region) to Russia. In the Language section (Mova/Language), select Russian. Resolution can be left at 1080 dpi
Next, an automatic channel search will start. Basically, if everything is connected correctly (and this is only the antenna)
If automatic tuning does not help, then try correcting, moving, raising the antenna and starting the search again through the main menu:
Manual search for digital channels
On the World Vision set-top box, you can set up digital television using manual channel tuning.
- To begin, select the broadcast format Cable (DVB-C) or Broadcast (DVB-T2) in the Search item.
- Next, go to Manual Search.
- For cable television it is necessary to enter Frequency, Baud Rate, Modulation. Check with your provider for these parameters.
- For Terrestrial reception via antenna, you only need to enter the frequency and click on start.
- After updating the frequency, the Power and Signal Quality will be shown; the higher the indicators, the better.
Question answer:
How much does it cost?
The advantage of RTRS digital terrestrial television is the absence of a subscription fee. You don’t need to sign an agreement, you don’t need to pay anyone - it’s truly free. TV channels are broadcast without encoding and are freely available
What is the resolution and quality in digital terrestrial television?
The broadcast is in a resolution of 720 by 576 pixels (SD quality).
Can the set-top box be used on multiple TVs?
You can use it - it’s not for nothing that the set-top box has several interfaces for connection (HDMI/RCA). However, it is worth considering that both TVs will have the same picture and sound. To watch different programs in different rooms, you need a separate set-top box for each TV.
How to record programs on a flash drive?
Recording settings are located in “System Settings” - “Timer”. Here you select the channel, date and time to start recording
Digital set-top boxes from the World Vision brand are among the most popular, due to their price and abundance of functions. Many World Vision models have the ability to connect to the Internet using Wi-Fi. Also, these set-top boxes can receive Terrestrial digital and Cable digital television, thanks to which many cable operators use these budget set-top boxes. The most popular models are T62A and T62D, there is also a Premium model, but it is a little more expensive, although it has similar functions.