In a modern developed community, not a single person can refuse to watch television. News, entertainment shows, educational programs - an ordinary person is unlikely to be able to spend his day without this. And of course, in order to get the most out of watching TV, people choose high-quality means for broadcasting TV channels. A satellite tuner is considered the most reliable and popular equipment for this. But if purchasing it is not a problem, then how to configure channels on a satellite tuner? All information about this issue is presented below.
What is included in the satellite TV package?
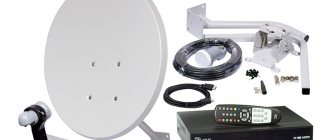
Today, anyone can purchase a kit for installing satellite television. The standard and most optimal kit will cost from 50 to 80 US dollars. Typically the kit includes the following list:
- A tuner, or receiver, is also called a receiver. This is the most expensive part in the installation kit, and you need to choose it very carefully, since the quality of the video broadcast depends on it. It is better to choose a broadcast in mpeg4 format, but mpeg2 is also suitable. How to install it, and how to independently configure satellite channels on the tuner, will be discussed below.
- Antenna. Necessary in order to receive a signal. It can be from 70 centimeters to 1.2 meters in diameter.
- Head, or converter. There can be several of them at once, but models with three heads are more common. Each of them receives from one satellite.
- Multifeed. This is the name of the special head mount. The standard kit includes 2 of them.
- Disek. He switches converters.
- TV cable. It should have a resistance of 75 Ohms and a length of 3 to 5 meters, with a small margin.
- F-connectors. Designed to connect kit parts. For a satellite dish with three converters, 8 such plugs are provided.
- Bracket and dowels (anchors) for mounting the antenna.
Before you independently configure channels on a satellite dish tuner, you should figure out how to properly install and configure the antenna itself.
Tuners
In English, tuner means “receiver”. The device is capable of extracting information from surrounding electromagnetic waves. Inside there is a whole complex of devices that perform the necessary operations.
A typical receiver consists of main stages:
- Bandpass filter of tuning type. The cascade operates on the basis of a resonant circuit: like a gate, it passes one channel from the range.
- The filtered signal is amplified to the level necessary for the correct operation of subsequent stages - a high-frequency amplifier. The next stage reduces the frequency to a standard value that can be recognized by the detector.
- The local oscillator lowers the received frequency to a fixed value (465 kHz).
- The new frequency is amplified in an intermediate frequency amplifier.
- The detector extracts information from the received signal. The specific implementation scheme depends on the encoding method used.
- A low frequency amplifier adds energy to the information signal. The viewer, the listener perceives the result of the tuner’s efforts.
A similar circuit is typical for superheterodyne tuners. Most modern devices process the signal this way. A TV tuner for a TV has two separate reception circuits for sound and image. Satellite information is encrypted: if the tuner is receiving from a dish, an access key is required to decrypt the signal.
The tuner is sold as a separate device (in the form of an expansion card for a personal computer), but is often included in the equipment:
- player with FM tuner for receiving radio broadcasts;
- home theater with TV tuner for watching programs from satellite;
- plasma panel with TV tuner.
The TV tuner can be produced as a single unit with the FM tuner. More often it concerns expansion cards for personal computers. Electronics don’t care what to play: video, music. The popularity of TV tuners has fallen: servers for online programs have appeared on the Internet. But paid channels are only available via satellite.
Required Tools
To begin installing the antenna at hand, you must have:
- Extension cord for socket.
- A hammer drill for making holes to secure the bracket to the surface using dowels or anchors. You can also use a drill for this purpose.
- Drill bits for a drill or hammer drill.
- Two wrenches, 10 and 13 mm in diameter.
- Phillips screwdriver.
- Hammer.
- Insulating tape. Instead, you can use plastic ties.
How to find a new channel on a satellite dish
If for some reason the receiver’s settings have been violated, you can solve the problem yourself. How to install channels?
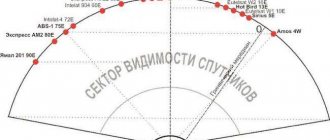
First you need to find out which satellites the dish is tuned to. This is not at all difficult to do if you remember which specific TV channels the tuner used to receive. Usually one antenna is installed on 3 satellites: “Amos”, “Astra”, “HotBird”. Sometimes heads for additional satellites are attached to the antenna.
A specific satellite always corresponds to a specific head. If you have a regular antenna installed for 3 satellites, then you need to take into account their location: on the left - “HotBird”, on the right - “Amos”, in . From each head comes a cable that connects it to the disegc switch, which is located at the back of the antenna. All disegc outputs have their own numbers.
Installation
Next, we move on to the process of installing the antenna, and after that we’ll look at the process of how to set up channels on a satellite tuner.
- First, we completely assemble the antenna. All fasteners must be securely tightened. Bolts, washers and engravers should be carefully checked for strength.
- The next step is to attach the multifeed to the head holder on the right and left sides. Here we also screw in the converters themselves, that is, the heads. Don't tighten them too much.
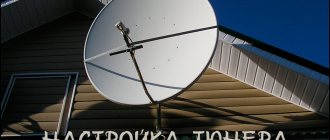
- We fix the bracket to the wall and hang the antenna on it. It should be directed to the south or southeast. You can determine the direction of the world yourself, or you can look around and pay attention to where your neighbors’ antennas are “looking.”
We mount, configure and connect the dish
The antenna itself is installed as follows:
- it is placed on the rod, while the adjusting nuts for moving it in the horizontal and vertical planes should be tightened with force, but with the possibility of further adjustment;
- If the equipment is installed on the roof of a building and is its peak point, it can become an object for lightning strikes, so you need to ground it and make a lightning rod to avoid failure of the entire structure or even injury from a lightning strike.
If the structure is mounted on a wall, balcony or loggia of a building with grounding, then there is no need to take additional measures to remove lightning; Fastening and installation of satellite TV antenna - now direct the dish in the desired azimuth, using the marks made earlier;
- Now you set the vertical angle of the plate, in our example it is -11°, the other settings do not change. The tilt is made relative to a plumb line, which can be a small weight on a rope. In the example under consideration, the angle has a “-” sign, so the antenna is tilted forward, and the plumb line is attached to the front side of the dish. If it has a positive value, it means that the plate is tilted back, and the plumb line is attached to its reverse side.
After installing the plate, screw the F-connector of the cable brought out and fixed to the rod onto the converter.
to contents ^
What to do next?
In fact, the antenna installation is complete; now you should correctly connect all the cables between the antenna, tuner and TV. Please note that the cables are connected to the tuner only when it is not connected to a power outlet. It is not enough to simply turn it off; you must unplug the plug from the socket.
So, you need to make at least two connections. Then you need to figure out how to configure the channels on the satellite tuner yourself.
- We connect the antenna and receiver (tuner).
- We connect the tuner to the TV.
- If necessary, you can also make a third connection, namely, connect peripheral devices.
Cable installation
Before installing the cable, you need to select a place where you can make a hole for it. If the antenna will hang on the facade of a building, it is recommended to drill in the following parts of the wall:
- in the corner of the window frame;
- in the wall at floor level.
If the antenna will be on the roof, the cable must be routed along the facade of the building. It must be secured both on the roof and near the window on the wall through the window frame. It is also allowed to run the cable through low-current risers of the structure.
Connecting the F connector
In order to connect coaxial cables, they must be stripped. After this you need to put on the F-connectors. This happens in the following order:
- cutting off the upper cable sheath at a distance of 2 cm without damaging the screen;
- carefully bending the wire onto the sheath;
- removing insulation from the central core protruding 2 mm from the screen;
- screwing on the F-connector;
- shortening the excess stock of the central core, leaving 2-5 mm from the plane of the connector.
The described method of connecting the F-connector is the simplest.
Multiswitch connection diagrams
The choice of a multiswitch should be made based on two important factors: the number of cables and the number of TVs in the house. The following basic connection diagrams for these devices are most often used:
- For the Amos 2/3 4.0w satellite you only need 1 SAT cable. Reception of TV channels: horizontal polarization (H) and lower range (Low) – multiswitch input H, Low.
- The Astra 5.0E satellite requires 2 SAT cables. Reception of TV channels: horizontal polarization (H) and upper range (High) – multiswitch input H, High, vertical polarization (V) and upper range (High) – multiswitch input V, High.
- The Eutelsat 36.0E satellite, which has NTV+ TV channels, requires 2 SAT cables. Reception of TV channels: horizontal polarization (H) and upper range (High) – multiswitch input H, High, vertical polarization (V) and upper range (High) – multiswitch input V, High.
- For the Eutelsat 36.0E satellite, which has Tricolor TV channels, you need 1 SAT cable. Reception of TV channels: horizontal polarization (H) and upper range (High) – multiswitch input H, High.
If a multiswitch is used, Diseqc is no longer required.
How to collect a multifeed
A dismountable multifeed kit often comes with two ears of different sizes. The smaller one needs to be put on a plastic tube. In turn, the large one must be secured to the central crossbeam. The ears can be positioned differently relative to each other: both at the same level and in different planes. The first method is more common. The second one makes the initial setup easier and saves time when searching for additional satellites. This option should be used in cases where different heads will pick up the signal from several satellite devices.
The third head should be placed on the same plane as one of the previous ones. The difference between different converters depends, among other things, on the diameter of the mirror. The smaller it is, the closer the heads should be to each other.
After screwing the strip, you need to pay attention to the angle between the axis of the plastic and the fastening to the traverse. It should be about 90 degrees
Additionally, it is necessary to take into account that the multifeed closest to the dish must be the one that is configured to receive a signal from the closest satellite.
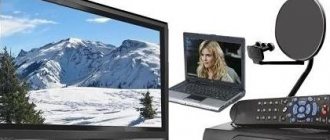
Connecting to a TV
You can connect the tuner to any of the TVs; for this purpose, a number of special inputs are located on the rear panel of the receiver:
- antenna cable input;
- tulips;
- Scart or HDMI connector.
How to connect is selected either according to the capabilities of the TV (it all depends on its model), or according to the desired playback quality.
Connecting via HDMI is considered the best, the image quality will be at the highest level. Next, based on this criterion, is the connection using the scart connector, followed by tulips. And in last place in terms of quality is the antenna output.
Only very old TV models have one antenna output without the additional ones listed above. New TV models have at least two connection methods from the above, and most often - all four. But if it happens that the TV does not have other connectors other than the antenna, then you will need an antenna cable with special connectors, which are called “male antenna” and “male antenna”. These connectors are simply screwed onto the ends of the cable and the “mother” is connected to the tuner, and the “father”, respectively, is connected to the TV.
All other connections are made using a connecting cable with appropriate connectors. Such cables can be included with your TV or satellite dish, and can also be purchased at any electronics store.
Satellite DVB-S2 tuner built into the TV
What is in DVB-S2 TV?
The presence of a DVB-S2 digital tuner makes it possible to directly connect a satellite dish to the TV and view CT channels without a receiver. Those. The DVB-S2 device is a satellite tuner built into the TV. Many TV models have such devices inside them. Manufacturers always indicate their availability in the technical description.
But the DVB-S2 built into the TV also has its drawbacks. If using a regular satellite tuner you can watch 70-80 free Russian television channels on your TV, then when you simply connect a dish to the TV, you can only watch completely open, unencrypted channels. The firmware of domestic receivers has already included keys that open encrypted channels. There are no such keys inside the TV.
All TVs that have such a built-in tuner support CAM modules. This is a device into which a paid CT card is inserted, and which, in turn, is inserted into the TV into a special PCMCIA connector. Those. You connect a satellite dish and purchase a starter package from any CT operator. The package must include a CAM module. The card with the module must be inserted into the PCMCIA slot.
After this, you need to start searching for channels on the TV (on those satellites indicated by your operator). Paid channels should open at the same time.
This method has several important advantages. Firstly, a separate receiver is not required to view CT. Secondly, you only need one remote control, i.e. You will control the channels using the TV remote control.
When purchasing a package from any CT provider, be sure to check whether their CAM modules work on TVs with built-in DVB-S2. And be sure to clarify this question in relation to a specific TV model.
How to set up an LG TV to receive satellite TV
- Connect the cable that comes from the antenna to the connector on the back of the TV marked “SATTELITE”.
- Insert the DVB-Cl+CAM module with the TB access card installed in it (so that the card number is directed towards you).
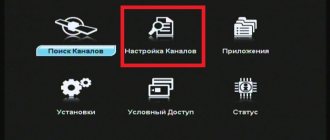
- On the remote control, press the “SETTINGS” button. A menu will open. In it, find the “Channels” item, then click on “OK”.
- A window will open in which you need to select the “Program mode” item. After that, click on “Ok”. A list will appear in which you need to put a dot opposite the inscription “Satellite” and click “Ok” again.
- The device will offer an automatic search, you must refuse it. In the “Channels” window, select “Satellite Settings”. A window will open in which you need to go to the “EUTELSAT 36 A/B 36.0 E” satellite. After this, return to the window with satellite settings.
The following parameters must be specified:
- LNB frequency – 9750/10600 for dual-band convectors with circular polarization;
- LNB frequency – 10750 for single-band convectors;
- LNB power supply – “On”.
Other parameters depend on the specific connection scheme of the TV to convectors and antennas.
How to set up a Samsung TV to receive satellite TV
- Click on "Menu". A menu will open in which you need to select the “Channels” item. It is depicted as a satellite dish icon.
- Go to the "Country" section.
- If the TV asks for a PIN code, then enter the numbers 1234, or 0000, or 1111. This is the standard set of numbers for a password.
- If you want to set up terrestrial or digital TV, then go to the “Other” item.
- After this, you will need to go back and select “Cable Search Options”.
- Here you need to enter the parameters:
- frequency – 290,000 kHz;
- transmission speed – 6875 KS/s;
- modulation order – 256 QAM.
- Return to “Automatic Settings” and select “Cable” as the signal source.
- Select digital and/or analog TV.
In search mode, go to “Network” and start the setup using the “Login” button.
Receiver setup
It is best to start the process of getting acquainted with the menu of the purchased tuner by reading the operating instructions.
The first thing to do is to check whether the signal is being received from the required satellite.
Second, check the settings of the satellite heads. The head label should indicate its type and the local oscillator frequency required for high-quality operation.
Third, you need to set the correspondence between each satellite and DiSEqC ports. To do this, during installation you need to write down which head is connected to which of the DiSEqC outputs. Then in the tuner menu you should set the switch in the order in which the heads are connected to the ports.
If this was not done when installing the satellite dish, then you need to carry out this adjustment using the selection method, one by one selecting the corresponding satellites to the ports.
These are the basic settings that should be made before setting up channels on a satellite tuner.
Conclusions and useful video on the topic
The author of the video demonstrates emergency tuner setup, which may be required in various cases of failure on a previously configured receiver. Such moments happen infrequently, but can be useful in user practice:
As the user instructions above demonstrate, it is quite possible to independently configure the reception of a TV signal from a satellite with a tuner. Moreover, the process is not at all complicated, as it may initially seem to an inexperienced user .
Each manufacturer completes the delivery with instructions and calls these instructions user instructions. Therefore, there is no need to order tuning from a specialist when you can really do it all yourself.
Perhaps you have had to configure the tuner yourself and you know some subtleties that we did not mention in this material? Please share information with visitors to our site - leave your comments in the block below. There you can ask questions about the topic of the article.
Channel search
In order to search for channels on the receiver, you need to scan the corresponding transponder on a specific satellite.
First you need to find out the characteristics of the transponder. To do this, you need to decide on the channel that you want to broadcast. So, the channel has been selected, now you need to find out which satellite it is broadcasting on and look at the transponder settings for it. For example, let's look at how to tune an NTV channel on a satellite tuner. Note that the NTV channel is broadcast on the ABS1 satellite, and there are 2 types of transponder settings for it. If the receiver plays video in mpeg-4 format, then you need to make the following settings: transponder 11473, vertical polarization, speed 22500. If this option is not available, then you need to select a different speed (43200).
Now that all the information about the settings is known, the process of setting up an NTV channel on a satellite tuner will not take much time. You need to go to the settings of the satellite tuner and select the sub-item responsible for setting up the transcoder. In this menu, select or manually enter the appropriate settings for the NTV channel, and press the button on the remote control to start scanning. The TV screen should display a hint at the bottom of the screen (which button on the remote control is responsible for scanning).
Experts recommend automatically scanning the channel list once every two weeks.
How to set up a satellite dish tuner yourself
To set up a satellite dish tuner yourself, you need to do a little preparation.
First you need to find out the exact coordinates of the point where the antenna will be installed. This can be easily found on the Internet.
After this, you will need information about the parameters of data transmission from the selected satellite:
- satellite position on the horizon;
- transponder frequency;
- information transfer speed;
- signal polarization;
- error correction (FEC).
The last parameter is not always required, because Some receiver models are equipped with the corresponding function automatically.
Information about the transponder can also be easily found on the Internet if you simply enter the name of the satellite.
It is also necessary to know the angles of inclination and rotation of the antenna. You can find them out either from your neighbors if they already have a tuned antenna (and if they did the setup themselves), or you can calculate them manually. For this purpose, you can find special algorithms on the Internet.
Automatic search
When the button to scan has already been pressed, a button will appear on the screen with the option to select the type of scan. Depending on the receiver model, the names of menu items may differ slightly from each other. For example, when considering how to set up channels on an Openbox satellite tuner, the menu will offer “Blind Search”, “Automatic Scan” and “Manual Search”. Automatic scanning is convenient because you will not need to enter the transponder settings; the system will independently select all the transponders that the satellite dish receives.
Registration
Without registration in the TricolorTV system, it is impossible to use the services of this company. The procedure can be performed either through the Tricolor Internet portal (there is a bot assistant on the website) or at the sales office. The Contact Center also accepts activation requests.
Registration involves the transfer of personal data from you to Tricolor. Therefore, to complete the procedure you will need a passport. Don’t forget to also indicate the correct address – the equipment connection address.
Activation via the Internet occurs through an online form, followed by notification to the user about the success or failure of the procedure. After this, you can finally insert the smart card into the receiver and move on to the next step.
If your search doesn't return any results
It happens that searching for a channel does not produce results, the antenna cannot reproduce it and displays a black screen when the settings are entered correctly. Most often the problem is that the antenna itself is poorly tuned. It’s worth checking, and it’s better, of course, to involve specialists in this field who can help at any stage of the process of installing and configuring a satellite dish and tuner.
You can also independently check the availability of the custom channel according to DVB-S or DVB-S2, MPEG-2 or MPEG-4 standards.
You can also double-check the settings for the selected channel; perhaps outdated information about the satellite, transponder and its speed was originally found. So, many users are faced with the problem of how to set up the Inter channel on a satellite tuner, because such a large media group is constantly developing, growing and changing. And in parallel with these processes, it changes satellites for broadcasting. This happened recently; now you can watch Inter on two satellites - Astra 4A or Sirius 5 with transponder settings:
- Frequency – 12399 MHz;
- Polarization – V;
- Speed – 27500;
- FEC – ¾;
- Standard/Modulation – DVB-S/QPSK.
Today, the process of how to tune the Inter channel on a satellite tuner can only be carried out in this way, and in no other way.
Installation and connection errors
1
At the very initial stage, do not make a mistake with fastening the traverse for placing the converters. It should be installed under the bracket, not on top of it.
Otherwise, there will be big problems finding a signal even on the central head. Incorrect focusing will be to blame.
2
Pass-through sockets are the first enemy of satellite television. From such devices there may be no signal at all.
Therefore, only the final ones can be used. They are often paired with television ones.
3
They can only be used for analog television. Satellite TV should not have any splitters. The fact is that channels are usually broadcast in two polarizations.
And the splitter is not able to simultaneously pass them through itself. As a result, some channels will simply be missing on some TV.
4
Any connection means a loss of signal quality, including at seemingly convenient sockets.
Particularly ensure that there are no connections in places of high humidity - attics. In bad weather, the signal will disappear altogether because of this.
5
Do not buy a Chinese cable of dubious manufacture. Almost half of the level of the signal that reaches the receiver from the dish can depend on the quality of the cable.
6
Never wrap dysec in a plastic bag. Even if this saves you from direct raindrops, condensation will still form inside over time.
And it is this that will cause the failure of the switch, which necessarily requires ventilation and communication with air. The simplest and cheapest option is an empty plastic bottle, which doesn’t really help either.
Therefore, it is best to place a moisture-proof box next to the plate and install the switch in it.
7
Also, do not wrap electrical tape around the F connectors. Such insulation does not help against rust, and only worsens the situation, since sooner or later moisture will still penetrate under the insulating tape.
And instead of gradually evaporating or rolling off the surface of the connector, it lingers on it and accelerates the corrosion process several times. Also, do not forget to put the insulating cap on the free Diseqc port.
Sources - https://cable.ru, Kabel.RF
Creating a channel list
The instructions for each receiver contain a clause about creating a list of favorite channels, where everything is described step by step.
In order to go to the menu item on how to configure channels on the Eurosky satellite tuner, you should find “Channel Editor” in the general menu, and then “TV channels” and alternately mark the necessary and most interesting ones.
In most receivers, including the Orton tuner, you can configure satellite channels either using the joystick buttons on the remote control or using colored additional keys. This makes setup much easier.
All questions about how to set up channels on a satellite tuner have been exhausted, so you should carefully read these instructions point by point again, and you can start installing the satellite dish.
Purpose of the tuner and its location
For users, and there are many of them, who are completely ignorant of radio-television electronics, the word “tuner” is perceived as difficult to fully understand.
However, there is nothing complicated about this word, since in fact it hides the usual meaning of a signal receiver.
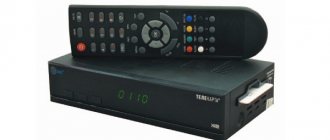
One of the many design variations of the receiver (tuner) of a television signal from a satellite, which traditionally represents the basis of the satellite system along with the “dish” - the satellite antenna
In this case, we are talking about a television signal receiver broadcast via satellite.
The signal received by the tuner is converted for consistent processing by the TV. As a result, the user visually perceives the television picture generated by the signal on the TV screen.
Before you start installing the tuner, we recommend reading our other articles, where we described in detail how to correctly install a satellite dish with your own hands and tune the “dish” to the satellite.
Correct installation of the tuner
After purchasing a television receiver, the user will need to configure it. That is, perform a series of sequential steps according to the instructions before the received signal is converted correctly and displayed on the TV screen.
Next, this process will be discussed in detail using the example of the tuner of the Tricolor TV system.
Even before you start setting up, the tuner should be installed on a flat, hard surface, preferably next to the TV, but no closer than 10-15 cm from the screen panel or back wall.
This is approximately how you should place the device next to the television receiver. Correct installation of the tuner - when a flat, hard surface is used and the technical distances between it and the TV are maintained
The receiver module must be installed with unobstructed air access to ventilation areas, usually the bottom and top covers or side covers. Violation of the ventilation mode can lead to overheating and malfunction of the device.
Typically the package includes:
- tuner module;
- control panel (RC);
- power adapter module;
- connecting cable type 3RCA.
The locally installed tuner must be connected to the TV using appropriate cables. This operation must be carried out with the network cable disconnected.
Interfaces and controls
The body of the standard tuner is rectangular, has a front and rear panel where operation control elements and system interfaces are located. The first ones, as a rule, occupy the front panel area. The second ones are located in the rear panel area.
The main control elements are the power on/off button, mode and channel change buttons, information display and user card slot.
The interface component of a modern tuner provides the end user with a variety of options for connecting an image output source and sound broadcast
Interfaces are usually located on the rear panel. The number of interfaces of a modern tuner is quite large and can reach more than 10:
- Under the RF cable (RF OUT) connection to TV.
- For over-the-air antenna cable (RF IN).
- Connection with another tuner (LNB OUT).
- Satellite antenna cable connection (LNB IN).
- Composite video (VIDEO).
- For connection to a computer (USB).
- TV connection (SCART).
- TV connection (HDMI).
- Connecting sound via “tulip” (AUDIO).
There, on the rear panel, there is traditionally a socket for the power adapter plug, sometimes mode switches and fuses.
Connection cable option (SCART/3RSA) that can be used when connecting the output of a satellite TV tuner to the input interface of a standard TV signal receiver
Connecting the tuner with a cable to a television receiver is usually done using a “SCART” cable (full wiring) through the appropriate connector.
However, other options are not excluded, including the RF OUT signal through the standard antenna input of the TV. But in these options, the quality of the image and sound is reduced.
Working with the menu
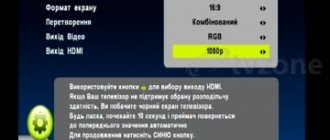
An approximate view of the menu is reduced to a list of items: “Settings”, “Antenna”, “Channel search”. You need to independently find in the configuration such options as LNB, DISEqC, “0/12V”, “Flash tone”, “Positioner”. Be sure to check the following points:
- Is there a signal exchange with the correct satellite?
- Find out if the satellite head settings are set correctly:
- for C-Band (LNB, frequency 5150).
- for a circular head - circular LNB 10750.
- for linear... - universal 9750/10600.
As a rule, such information is in the notes in the instructions for the satellite head. After that, find in the menu and set DISEqC for the desired satellite. You'd better remember or write down which outputs correspond to which antenna.
And also pay attention to other settings:
- Disek port - has several inputs that are switched to connect satellite heads to them.
- Power LNB is the technical name for the satellite head. It is used to control the power of the satellite head or devices of the Disek standard.
- 0/12V - used to switch the power of two devices (mono pendant, Disek).
How to add a channel
Perform a transmitter scan on the desired satellite in the receiver.
To determine transponder settings, identify and view the satellite broadcast channel. Review the settings in the list of transponders.
To make settings:
- Go to the list of settings for the CIS/Russia.
- Select satellites Yamal, Amos, Sirius, Hotbird, ABS1.
- If the list does not contain the channels you need, enter in an Internet search:
Lingsat 5e or 4w, 75e, 53e, 40e
The information you need will be present in the list of satellite parameters.
Transponder scanning
The data that comes from transponders is needed to receive data from TV channels. It is necessary to scan the signal from the transponders so that the list of required channels becomes up-to-date. You can find the transponder options in the same place as the transponder selection menu.
The search strings on the properties of TV channels and radio indicate the search method:
Here you select channels by broadcast type, for example:
- TV Only - television only;
- or TV and Radio - for TV and Radio.
- Search method.
Channel options by encryption type - for example, All - search for all channels, including decoded or closed. Or Free to Air - only non-encrypted channels.
- Type of search:
- Find the transponder.
- Network search - a network of transponders for an individual satellite.
- Search for satellite channels. A string whose conditions depend on the selected suspension type. Here you can choose an antenna with a motorized suspension or a satellite dish. If a catcher with a motorized suspension based on the USALS principle is selected, the receiver will be able to move the antenna if a position is assigned to them.
Satellite set-top box
A receiver is a device for recognizing and decoding television signals received by a dish antenna. The main requirement for these devices is to ensure stable and high-quality broadcast of television programs. In addition, the receiver’s support for a number of advanced multimedia functions is important for modern users.
Basic criteria for choosing a tuner
The most important thing is the signal interface. Most modern satellite receivers are digital. It is believed that support for the “S2” standard is a mandatory requirement today. Very important from the point of view of ensuring picture quality in satellite tuners is the microcircuit for fixing the satellite coordinates, as well as the module for automatically selecting the antenna position.
Selection criteria: appearance, support for connectors, and ease of operation. It is advisable that the device have its own display, which would display all the data on the tasks being performed. For many users, a significant factor when choosing a tuner is the presence of buttons for controlling channels, adjusting the volume, and accessing the menu. Moreover, it is desirable that these buttons be located on the front panel of the device. They may be needed if the remote control is lost or malfunctions. Most modern models have front-facing slots for access cards to paid channels, various interfaces for decoding, as well as USB ports used for flash drives and external devices on which video content can be recorded. The rear panels of modern devices contain interfaces such as:
- RS-232, used to connect the device to a computer;
- S/PDIF – for connecting the tuner to various audio devices, as well as to home theaters;
- HDMI – for transmitting images in high definition format.
Popular receivers
The most popular devices in Russia today are produced by “World Vision”, “Gl”, “General Satellite”.
How to set up a satellite dish tuner yourself
Satellite television has long been nothing new to anyone - nowadays this luxury is available in most homes. But the installation of this structure continues to be considered a rather complex process that cannot be completed without the help of specialists. To some extent this is indeed true - it is not so easy to install a satellite dish yourself. In addition, if a person does not have certain skills, this process can be dangerous for him. But setting up a satellite tuner without outside help is not at all difficult.
Satellite set-top box
A receiver is a device for recognizing and decoding television signals received by a dish antenna. The main requirement for these devices is to ensure stable and high-quality broadcast of television programs. In addition, the receiver’s support for a number of advanced multimedia functions is important for modern users.
Basic criteria for choosing a tuner
The most important thing is the signal interface. Most modern satellite receivers are digital. It is believed that support for the “S2” standard is a mandatory requirement today. Very important from the point of view of ensuring picture quality in satellite tuners is the microcircuit for fixing the satellite coordinates, as well as the module for automatically selecting the antenna position.
Selection criteria: appearance, support for connectors, and ease of operation. It is advisable that the device have its own display, which would display all the data on the tasks being performed. For many users, a significant factor when choosing a tuner is the presence of buttons for controlling channels, adjusting the volume, and accessing the menu. Moreover, it is desirable that these buttons be located on the front panel of the device. They may be needed if the remote control is lost or malfunctions. Most modern models have front-facing slots for access cards to paid channels, various interfaces for decoding, as well as USB ports used for flash drives and external devices on which video content can be recorded. The rear panels of modern devices contain interfaces such as:
- RS-232, used to connect the device to a computer;
- S/PDIF – for connecting the tuner to various audio devices, as well as to home theaters;
- HDMI – for transmitting images in high definition format.
Popular receivers
The most popular devices in Russia today are produced by “World Vision”, “Gl”, “General Satellite”.