TV set-top boxes, with which you can watch digital TV channels, have long become commonplace, which will not surprise anyone. However, like any other technical device with its own firmware, such a receiver requires periodic updating, for example, after the release of new software, due to malfunctions or other reasons. Tricolor TV GS 8304 is no exception.
Despite the fact that most of the population prefers to call a specialist to update the receiver’s firmware, in fact this is not such a difficult task that you can’t handle it yourself. On the other hand, if you treat it too carelessly and inattentively, equipment repair will cost more.
Thanks to updates to receivers and their modules, the device is modernized, improved and becomes more comfortable to use. However, before updating the software, you definitely need to find out what the version of the current firmware is (in the settings via the remote control) and what is the latest version released for your model, in this case GS 8304. It is not recommended to use third-party information resources for this, all necessary and up-to-date Information is available on the official website of Tricolor TV.
Design features
The body of the satellite receiver is silver in color and has a regular rectangular shape. There is a ventilation grill on top. On the left, on the front panel, there are four control buttons:
- Standby is responsible for turning on the device and transferring it from standby mode to working mode and vice versa.
- TV/Radio switches reception modes.
- Channel “↑” and “↓” – two buttons for switching channels.
The display shows the channel number, a special symbol indicating signal reception, TV/radio mode, Standby, mail icon, and the current time.
On the front panel, behind the hinged cover, on the right, there is a slot for installing a DRE Crypt conditional access card.
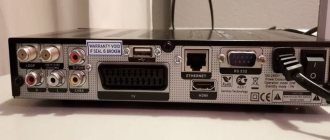
The rear panel of the receiver is equipped with connectors:
- LNB IN for connecting the converter cable;
- USB for software update;
- CVBS for connecting to the video input of a TV;
- R-, L-audio signal outputs for the right and left channels;
- input for connecting an external network adapter.
Contents of delivery
- Satellite receiver.
- Remote control with two AAA batteries.
- RCA cable.
- External power supply.
- User manual.
The device is activated only if you have an access card.
The connection must be made only when the power of the satellite receiver and connected devices is turned off.
To connect the antenna, you need to connect the converter cable to the LNB IN input of the GS 8304 satellite tuner. In this case, use the F connector.
To connect to a television receiver via SCART, you need to insert one end of the cable into the TV socket of the satellite receiver, and the other into the SCART socket of the TV.
To connect to a TV receiver that has a composite input, you need to connect 3 RCA connectors (white, yellow and red) to the video and audio outputs of the corresponding color (CVBS and L/R) located on the rear panel of the device. The connectors on the opposite end of the cable must be connected to the video and audio inputs of the TV that match the color.
Selecting menu and audio languages
If the menu language needs to be changed, you should select it from the drop-down list using the navigation buttons on the remote control and confirm your decision with the “OK” button.
The choice made in the line “Main language of the audio channel” will become the audio language when silent. If any channel does not support it, the device will automatically select the audio track corresponding to the installed second language.
The correctness of the automatic selection of the support language depends on the correctness of the data transmitted by the operator. If the channel name is missing or incorrect, the automatic tuning will differ from the specified preferences.
Search channels
In the GS 8304, the firmware already contains the necessary settings for searching for Tricolor TV channels. Additionally, you can set the type of converter – single or universal.
If the LNB is single, then the operating frequency of the local oscillator is set to 5150, 9750, 10 600, 10 750 MHz. If the required frequency is not available, you can enter it manually using the remote control buttons. For the universal LNB type, switching between frequencies 9.75 and 10.6 GHz occurs automatically.
Standard converter power is supplied to the LNB IN connector. Increased power supply, i.e. 1 V higher than standard, is used in case of non-standard installation, for example, with a long cable length.
After selecting a satellite, you must enter one of the channels it broadcasts.
To start your search, click Next. Found channels are displayed in the TV and radio columns. Once the search is complete, a message will appear indicating the number of channels found. To finish, press the yellow F3 button. A recording will occur in the receiver's memory.
The search can be interrupted with the red F1 button. In this case, only the found channels will be saved.
Channels are switched using the digital or navigation keys on the remote control or CHANNEL “+” and “-” on the front panel of the satellite tuner.
The volume level is adjusted using the “→” and “←” buttons. They work in all modes. To temporarily mute the sound, press the “Sound” button.
To access some functions of the receiver, you need to know the PIN code, which by default is 0000.
The list of channels when watching TV can be called up by clicking on “OK”. Navigation through the list is carried out using the “↑” and “↓” buttons. The selection is confirmed by pressing “OK”.
To exit the list, press “Exit” on the remote control.
TV channel and program data is displayed in the information banner when you switch them or after pressing the red F1 button.
Updating the receiver using a flash drive
In such a situation, the help of third-party resources will be required. The latest firmware for the receiver can be found on a wide variety of websites dedicated to Tricolor .
It is worth noting that when downloading a software package that is not explicitly offered by the official website, the user acts at his own peril and risk. In order not to take risks, it is worth studying the forums, reviews of other subscribers about the results of using this or that firmware on a third-party resource. If everything suggests that it functions correctly and complies with the official one, you can start working.
To update the receiver from a flash drive, you need to proceed as follows.
- Prepare the media. The flash drive needs to be formatted in FAT32. For the process to proceed without setting additional parameters on the part of the user, the storage capacity must be a maximum of 4 GB.
- A file with the IMG extension is written to the flash drive, which is downloaded from the Internet in an archive or uncompressed form.
- The receiver is completely disconnected from the network by removing the plug from the socket.
- The flash drive with the firmware image file is inserted into the service USB port.
- The device turns on.
- The system will automatically detect the presence of media with the image and begin the update.
The process ends in the same way as when downloading software from a satellite. The system will prompt you to reboot. You need to remove the flash drive from the port and press the OK button on the remote control.
After the update, it is recommended to reset the receiver to factory settings and perform the initial setup of the device. For this:
- press the Menu button on the remote control;
- included in the Settings section;
- press the F1 button (usually red) or Info on the remote control;
- Select the Yes button on the screen prompt and press OK.
After a short time, during which all user parameters will be erased, the receiver will turn on and ask you to perform the initial setup. The device will need to specify the time zone and region, menu and audio language, and output configuration. There is no need to select the Primary channel set. After completing the search, you should save the resulting list of broadcasts.
GS 8304: how to update software via satellite
The operator can change the receiver firmware via a satellite signal. When you change channels, a message will appear indicating that new software is available and asking you to confirm the update. If the user agrees, data transfer and tuner firmware will begin, displayed on the TV screen as a percentage of completion.
During the update, it is important to ensure uninterrupted power supply to the satellite receiver, otherwise the receiver may be seriously damaged and require assistance from a service center.
User settings, including antenna configuration and channel list, may not be saved after a software update.
How to update the Tricolor channel list on the gs 8304 receiver
To find new channels, do the following:
Why do you need to update the channel list?
Updating the channel list may be required in several cases:
1. To find new Tricolor TV channels that are not on your receiver 2. After carrying out maintenance work on the satellite 3. During the initial setup of the equipment 4. When changing broadcast parameters (changing frequencies) of some channels 5. Preventatively twice a year
If you have a Tricolor TV General Satellite GS 8304 receiver and it stops turning on, then its firmware has crashed and you should reflash it.
You can do this yourself.
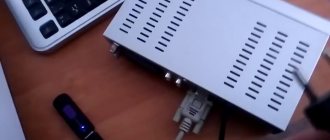
To flash the Tricolor TV receiver firmware, we need a flash drive and Internet access. First we take a flash drive and format it to FAT32. After that, download the latest firmware for your receiver. Follow the link below for the latest firmware for July 2013.
We write this firmware to our flash drive. And we begin the process of flashing our satellite receiver Tricolor TV GS 8304.
To do this, we need to unplug the receiver from the outlet, install the flash drive into the connector located on the back of the receiver and plug it into the outlet. After this, we need to wait until the process of writing new software (software) to the receiver takes place.
Update for gs-8300m, gs-8300n, drs-8300 receivers
The firmware process takes place in three stages:
1. First stage.
2. Second stage
3. And the final third stage.
This process takes approximately 1-2 minutes.
The video recorded the entire software update process.
When flashing new software, the following stages go through: Update loader Clearing memory sectors Writing an image to memory Firmware is completed Click OK to reboot
When the message appears, click OK to reboot, first you need to remove the flash drive, and only then press the OK button on the satellite receiver's control panel. After clicking OK, you need to wait 1-2 minutes and if nothing happens, it means the receiver was unable to reboot on its own. You need to reboot it manually; to do this, you need to unplug the satellite receiver from the outlet and turn it on after about 20 seconds.
Firmware for GS 8304 1.0.2
1. Format the USB Flash on your computer using FAT-322 format. Write the software file “………………..img” to the root directory of the USB-Flash
3. Connect the receiver to the TV4. Turn on the TV and switch its video input “TV/AV” to AV5. Turn on the power of the receiver6. Insert a Flash drive into the USB port of the receiver5. After some time, the receiver will enter software update mode6. When the message “The update process is complete” is displayed, remove the USB Flash.7. Press "OK" on the remote control to reboot8. The receiver will reboot.9. Press the “No.ID” button on the Remote Control, make sure that the GenSat Software version …………….. is successfully installed.
“dL” will appear on the receiver display, indicating that the software update process has begun. During the entire process, the message “Update Downloader” appears in the upper left corner of the TV screen, then the message “Cleaning memory sectors” appears in the middle of the screen for a few seconds, then “Write image to memory” while the software is loading. After installing the software update, the inscription in the upper left corner changes to “Update downloader - completed”, and in the middle of the screen “Update download completed successfully”
10
The receiver's power can be turned off. Attention!!! Connect and disconnect the receiver and TV only with the power off
This software version is not official.
The unofficial software version 1.0.2dre does not have a channel editor, but there is a manual search and diseq support
Unzip this firmware on the computer, transfer the file to a flash drive, preferably a clean one, insert it into the USB input of the receiver and wait until the firmware is fully loaded, then click OK to complete and immediately remove the flash drive. In the Menu, scan “Search Tricolor”, then go to manual search and We scan separately the frequencies 12054 Right 27500, 12015 Right 27500, 12174 Left 04340, after which we make sure that there are 150 channels.
Replacing the program via USB connector
It is important that the firmware of the GS 8304 receiver is not interrupted by turning off the power supply to the tuner or removing the flash drive.
The procedure is as follows:
- Write the firmware update img file to the root directory of the USB flash drive.
- Turn on the device and make sure that any channel is working.
- Insert the flash drive into the USB connector of the tuner.
- A message will appear indicating that the download process has begun.
- After its completion, the receiver will notify you that the software download has completed.
- Remove the flash drive from the USB connector.
- Press the “OK” button on the remote control. The update is complete.
Step-by-step guide to action
Having seen such an image on the screen, you need to perform certain actions, as a result of which the updates will be installed. It is recommended to strictly follow the instructions below:
- Unplug the receiver from the outlet. Wait a while and turn it on again. Then tune into the information channel, where information about the available update will be displayed.
- By choosing a positive answer about changing the update. Confirm your consent to start the automatic process, during which the necessary data will be downloaded.
- Next, the receiver firmware will occur. This stage is the most important in updating the receiver. Therefore, it is necessary to ensure all conditions to prevent a power outage. Otherwise, premature shutdown of loading will lead to device failure, which can only be repaired by a specialist.
- After 15 minutes, the update will be completed completely. A message will appear on the screen indicating that the installation is complete. The next step is to reboot the receiver. This process is automatic and does not require intervention. If for some reason this does not happen, you must reboot the receiver yourself.
- The receiver update process is complete.
After the updated software is installed, the receiver settings are reset to factory settings. Therefore, it is necessary to re-configure the language, operator and other settings. The Installation Wizard will help you with this.
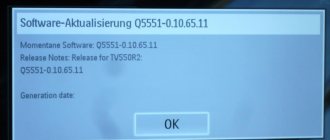
In order to make sure that the actions taken are correct, you must again enter the “Status” menu and view information about the receiver software. If everything is done correctly, the previously announced version will be displayed.
Copying the receiver's database and firmware to a PC
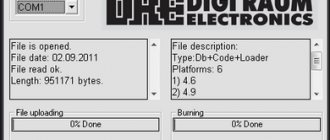
In the GS 8304 digital satellite tuner, software is updated and the database is copied to a PC using the GS Burner program, developed for Windows 2000 and Windows XP. The procedure is as follows:
- Turn off the power.
- Connect the RS-232 cable to the receiver and computer.
- Install and launch the GS Burner application on your PC, select the Download menu item and specify the file name.
- Turn on the GS 8304 and go to the “Data Transfer” menu item.
- To transmit only the channel base, press the “0” button, and then the blue UHF button on the remote control.
- Database and software transfer occurs after pressing the blue UHF button. The display will show the data transfer process, which will end with a message about the number of kilobytes transferred in the left window.
Current (latest) software version dated 02/05/2019
Receiver software
1.6.1
Module software
07.00.00
ATTENTION!
►
Never turn off the power to the receiver until the update procedure is complete! Otherwise, the receiver may fail!
►
It will be impossible to return the previous version of the software!
- Characteristics of the receiver GS 8304 operator Tricolor TV
The content of the article
Software update via USB drive Software update via satellite Updating the channel list