How to flash a Samsung TV
Hi all!
You’ve probably also heard the phrase “flashing a TV” many times, but not everyone understands what it is and how to do it. Many of my subscribers, and not only subscribers, also often ask me these questions. So, taking all of the above into account, I decided to answer these questions in an accessible language.
First, let's talk about why you need to flash your TV at all.
Well, firstly, technology does not stand still and new features and functionality are appearing on televisions, and in order not to buy a new, more “advanced” device every year, you can simply update the TV software.
Secondly, if you correctly update the TV's firmware, you can remove some errors that occur during operation of the TV.
And thirdly, it happens that the firmware simply “flies” and the device stops working altogether.
In general, in this article we will go through the procedure for flashing the firmware (or software update) of the TV step by step. We will analyze this using the example of a Samsung TV.
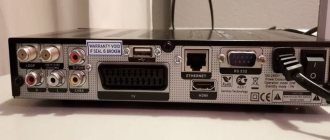
So, the first thing you need to do is find out the exact model of your TV. You can find out the TV model by looking at the back wall of the device, where there is a special plate that indicates the make and model of this device, country of manufacture, barcode and some other information.
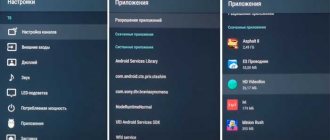
After this, you need to go to the official Samsung website and enter the model number of your TV in the search bar and click on “search”. Then, in the search results, in the left column “Support”, select “firmware”. Next, you need to click on your TV model. Once you have navigated to your model's page, you will see a table with all the updates available for download. You need to download the latest version. You can find out the firmware version installed on your TV by going to the TV menu: Menu-Support-Software Update. A window will appear showing the exact version of the installed firmware.
Before downloading, make sure that the firmware description indicates that the file is intended for updating via USB and that your language (or multilingual) is present in it. If you have taken everything into account, then you can start downloading.
Now we need a clean flash drive. The flash drive needs to be inserted into the computer and formatted in FAT32 format, since some TV models do not accept flash drives formatted in NTFS format.
After this, you need to copy the downloaded TV firmware to this flash drive.
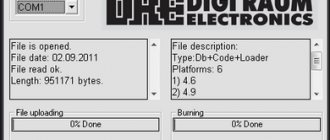
Then we launch the firmware file recorded on the flash drive and click “Extract,” thereby starting the unpacking process. After the file unpacking process is completely completed, you need to remove the flash drive from the computer.
Then insert the flash drive with the recorded update files into the USB port of the TV. Next, you need to go to the menu to start the update process: Menu – Support – Software update – via USB and click “OK” or “Yes”.
Well, if you did everything correctly, then new firmware will be installed on your TV.
That's it, if you have anything to add, write comments.
Register on the site and be the first to receive notifications about new publications.
Share the article on social networks using the buttons at the bottom of the page!
Good luck to everyone and bye!
Modern televisions are already very close to personal computers in their functionality.
They allow you not only to watch video content, but also to play games, surf the Internet and much more. All the main functionality of the TV is in its firmware. The multimedia capabilities of the device directly depend on the current software. Manufacturers periodically release updates, adding current tools, services, etc. Some users have serious problems with the software update procedure. So, let's find out how to update the TV software on our own.
Why do you need flashing?
TV equipment manufacturers strongly advise against ignoring official updates. And there are a number of good reasons for this. Timely flashing of the TV increases the stability of its operation and eliminates all or at least most of the vulnerabilities that are typical for Smart technology.
In a good half of cases, all models that have just appeared on the market have crude software that works with glitches and errors. Most often, owners of new LG and Dexp TVs encounter such problems. The basic factory firmware has not changed for years, and the models begin to freeze, “think” for a long time, or even periodically turn off. The only panacea in this case is to update the software on the TV.
The second point is the speed of work. Manufacturers try to optimize the software as efficiently as possible, which reduces the time it takes to complete both basic and more advanced tasks. After updating the TV, channels will begin to switch faster, and applications will become noticeably more responsive.
And the last thing is the expansion of functionality. Software developers are constantly adding and improving their services. TV manufacturers, in turn, make sure that their equipment has an up-to-date platform for working with both third-party and their own services.
Advice! You can find out exactly what changes the flashing will bring on the brand’s official website. The “Technical Support” section describes in detail all the nuances of the software: new functions, solved problems, elimination of specific vulnerabilities, etc.
Modern firmware for TV Mystery
Firmware for TV site Monitor
- Firmware for TV MYSTERY MTV-1605W
- Firmware for TV MYSTERY MTV-1611LW
- Firmware for TV MYSTERY MTV-1614LW
- Firmware for TV MYSTERY MTV-1623LW
- Firmware for TV MYSTERY MTV-1628LW
- Firmware for TV MYSTERY MTV-1629LW
- Firmware for TV MYSTERY MTV-1907W
- Firmware for TV MYSTERY MTV-1911LW
- Firmware for TV MYSTERY MTV-1911WL
- Firmware for TV MYSTERY MTV-1913LW
- Firmware for TV MYSTERY MTV-1914LW
- Firmware for TV MYSTERY MTV-1918LW
- Firmware for TV MYSTERY MTV-1921LD
- Firmware for TV MYSTERY MTV-1922LW
- Firmware for TV MYSTERY MTV-1923LW
- Firmware for TV MYSTERY MTV-1924LT2
- Firmware for TV MYSTERY MTV-1924LW
- Firmware for TV MYSTERY MTV-1929LT2
- Firmware for TV MYSTERY MTV-2204W
- Firmware for TV MYSTERY MTV-2210LW
- Firmware for TV MYSTERY MTV-2211LW
- Firmware for TV MYSTERY MTV-2211W
- Firmware for TV MYSTERY MTV-2213LW
- Firmware for TV MYSTERY MTV-2214LW
- Firmware for TV MYSTERY MTV-2216WD
- Firmware for TV MYSTERY MTV-2218LW
- Firmware for TV MYSTERY MTV-2220LW
- Firmware for TV MYSTERY MTV-2221LD
- Firmware for TV MYSTERY MTV-2222LW
- Firmware for TV MYSTERY MTV-2223LT2
- Firmware for TV MYSTERY MTV-2224LT2
- Firmware for TV MYSTERY MTV-2228LT2
- Firmware for TV MYSTERY MTV-2229LT2
- Firmware for TV MYSTERY MTV-2229LT2 2
- Firmware for TV MYSTERY MTV-2231LT2
- Firmware for TV MYSTERY MTV-2410LW
- Firmware for TV MYSTERY MTV-2411LW
- Firmware for TV MYSTERY MTV-2414LW
- Firmware for TV MYSTERY MTV-2415LW
- Firmware for TV MYSTERY MTV-2418LW
- Firmware for TV MYSTERY MTV-2421LD
- Firmware for TV MYSTERY MTV-2422LW
- Firmware for TV MYSTERY MTV-2423LT2
- Firmware for TV MYSTERY MTV-2423LW
- Firmware for TV MYSTERY MTV-2424LW
- Firmware for TV MYSTERY MTV-2425LW
- Firmware for TV MYSTERY MTV-2428LT2
- Firmware for TV MYSTERY MTV-2429LT2
- Firmware for TV MYSTERY MTV-2429LTA2
- Firmware for TV MYSTERY MTV-2430LTA2 Android
- Firmware for TV MYSTERY MTV-2431LT2
- Firmware for TV MYSTERY MTV-2607W
- Firmware for TV MYSTERY MTV-2611LW
- Firmware for TV MYSTERY MTV-2614LW
- Firmware for TV MYSTERY MTV-2615LW
- Firmware for TV MYSTERY MTV-2618LW
- Firmware for TV MYSTERY MTV-2620LW
- Firmware for TV MYSTERY MTV-2824LT2
- Firmware for TV MYSTERY MTV-3012W
- Firmware for TV MYSTERY MTV-3018LW
- Firmware for TV MYSTERY MTV-3022LW
- Firmware for TV MYSTERY MTV-3023LT2
- Firmware for TV MYSTERY MTV-3027LT2
- Firmware for TV MYSTERY MTV-3028LT2
- Firmware for TV MYSTERY MTV-3029LT2
- Firmware for TV MYSTERY MTV-3031LT2
- Firmware for TV MYSTERY MTV-3206W
- Firmware for TV MYSTERY MTV-3209W
- Firmware for TV MYSTERY MTV-3210W
- Firmware for TV MYSTERY MTV-3211LW
- Firmware for TV MYSTERY MTV-3213LW
- Firmware for TV MYSTERY MTV-3214LW
- Firmware for TV MYSTERY MTV-3215LW
- Firmware for TV MYSTERY MTV-3217LW
- Firmware for TV MYSTERY MTV-3218LW
- Firmware for TV MYSTERY MTV-3219LW
- Firmware for TV MYSTERY MTV-3220LW
- Firmware for TV MYSTERY MTV-3221LW
- Firmware for TV MYSTERY MTV-3222LW
- Firmware for TV MYSTERY MTV-3223LT2
- Firmware for TV MYSTERY MTV-3223LW
- Firmware for TV MYSTERY MTV-3224LT2
- Firmware for TV MYSTERY MTV-3224LW
- Firmware for TV MYSTERY MTV-3225LT2
- Firmware for TV MYSTERY MTV-3226LT2
- Firmware for TV MYSTERY MTV-3227LT2
- Firmware for TV MYSTERY MTV-3228LT2
- Firmware for TV MYSTERY MTV-3228LTA2
- Firmware for TV MYSTERY MTV-3229LT2
- Firmware for TV MYSTERY MTV-3229LTA2
- Firmware for TV MYSTERY MTV-3230LT2 (V5R03)
- Firmware for TV MYSTERY MTV-3230LV
- Firmware for TV MYSTERY MTV-3230LW
- Firmware for TV MYSTERY MTV-3231LW
- Firmware for TV MYSTERY MTV-3233LT2
- Firmware for TV MYSTERY MTV-4018LT2
- Firmware for TV MYSTERY MTV-4018LW
- Firmware for TV MYSTERY MTV-4019LW
- Firmware for TV MYSTERY MTV-4022LT2
- Firmware for TV MYSTERY MTV-4022LW
- Firmware for TV MYSTERY MTV-4023LW
- Firmware for TV MYSTERY MTV-4025LT2
- Firmware for TV MYSTERY MTV-4026LT2
- Firmware for TV MYSTERY MTV-4028LT2
- Firmware for TV MYSTERY MTV-4028LTA2
- Firmware for TV MYSTERY MTV-4029LTA2
- Firmware for TV MYSTERY MTV-4030LT2
- Firmware for TV MYSTERY MTV-4031LT2
- Firmware for TV MYSTERY MTV-4128LTA2
- Firmware for TV MYSTERY MTV-4129LT2
- Firmware for TV MYSTERY MTV-4214LW
- Firmware for TV MYSTERY MTV-4217LW
- Firmware for TV MYSTERY MTV-4225LT2
- Firmware for TV MYSTERY MTV-4330LT2
- Firmware for TV MYSTERY MTV-4618LW
- Firmware for TV MYSTERY MTV-4829LTA2
- Firmware for TV MYSTERY MTV-5031LTA2 (NAND)
- Firmware for TV MYSTERY MTV-5531LTA2 (NAND)
- Firmware for TV MYSTERY MTV2429 LT2 V2N05
- Firmware for TV MYSTERY MTV3209W
- MYSTERY TV firmware page 2
- MYSTERY TV firmware page 3
- MYSTERY TV firmware page 4
- MYSTERY TV firmware page 5
- MYSTERY TV firmware page 6
Site monitor firmware
- AIWA TV firmware
- AKAI TV firmware
- AKIRA TV firmware
- BBK TV firmware
- DAEWOO TV firmware
- DEXP TV firmware
- TV firmware DNS
- Firmware for DIGITAL TVs
- Firmware for ELENBERG TVs
- ERISSON TV firmware
- Firmware for FUSION TVs
- GOLDSTAR TV firmware
- HAIER TV firmware
- HARPER TV firmware
- HITACHI TV firmware
- Firmware for HYUNDAI TVs
- IZUMI TV firmware
- JVC TV firmware
- LG TV firmware
- MANTA TV firmware
- MYSTERY TV firmware
- PHILIPS TV firmware
- Firmware for ROLSEN TVs
- RUBIN TV firmware
- SAMSUNG TV firmware
- SHARP TV firmware
- SUPRA TV firmware
- Firmware for TCL TVs
- Firmware for TELEFUNKEN TVs
- THOMSON TV firmware
- Firmware for TOSHIBA TVs
Firmware methods
The easiest option is to invite a specialist from a local service center to reflash it, but this service costs money, sometimes quite a lot. In a good half of cases, this procedure can be performed independently.
Firmware methods:
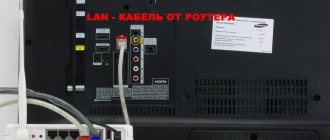
- via the Network (“over the air”), via Wi-Fi or LAN protocols;
- TV software update via USB.
The first method is the simplest and least labor-intensive. To implement it, just press a couple of buttons, and the device will update the software automatically. Flashing a TV from a flash drive is noticeably more difficult, but if the TV is not connected to the Internet, this is the only option. Let's consider both methods in more detail.
Firmware via menu
Updating the software through the menu, that is, via the Internet, will take 10-15 minutes at most . The procedure is approximately the same on all models. But on some, the names of menu items may change. For example, BBK refers to updates as firmware, while other brands stick to the strict, common name.
- How to update your LG Smart TV: step-by-step instructions
The sequence of actions is as follows.
- Press the Smart-TV button on the remote control and go to the “Support” section.
- In the menu, select “Software Update”.
- The system should start searching for all available firmware.
- Then the current version of the software and download methods will appear.
- Click on “Update via Internet”.
- A user agreement will appear that you must agree to.
- We wait for the update to complete and reboot the device.
Important! Some TV models allow you to use basic TV capabilities at the time of flashing. For example, Sony devices always update in the background without compromising the main functionality.
Sometimes when flashing the TV's firmware, it may freeze or reboot. This is standard procedure and there is no need to worry. If it does not turn on after the update, it means that the device needs time to install large files.
Firmware from USB drive
If the TV does not have a network connection, then updating from a flash drive is the only option . To do this, you will need a standard USB drive with a capacity of at least 1 GB and a PC with Internet access. Some updates, especially for premium Sony and Toshiba models, take up more space, so it's best to have a spare disk.
Important! The flash drive must be fully formatted, and with an eye to the TV file system (NTFS or FAT32). You can find out the features of the latter in the operating instructions for the TV.
It would also be useful to find out the current firmware version of the TV. It is listed in the “Software” section in the “Setup” or “Installation” menu items.
The procedure is given below.
- We go from the PC to the official website of the TV manufacturer and enter the TV model in the search bar.
- In the results, look for a line containing the phrases “Software”, “Updates” or “Firmware”.
- Click on the desired item and study the software. The version must be younger than the one already available on TV.
- Download the firmware files and copy them to a USB drive.
- We connect the flash drive to the TV.
- In the TV menu, find the “Software Update” item and go to the “Update via USB” section.
- We agree to the user agreement and wait for the firmware to finish.
- Reboot the device.
Some manufacturers, for example, such as Supra, archive their updates when downloading from the official website, so you may need additional software for unpacking (WinRAR, 7-ZIP, IZArc, etc.).
Useful tips
Download updates only from the official websites of equipment manufacturers . Amateur firmware is often unstable and can be infected with malicious code. While updating the software via the network, do not turn off the TV or remove the plug from the socket. A failure in the firmware procedure may result in a trip to the service center.
- Philips TV firmware - all the nuances
Important! If the light turns off while installing an update from a USB drive, you cannot remove the flash drive from the slot. After power is applied, the download will either begin again or continue from where it was interrupted.
If any errors occur, you should reflash the TV again.
Published:09/20/2019
Modern television devices are not just “boxes” with which a person switches channels. This is a smart technique that can be customized to suit specific needs.
For these purposes, manufacturers constantly release software add-ons that are installed after purchase. This requires firmware. How to flash a TV correctly is further in the article.
Why do we need updates?
There are several main reasons why users decide to flash the system:
- Increasing the stability of the new TV device. Some TVs have so-called raw firmware, if the sample is completely new and was turned on for the first time. LG and WebOS users face this problem. All errors can be corrected using the downloaded program for the system. Having done the firmware correctly, a person will get rid of many problems.
- Increased work speed. System firmware is often used to increase the speed of the TV. Sometimes the device responds slowly to the remote control. This applies to Smart applications, changing channels, and simply turning the device on and off.
- TV firmware is an ideal way to expand functionality. Manufacturers release updates that increase the capabilities of an existing device. This is how additional programs and useful applications appear in the menu.
- Solving problems with Smart TV. If you have any problems with the Smart TV function, then perhaps the preferred solution to the problem is a full software firmware. If you study user reviews on the Internet, you can understand that the firmware helped solve many problems on the TV.
To understand the purposes for which a specific update is intended, you can go to the official website of the TV manufacturer and in the appropriate section find a full description of the new firmware version. There it will be written in detail about the advantages of the program, new functions, as well as problems that can be solved.
Why flash TV BOX?
The Android TV set-top box, like other devices, gets flashed over time. Let's name the most common situations when this is necessary:
- the device malfunctions (although the hardware is fine), and the usual settings do not solve the problem;
- operating system update. The new version solves many problems and fixes bugs, therefore improves the performance of the device;
- desire to improve the performance of the gadget. Any device without an OS is nothing more than a piece of hardware; all functions are performed precisely thanks to the software. The speed and ease of working with the device depends on it;
- Improved design, sound and picture quality.
What is needed to flash the TV firmware?
To flash software on your TV yourself, you can use two main methods:
- Why update the TV firmware and how to update it on Samsung, LG, Philips, Sony, etc.
- Update via the Internet. In this case, you need to use a LAN or Wi-Fi signal for the update to be downloaded to the TV device. This option is the easiest and requires the least effort. To cope with the task, you just need to press a few buttons in the menu and the device will do everything on its own.
- TV firmware via USB flash drive. If it is not possible to connect your TV to the Internet (you are using an old model), then this is the only way to update the system.
To use this option, you need to find a free flash card with a working capacity of approximately 1 GB, and using a laptop or computer with the Internet, download the necessary software.
Preparatory stage
Preparing a TV is not a difficult task and consists of two stages:
- Check if there is free flash memory on the TV. If there is little or none at all, you will have to get rid of applications or multimedia files. This must be done so that the downloaded version of the update has space for installation.
- Flashing Smart TV requires an Internet connection. It doesn't matter how you connect to the Internet: via cable or wireless connection.
To update manually, you will need a flash drive. It also needs to be prepared:
- There should not be any extraneous files on it. Therefore, delete all files from the drive. If the data on it is important, make a backup copy.
- Go to “My Computer” on your PC and find the connected flash drive there. Right click on it.
- Select "Format...".
- In the “File system” line, set “FAT32”. You don't need to touch anything else.
- Click on "Get Started".
All is ready. You can start updating.
Software update via menu
A quick and easy way to update the firmware is to go to the menu and configure the installation from the remote control. The operation will take no more than 10 minutes, and the operator will only need to press a few buttons.
Procedure for flashing the TV firmware:
- On the remote control you need to press the Smart TV button and find the installation shortcut.
- Next, click on “software update”.
- The next step is to “search for available updates.” When all possible options have been found, you need to select “download method via the Internet”, select “update”.
- The user agreement will appear on the screen. They agree with it and give confirmation for downloading.
- While downloading, you can use the Internet or watch TV channels without any problems. At this point, the software will begin downloading.
- On some models, for example, Philips smart TV, a reboot will be required.
- After turning on the device, the program will automatically begin installing the software. The final stage is to reboot the system.
After this, you can use all the innovations that have become available with the new firmware for the TV. Updating the firmware is not a difficult procedure if you follow the instructions.
Where is the model number?
To prevent the firmware from ruining the device, you need to find out what benefits it will bring. The user may not benefit from system updates. To study the nuances, you need to find out the model number of your TV device.
The information should be on the back panel or in the technical documentation. By entering this number in the search on the manufacturer's website, you can find a complete guide to updating the system and study the necessary characteristics that will be presented to the user after installation.
If all the parts fit, you can download the update via the TV menu without a doubt.
Cable
If, after checking the settings, the TV connected to the laptop suddenly stops working, then there are two options:
- the cord came off;
- the wire is broken.
The first problem is more likely. The user could accidentally touch the cord, disrupting the stability of the connection, and the image would stop being shown on the TV screen.
A broken wire is rare. Usually the product wears out naturally (temporary wear).
The entrance may also break. Replacement is a simple procedure for a specialist. An inexperienced user risks damaging adjacent sockets or the board where the port is connected.
Modern game consoles (PS3, X-box) are also connected via HDMI. Despite the features of the devices, malfunctions and root causes are of a similar nature. If the port or wire is damaged, the set-top box will not be able to start. The PC or TV writes: “no signal,” although in fact everything is connected correctly.
How to flash a TV from a flash drive
This method is the safest than the previous option, since before downloading the program, you can study all the necessary characteristics. But this one takes more time to cook.
To update the system, you will need a USB flash drive with approximately 1 GB of free memory. The method is convenient if you cannot connect your TV to the Internet.
Instructions:
- First you need to decide on the exact version of the TV model. This way, you will be able to select the appropriate firmware for a specific TV device. To do this, you need to use the number written on the back of the TV. You can also find it in the technical documentation.
- You will also need information about the already installed firmware. To obtain data, you need to press “house” on the remote control and select “install and configure software”. Next, click on “information about already installed software.” In the window that appears, read the necessary information.
- Next, you need to insert the flash drive into your computer or laptop, go to the manufacturer’s official website, and enter the model of your TV on the search page.
- When you have found the software you need, confirm the license agreement and download it to your personal computer or directly to a flash drive.
- An important point is that before connecting to the TV, the flash drive must be formatted in FAT 32 format.
- The USB drive is connected to the device, and the archive with the downloaded firmware is unpacked.
- The download process begins. It may be automatic, or you will have to use a preliminary request for action permission.
After installation and complete flashing, the TV will automatically reboot and operate in normal mode. It is advisable to save the firmware on a flash drive so that you can install it next time if problems arise.
Before installation, you need to learn a few simple tips:
- It is advisable to download updates only from the official websites of manufacturers. Otherwise, there is a risk of damaging the TV device. On third-party resources, a virus can be inserted into the TV through the firmware, which will take it out of working order or significantly slow down its operation. The response to the remote control in this case will not be 1-2 seconds, but 5-10. For modern generation TVs this is a very long time.
- You should never turn off the TV during the firmware process, as the equipment will become damaged and you will have to take it to a service center to install a new motherboard.
- If the light from the flash drive goes out during installation, you cannot remove the USB drive. As soon as the power is restored, the process will continue and the download will continue without damaging the TV.
- If you receive an error message while updating your system, you just need to start over. This is no cause for concern.
Updating TV software is a fairly simple task that anyone can do.
Greetings! This universal article will focus on how to update your TV. First of all, we are talking about updating the firmware and Smart TV. But you may mean something else by this. I suggest you get down to business!
Attention! All TVs are different. It is impossible to write detailed instructions for all models in one article. Therefore, look for analogies or look for the exact procedure for your specific model.
The steps are shown using Samsung TVs as an example. We have a separate article for LG and others.
Content
What should you do first?
First, you need to determine what caused the problem, since how to solve it may vary depending on the situation.
A common occurrence is that HDMI does not work on a Windows laptop, that is, after the connection has been made, you only see an empty desktop on the screen. Here the problem lies not in the connector or cable. The fact is that the TV here acts as an extension of the laptop screen, i.e. it becomes an additional desktop area. To see the window in this situation, it will be enough to simply move it left or right.
This is not enough for correct operation, so you need to switch the display to full desktop duplication mode. To do this, proceed as follows:
If the HDMI output on your laptop does not work, this method will help fix the problem.
The laptop sees the connection, but there is no image on the TV display. First of all, you need to check the connection. The wire should sit firmly; carefully inspect it for damage and kinks. If they are present, the cable will have to be replaced.
If everything is absolutely fine with the cable, there is no damage, then you need to check whether the correct socket was selected. Often TVs have several ports at the same time, but signal reception in the settings is set to only one port.
Everything is fine with the picture, but there is no sound. In this situation, your task is to route the audio signal correctly. To do this we do the following:
If HDMI on your laptop stops working, and all of the above steps did not help, then you should check whether the port itself is in working condition. Sometimes they burn out - naturally, you will have to take the laptop to a service center. To avoid this problem, be sure to disconnect the cable cable and satellite dish from the TV before connecting. If the outlet that supplies power is not grounded, disconnect power from all devices before connecting.
It is worth noting that troubles of this kind can appear both with the TV port and with the laptop connector. To find out exactly where the problem lies, connect another gadget using HDMI. If problems are found with one of the devices, it is best to seek help from professionals.
Service center for laptop repair in St. Petersburg. We do our work professionally, see for yourself. Laptop glass crack? Need a screen replacement? - We will complete it in one day. We repair Lenovo laptops, constant discounts.
Often, if HDMI on the TV does not work, connection problems are observed. Causes:
- The cable connection is incorrect or it does not work at all.
- The TV connected as a monitor is not configured correctly.
- The video card cannot cope with the load.
- TV settings are not configured.
To avoid problems connecting devices, learn how to do it correctly. Follow the instructions:
- check wires and connectors. If they are damaged, repair or replacement is required. Once you are satisfied that everything is working properly, proceed to the next step. step;
- configure the computer, indicate that all information from the monitor is transferred to the TV display. Usually it is enough to check the box;
- update your video card drivers (upon request);
- checking for viruses and other malware. Check computer and television equipment;
- connection.
Given the complexity of the software settings, not everyone is able to complete the task on their own. It is better to turn to specialists so that you do not have to correct the mistakes of an inexperienced user.
Method 1 – Via the Internet
This method is relevant for TVs with Smart TV. For others, I recommend moving to the next section of the update from a flash drive. Everything is quite simple here:
- We connect our TV to the Internet. Surely you already have it connected to it, so this point is more for checking - so that there is a place for him to download his update from.
- Use the remote control to enter the TV menu (you've probably already done this).
- "Support":
- “Software update” (if this item is missing, it means you most likely have problems with the Internet, check its availability, and also reboot the TV and router):
- “Update now” (sometimes this item is called “Online”):
- The TV will start checking for updates, and if there is anything, it will display a message about it:
- We agree to the download and wait for the process to complete. Afterwards the TV will reboot and start working again.
Attention! Never turn off the TV during the update. Otherwise, you will have to use a manual update via a flash drive.
Occasionally there is a need to update to an older firmware version - in this case, updating via USB will help again.
Method 2 – Via USB
Since you are in this section, it means you need to do something more serious - either roll back to the old version, or restore the TV. Occasionally, people come here who simply do not have a Smart TV or Internet connection. The best way to update your Smart TV as standard is see the previous section.
We will need:
- The required firmware from the site.
- A flash drive that can accommodate this firmware file.
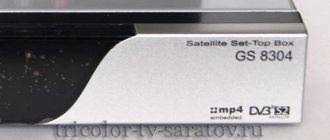
I would like to immediately draw attention to the numbering of the firmware. The higher the number, the newer it is:
Next steps:
- Go to the support section of the Samsung website, select your model and download the required firmware version:
- Format a flash drive in FAT TVs that are familiar to us may not understand NTFS:
- Copy the firmware to the USB flash drive and run this file. The file is an archive, so we will be asked to unzip it directly to the root. What we do:
- We wait for the archive extraction process to complete, and after that we remove the flash drive from the computer and insert it into the TV:
- We turn on the TV. Go to the “Support” menu:
- Software Update:
- Update now:
- A message will appear indicating that you are trying to search for firmware on the flash drive. We agree with this:
- If detection is successful, you will be prompted to update the TV. We agree and wait for the process to complete.
Why do you need to flash Smart TV?
When releasing new firmware, any European, Korean or Chinese manufacturer, be it Samsung, LG, Xiaomi, Dexp, Toshiba or Philips, first of all introduces critical bug fixes to the Smart TV or Android system, which may affect the security of your TV on the Internet. But it's not just them. Every year new technologies are developed, new functions are added that are missing in the factory software installed on the TV several years ago at the factory. Therefore, the advantage of keeping the smart TV firmware up to date is obvious. One of the main features is the support for newer video formats for playback, which I noticed in my experience. I constantly use a DLNA server, playing videos saved on my PC over a local network on my TV. However, not all formats were played; they had to be pre-encoded into an extension understandable for the TV.