Greetings! This universal article will focus on how to update your TV. First of all, we are talking about updating the firmware and Smart TV. But you may mean something else by this. I suggest you get down to business!
Attention! All TVs are different. It is impossible to write detailed instructions for all models in one article. Therefore, look for analogies or look for the exact procedure for your specific model.
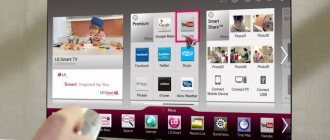
The steps are shown using Samsung TVs as an example. We have a separate article for LG and others.
Method 1 – Via the Internet
This method is relevant for TVs with Smart TV. For others, I recommend moving to the next section of the update from a flash drive. Everything is quite simple here:
- We connect our TV to the Internet. Surely you already have it connected to it, so this point is more for checking - so that there is a place for him to download his update from.
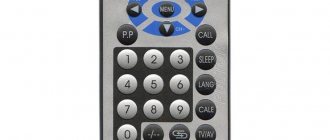
- Use the remote control to enter the TV menu (you've probably already done this).
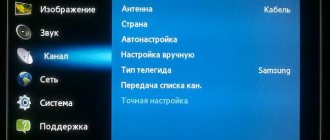
- "Support":
Method 2 – Via USB
Since you are in this section, it means you need to do something more serious - either roll back to the old version, or restore the TV. Occasionally, people come here who simply do not have a Smart TV or Internet connection. The best way to update your Smart TV as standard is see the previous section.
- The required firmware from the site.
- A flash drive that can accommodate this firmware file.
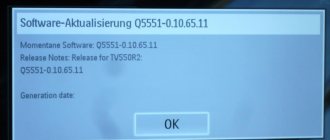
I would like to immediately draw attention to the numbering of the firmware. The higher the number, the newer it is:
How to download the firmware?
This is especially true for the second method. Those who were unable to download their firmware do this:
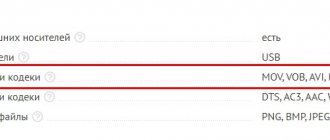
- Go to the website www.samsung.com/ru/support and enter the exact model of your TV:
Useful tips
Download updates only from the official websites of equipment manufacturers . Amateur firmware is often unstable and can be infected with malicious code. While updating the software via the network, do not turn off the TV or remove the plug from the socket. A failure in the firmware procedure may result in a trip to the service center.
Important! If the light turns off while installing an update from a USB drive, you cannot remove the flash drive from the slot. After power is applied, the download will either begin again or continue from where it was interrupted.
If any errors occur, you should reflash the TV again.
Setting up Android TV
Any TV on the Android TV OS is configured as standard, but for example, we will have in mind the Sony Bravia KD-55XF9005. It is assumed that the TV is already connected to the Internet either wired or wireless and that your Google account is activated. Our task is to unload the system from a significant number of unnecessary applications.
First of all, disable automatic software updates. In order not to burden the Android TV operating system with regular searches for updates in the background, it is better to periodically check for updates to the necessary applications, including Android TV firmware. The TV is now ready for pumping.
Disabling software updates
If this is the first time you've launched the TV, a system update will probably be available. It can be found in the About device settings section. Software updates can be downloaded in the background. But from my experience with Smart TV on Android, the TV does not always allocate the required amount of system memory for this, and loading sometimes fails.
So just wait for the update to finish without doing anything. Once the update is downloaded, you can run it immediately or later. Typically, the update process itself takes about 20 minutes.
Disable unnecessary applications
To free up space in the internal memory, disable unnecessary applications. In the “Applications” settings section we will find system applications that uselessly load the processor. Firstly, there is Sony Select, which is responsible for displaying the Sony recommendation panel on the screen. Let's deactivate it, i.e. select “Stop” in the submenu of the application itself and “Delete data”. Click OK.
Secondly, we disable SonyShelf in the same way. We delete data and turn off notifications.
After these steps, both lines of recommendations are no longer displayed on the main screen. You can similarly disable the following applications:
• Play Station Video. • Amazon Video. • Netflix. • Google Play Movies. • Google Play Music. • Google Japanese Input. • Samba Service Manager. • Demo application.
If you don’t play games, you can safely disable Google Play Games and delete the Asphalt game. Well, applications related to calls are disabled painlessly - Contacts Storage and Google Contacts Synchronization.
Main screen
Here you can customize the Recommendations Line and the Games and Applications Lines. Recommendations are a kind of reminder about the applications and services available on the Android TV. Accordingly, unnecessary reminders can be turned off by moving the slider to the left. We do the same for games and applications. What is not needed, we delete, what is needed, we organize (sort). Standard applications cannot be deleted, only moved.
Setting up Smart TV Android in developer mode
Here we will need to adjust the speed of the operating system GUI. To do this, you need to make developer mode available. In the settings, go to the “About device” menu and at the very bottom click three times on the “Build” submenu. After this, the “For Developers” line appears in the settings. Here we will adjust four parameters.
1. Set the background process limit to “No more than 1 process.” 2. Set window animation to “Animation 0.5x”. The loading speed of icons will increase. 3. Transition animation – 0.5x. 4. Animation duration – 0.5x. You don't need to do anything else in this menu.
Why do we need updates?
There are several main reasons why users decide to flash the system:
- Increasing the stability of the new TV device. Some TVs have so-called raw firmware, if the sample is completely new and was turned on for the first time. LG and WebOS users face this problem. All errors can be corrected using the downloaded program for the system. Having done the firmware correctly, a person will get rid of many problems.
- Increased work speed. System firmware is often used to increase the speed of the TV. Sometimes the device responds slowly to the remote control. This applies to Smart applications, changing channels, and simply turning the device on and off.
- TV firmware is an ideal way to expand functionality. Manufacturers release updates that increase the capabilities of an existing device. This is how additional programs and useful applications appear in the menu.
- Solving problems with Smart TV. If you have any problems with the Smart TV function, then perhaps the preferred solution to the problem is a full software firmware. If you study user reviews on the Internet, you can understand that the firmware helped solve many problems on the TV.
To understand the purposes for which a specific update is intended, you can go to the official website of the TV manufacturer and in the appropriate section find a full description of the new firmware version. There it will be written in detail about the advantages of the program, new functions, as well as problems that can be solved.
Download the latest files and instructions.
Download instructions for restoring OS Windows
Procedure for returning an OEM version of Windows OS
Refund for the OEM version of Windows OS distributed along with computers, all-in-one PCs and laptops of the DEXP brand.
Procedure for returning the OEM version of Windows OS:
- The return program information page is located on the DEXP website.
- Refunds will only be made in the country where the product was purchased.
- To receive monetary compensation, you must fill out a special form and contact an authorized DEXP service center no later than 14 calendar days from the date of purchase of the device.
- The ASC will carry out the procedure of formatting the hard drive and removing the license sticker from the device, or extracting and blocking the license key in the BIOS using special software. A note will also be made on the form indicating that the work has been completed.
- After this, you must submit the form to the store where you purchased the DEXP device to receive compensation. Compensation is paid in cash from the store's cash register based on the cost of the software according to the price list. The amount is returned in rubles at the official $ exchange rate established by the Central Bank of the Russian Federation at the time of contacting the SO. Refunds are made within 5 working days.
Refunds for the operating system are NOT POSSIBLE if:
- The operating system has been activated.
- You have accepted the Windows License Agreement.
- You have reformatted your hard drive.
- You have damaged or torn off the license sticker.
- You did not provide all the disks and documentation that came with the computer or opened their packaging.
- You have not provided a payment document confirming the purchase of this product.
- You have not completed or signed the appropriate waiver form.
After rejecting the pre-installed OS, you will lose free technical support related to Windows OS in the service center or by calling the hotline.
- Download Windows key detection software
- applications for removal of pre-installed Microsoft® Windows® operating system and refund.
- Download the list of licenses for which refunds are made in case of refusal.
List of devices that support Windows 10 and updates
Greetings! This universal article will focus on how to update your TV. First of all, we are talking about updating the firmware and Smart TV. But you may mean something else by this. I suggest you get down to business!
Attention! All TVs are different. It is impossible to write detailed instructions for all models in one article. Therefore, look for analogies or look for the exact procedure for your specific model.
The steps are shown using Samsung TVs as an example. We have a separate article for LG and others.
What is needed to flash the TV firmware?
To flash software on your TV yourself, you can use two main methods:
- Update via the Internet. In this case, you need to use a LAN or Wi-Fi signal for the update to be downloaded to the TV device. This option is the easiest and requires the least effort. To cope with the task, you just need to press a few buttons in the menu and the device will do everything on its own.
- TV firmware via USB flash drive. If it is not possible to connect your TV to the Internet (you are using an old model), then this is the only way to update the system.
To use this option, you need to find a free flash card with a working capacity of approximately 1 GB, and using a laptop or computer with the Internet, download the necessary software.
This is done on the official website of the manufacturer of the TV model that was purchased. For proper operation of the device, install the latest firmware versions. Next, the USB driver is connected to the TV to transfer the program to the TV and unpack it. It is important to know that on LG, Samsung, Toshiba, Sony and Phlips devices, you do not have to worry about updating the software. If you go to the menu and click on the button that starts automatic updates, the device will perform all the necessary actions independently.
How to flash a TV from a flash drive
This method is the safest than the previous option, since before downloading the program, you can study all the necessary characteristics. But this one takes more time to cook.
To update the system, you will need a USB flash drive with approximately 1 GB of free memory. The method is convenient if you cannot connect your TV to the Internet.
Instructions:
- First you need to decide on the exact version of the TV model. This way, you will be able to select the appropriate firmware for a specific TV device. To do this, you need to use the number written on the back of the TV. You can also find it in the technical documentation.
- You will also need information about the already installed firmware. To obtain data, you need to press “house” on the remote control and select “install and configure software”. Next, click on “information about already installed software.” In the window that appears, read the necessary information.
- Next, you need to insert the flash drive into your computer or laptop, go to the manufacturer’s official website, and enter the model of your TV on the search page.
- When you have found the software you need, confirm the license agreement and download it to your personal computer or directly to a flash drive.
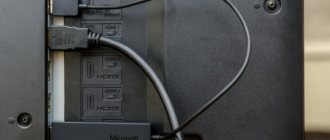
- An important point is that before connecting to the TV, the flash drive must be formatted in FAT 32 format.
- The USB drive is connected to the device, and the archive with the downloaded firmware is unpacked.
- The download process begins. It may be automatic, or you will have to use a preliminary request for action permission.
After installation and complete flashing, the TV will automatically reboot and operate in normal mode. It is advisable to save the firmware on a flash drive so that you can install it next time if problems arise.
Before installation, you need to learn a few simple tips:
- It is advisable to download updates only from the official websites of manufacturers. Otherwise, there is a risk of damaging the TV device. On third-party resources, a virus can be inserted into the TV through the firmware, which will take it out of working order or significantly slow down its operation. The response to the remote control in this case will not be 1-2 seconds, but 5-10. For modern generation TVs this is a very long time.
- You should never turn off the TV during the firmware process, as the equipment will become damaged and you will have to take it to a service center to install a new motherboard.
- If the light from the flash drive goes out during installation, you cannot remove the USB drive. As soon as the power is restored, the process will continue and the download will continue without damaging the TV.
- If you receive an error message while updating your system, you just need to start over. This is no cause for concern.
Software update via menu
A quick and easy way to update the firmware is to go to the menu and configure the installation from the remote control. The operation will take no more than 10 minutes, and the operator will only need to press a few buttons.
Procedure for flashing the TV firmware:
- On the remote control you need to press the Smart TV button and find the installation shortcut.
- Next, click on “software update”.
- The next step is to “search for available updates.” When all possible options have been found, you need to select “download method via the Internet”, select “update”.
- The user agreement will appear on the screen. They agree with it and give confirmation for downloading.
- While downloading, you can use the Internet or watch TV channels without any problems. At this point, the software will begin downloading.
- On some models, for example, Philips smart TV, a reboot will be required.
- After turning on the device, the program will automatically begin installing the software. The final stage is to reboot the system.
TV repair DEXP F24D7100E
General recommendations for repairing TV LCD LED
Possible faults
— The DEXP F24D7100E TV does not turn on, does not respond to the remote control and control panel buttons, does not light up or blink indicators.
In this case, the main power source may be faulty - the AC/DC voltage converter, the elements of which in this model are located on the common MainBoard CV512L-U24 board. It is necessary to measure its secondary output voltages, and if they are absent, check the power switches (70R900P) and rectifier diodes in the converters for short circuits. In case of any breakdowns in the secondary circuits, the converter can operate in emergency short circuit mode, and in the event of a short circuit in the power elements of the primary circuit, the mains fuse or the current sensor at the source of the switch often breaks. Mos-Fet switches used in switching power supplies usually fail due to a malfunction of other elements, which can prevent it from working in switching mode, or cause the maximum current or voltage values to be exceeded. These can be circuits that power a PWM controller, damper or frequency-setting circuits, or OOS (negative feedback) elements in a stabilization circuit. PWM controllers (PWM) LD5535, in the absence of external damage and short circuit between the terminals, are checked by replacing them with known good ones.
— There is no image, there is sound, it responds to the remote control. Or, immediately after turning on, the image may appear for a second and immediately disappear.
In some of these cases, the problem is caused by a lack of display backlight. The reason may be the power supply of the LEDs, their serviceability (breakdown or breakage), as well as a violation of the contact connections of the LED strips. To check the LED strips for breaks without disassembling the panel, for example, a current source will help. It is impossible to open series-connected PN junctions with a simple multimeter; a voltage of the order of several tens of volts will be required.
— The TV does not turn on and does not respond to the remote control. The indicator blinks or indicates standby mode.
Repair or diagnostics of the CV512L-U24 motherboard should begin by checking the stabilizers and power converters required to power the chips and matrix. If necessary, the software (software) should be updated or replaced. In cases of complex MB (SSB) repairs and if you have the necessary skills and equipment, sometimes it may be necessary to replace its CPU chips: S2T512, SPI Flash: GD25Q64C, Audio: TDA3118E28 and other possible faulty components. Malfunctions associated with the use of BGA soldering technologies are usually easily diagnosed using the heating method.
Before replacing the CDT-9NT372-RD60 tuner, if there is no channel adjustment, you must first check the software and supply voltage at its pins. You also need to make sure that the tuner and processor can exchange data via the I2C bus.
Attention TV owners! Attempting to repair the DEXP F24D7100E yourself is not recommended by the manufacturer and can lead to serious negative consequences!