Miracast is another wireless connection technology that has wider functionality compared to Wi-Fi Direct. For example, in this case it is possible to display on the TV screen not only a separate file, but also all movements through the phone menu.
Modern technologies allow you to perform a variety of operations related to smartphones. Many of them significantly simplify the process of interacting with the device and allow you to expand its functionality. In particular, you can connect Haier i50 to your TV. Why is such a connection necessary, and how to make it?
The owner of Haier i50 can add to the presented list by showing his own imagination. But the fact remains that connecting the phone to the TV is a function that the developers built into the Haier i50.
Wireless Connectivity Options
At the same time, the smartphone itself confirms the data exchange with the TV by selecting the connection as a media device. If everything is done correctly, the TV receiver will recognize the Haier i50 as an external storage device, and using the remote control you will play photos, audio and videos on the TV screen.
If everything is done correctly, the Haier i50 desktop will be displayed on the TV screen. After this, you can manipulate the smartphone, and the movements will be displayed on the TV receiver.
Methods for setting up connections between devices without using wires are the most convenient and popular. But in order to connect the Haier i50 to your TV wirelessly, the latter must support Smart TV technology. Otherwise, you can only connect via cable.
If you couldn’t find the Miracast function in the settings of your Smart TV, then don’t despair. The technology is supported by all models with a built-in Wi-Fi module. You just need to connect your TV and smartphone to the same Wi-Fi network, and then activate the wireless display in the Haier i50 settings.
Please note that you will not be able to connect your phone to an old TV (not in terms of years, but in terms of characteristics) even with a USB cable, although the TV will have a USB connector.
To connect to the selected equipment, you must have at least one device with a certified Wi-Fi Direct card.
On topic
But what if your TV set-top box has a different OS than Android TV? It's okay - even if there is no built-in voice search, you can set it up yourself.
It would seem, why install anything other than Android TV at all? The answer is simple: not everyone is delighted with the interface, controls and available features. Some people prefer to use a TV set-top box with a different OS. Usually this is a full-fledged, not “stripped down” version of Android with the usual Play Market application store and other functions.
True, many are sure that when choosing Android instead of Android TV, you will have to sacrifice voice search and suffer with the remote control moving the cursor from letter to letter. But that's not true.
Do you have a smart TV
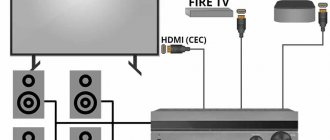
If the TV you purchased does not have WiFi functionality, then you need to use a more traditional solution - via an HDMI cable.
Next, start sending data by enabling the Screen Mirroring function on our device. On some devices, this option may have a different name, for example, Cast, Miracast.
Then select the device you want to send the image to. In our case, we connect to the TV by selecting the appropriate item in the list, and in this way we complete the procedure for connecting devices.
Many modern devices are equipped with this option. Connecting via Wi-Fi Direct is one of the most practical ways to connect a smartphone to a TV.
- Take your smartphone and go to Google Play.
- Find the DLNA Server app and download it.
- Open the main menu of the utility.
- Add a new server.
- In the appropriate line, enter its name (home Wi-Fi network).
- Switch to the “Root” tab, mark the folder that can be viewed. Save your changes.
- Return to the main application menu. Now the pre-created Media Server is displayed there.
- Click on the "Start" button to start the server.
- Open your TV's settings and go to the "Video" section.
- Find the server name there, and then select it. Folders that you can browse will be displayed on the screen. Run the required file.
How to set up Alice from Yandex to control a TV, set-top box and air conditioner
Voice assistants from different manufacturers are becoming smarter every year and learning to perform a wide range of commands. Nowadays it’s no longer surprising to turn on a light bulb or lamp using a voice command.
Unfortunately, aside from banal scenarios for managing a smart home, out-of-the-box assistants are not capable of anything. However, there is a way to add your own automation scripts and run them using convenient voice commands.
Now we’ll tell you how to set up custom actions to control equipment in your home.
What you need to quickly manage accessories
► Almost any set-top box on Android or Smart-TV with an IR remote control.
► Any gadget with voice assistant Alice . This could be a Yandex.Station from mini to Max, a compatible speaker, a smartphone with a proprietary application, or a Yandex browser on a computer.
► 15 minutes to set up.
In this way, you can configure not only your TV or set-top box. Any gadgets that support IR control can be configured using these instructions.
How to set up voice control
1. Launch the Yandex application and go to the Devices section.
2. Press “+” , select Other device and connect the gadget to the smart home system (if you haven’t done this before).
When using a third-party IR remote control, you can connect it as an original remote control from Yandex or “pass it” through a plugin of the brand you are using, for example, Tuya or Xiaomi.
In this case, the delay between the command and its execution may increase, because the signal, in addition to the Yandex cloud, will pass through Chinese servers and clouds of third-party companies. If the gadget is recognized as an original Yandex accessory, it is better to connect it that way.
3. When the remote control is added to the application, open its page and click Add device.
4. We select the appropriate type of device (TV, set-top box, air conditioner or receiver) and find the model by manufacturer.
You can use automatic gadget selection, in which case you will need to point the device’s original IR remote control at the receiver and press several buttons. The system identifies the accessory and selects the most suitable control profile.
The most interesting option in this section is Configure manually . It allows you to create custom remote controls for further voice control. You will not get a convenient remote control interface in the application, but you will be able to use many more features of the controlled device. We'll talk about this below.
5. On the page of the added device, you will see a control panel and a tab with the most common voice commands that can be used for control. The command can be sent through the Yandex application on a smartphone, a proprietary browser on a computer, or a column with assistant Alice.
After this, the original IR remote control for the TV or set-top box will no longer be needed.
How to add convenient control commands
After the basic setup, all the remote control buttons will move to the Yandex application, and basic actions can be performed using the voice assistant.
However, not everything can be done using Alice, especially when using a Smart-TV or Android set-top box. You won't be able to end the app, pause watching, or start the next episode of the series this way.
You can create your own voice commands for control. First you need to create a custom command for the IR remote control, and then link it to a convenient phrase for voice activation.
1. In the Yandex application, open the Devices section and find the gadget added via the IR remote control.
2. Click on the settings gear and select Edit remote control (available only for devices added in manual mode, mentioned above).
3. Click the Add Command button and enter its name.
4. Follow the setup assistant's prompts and activate the desired feature through a standard IR remote control on your TV or set-top box.
5. Go to the Scripts section and create a new script.
6. As a condition, enter a convenient voice command for activation. In the future, the phrase can be changed or adjusted for accurate operation.
7. Specify the newly created remote control button as the action.
Please note that when setting up a script, you can specify a whole sequence of actions. This will enable multiple IR commands to be activated one after the other.
In this way, you can implement almost any action with a set-top box or TV. For example, exiting the current application and launching the next one on the list, switching channels when watching IPTV or streaming services.
For example, I made several commands to control playback, which my son quickly mastered. Now he can switch episodes himself when watching cartoons, and with one voice request I can completely end playback and turn off the TV.
This is also a convenient way to activate several successive commands to increase or decrease the volume. So Alice will make the TV louder or quieter not by one division, but by 5, 7, 10 or any other convenient number.
This is how, in just a few minutes, you can set up voice assistant control for all frequently used actions with your IR devices.
- Tweet
- Share
- Tell
- Alice,
- gadgets,
- smart House,
- pieces,
- This is interesting,
- Yandex
Artyom Surovtsev
I love technology and everything connected with it. I believe that the greatest discoveries of humanity are yet to come!
Using Wi-Fi Direct technology
There are also special mobile applications with which you can configure the connection of your smartphone to the TV. This type of connection is based on the “Mirroring” technology - mirror reflection. That is, the picture from the smartphone will be duplicated on the large TV screen.
Which option is better? To answer this question objectively, we will analyze in detail the advantages and disadvantages of all of the listed methods.
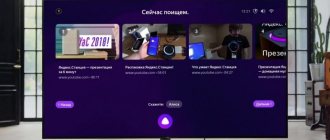
- Before you start synchronizing your devices, check whether the YouTube service application is installed on your smartphone. If it is not there, then download it from the market.
- Launch the application and open the settings menu. Turn on the Watch on TV feature. If you did everything correctly, instructions will appear on the screen with hints regarding next steps.
- Turn on the YouTube app on your TV. Go to the settings section. Select the connection type "Manual".
- A code will appear on the screen. It must be entered into the appropriate field on your mobile phone. Then click on the “Add” button.
- Select your TV from the list of found devices, and then agree to broadcast. Now you can watch videos on a big TV screen.
❌ Cons:
✅ Pros:
Test your voice search now
Open Google Chrome, YouTube, or any of the other apps that themselves support voice search. Look: there is now a microphone icon in the search bar. It is with this icon that you can use voice search from the remote control.
Agree, it’s much more convenient than entering results using the on-screen keyboard every time. In addition, you no longer need to press the microphone button on the remote control - instead, just click on the microphone icon in the search bar.
Note! The first time you click on the microphone icon in the application, it will ask for permission to record audio - allow it. Then, when you use the same application, such a request will no longer pop up.
So, your advantage over Android TV users is that you are not limited to those apps that officially support remote search and are therefore available to Android TV users. Now you can search content using your voice in almost any application.
How to connect your phone to TV via USB
✅ Pros:
✅ Pros:
Of course, it is important to consider that without a suitable cable and adapter nothing will work. However, no additional manipulations are needed - just make a connection and select a specific port as a source.
USB, DLNA and Wi-Fi Direct are obsolete, but can be used as fallback options. Nowadays, connecting via an HDMI cable or wirelessly via Miracast, Chromecast or AirPlay is relevant. Which one you choose depends on your smartphone and TV.
This time the connection occurs through the router. In this case, the TV can connect to the home network via cable, and the smartphone via Wi-Fi.
Google Chrome YouTube channel
Size range and series design
Visually, the devices of the Haier Smart TV MX series are similar: black body color, minimalistic design, frameless display. The distance from the edge of the screen to the edge of the TV is less than one centimeter (≈ 0.7 cm). The diagonal varies from 32″ (80 cm) to 65″ (165.1 cm). The stands are thin, V-shaped, their height is approximately 6 cm. The body of the TVs is relatively small, so the weight of the models including the stand varies from 4.2 kg for the most compact (32″) to 22.7 kg for the leader of the series (75″).
Haier Smart TV MX size comparison
The Haier MX series is suitable for apartments of any size and layout. The minimum acceptable distance for watching TV, according to ophthalmologists, is considered to be a diagonal multiplied by 4; the result will be in centimeters (the diagonal can also be divided by 25, the result will be similar, but in meters). This means that it is optimal to watch a 32″ TV from a distance of more than 1.3 m, 75″ - more than 3 m. To calculate the comfortable distance
these numbers should be multiplied by two: 2.6 m and 6 m.
Haier TVs can be hung on a bracket (not included). In this case, the angle between the wall and the device should not exceed 3°, the instructions say.
How to connect your phone to TV via Chromecast
This option allows you to use the TV as an external display while playing games, watching movies and surfing the Internet. The picture from the mobile device is mirrored, that is, everything that happens on the smartphone screen is displayed on the TV.
If you have an Android smartphone and Smart TV, just connect via Miracast. If your TV is regular, buy a Miracast adapter, Google Chromecast, or a compatible HDMI cable. Backup options are a USB cable, DLNA or Wi-Fi Direct.
This is the most convenient way to connect your iPhone to a TV with an Apple media set-top box. The proprietary AirPlay feature allows content to be transferred to Apple TV over the air. And you can give presentations, play games, view photos and videos.
The easiest connection method that allows you to use your mobile device as a flash drive. True, you can only play media files stored in the phone’s memory: photos, videos and audio.
An Android device can be connected to a TV in two ways: wired and wireless (Figure 2). Using a cable is suitable when using this connection method at home, since it eliminates intense battery drain and even allows you to watch videos for a long time or play games.
After performing these steps, an image should appear on the big screen.
Haier MX Screen Parameters
The main difference between TVs within the series is screen size and resolution:
- Two budget models of 32 and 43 inches have HD and Full HD
(1366x768 and 1920x1080 pixels, respectively). If you are not chasing a perfectly detailed picture, you can save about 8,000 rubles with this option. For TVs with a diagonal of up to 45″, the difference in image quality will not be significant, writes the specialized website Hi-Tech Mail. - The remaining models have 4K Ultra HD
(3840×2160) with the Upscaling function, which at the software level improves HD and Full HD content to a level comparable to 4K UHD.
The latter also uses HDR10 technology
(High Dynamic Range). To put it simply, it allows you to watch a video (film, TV series) in the form in which the creator or film company intended it - with the color depth (bit depth), brightness and color gamut. This does not mean that the picture will always be perfect, but rather that it will be atmospheric.
Illustration of how the HDR10 function works on Haier TVs.
The Haier MX series uses an IPS LED matrix.
, that is, a classic liquid crystal display with LED backlight. The type of backlight is matrix or Direct LED, which evenly covers the entire screen area.
TVs in the series have an equally high contrast ratio of 5000:1 (the brightness at the brightest point of the picture is five thousand times higher than at the darkest). Viewing angles horizontally and vertically - up to 178°. This angle means that when watching TV from the side, even at extreme angles, colors will not shift or overlap each other.
Another important parameter is the sweep frequency
, which affects the screen refresh rate.
For the MX series it is 60 Hz
. The limit perceived by the human eye is 120 Hz. There are also televisions with this parameter, but they are rare and do not provide advantages for standard activities. It's worth looking for them if you plan to exclusively watch sports or play video games on TV.
Don't confuse refresh rate with response time - this is the time it takes for a pixel to change brightness up or down. If the value is high, the picture on the screen will appear blurry in dynamic scenes. Haier TV response time is 8 ms
. For most viewers, 20–25 ms is considered comfortable, but some people who specifically perceive visuals may notice a “stretching trail” with such indicators. For them, 14–18 ms is optimal.
Instructions for Android phones
After this, you can safely watch videos using a wireless connection.
The “Screen Mirroring” function allows you to display everything that happens on the device on the big screen. Essentially, you get the opportunity to use your smartphone more conveniently and even use it as a tool for working and watching media. This article will discuss how to connect a smartphone and TV.
Do as indicated on the screen, and after completing these steps, you will be able to observe everything that is happening on your phone using the TV and even control it using the remote control.
A USB - Universal Serial Bus port is found on the back or side of most LCD or plasma TVs. If the model does not support wireless data transfer technologies, you can connect your smartphone to your old TV via a cord. For convenience, we recommend purchasing a universal adapter with different ports: USB Type-C on one end, HDMI, VGA, DVI, Display Port or miniDP on the other.
A similar AllShare function on Samsung TVs quickly starts pairing with a smartphone.
If the TV does not have Bluetooth, or the function does not connect
There are devices such as adapters that can be used with televisions and other devices. They can be found at any hardware store. You must purchase an adapter based on your specific TV model.
The adapter takes up very little space, is inexpensive, and also:
- receives a signal;
- switches it to the desired format for reading by the Bluetooth receiver;
- performs pairing;
- sends a signal over radio frequency lines.
After connecting the Bluetooth transmitter to the audio output of the TV (and to the power source, if it does not have its own battery), it will synchronize with the device. To do this, you should bring the laptop as close to the TV as possible. Activating pairing mode is functionally different for a specific device. Therefore, it would be logical to study the manufacturer’s instructions. These are included with the adapter and TV.
How to connect your phone to TV via Wi-Fi
Some TV models do not recognize the phone as a flash drive via the USB port. It is not possible to connect a smartphone to view files; only charging via a cord is possible.
It is more convenient to connect your phone to your LG TV by launching the built-in Smart Share program.
Wi-Fi wireless data transmission technology is named from the English phrase Wireless Fidelity - wireless precision. A simple and free method allows you to connect your TV to a phone running older versions of Android – 5.0 and lower, without any additional devices – and transfer information at speeds of up to 6 Gbps. The devices are paired via Wi-Fi Direct technology, which is built into the menu. The main condition is fast Internet; when connecting to a service package from a provider, choose a speed of 50 Mbit/s.
Typically, you don't need to install any additional software on your phone to use Wi-Fi Direct technology. The Android system already contains the corresponding settings. I have already shown how the “Wireless Display” works in Xiaomi. Now let’s look at the example of “naked” Android 8.0:
Today, the application of Wi-Fi Direct is mainly focused on home electronics. There are also its varieties, which are also often referred to as Miracast, MiraScreen, AnyCast, ChromeCast, Wireless Display, and so on.
If we delve a little deeper into the theory, then at the hardware level, Wi-Fi Direct chips are by and large almost identical to ordinary WiFi modules that are installed in all modern devices. The use of this technology allows you to transmit information at a frequency of 2.4 GHz over a distance of no more than 200 meters with line of sight. Also today there are more expensive modules operating in the 5 GHz band. They have a higher speed, but there is greater signal loss over a distance.
Haier TV sound
The sound power varies slightly between different Haier TV models, but one property is constant throughout the series: it simulates surround sound
(stereo) due to the Simulated Surround Sound function. Numerical characteristics: 10 or 8 W for each of the two channels (2.0 system). The speakers are located under the TV on the sides: on the right and left.
Location of speakers in series TVs using the example of the Haier 58 Smart TV MX model
Speaker power 10 W - is it a lot or a little? As a rough estimate, 1 W produces approximately 85–90 dB(A) of volume at 1 meter. As the power increases to 10 W, the decibel level will only increase by 10, so 10 W of one speaker will provide up to 105 dB(A) in a 20 m² room, which corresponds to the noise of a blacksmith shop. Listening to music or watching movies is unlikely to require more than 85 dB(A).
The MX series TVs have an equalizer and several audio modes (Standard, Clarity, Sports, Cinema, Music, News and Custom). In the settings you can set the external audio system, delay time, balance, bass and treble. Connectors for connecting an external system: TRS (aka 3.5 mm mini-jack for headphones), 2×RCA (R+L audio outputs for video equipment or speaker system), optical output for an audio receiver.
Diagram of available connectors using the example of the Haier 65 Smart TV MX model. The TVs also have 4 HDMI connectors, a YPbPr component input and 2 antenna connectors (LNB+ANT)
How to enable Wi-Fi Direct on your TV and connect your smartphone or tablet to it?
For a long time now, readers have been asking me to talk about technology like WiFi Direct. With its help, you can connect your phone or tablet to your TV and broadcast the screen of your mobile device to it wirelessly. How to enable it on an Android smartphone? How to use on TV - LG, Samsung, Sony, Philips, Toshiba, DEXP, etc.? All this is discussed in this article.
That is, simply put, a TV with WiFi Direct support will itself be a wireless access point. It will relay the signal to which you can connect, like any router. And directly display an image from a mobile phone or laptop screen onto it.
Despite the fact that support for WiFi Direct is already built into all modern operating systems, there are many applications from third-party developers. They often make things easier and make screen display controls more beginner-friendly.
Once the connection is established, the user will be able to transfer information, broadcast images from the screen or play sound files on the TV speakers.
Follow the presented requirements, and then no problems with setup and connection will arise. We also recommend reading our article about connecting a smartphone to TV.
Also, a small number of smartphone manufacturers install infrared ports in their devices, which allows you to use even the oldest TVs. These companies include Xiaomi, Lenovo and Huawei . So, in order to control your TV from your phone, you need to meet the following conditions:
Most modern TVs support Smart TV, and as a result, have a built-in Wi-Fi module. It is through a wireless Internet connection that the TV will be controlled without a remote control. It is worth noting that both devices must be connected to the same Wi-Fi router , so switching channels from another apartment will not work.
Instructions for setting up digital TV channels on your TV
Digital channels are configured on one of two devices:
- on the TV (if it supports digital, i.e. is equipped with an appropriate built-in tuner);
- on the set-top box (aka receiver, tuner, decoder).
On this page we will look in detail at the first option - automatic and manual search for 20 digital channels (in Moscow - 30) on TVs.
General procedure for setting up broadcast channels
The easiest way is automatic configuration. The general algorithm for TVs of all brands is the same:
- Connect your TV to the antenna. It should be clearly oriented towards the nearest repeater: unlike the MV antenna, DVMs are very sensitive to the direction from which the signal comes.
- Open the menu (there is a special button on the remote control for this).
- Go to the “Options” or “Settings” section (the name depends on the manufacturer and the interface it uses).
- Here select “TV” or “Reception”.
- Specify the type of television signal source: antenna (to search for over-the-air channels) or cable.
- Select the automatic search function (for cable and satellite TV, specify the frequencies of the provider; for terrestrial TV, nothing is needed).
- The TV will display a list of channels found.
- Click "OK" to confirm the entry. The programs will be stored in the TV memory.
- You can start watching shows.
Manual setting
If automatic tuning does not produce results or shows an insufficient number of channels, proceed as follows:
- Using the RTRS online service, find your location and click on it. Parameters will open, which indicate the frequencies of digital channels for the 2 nearest towers. Write down these values (in the example below, highlighted with gray frames).
- Go to the menu and then to the “Settings” mode.
- Select the “TV” item, but now go not to the auto search section, but to the manual setup item.
- Select the signal source "antenna".
- Enter the frequency (MHz) and channel number (TVK) values for the 1st multiplex that you wrote down in the first step.
- Start your search.
- Once the channels are found, save them in the TV receiver's memory.
- Repeat the search procedure for the 2nd multiplex using the appropriate values.
- You can start watching.
Algorithms for setting up channels by brand
Samsung
We recommend following the step-by-step instructions for setting up digital TV on a Samsung TV.
Below is a shortened version. The channel search order depends on the model.
On TVs of the M, Q, LS and K series you need to do this:
- Turn on the menu using the Home button on the remote control.
- Go to the TV settings, then to the “Broadcast” section. Select Auto Configure.
- Select the signal source "Antenna".
- Specify the type of channels you want to find (default is “Digital”). If this is not done, the TV will additionally search for local analogue ones.
- The menu will prompt you to select an operator and search mode. If the signal is received only from the terrestrial antenna, then it is enough to leave everything as is: this setting item is needed only for satellite and cable operators.
- Click the "Scan" button. The TV will find and store all available channels.
For the J, H, F and E series, the procedure initially looks a little different:
- Make sure the source is set to TV. This can be done by clicking on the “Source” button.
- Go to settings and select the “Broadcast” section.
- The further course of execution is the same as for the series described above.
We recommend following detailed step-by-step instructions for setting up digital channels on your LG TV.
Below is a shortened version. The search procedure is as follows:
- Go to the settings menu: press the “Settings” button on the remote control (on new models, the button has an icon in the form of a gear).
- Select "Channels".
- In the next window, click on “Autosearch”.
- Select the signal source: antenna, cable or satellite. Click on the first one.
- Check the “Digital only” checkbox if you do not want to search for additional analogue channels.
- Click “OK” to start scanning.
- At the end of the procedure, the channels will be saved. You can start watching.
The process is identical for all LG models adapted for Russia and having menus in Russian. Only the interface design changes.
Philips
It is best to set up according to the instructions for searching for digital channels on your Philips TV. Below is a shortened version.
The procedure looks like this:
- Enter the menu by pressing the “Home” button (on some models it is indicated by an icon in the form of a house).
- Open the “Configuration” tab, and in it – the “Installation” item.
- Go to the “Channel setup” section.
- Select automatic mode and start it with the “Start” button.
- Sometimes the TV may require you to select a country. Enter "Russia". If it is not on the list, you should choose Germany or Finland: the same television broadcasting standards apply there.
- Select an antenna (for over-the-air channels) or cable.
- Once your search is complete, click "Done" to save your results.
The TV may require you to enter a password - use four identical numbers (for example, 0000).
We recommend following the step-by-step instructions for setting up digital TV on your Sony TV. Below is a shortened version.
The channel search looks like this:
- Enter the main menu and select the “Install” section.
- Click on "Settings". If the TV asks for a PIN code, enter four random numbers (0000, 1111, 1234, etc.). If you have previously installed your code, use it.
- Select the “Digital Configuration” item (if this is not available in the interface, then immediately proceed to step 6).
- In “Configuration”, click on “Digital Setup”, then on “Auto Search”.
- Select the signal source "Antenna".
- The TV will perform an automatic search. The results will be saved and you can start viewing.
If you are setting up a Sony Bravia series model, the procedure will be slightly different:
- Go to the “Settings” menu item.
- Select the “Settings” section, then the “Auto Configuration” mode.
- Specify what type of signal to look for: click “Digital TV”.
- Select the signal source and start scanning.
Here, too, you may need a PIN code: it blocks access and activates the “Parental Control” function, which makes some channels inaccessible to children. Come up with the code yourself.
Other brands
It is easy to notice that the setup procedure for most brands is similar.
We described in detail how Toshiba, Sharp, Panasonic, Mystery, BBK, DEXP and Haier TVs are configured.
But, looking ahead, let's say: the procedure is similar. The differences are only in some subtleties of the interface used.
Adding regional analogue channels
In most regions of Russia, in parallel with the broadcasting of two federal multiplexes, regional analogue television channels are also broadcast. How can I increase the number of programs by adding them to the list on my TV?
Proceed according to the following algorithm:
- Point the antenna exactly at the repeater and turn on the analog channel search mode on the TV.
- The specific scenario of action depends on the brand of television receiver. For example, on a Samsung TV you need to specifically indicate that when scanning you need to take into account only digital channels: the default auto-tuning system will search for everything that is received from the antenna. If you also need to catch an analog signal, select the appropriate item.
- After all TV channels have been found, record them in the memory of the TV receiver.
Common problems and their solutions
Channels are not picked up at all, “no signal”
Check the following factors:
- Serviceability of the equipment (the TV itself, the antenna and the cable connecting them). If problems are found, it is better to contact a repairman;
- Antenna adjustment. UHF antennas are extremely sensitive to the direction from which the signal comes. The problem may be resolved by changing the orientation of the antenna.
- Distance to the repeater and its power. This information can be obtained from the RTRS service. You may be in a “dead zone” that is not yet covered by the broadcast. Until new towers are built, there will be no reception in this area. All that remains is to use satellite broadcasting, which is available wherever the direction to the south is free.
- Radio shadow from nearby natural (hills, mountains and other elevations) and man-made objects (major buildings made of steel and reinforced concrete), which can interfere with the passage of the signal. This can be corrected by changing the position of the antenna (for example, raising it higher to get out of the radio shadow) and adjusting the reception of the reflected signal. You can also try to catch the air from another broadcaster if it is within 30–40 km from you.
Can I control my TV remotely?
To consistently adjust the sound and switch channels on TV from a smartphone, you need to download a special application to your phone. Some well-known TV manufacturers produce their own programs, all of which are distributed free of charge. If the device manufacturer is an unknown Chinese company, then universal software that works with all TV models comes to the rescue. Read about the highest quality and proven utilities below.
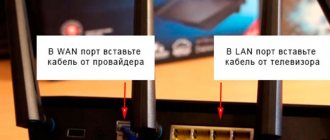
After purchasing a Smart TV, it is not always possible to connect it to the Internet via a router. And it’s not always possible to install cable Internet into your home and install a router. Often you have to distribute the Internet from your phone. In this article I will show you how to connect your TV to the Internet via your phone. That is, distribute mobile Internet to a TV for watching movies, YouTube, etc.
Then we select our network, enter the password we set and we’re done. Instructions: how to connect a Samsung TV to Wi-Fi.
Electricity consumption
All six MX TVs are rated Class A energy efficient
- the highest energy efficiency class, according to the new EU directives, which came into force in January 2021 (previously there were 10 classes, from A+++ to G; now there are 7, from A to G). This means that TVs operate 70% more efficiently than EU standards allow (EEIl coefficient
At the same time, the energy consumption of the models is different and depends, logically, on the screen size. For example, the model with the maximum screen diagonal Haier 65 Smart TV MX consumes 170 Wh, the model with the minimum diagonal Haier 32 Smart TV MX - 56 Wh. Power consumption in standby mode for all is no more than 0.5 Wh.
According to research company Mediascope, in 2021, Russians watched TV for an average of 3 hours and 40 minutes a day. To estimate electricity consumption, let’s round up to 4 hours:
How to connect your TV to the Internet via Wi-Fi from your phone?
On Samsung Smart TVs, you can connect to a wireless network in the “General” - “Network” section. Open the settings and select the wireless connection method.
- Go to settings, to the “Cellular” section.
- Set a password and enable sharing (“Allow others”).
- All. Our phone already distributes the Wi-Fi network.
The instructions can be divided into two parts. In the first, we turn on the access point on the phone, and in the second, we connect the TV to the Wi-Fi network. Since I have already written many separate instructions on these topics, I will leave links to them. And below, just as an example, I’ll show how it all works.
What is needed to connect TV to mobile phone
DLNA is the most common wireless standard and is intended for most TVs. In this case, TV devices must have a Wi-Fi connection function.
Note! Owners of Android smartphones should use the special BubbleUPnP application so that they can transfer music and photos from their mobile phone to TV.
Comparing Miracast and Airplay, DLNA content display quality is not very good. This application is designed to transfer music, photos and other media files. In order to perform the steps correctly, step-by-step instructions are provided:
- Initially, you need to select the HOME option, and then you will have to select “Network” - “Wi-Fi Direct” - “Enable”.
- Next, the user goes to the “Wi-Fi Direct Settings” section.
- Select the TV name displayed on the TV screen with the Wi-Fi Direct device.