The South Korean company Samsung produces high-quality televisions that have gained wide popularity among many users. The electronic equipment of this company is constantly developing and improving. The latest models are equipped with a convenient and intuitive interface. Below we will step by step configure the Samsung TV.
How to set up a Samsung TV
The improvements made by Samsung in modern TVs affected not only matrices, screen diagonal and other parameters. Along with the technical specifications, the feature sets are also updated. Thanks to them, control becomes better, and settings become easy and fast, accessible even to novice users.
However, all new models joining the product line have their own characteristic features, including in the area of settings. After all, the entire operation of the TV will depend on them. Some of the new features can be confusing, especially the updated interface that is used to set up all of your Samsung TV settings.
This is largely due to the fact that, starting with the 6th series, devices with an LED matrix are equipped with a pre-installed Smart TV function. Those who first encountered smart electronics cannot and do not want to delve into the intricacies of the settings, preferring to pay quite a lot of money to hired specialists. This, of course, is a personal matter for everyone, however, it is worth remembering about the Russified operating system, which allows you to easily perform all the manipulations yourself. You just need to follow the tips and hints that appear on the screen step by step.
Nowadays, not everyone uses paper instructions, since the simplest interface easily resolves the question of how to set up a Samsung TV. The menu does not contain incomprehensible commands with complex or ambiguous interpretations. After turning on the device, all actions are performed using the remote control. Setting up free channels is possible using the simplest antenna.
All innovations released by the company mainly affect additional functions that can wait. You can do them later, when all the basic settings have been completed.
What Samsung TVs are there?
Samsung has been producing household appliances since 1930. Since then, products have improved significantly, and in 1998, a TV with a large 30-inch LCD screen first appeared on the electronics market.
Modern models, based on their ability to receive signals, are divided into 3 categories:
- TVs with a built-in tuner. Independently receive DVB-T (T2) digital signals.
- Devices equipped with external devices.
- Receivers without digital signal support. They require a separate attachment.
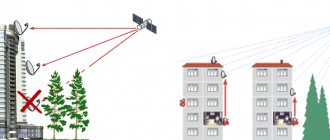
Broadcasting of digital channels is carried out not only through a tuner. If the Internet is available, Smart TV or IPTV is used for this. Therefore, before setting up digital television, you should check the year of manufacture and model, as well as the TV’s ability to support the DVB-T2 format.
How to find out the model and year of production of a TV
Any setup of digital channels on a Samsung TV begins with determining its modification and when it was released. To solve this problem, the following options are provided:
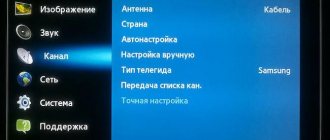
- Using the menu. Sequentially go to the sections: “Menu” – “Support” – “Contact Samsung”. On the screen that opens you can see the line “model code”.
- Sign attached to the back wall. The model and its code are indicated here, as well as the series and number from the manufacturer. Letter symbols indicate the type of device: UE/LE - models with a liquid crystal screen, PS/PE - with a plasma screen. Numbers, for example, 32, indicate the diagonal size (inches) from 19 to 105. The following letters correspond to the years of manufacture: A - 2008, B - 2009, C - 2010, D - 2011, ES/EH - 12, F/FH - 2013 , H/HU – 2014, J/JU/JS – 2015, K/KU/KS – 2021, M/MU/Q/LS – 2021, N/NU – 2021, S – premium models of different years.
After determining the model, it is necessary to accurately establish the technical ability to receive a digital signal.
How to determine the presence of a tuner
Before you set up channels on your Samsung TV, you should check its ability to receive digital broadcasts. Many built-in tuners operate using the outdated DVB-T standard, while in Russia DVB-T2 is currently used.
Features of Samsung TVs
The popular South Korean brand regularly releases new models of television equipment, which differ not only in screen diagonal, price, but also in the range of functionality. Analyzing consumer reviews, we can come to the conclusion that absolutely every user can set up a Samsung TV, but there are still some characteristic features, and of course, they need to be taken into account.
The company constantly makes every effort to expand its model range, annually releasing several new television devices. Each series has its own characteristic features regarding the process of setting basic parameters. Sometimes this can be difficult.
For example, 6 series TVs with an LED matrix are mainly equipped with a Smart TV function. Potential buyers who have not previously used “smart” technology do not want to set up such devices themselves, so they pay exorbitant amounts of money for the services of specialists. This is not the wisest decision, since the operating system has a Russian language, therefore, to set up the equipment, you just need to follow the step-by-step tips that pop up on the screen.
What to do if you have lost the instructions? Manufacturers are well aware that only a small part of consumers continue to use traditional paper instructions, so they try to simplify the interface as much as possible and make it intuitive.
You won't find any overly complex or confusing commands in the menu. Simply connect your TV to the network and turn it on using the remote control. You can tune in free TV channels with a connection to the most ordinary antenna.
Of course, devices released by Samsung have their own “tricks” that distinguish them from other brands, but believe me, they mostly relate to additional functionality, so they won’t be a big problem.
Stages of setting up channels on Smart TV
It’s not for nothing that TVs with Smart TV are considered smart models. All manipulations are performed automatically, after determining the received signals. The quality of playback is influenced by the state of the Internet.
How to turn a regular TV into a Smart TV
Setting up digital broadcasting occurs in several stages:
- Connection to the Internet via a wireless Wi-Fi connection or through a special patch cord cable.
- Smart TV has its own store with applications. You need to open it and enter.
- To watch TV shows, select a suitable application - Peers TV, Fork Player or other similar services.
- The required application is downloaded and installed. Next, you need to register and launch it.
- In the application menu there is a playlist, which contains a list of available channels.
- The desired channel opens according to the instructions attached to the program. After that, you can watch it or switch to other television channels.
No additional settings are required. If the Internet and signals are unsatisfactory, then all channels will be broadcast with glitches.
Instructions for models with DVB T2 tuner
Digital TV on a Samsung TV is received through the built-in tuner, without any separate set-top boxes. Therefore, all settings are easily made in the main menu. It is recommended to carry out this operation in automatic mode, during which each available TV program is stored under its own number.
If manipulations are performed manually, it will take a lot of time to configure all channels in full.
The task of how to automatically set up digital television on a TV occurs in the following order:
- Enter the menu, then select “Broadcasts”.
- In this section you need to open “Auto Configuration”.
- The signal source is indicated. Choose between antenna, cable and satellite.
- Determining the type of channels - choosing digital broadcasting.
- After clicking the “Search” button, the “Full” option is selected, then “Scanning” is launched.
- Wait until the settings are completed, after which they are saved. Everything is ready - you can start watching.
In some cases, automatic tuning cannot be performed; in such a situation, channels must be searched and saved manually.
Manual channel search - instructions
Manual channel tuning on a Samsung TV is performed in a certain sequence:
- The menu allows you to select the setting manually.
- Instead of an antenna, you need to choose a cable.
- Click on the “country” item and select Eastern Europe.
- When requesting a PIN code, enter one of the options: 0000, 1111, 1234.
- In the “parameters” section, the cutoff frequency is selected in the range of 298-362 thousand kHz.
- In the “search” we select “network”, after which we select a search that reveals all available options.
- Each found channel is saved separately.
Automatic tuning of digital channels on Samsung
This method involves connecting and setting via an antenna. To do this, just run the search in automatic mode. Samsung TVs are presented in various modifications with their own series and years of production. Each of them has its own connection features, which will be discussed below.
M, Q and LS Series
Before setting up TVs of the M, Q and LS series, you need to connect a common house, street or indoor antenna to them. After this, the receiver turns on and the following actions are performed:
- Press the “Home” button on the remote control and enter the main menu.
- In the “Source” section, select the “TV” item.
- Re-enter the main menu and select “Settings”.
- Next, go to “Broadcast”, then to “Auto Configuration”.
- The “Start” button is pressed. After this, a message will be displayed on the screen about deleting the current list of television channels.
- Selecting a signal source. In this case, “Antenna” is indicated. If the connection is made by other methods, select “Cable” or “Satellite”.
- The next setting item determines the type of channels. One of two options is indicated - “Digital” or “Digital and analogue”. If you have local analog TV, then it is better to choose the second option so as not to be distracted by additional settings in the future.
- When setting up paid channels, the operator is specified. If you are setting up cable TV, you should select “Others”. Broadcasting does not need this, so in our case this point is skipped.
- Search mode is selected. O, in which the system searches for everything that can be detected by the antenna.
- The search procedure is started with the “Scan” button. All detected terrestrial channels are shown on the screen, including digital and analogue. At the same time, the indicator displays the scanned part of the range.
- When the operation is completed, a message is displayed. Press the “Close” button on the screen and the “Return” button on the remote control to exit the menu.
Setting up a wireless Internet connection
How to use smart TV on a Samsung TV? Let us immediately note that the Smart TV function is not only about using the Internet to access various online resources. Essentially, your “smart” TV has an advanced operating system that allows you to view photos and videos from external media (connected to USB ports and a router), such as flash drives and external HDD and SSD drives, and record TV programs (including scheduled ones) to media connected to the USB port, and even play various games. All this does not require an Internet connection.
However, most of the functions are connected specifically to the Network and, because... your new TV is now “smart”; when you connect it for the first time at home, it will independently scan the Wi-Fi range and offer to connect to the points found. All you need to do is select your home wireless network. When you connect to it, you will be asked for a network key (password for your home wireless network). It must be there to protect your network from access by strangers.
Entering such a key, especially if it is quite long and complex, is not very convenient, because You will have to use the TV remote control keys and the TV's on-screen keyboard. You won’t have to enter any other parameters or DNS - everything should already be configured in your home router.
After connecting to the Internet, the TV will automatically check for firmware updates for your model and, if it is on the manufacturer’s server, offer to download and install it. Here you should agree and wait for the installation to complete.
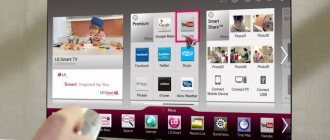
But this is not the only authorization operation in the Smart TV function on Samsung TVs. To access this manufacturer's app store, you will need to register a personal account on Samsung's online resource. Go to the account creation section and enter your email address and a password that suits you. After registering a Samsung account, you can go to the application store, launch existing ones and add new ones.
Finding it is quite simple - pressing the colored Smart Hub button on the remote control will bring up the corresponding menu on the screen, where you can use the right-left buttons to go to the APPS section. Here you can also use the built-in Youtube application, which also allows you to watch free movies in high quality.
Note that most of the applications preinstalled on the TV provide access to various online cinemas, which require a subscription fee. But there are also applications for watching broadcast channels in high quality absolutely free. Of course, smart TV allows you to watch over-the-air channels from a satellite receiver, where a special card is required for registration. But this option again requires a subscription fee. Below we will tell you how to connect a smart TV on a Samsung TV via an Ethernet cable.
Manual TV setup
Many users still have quite a lot of old TVs that do not have an automatic tuning function. All of them are equipped with an outdated interface, which is significantly different from the new models. In addition, manual tuning is carried out by changing various important parameters, and many are simply afraid to perform actions without knowing the consequences.
According to experts, there is nothing to worry about here, and any owner of outdated equipment can set up a Samsung TV with their own hands. The most important thing is to follow the instructions provided exactly:
- Open the main menu, then enter the “Antenna” section.
- Find and select “Manual setup”, then “Set up digital TV channels”.
- Click on the inscription: “Create”. A window will appear with the frequency parameters, module and transmission.
- Initially, the following indicators are set: 170000 kHz, 128 QAM, 6900 KS/s.
- The TV will be adjusted for some time, changing images and frames of TV programs.
- After completing the settings, click “Save”. Next, a window with parameters will appear again. Here only the frequency changes - up to 178000 kHz, after which the search starts again.
According to this scheme, the search for channels continues with a constant increase in frequency by 8000 kHz. Similar manipulations can be performed up to the upper limit - 226000 kHz.
You can manually configure not only channels on a Samsung TV. Images and sound are located in the corresponding sections of the menu, after which all the necessary improvements in clarity and quality are made. Contrast, brightness and other parameters are also adjusted here.
Setting up channels
Of course, immediately after connecting the TV, users have the question of how to properly set up the reception of TV channels? The predominantly Russian-language interface is selected by default, so you just need to follow simple steps in accordance with this step-by-step algorithm:
- Open the main menu by pressing the corresponding button on the remote control.
- Go to the basic settings section.
- Click on the “Search and configure TV channels” section.
- Choose one of two channel search methods - manual or automatic.
- Wait until your TV device finds channels, and then save the programs to your Samsung TV.
If the user begins to tune in to television broadcasting automatically, then, in fact, the whole process will take a few minutes. The device will find available channels and then assign them numerical values, which, by the way, can be changed later.
Immediately after setting up your Samsung TV, the first channel in the list will turn on automatically. To view the full list of broadcasts, use the corresponding buttons on the remote control.
Many people do not know how to connect and configure an external receiver, especially if it is a satellite set-top box. It’s actually not difficult to do this either, since most of the interface of modern receivers is also translated into Russian and is as simple and understandable as possible.
Now let's talk about the features of automatic and manual search for channels that are included in free digital TV multiplexes.
Auto mode
It is the auto-tuning function that is the reason that many experts define Samsung TV equipment as the most “smart” among all those on the market. Each user will be able to automatically configure TV programs and arrange them alphabetically.
First you need to select the signal source: antenna, cable, satellite. Some Smart TV models offer the user the most popular providers: NTV+, Telekarta, Rostelecom, Tricolor. If you want to use the services of the listed operators, the channels will be found automatically and arranged according to the traditional order.
After auto-tuning is completed, select programs from a specific provider. They will be arranged in accordance with the settings of the television broadcast operator. To change the position of channels, use the “Move” function:
- Press the Main Menu button on the remote control.
- Then select the “Broadcast” command, it is represented as a white satellite dish icon.
- Scroll down until we come across the “Change TV channel number” command, activate it by selecting “Enable”.
- To move on to the next step, return to the “Home” tab, and then again open the “Broadcasts” section, click to the right and select the “Edit” command.
- Select the channel whose location you would like to change, select it with a checkmark, and then click on “Change number”.
You can start automatic search without the remote control. If you are using an LCD Smart TV, then you can enable auto-tuning using a keyboard, mouse, or a regular smartphone. Regular TVs can be configured through navigation buttons located on the front panel of the device.
Manual mode
To reconfigure TV channels on an old Samsung TV model manually, without calling a technician, you need to take into account several extremely important nuances:
- old models differ from new ones in a complex and incomprehensible interface, which causes problems;
- outdated TVs are not equipped with an automatic tuning function;
- Old Samsung TVs are not capable of broadcasting images in high definition.
Manual configuration involves changing many important basic parameters. Sometimes this scares off users, although in fact there is nothing complicated about it, you just need to set the frequency correctly, you definitely won’t be able to break the TV.
How to set up your TV manually? Follow the simple step-by-step instructions:
- Open the main menu, and then go to the “Antenna” section.
- Select “Manual setup” – “Set up digital TV channels”.
- Click on “Create”, which will open a window with additional indicators: purity, module, transmission.
- First you need to set the following parameters: 170000 kHz, 128 QAM and 6900 KS/s.
- The TV will tune in for a certain amount of time, searching for channels. The images will change and frames of television programs will begin to appear.
- After finishing, you need to click on the “Save” button, after which a window will appear for adjusting the frequency, module and transmission, leave the last parameters unchanged, but specify the new frequency - 178000 kHz, and start the search again.
Using the same principle, you can continue searching for TV channels, constantly adding 8000 kHz to the frequency. Experiments of this kind can be carried out up to 226,000.
In this way, the quality of sound and picture can also be significantly improved, making them very clear. Go to the menu and select the “Image” section, and then customize the clarity, brightness, contrast and other parameters.
You can also sort channels manually. To do this, open the main menu, and then go to the “Broadcast” section. Check the boxes next to the programs you need. Here you can add your favorite channels to favorites or save the current arrangement.
How to set channel order
Often, it is necessary to retune the TV, after which the channels change their usual location and are arranged in a chaotic order. This mostly happens after automatic setup.
Many Samsung models are equipped with a function for sorting and organizing TV channels. Thanks to her, it’s not difficult to make the necessary changes:
- Enter “Settings”, then find “Channel List”. In some models, login is performed through the task manager login button located on the remote control.
- In the list of channels, click the “Change channels” icon located at the top right.
- At the bottom in the submenu, select “Change number”, mark the desired channel with a tick and move it to another place.
- The changed channel position is confirmed by pressing “OK”.
- According to a similar scheme, the remaining channels are moved to other places.
After starting the automatic search, the placement of channels may change again. The same will happen after automatic updating, unless this feature is disabled. In such cases, you will have to do manual adjustment again.
MANUAL Thank you for purchasing this Samsung product...
E-manual
- Image
- Text
- Content
E-MANUAL
Thank you for purchasing this Samsung device. For best service, register your device at:
www.samsung.com/register
Model__ Serial number ____________
- Content
How to set up cable TV
When setting up cable television in Samsung models, it is preferable to use automatic settings. The device will automatically scan all frequency ranges. When a channel is detected on a certain frequency, it is automatically remembered and assigned for later use. In the future, you can switch them and view all the necessary programs.
Sometimes during adjustment it turns out that the cable mode does not function. This mainly happens if the cable is not connected to the device. Sometimes the connector just doesn't sit tightly in the socket.
After checking all connections, setup begins:
- Turn on the TV receiver.
- Enter the menu on the remote control.
- Select the “Broadcast” mode.
- In the window that opens, mark the signal source. Our version will have a cable.
- After the connection is established, the channels are configured automatically. Enter “Auto Configuration” - then “Search Options”, then select “Full”.
- Go to the “Start” tab and enable the search task. The device will automatically detect channels on available frequencies.
- After completing the search actions, save the changes by activating the “Save” icon.
- The sections are closed and the receiver is ready for viewing.
or The image shown may vary depending on...
Page 6
- Image
- Text
or
The image shown may differ depending on your device model.
Back panel
TV
Connecting to an AV device
Using HDMI (up to 1080p)
Features of viewing channels through a set-top box
Everyone knows that outdated Samsung models do not support digital broadcasting. To recognize such channels, special TV set-top boxes are required. Before purchasing such equipment, you need to check the TV connectors to ensure that the connecting cable fits both devices.
How to connect and configure the set-top box
Before setting up digital television through a set-top box, all equipment must be assembled and connected correctly. All actions are performed in the following order:
- Check the installed antenna, which must match the set-top box used. Detailed instructions regarding installation and settings are available in the instructions supplied with the equipment. In addition to the antenna, you can use a cable connection.
- The set-top box is selected based on various parameters, including additional functions. The more such options, the more expensive the device.
- Check connection options, if necessary, buy a special adapter
- After connecting the equipment, you need to put it into operation and set up 20 free basic channels.
If you want to increase the number of channels, in addition to the set-top box, you will need a CAM module with a paid package, like cable television.
Channel tuning - Automatic and manual
To solve the problem of how to connect a Samsung TV to digital broadcasting via a set-top box, you need to follow simple steps:
- Through the control panel, enter the menu by pressing the “Source” key.
- In the window that opens, click HDMI. The digital stream of television broadcasting passes through this connector.
- Find “Autosearch” and run it. The set-top box itself will select the desired frequencies, detect a list of available channels on them and save them for further viewing.
What to do if the TV does not see channels when searching
During the automatic setup of digital broadcasting, various failures and deviations from the established procedure are possible. The cause of the problem may be the antenna or set-top box, as well as incorrect connection of all components to each other.
To successfully resolve this situation, you need to do the following:
- Check the connection of the TV and set-top box. If it is done incorrectly, the device will not be recognized by the TV. When you click on the HDMI 1 icon, a message indicating no signal will appear.
- Return the console to factory settings with a full reboot. To do this, enter the menu, select the “Settings” tab, then “Restore.” Possible passwords for this: 0000, 1111, 1234.
- Reconnect and configure the antenna. To improve the quality of the connection, you can use a signal amplifier. All manipulations should be carried out taking into account the location of the house and the antenna itself relative to the tower. At long distances, a stronger receiving device will be required.
Setting up channels when using a set-top box from mobile operators
In apartment buildings, under certain conditions, it is possible to view IPTV. The abbreviation stands for Internet Protocol Television. This television does not require a separate connection to the network, but the Internet protocol is required for its operation. The operator provides digital cable to the apartment and gives the set-top box for temporary use. This device is engaged in decoding and broadcasting channels.
Connection and settings are carried out by specialists. However, in case of any failures or updates with the release of new broadcasts, additional configuration will be required. For this purpose, enter the menu, then select “Search for channels” in the settings and start “Auto tuning”. Usually everything is limited to this, without entering other data.
Connecting to the Internet via cable
Even if your TV is equipped with a Wi-Fi module, a higher data transfer speed is provided by connecting via an Ethernet port over a wire. And this is what you should use if you have the opportunity to connect such a cable to the TV. With a wired connection, you will be able to view media content in super-high quality (4K) without any delays, not only from online resources, but also from media connected to your home router as a network drive. This means you can watch your vacation videos in 4K or take full advantage of torrent resources.
Cable connection to a home network is somewhat simpler than via Wi-Fi, because... does not require authorization in the wireless network. After all, no stranger will connect to you via cable, and the router itself provides protection from external intrusion. But even here you need to be careful when setting up access to drives connected to the router. In the next step we will show you how to set up a Samsung smart TV wirelessly.
Blocking individual channels
If you have a smart TV on your TV, some channels appear that need to be blocked, for example, from children. Such manipulations are performed in several stages:
- Enter the main menu and o.
- In the submenu that opens, click on it.
- Activate the lock with the “Enable” button.
- All channels to be blocked are marked with a check mark.
The default password is 0000. To save the changes, the system will prompt you to set your own password.
When you need to remove the lock, all the same actions are performed, only instead of turning it on, the unlock command is executed, confirmed by the password entered earlier.
Setting up picture and sound
These settings are very easy to make. You just need to use the remote control and enter the menu. Quite often, the image is displayed on the monitor in very light or, conversely, very dark colors. All this can be corrected by entering the main menu and oh. Here you can configure the following settings:
- Contrast. Adjusts the proportion between different tones.
- Definition. Sets the desired image sharpness and eliminates the blur effect.
- Brightness. If necessary, the picture is made lighter or darker.
- Color. Its correction ensures the greatest saturation of the picture.
Sound parameters are also easy to adjust. Select “Settings” in the menu, then go to the sound section. After this, select the “Quality and method of sound transmission” item. All the necessary parameters are configured here.
Each modification of Samsung is distinguished by the individual qualities of the speaker system. Therefore, they must be taken into account when making settings.
Removing unnecessary channels and adjusting the order
Removing unnecessary channels occurs as follows:
- Open the main menu and enter the “Broadcast” section.
- Next, open the item in the submenu “Change channels”.
- Use the “Enter” button to check the boxes to be deleted.
- Select “Delete” and confirm the command with the “Yes” button.
- After this, all unnecessary channels will disappear.
On TVs with the Smart TV function, removing unnecessary content is even easier:
- Press the “Smart Hub” button and go to the system hub.
- In the form where the channels are listed, select the edit located at the top right.
- Next, step by step remove unnecessary channels.
You can change the order of channels after automatic tuning as follows:
- In the main menu, go to “Settings”.
- Enter “Broadcast” and then go to “Additional settings”.
- Select: “Change. channel numbers”, go to “Channel List”, “Change Channel” item.
- The selected channel is marked with a tick using “Enter”.
- Select the “Change number” item, after which the channel is dragged to a new location using the arrows on the remote control.
- Pressing “Enter” again removes the check mark and records the result.
Editing and deleting
To remove unnecessary channels, add new ones, or sort them, placing your favorites at the top of the list, use the “Change” option.
How to set up channels? To adjust TV channels, follow the simple step-by-step instructions:
- Open the menu, select the “Broadcast” or “Live” section.
- Press the remote control to the right.
- Select the Change option.
- Select the checkboxes for the channels that will be deleted.
- To move TV channels, use the arrows on the remote control.
As you can see, adjusting the television broadcast grid is extremely simple. It is enough just to follow the algorithm described earlier.
Particular attention should be paid to the fact that when moving a channel that has a name, you will simply swap it with others. For example, if you want to move TNT from position 20 to position 2, where STS is already located, then there will be no shift, they will simply exchange positions.
However, if the TV program does not have a name, then there will be a shift in a certain direction of the entire grid. Sometimes the set position may be confused, so you have to periodically repeat this procedure again and again.
How to set up digital TV on an old Samsung that does not support digital TV
Many older TVs do not support digital broadcasting at all. However, they can still be used, it just requires special equipment. This is a separate TV set-top box - the tuner already contains more than 20 basic channels. They are free, they have a pre-set frequency, and are distinguished by high image quality and complete absence of interference. The tuner has all the missing connectors installed, and is assigned the main function - digital broadcasting.
Before buying a tuner, you need to check the TV connectors - “Tulip” or SCART. If they are not there, then this device is completely unsuitable for digital TV.
If everything is in order, then the connection is made as follows:
- Turn on the TV and make sure it is working.
- Connect the antenna to the DVB-T tuner. The cord is screwed into the socket and must fit tightly to it.
- Connecting the tuner to the TV. When using the Tulip, three wires of white, yellow and red colors are connected to the corresponding sockets of both devices. If you have a SCART connector, you will need an adapter. On one side it is plugged into the TV connector, and on the other side the Tulip cables are connected to it.
- Check system functionality. There is a separate remote control for the tuner. If connected correctly, everything should work, after which the digital broadcast will begin.