Digital broadcasting continues to develop rapidly. In the segment of digital equipment that provides television, today there are more and more interesting and functional models that allow you to obtain higher quality images and also have other useful features. These include receivers 4100c, 9500, 9600, globo hd x403p, etc. Channels are gradually moving to new broadcasting standards, and users who are used to watching certain programs do not want to give them up. And with the latest generation of receivers, they still remain quite affordable.
Reasons why the Tricolor receiver may not turn on
Failure to turn on the receiving equipment may be due to:
- Supply of food;
- Switching the TV to another connector;
- Technical work at the provider;
- Problems with the antenna;
- Signal conversion in the converter has stopped;
- Damage to the cable or F-connector;
- Software failure;
- Technical malfunctions in the operation of the receiver;
- The remote control does not work.
To detect a problem, the user can carry out simple steps that involve diagnosing the equipment. Moreover, it is possible to evaluate the performance of individual links or the entire signal supply chain from the antenna to the receiver.
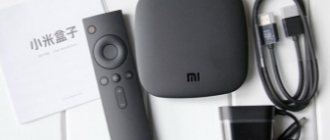
Receiver digital globo hd x403p
Among standard equipment without Linux today, this is the smallest satellite digital receiver.
Has a DVB-S2 tuner, supports channels in high quality HD. There is also an Ethernet port that allows you to connect to FTP servers and record via a USB port. Another important point is the presence of a card reader and CI slot. The design of the globo hd x403p took a lot from the 9500 and 9600 models, which were very popular among users.
The functional content is also up to par. There is one card reader that supports official cards in Viaccess and Irdeto encodings. And if problems arise with it, for full compatibility you can connect a CAM module thanks to the presence of a CI slot. What else is attractive about this equipment?
- The modern dvb S2 tuner installed in this Globo model (as well as the 4100c) makes it possible to receive channels from dvb S and dvb transponders. The powerful processor decodes channels equally well for both standard definition and HD quality. At the same time, it also supports blind channel scanning. There is no need to rewrite dvb transponders from satellites, since the receiver finds dvb on its own in automatic mode.
- Globo hd x403p can also work as a digital video recorder if you connect a hard drive via a USB interface. At the same time, it will be able not only to record channels in standard and high definition, but during this process it allows you to watch TV from the same transponder
- There is support for pausing, after which you can resume watching the program from the moment you stopped.
- The model is very easy to integrate into a local network, and depending on the settings, use either a static address or the one that comes from an external router.
- In addition to music and photos, you can also play movies from external media.
- Television is not the only thing you can get using a digital receiver. Setting up via the Internet port makes it possible to update software, expand the functions of encrypted channels, and use sharing services.
Familiarization information before self-diagnosis - special symbols
A Tricolor subscriber, if he has certain knowledge and skills in electrical circuits or power circuits, can diagnose a broken receiver with his own hands. This will avoid long-term restoration of the receiver’s functionality in service centers. Having decided to open the equipment, the user must know the special symbols used on internal elements.
Triangle with an exclamation point inside
The meaning of the designation is safety. If this warning is marked on some parts, handling these parts may damage accessories or the receiver itself.
Triangle with lightning inside
The meaning of the sign is a threat. Lightning indicates danger during opening or situations where elements are being handled. Danger involves harm to health or life.
Circle with English letter i
The designation provides information about problems and malfunctions that may arise during work.
When there is no point in repairs
Repairing a digital TV set-top box is only relevant if you have basic knowledge of electronics and the necessary set of tools. In addition, self-repair is relevant in the following cases:
- The warranty has expired.
- The device is simple and has only one decoder.
- The receiver has a high price and is too expensive for the user to replace.
If the damage is serious and requires the purchase of an expensive part, it is better to replace the digital TV set-top box.
Nutrition problems and their solutions
Testing of GS series receivers.
The first priority is always to check the power supply:
- Is the plug plugged into the socket?
- Is the power supply OK?
- Correct connection of the power supply to the network;
- Is the wire disconnected from the console, because sometimes children can accidentally remove it;
- The power switch on the rear panel should be in the On position.
Models of older receivers typically have an external power supply. The power problem may be a malfunction of this element. A Tricolor user can buy a new unit and enjoy watching television.
On new models, the power supply system is located inside the case, which complicates the repair task. Power may not be supplied due to lost capacity or defective areas on the diode bridges. Also, a unit that is used for a long time may fail over time. During repairs, you will need to replace the capacitor, which is swollen. Having disassembled the receiver case, you can immediately distinguish the power supply. By disconnecting it from all the boards, a skilled craftsman will be able to replace the failed elements.
Video: how to replace the power supply on the GS8300 receiver
To simply replace a capacitor you will need:
- Soldering iron;
- Screwdriver;
- Soldering flux;
- New capacitor.
The element to be replaced is purchased after opening the case. You should purchase a capacitor of the same capacity that matches the previously installed element.
When opening a part, the location of the element must be observed. When soldering a new capacitor, observe all boundaries.
Repairing the power supply will allow the current to flow again. If power is supplied, the indication is activated. Maintaining the “non-switchable” state in the presence of an indication is associated with other breakdowns.
More details in the video:
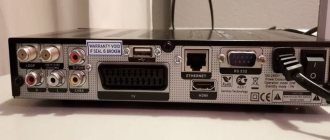
Connection instructions
The installation algorithms for additional equipment are similar. First, let's look at how to connect a second TV to a second Tricolor receiver via a satellite splitter.
Important! During the installation process, all equipment must be disconnected from the power supply, including televisions to which set-top boxes are connected.
Installation of a second console through a divider
To install a second receiver using this connection method, the subscriber, in addition to the satellite splitter, will need:
- high frequency television cable;
- two F-connectors;
- sharp knife;
- wire cutters
Work begins by stripping both ends of the cable. The outer sheath is carefully removed with a knife, the foil and braid, which shield the main core, are wrapped on the surface of the cable. For ease of work, a piece of core is released, the length of which is 15-20 mm.
F-connectors are then installed on the stripped ends. You need to act carefully, trying not to jam the bent braid. Under no circumstances should it come into contact with the central core of the wire. The vein itself protruding from the connector is cut with pliers to a length of no more than 2 mm.
Read: what channels are included in the Night package and how much it costs to connect.
We advise you to find out how to reset the Tricolor receiver to factory settings.
The cable coming from the satellite dish is treated in the same way. It is then connected to the connector marked IN on the divider. The wires coming from the receivers are connected to the connectors marked OUT. At this point, the installation work can be considered complete.
Installing a second set-top box via a converter
Connecting 2 Tricolor TV receivers via a converter begins with installing the converter itself on the plate. The old device is removed from its mounts, and a new one with two outputs is installed in its place. Moreover, its location, orientation and angle of inclination must completely coincide with the listed characteristics of the old equipment.
Next, a cable from the old receiver equipped with an F connector is connected to one of the outputs of the installed “adapter”. The second end of the cable is connected to the old receiver, to the LNB IN connector. A new receiver is connected to the second output in the same way. The cable for connecting it is prepared in the same way as when installing a satellite divider. At this point the assembly process can be considered complete.
Important! When connecting more than two set-top boxes, the equipment assembly process will be the same. The main thing is to purchase an adapter with the required number of outputs.
Message No signal on TV
When a message appears, the subscriber first checks the likelihood that it is coming from the receiver and not from the TV. The indicators on the receiver light up, and when you press the buttons, a response occurs. When you call up the Receiver Menu, the device displays the corresponding window. This means that the equipment is correctly connected to the TV, and the error is related to the operation of the receiver.
If the weather is good outside and the provider does not carry out technical work ( information about technical work is presented on the company’s website or displayed in advance on the Info Channel ), then the message may appear due to the following reasons.
Antenna offset
The antenna goes astray under the following conditions:
- Bad weather;
- Poor fixation;
- Long-term operation;
- Fall of a heavy object.
A displacement of 1 cm causes the signal to disappear. The user needs to analyze the rigidity of the fastening. If the fastening is found to be weak, adjustment will allow you to achieve the desired signal range. The signal is monitored on the television display during the period when the “Settings” section is turned on in the receiver Menu.
The location of the antenna changes by slowly rotating in different planes. You should not make turning steps of more than 1 cm. After turning, wait 5-6 seconds until the signal is set.
After the initial adjustment, it is necessary to perform a fine tuning operation so that the corresponding signal parameter scales are filled at the level of 70-80%. The final step involves securing the pole bolts to the antenna.
When a large object falls on the antenna, it leads to changes in geometry, which requires a change of equipment.
Often, changing your position on your own does not bring positive results. A dish installation and setup technician will be able to quickly set up the signal. The cost of services depends on the region and location of equipment installation.
Cable damage
The subscriber should check the cable from the dish to the receiver. If a broken area is identified, the wire should be restored using available tools and an F-connector (if there is only one damaged area). Repair stages:
- Cut the wire in the area to be restored;
- Clean connecting areas;
- Use F-connector on stripped ends;
- After fixing the connection, screw on the electrical tape.
The operation is not performed if the rupture occurs again. A new wire must be used. Some technicians, without visually identifying a break, identify hidden defects in the cable using a tester.
Problems with F-connector
A cable coming out of the connector may cause a lack of signal. It is required to screw it back under force. A damaged connector can be replaced.
Problems with the converter
The converter is one of the connecting links in the signal transmission chain. Being constantly outside, he takes on the weather and the negative influence of the external environment. When purchasing equipment, warranty service is provided for 1 year. In practice, the part is used for 3-6 years.
An ordinary user will not be able to detect a breakdown. If other options for signal deficiency are excluded, the part should be replaced.
A new converter can be purchased at the sales office. Replacement instructions:
- Disconnect the element from the fastening;
- Without moving the antenna, secure the new converter;
- Check the range of signal stability on the corresponding scales displayed using the receiver menu on the TV;
- If the settings are lost, re-adjust the plate.
When you call a support specialist, you will have to pay for the services of identifying the problem and installing a new part if replacement is necessary.
Interference on the way to the satellite
Interference is various objects that appear on the signal transmission line from the satellite to the antenna:
- Tree branches;
- Construction of a high-rise building;
- Snow accumulation.
The method for removing an obstacle depends on the object that has arisen. The subscriber can simply reinstall the antenna to clear the signal path. After the transfer, you will need to configure the signal again.
Checking the serviceability of LNB “heads”
The functionality of the “heads” is determined after the disk drive (several converters) is turned off. After which each one is connected to the receiver.
Possible reasons
When the TV screen does not show anything or the message “No signal” appears, multiple signs contribute to this. These signs are most easily classified into categories:
- Hardware - when the problem is in the hardware. There may be an incorrect connection or breakdown of any element of the equipment.
- Software – when problems and failures are caused by incorrectly set parameters. With 99% probability, such a malfunction can be resolved by the user himself.
- External factors – when the problem is related to reasons beyond the user’s control (bad weather, broken repeater, etc.).
To eliminate errors, you should know:
- The UHF antenna (or all-wave) and the amplifier are connected to the TV tuner with different wires.
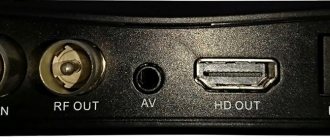
- Connecting the receiver to the TV is done through the AV or HDMI ports and the cables corresponding to these ports.
- Connecting a TV tuner to a computer works via a VGA port. If the requirement is not met, the equipment does not see the tuner.
- You can find out whether the channel search on your TV works or not by connecting it to a regular over-the-air antenna.
- In the set-top box menu settings, you can start auto-searching for channels and see what happens. If the picture changes, but there are no channels, there is a malfunction in the signal receiver or antenna.
- You can check the signal quality at your own address using the map.rtrs.rf service. It doesn’t matter if you are connecting to generation 1 or 2 of the multiplex. The only thing that matters is the distance from the repeater; the quality of the signal depends on it.
- When the gain is active and the image changes on the display, but it still shows poorly - you have a low-power antenna or the signal is not strong enough.
- It is recommended to update the firmware if there are no channels. Since the software tends to become outdated, and not every developer can support it, this leads to incorrect search for channels at different frequencies.
- Always choose the right channel on your TV. “Sourse” button on the TV remote control and select the connection channel for the DVB-T2 receiver. After that, pick up the remote control from the set-top box and catch the necessary channels. Otherwise, nothing will be found except analog channels.
- Sometimes, preventative work (repair, maintenance) is carried out on television towers and repeaters. You can also find out about this on the website rtrs.rf
- Climatic conditions can also disrupt the display of TV channels. Although there is no such strong influence of bad weather as it was with analog television, strong winds and clouds can further degrade the signal if the tower is really far away. If you install a more powerful antenna, the problem will disappear on its own.
The receiver does not turn on from the remote control
If there is no response to the remote control buttons, you should perform the action using the button panel on the receiver itself. If the actions are performed, then the receiver is functioning. After changing the batteries in the remote control, check the control using the remote control again. Operation did not resume - you need to use a different remote control.
Craftsmen can try to check the functionality of the remote control in another way. A mobile phone camera is used for this. Point the remote control LED at the camera that is turned on.
Point the remote control at the camera.
While looking into the camera and pressing buttons at the same time, monitor the LED indication:
- Steady flashes indicate that the remote control is working properly;
- Unstable lighting intermittently is due to the board not functioning;
- Lack of indication means the remote control is faulty or the batteries are low.
If after changing the batteries the LED does not start blinking, then you should buy a new remote control.
Repairing a device with rare glows is carried out by disassembling the case and cleaning the surface of the board with a damp cloth, soapy water and a dry rag. After all cleaning operations, dry the parts and assemble the remote control. If the flash does not become constant when viewed through the camera, a new device is required.
How to increase the number of channels on T2
If an external or built-in tuner does not find terrestrial digital TV channels from one of the multiplexes, check through the map.rtrs.rf service to see if it is available in your region of residence. There you will also find all the necessary data for receiving a signal from the tower you need and can increase the number of channels from 10 to 20.
Useful: What is a digital television coverage map and how to use it
Technical malfunctions of the receiver
The receiver is the link responsible for receiving the signal and transmitting the video stream. Technical components of the device may break down or software problems may occur. The receiver itself has a warranty period (1 year), during which specialists must repair the device.
If a breakdown occurs after the end of the warranty period, you can carry out independent diagnostics or send it to a service center. Problems that often occur are displayed as errors on the TV screen or the device itself. Please note that the following errors are specific to some models:
- DRE 5000, 7300, 5001;
- DRS 5003;
- GS 7300, 8300, 8300N, 8300M.
For other receivers, the same errors may occur.
When turned on, the receiver screen flashes
A flashing display indicates a faulty power supply. This may be due to a power surge. The use of a surge protector or stabilizer will protect against damage.
When turned on, Boot appears on the screen
The letter combination “BOOT” indicates two problems:
- Software failure, which requires flashing the device;
- The motherboard is not working properly or is broken.
You can reflash the device yourself by finding software for this receiver model. In such a situation, the user loses all warranty obligations of the equipment supplier. If the re-flashed receiver does not start sending a signal, then they resort to replacing the motherboard.
The motherboard is replaced at a repair center. There are brave souls who do it with their own hands. Then you will need to disassemble the receiver and remove the old element. Such actions will void the warranty.
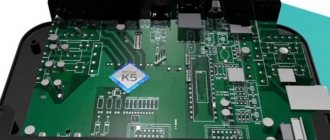
All the symbols on the receiver screen light up and it does not turn on.
The lighting of all indicators and symbols allows us to conclude that there was a software failure. In some cases, the motherboard breaks down. After disassembling the receiver, specialists will be able to determine the true cause of the failure. If the power supply is functioning normally, the motherboard will be replaced. When other boards are also damaged, it is better to buy new equipment, since the cost of repairs can be high.
Receiver motherboard.
The message “Short circuit!” appears on the receiver screen. Check antenna cable!
The message is translated as “short circuit”. The process can occur in several areas. Diagnostic stages:
- If the inscription disappears after disconnecting the antenna wire, then a broken converter, dish or short circuit in the wire may be a cause for concern;
- Inspect the wire for signs of a short circuit by unhooking it from the converter;
- When the wire was pulled out, the message did not disappear - the tuner unit had failed.
The subscriber can diagnose the breakdown himself.
The receiver displays "ER31"
The inscription implies a failure of the motherboard. It is better to replace the part at a service center.
Why do spots appear on the screen?
First, let's look at the general problems that are common to all modern TV equipment, regardless of its type. Fortunately, there are much fewer of them than on old analog TVs, because only one element, although quite complex, is responsible for correct visualization - the matrix.
Manufacturing defects
This is true not only of budget models, but even of premium models from famous brands – Samsung, LG, Philips and others.
Advice! The only option to avoid manufacturing defects is to carefully check the equipment at the time of purchase.
Almost every firmware has special software - grids aimed at identifying dead pixels (black and white dots), spots and other defects. If a manufacturing defect was discovered at home when purchasing through an online store, the seller is in any case obliged to replace the product.
Physical damage
Pressing or hitting the TV screen hard may cause colored spots to appear. Moreover, dead pixels can spread to the rest of the matrix, which is typical for budget models where there is no independent protection for each sector. This kind of damage excludes any repairs - only matrix replacement.
Moisture and air getting into the matrix
This may involve a violation of transportation rules by the seller or improper operation of the equipment by the user. Even a few drops of water or dust particles that get into the body of the matrix can cause unpleasant spots to appear on the LCD TV screen.
High temperatures
If there is a heater or other strong heat source near the TV equipment, then the matrix may delaminate in LCD devices, or even stop working altogether if it is a plasma panel . In this case, small highlights appear that gradually fill the entire screen space.
The shape and color of the spots can also tell a lot about the nature of the problem, which allows you to immediately begin solving it. For example, on old analog TVs, multi-colored spots indicate excessive magnetization of the screen. To eliminate this problem, simply move the device to another place, away from electromagnetic equipment affecting it.
Yellow spots indicate that the process of matrix delamination has already begun, which is typical for budget models that have been actively used for more than 5 years. More expensive TV equipment for the most part does not have such problems.
The receiver does not turn on after a software update
Updated software may not install correctly. As a result, the receiving device will not turn on. The subscriber must follow the reset steps:
- In the receiver Menu, find and open the “Settings” section;
- Select the “Reset” command;
- After confirmation, wait for the end of the process and reboot the receiver;
- When turning on, you may need to enter an access code - then enter the combination “0000”;
- After logging in, the necessary parameters are set (language, time, location);
- To install TV channels, you need to perform a search operation and save the changes.
Sometimes the problem is simply solved by turning off the receiver for 30-45 minutes and then booting into normal mode. This method can also be used by users who flashed the device on their own.
How to protect your device from accidental damage
If the TV is not equipped with display protection from accidental mechanical impacts, you can take care of this yourself. Acrylic protective screens are produced separately, and you can purchase a product of a suitable diagonal to install on an expensive TV panel.
The option of installing protective glass on the TV panel will not affect the image quality, but will protect the matrix from moisture, dust and other mechanical influences. True, such protection will not protect you from damage in the event of a fall. To prevent the TV from falling, it is recommended to properly mount it on the wall using a special bracket.
What to do if none of the methods helped
After diagnosing the equipment and eliminating all possible breakdowns, you can contact the service center. First you need to remember about the warranty, if it is still valid. Typically the period is 12 months. Once you have found the warranty card, contact your nearest service center. After a quick diagnosis, employees will be able to repair the broken part free of charge.
When the warranty has already expired, you will have to take the product for service under normal conditions. Specialists can open the case and identify the cause. After which they will offer to carry out repair work, voicing the cost of spare parts and repair procedures. It is worth considering that a long service life of the receiver leads to the exhaustion of the intended resource. Therefore, for greater savings, it is better to buy a new receiver than to repair an old receiver.
LG 29FS2ANX
Good afternoon. Tell me, please, the TV started to show purple-pink color. What is the reason and how to fix it?
Answers 3
You have an electro-beam TV that has exhausted the service life indicated on page 3 of the instructions. The purple-pink color of the picture indicates problems with the green gun of the kinescope; the reason for this may be a defect in the circuitry of the device or failure of the kinescope itself. In any case, repairing such a device is not advisable, because After identifying a defect and eliminating it, the next one may appear at any time. Consider purchasing a new TV!